
- 1 -
COTENTS
COTENTS............................................................................................................................................................................ 1
PRECAUTIONS................................................................................................................................................................... 2
How to Handle Discs ................................................................................................................................................. 2
Precautions & Warnings ............................................................................................................................................ 2
Lithium Battery Cell Warnings ................................................................................................................................... 2
Drives and connections ............................................................................................................................................. 2
Others Warnings ....................................................................................................................................................... 2
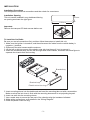
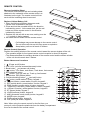
INSTALLATION.................................................................................................................................................................... 3
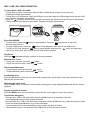
Installation Procedures.............................................................................................................................................. 3
Installation Opening................................................................................................................................................... 3
Important: .................................................................................................................................................................. 3
To Install the Car Radio ............................................................................................................................................. 3
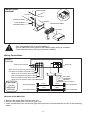
Wiring Connections ................................................................................................................................................... 4
Removal of the Main Unit .......................................................................................................................................... 4
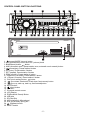
CONTROL PANEL BUTTON LOACTIONS .......................................................................................................................... 5
GENERAL OPERATION ...................................................................................................................................................... 6
Turn Unit On/Off ........................................................................................................................................................ 6
Adjust Volume (VOL)................................................................................................................................................. 6
Adjust Menu Options (SEL)....................................................................................................................................... 6
Set the Clock (CLK)................................................................................................................................................... 6
Change the Source (MODE) ..................................................................................................................................... 7
Mute on/off ................................................................................................................................................................ 7
Loudness on/off......................................................................................................................................................... 7
Preset Equalizer(EQ) ................................................................................................................................................ 7
Release the detachable front panel ........................................................................................................................... 7
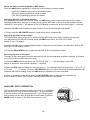
USB port.................................................................................................................................................................... 7
Built-in Microphone.................................................................................................................................................... 7
Aux input connector................................................................................................................................................... 7
Reset System (RESET)............................................................................................................................................. 7
RADIO OPERATION............................................................................................................................................................ 8
Switch Between USA area and Europe area Frequency............................................................................................ 8
Change Bands (BAND) ............................................................................................................
................................. 8
Manual Tuning ( / ) ........................................................................................................................................ 8
Auto Seek Tuning ( / ).................................................................................................................................... 8
To Store / Recall Preset Stations ............................................................................................................................... 8
Automatic Store station/ Preset station scan (AMS)................................................................................................... 8
LOCAL/DX ................................................................................................................................................................ 8
STEREO/MONO ....................................................................................................................................................... 8
DISC / USB / SD CARD OPERATION ................................................................................................................................. 9
To insert DISC / USB / SD CARD.............................................................................................................................. 9
Eject Disc/USB/SD.................................................................................................................................................... 9
Play/Pause................................................................................................................................................................ 9
Next/Previous Track .................................................................................................................................................. 9
Fast Forward/Backward............................................................................................................................................. 9
Introduction Scan ...................................................................................................................................................... 9
Repeating the same track.......................................................................................................................................... 9
Playing all tracks in random....................................................................................................................................... 9
Track/Folder Navigation ............................................................................................................................................ 9
Select the track or file for playback in MP3 format................................................................................................... 10
AUXILIARY INPUT OPERATION ....................................................................................................................................... 10
BLUETOOTH OPERATION ................................................................................................................................................11
Pair and Connect......................................................................................................................................................11
Make a Call ..............................................................................................................................................................11
Redial Last Dialed Number.......................................................................................................................................11
Answer a Call ...........................................................................................................................................................11
Reject a Call.............................................................................................................................................................11
End a Call.................................................................................................................................................................11
Switch Audio Between Car Audio and Mobile Phone................................................................................
................11
Adjust Talk Volume ...................................................................................................................................................11
Audio Streaming (A2DP) ..........................................................................................................................................11
REMOTE CONTROL ......................................................................................................................................................... 12
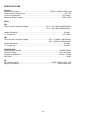
SPECIFICATIONS ............................................................................................................................................................. 13
TROUBLESHOOTING ....................................................................................................................................................... 14


 1
1
 2
2
 3
3
 4
4
 5
5
 6
6
 7
7
 8
8
 9
9
 10
10
 11
11
 12
12
 13
13
 14
14
 15
15


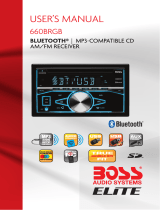 Boss Audio Systems 660BRGB User manual
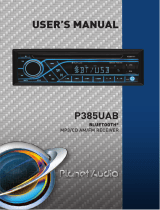 Planet Aaudio P385UAB User manual
 Planet Aaudio PB475RGB User manual
Boss Audio Systems 750BRGB User manual
SSL ML41B User manual
Ricatech RR-65 User manual
 Boss Audio Systems 660BRGB User manual
 Planet Aaudio PB475RGB User manual
Boss Audio Systems 550B User manual


