Page is loading ...

Compatible with four-conductor, 10mm wide tape that has appropriate copper pad contact points.
To view an online video tutorial, visit armacostlighting.com/surelock.
SureLock
™
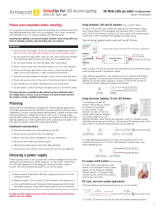
Wire Lead Connectors
SureLock Wire Lead Connectors are used
for going around corners or, when cut in half,
to create two power leads (like jumper cables)
for bridging gaps and extending wires.
IMPORTANT: Always use the +12V/G/R/B
indicators printed on the tape light to maintain
the same polarity.
To increase the wire length between two LED strips, simply splice in the extra wire.
20 gauge or heavier wire is generally recommended.
(
+12V
)
(G/R/B)
(
+12V
)
(G/R/B)
length to
fi t needs
Be sure all wire splice connections are secure and sealed. Options include
soldering, electrical tape, crimp connectors, terminal blocks, wire nuts, etc.
SureLock
™
Splice Connectors
SureLock Splice Connectors are used to join two strips, creating a continuous run
of LED lighting.
(
+12V
) (
+12V
)
(G/R/B) (G/R/B)
If the +12V/G/R/B marks do not line up, fl ip the tape strip
and use the opposite end for proper +12V/G/R/B alignment.
SureLock
™
Connectors
For RGB LED Tape Lighting
How to use SureLock Connectors
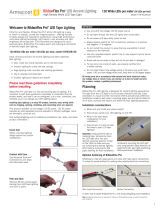
SureLock Connectors – both the wire lead and splice models – connect to the copper pads
on cut sections of LED tape lighting. Connect to only clean copper pads. Do not use
connectors on soldered joints.
IMPORTANT: If the RGB LED tape you are using has a
scissors symbol printed on the copper pads, carefully
cut to either side of the scissors symbol, as shown.
Discard the small center section with the scissors
symbol, as some ink is not conductive and could
interfere with the connection. If there isn’t a scissors symbol, cut in the center of the
copper pads. Always use sharp scissors. If your LED tape model has very short copper
pads, you may have to cut to one side or the other of the pads to leave suffi cient
copper surface area, so the SureLock connector can make proper contact.
■
Carefully peel back a small section of the adhesive tape paper backing – remove only
the paper, not the adhesive underneath.
■
With the connector in an upright
position (logo facing up), carefully insert
the LED tape into the channel grooves,
as shown at right.
■
Use a gentle, side-to-side motion while
inserting to make sure the tape light is
seated fully inside the connector.
■
Once the lighting is seated, push to close and securely lock the pressure pad door.
If needed, put the tape and connector upside down on a hard surface and use a fl at
head screwdriver to close and lock the door in place.
Be sure pressure
pad door snaps
securely into
connector grooves
Once tape is fully inside connector,
close and lock pressure pad door.
Use a fl at head screwdriver
to securely lock door if necessary.
■
Perform an overall power test to ensure that all connections are secure and all LEDs
light before fi nal installation.
Follow the same basic instructions when using SureLock Splice Connectors.
armacostlighting.com
© 2016 Armacost Lighting. All rights reserved.
160404
/


