Page is loading ...

OWNER’S MANUAL
Models: 1104HB – 1104HG – 1104HP – 1104HV – 1104HW
EURO-PRO Operating LLC
4400 bois Franc,
St. Laurent Qc H4S 1A7
Tel.: 1 (800) 361-4639
EURO-PRO Operating LLC – All rights reserved
1 Year Limited Warranty
This warranty applies to defects resulting from imperfections in manufacture of
parts entering into the manufacture and assembly of the sewing machine which this
warranty accompanies, for a period of one (1) year, subject to the following
conditions, exclusions and exceptions.
This warranty is enforceable if said sewing machine is given reasonably good care
and proper maintenance in accordance with the accompanying printed instructions.
Needles, lamp bulb, and bobbins which normally require replacement are not
covered under this warranty.
Your exclusive remedy for any losses or damages resulting from defects in both
performance, workmanship and materials of this product shall be the repair or
replacement of this product.
The manufacturer shall not be liable for consequential or incidental damages for
breach of any express or implied warranty of this product.
This warranty is extended only to the original purchaser of the machine and this
warranty excludes all other legal and/or conventional warranties. The only
responsibility of EURO-PRO Operating LLC, if any, is in relation to the specific
obligations expressly assumed by it under the terms of this warranty bond.
Please include proof of purchase. For repairs or replacement, send to:
EURO-PRO Operating LLC, 4400 bois Franc, St. Laurent, Qc H4S 1A7, Tel.: (800) 361-4639
------------------------------------------------------------------------------------------------------------------------------
OWNERSHIP REGISTRATION CARD
Please fill out and mail the product registration card within ten (10) days of purchase. The
registration will enable us to contact you in the unlikely event of a product safety notification.
By returning this card you acknowledge to have read and understood the instructions for use,
and warnings set forth in the accompanying instructions.
_________________________________________________________________________
Appliance model
_________________________________________________________________________
Date purchased Name of store
_________________________________________________________________________
Owner’s name
_________________________________________________________________________
Address City State Zip Code
Printed in China
Models
1104HB
1104HG
1104HP
1104HV
1104HW
Models: 1104HB – 1104HG – 1104HP – 1104HV – 1104HW

IMPORTANT SAFETY INSTRUCTIONS
When using an electrical appliance, safety precautions should always be followed,
including the following:
Read all instructions before using this sewing machine.
Danger – To reduce the risk of
electric shock:
1. An appliance should never be left
unattended when plugged in or
with batteries in place.
2. Always unplug this appliance from
the electrical outlet and/or remove
the batteries immediately after
using and before cleaning.
Warning – To reduce the risk of
burns, fire, electric shock or injury to
persons:
1. Do not allow to be used as a toy.
Close attention is necessary when
this appliance is used by or near
children.
2. Use this appliance only for its
intended use as described in this
manual. Use only attachments
recommended by the
manufacturer as contained in this
manual.
3. Never operate this appliance if it
has a damaged cord or plug, if it is
not working properly, if it has been
dropped or damaged, or dropped
into water. Return the appliance
to EURO-PRO Operating LLC for
examination, repair, electrical or
mechanical adjustment.
4. Never operate the appliance with
any air openings blocked. Keep
ventilation openings of the sewing
machine and foot control free from
accumulation of lint, dust and
loose cloth.
5. Keep fingers away from all moving
parts. Special care is required
around the sewing machine
needle.
6. Always use the proper needle
plate. The wrong plate can
cause the needle to break.
7. Do not use bent needles.
8. Do not push or pull the fabric
while stitching. It may deflect the
needle causing it to break.
9. Turn the sewing machine “Off”
when making any adjustments in
the needle area, such as
threading the needle, changing
the needle, threading the bobbin
or changing the presser foot.
10. Always unplug the sewing
machine from the electrical outlet
when removing covers,
lubricating or when making any
other user servicing adjustments
mentioned in the instruction
manual.
11. Never drop or insert any object
into any opening.
12. Do not use outdoors.
13. Do not operate where aerosol
(spray products) are being used
or where oxygen is being
administered.
14. To disconnect, turn all controls to
the “Off” position, then remove
the plug from the electrical outlet.
15. Do not unplug by pulling on the
power cord. To unplug, grasp
the plug, not the cord.
SAVE THESE INSTRUCTIONS
This sewing machine is intended for household use only.
1 REV. 02/06A 10
TROUBLESHOOTING
1. The sewing machine does not run when the On/Off button is pressed to the “On”
position.
- The batteries are inserted incorrectly. Re-insert using the diagram provided
inside the battery compartment.
- Batteries are dead. Replace with new ones.
- Make sure that the AC/DC adapter is connected in the right position.
2. The sewing machine runs but does not sew.
- The machine is threaded incorrectly. Rethread the machine.
- The needle is threaded incorrectly. Make sure that the needle is threaded from
left to right.
- The needle is not properly inserted.
- The batteries are installed backwards. Check the placement diagram in the
battery compartment and reinstall.
Caution: When removing fabric after sewing, first turn the hand wheel to raise the
needle to the highest position. Then lift the presser foot and remove the fabric.
This will prevent the needle from bending.
3. The sewing machine runs slowly.
- Used and new batteries are mixed together. Replace using all new batteries.
- Use only 4 AA batteries.
4. The sewing machine stops sewing.
- Very heavy fabric or too many layers of fabric will force the sewing machine to
stop.
- The thread is tangled in the lower bobbin. Stop the machine and cut the
tangled threads to clear it from the machine. Rethread both the bobbin and the
needle.
- Poor quality stitching, refer to “Adjust Thread Tension” section.
- The sewing machine should run approximately for two (2) hours with new
batteries under normal sewing conditions. Sewing heavy fabric requires more
power, so it will reduce the running time of the batteries.

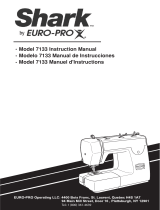
NAME OF PARTS
2
NEEDLE REPLACEMENT
Caution: Remove the batteries and/or
disconnect the AC/DC adapter before starting
to replace the needle.
1. Turn the hand wheel to raise the needle to
its highest position.
2. Hold the old needle and loosen the needle
clamp screw. Remove the old needle and
discard responsibly.
3. Insert the new needle into the clamp with
the flat side toward the right. Be sure to
push the needle all the way up into the
needle clamp before tightening the needle
clamp screw.
4. Tighten the needle clamp screw.
SEWING SLEEVES
This sewing machine has been designed to
sew sleeves or any narrow openings in
garments.
1. Lift the presser foot.
2. Position the garment over the sewing arm
and between the platform and the base.
3. Lower the presser foot and follow the
regular sewing instructions.
CAUTION:
1. Don’t press the On/Off button at the same time as the foot control.
2. Don’t use the batteries and the AC/DC adapter at the same time.
3. Make sure that the batteries are inserted in the correct position.
4. Don’t keep the machine running for too long.
5. Sewing some very stretchy fabrics might result in skipping stitches – use a stretch
needle.
6. It is not recommended for use on sewing fabrics such as terrycloth.
7. Use AC/DC adapter (6V, 1A) or 4 AA alkaline batteries (1.5 V) only.
9

ACCESSORIES
Foot Pedal AC/DC Adapter
Bobbins (x2),
Thread Spools (x2), Needle,
Needle Threader
BATTERY INSTALLATION
1. Battery compartment is on the bottom of the
sewing machine.
2. Open the cover of the battery compartment and
insert the 4 “AA” alkaline batteries. Make sure
that the batteries are in the correct position as
marked on the inside of the battery compartment.
3. Replace the battery compartment cover.
Caution: Make sure that the On/Off Button is in the
“Off” position when inserting or changing the
batteries. If the On/Off button is in the “On” position
when inserting or changing the batteries, the sewing
machine may run suddenly.
THREADING UPPER THREAD
Caution: When threading the
sewing machine, make sure that
the On/Off button is in the “Off”
position.
1. Place the spool of thread into
the spool pin.
2. Thread the machine following
this sequence: ①, ②, ③, ④, ⑤,
⑥, ⑦, ⑧, k.
3
②
③
④
⑤
⑥
⑦
⑧
①
⑨
BOBBIN WINDING
8
To wind your bobbins:
1. Press on the bobbin winder lever to raise the bobbin winding pin.
2. Place an empty bobbin on the bobbin winding pin.
3. Place a spool of thread on the spool pin spindle.
4. Take the end of the thread from the thread spool and wind it counter clockwise
around the upper section of the thread clamper following the numbered sequence
in the illustration above.
5. Continue taking the thread around the needle bar.
6. Wrap the thread counter clockwise around the empty bobbin several times.
7. Press the bobbin winder button and run until the bobbin is full.
8. When the bobbin is full, release the bobbin winder button and remove the bobbin
from the bobbin winding pin.
9. Lift the bobbin winding lever to lower the bobbin winding pin.
Thread Clamper
Needle Bar

REPLACING THE BOBBIN
Caution: When replacing or inserting the bobbin,
make sure that the On/Off button is in the “Off”
position.
1. Press the bobbin cover release button and
remove the bobbin cover.
2. Insert the new bobbin into the compartment
leaving a 3-inch tail.
3. Hold the end of the upper thread with your
right hand and turn the hand wheel slowly
counter clockwise until the needle goes down
and up again to its highest position. Pull the
upper thread slowly and the lower thread will
come up in a loop. Pull up both threads to
the back and place them together under the
presser foot.
4. Replace the bobbin cover.
4
TENSION ADJUSTMENT
Caution: Never adjust the thread tension while sewing.
A correctly adjusted seam has the upper and the lower threads even and the junction
in the middle of the fabric. (See illustration below.)
1. If the upper thread (visible on the top of
the fabric) becomes a straight line, turn
the thread tension dial, counter clockwise
to obtain a balanced stitch. (See
illustration below.)
2. If the lower thread (visible on the
underside of the fabric) becomes a
straight line, turn the thread tension dial,
clockwise to obtain a balanced stitch. (See
illustration below.)
SETTING THE SEWING SPEED
This sewing machine has two (2) sewing speeds.
To adjust the sewing speed, press the speed
button. When the button is depressed, it is on the
faster speed. When the button is up, this is the
lower speed.
High speed
Low speed
7

SEWING
1. Turn the hand wheel to raise up the
needle to the highest position. Lift the
presser foot and place the fabric to be
sewn under the presser foot. (Fig. 1)
2. Lower the presser foot. (Fig. 2)
3. Press the On/Off button to the “On”
position and begin sewing. Do not
pull the fabric. Gently guide the fabric
to keep the seam straight. (Fig. 3)
4. After finishing sewing, press the
On/Off button to the “Off” position to
stop sewing. (Fig. 3)
5. Turn the hand wheel to raise the
needle to the highest position. Lift the
presser foot and gently remove the
fabric away from the sewing machine.
(Fig. 4)
6. Cut the thread using the thread cutter.
(Fig. 5)
Fig. 1
Fig. 2
Fig. 3
Fig. 4
5
Fig. 5
STITCH LENGTH ADJUSTMENT & REVERSE SEWING
Before sewing your garment, test for the correct stitch length using a piece of fabric.
You can select from three different (3) stitch lengths for sewing and three (3) for
reverse sewing. To select the stitch length:
1. Turn the stitch length adjustment dial all the way to the left for the longest stitch
length. This is recommended for normal sewing.
2. As you turn the dial to the right, you decrease the length of the stitch until you get
to the center point which is “0” length. The needle will remain stationary if you set
the dial at this point.
3. As you continue to turn the dial to the right, you will now set the sewing machine
into reverse sewing. Again, you have three (3) different stitch lengths for reverse
sewing, the farthest to the right being the longest.
4. Use reverse sewing to secure your stitches at the beginning of your seam and at
the end. This will strengthen your seams.
Caution: Do not sew at “0” stitch length as this will cause your machine to get stuck.
0
Regular Sewing
Reverse Sewing
0
WORK LIGHT
If additional light is needed, press the light
switch to turn the light “On”. Press the switch
again to turn it “Off”.
6
/