Page is loading ...

Amigo™
Safety and Operation Manual
www.flexco.com
www.flexco.com
IMPROPER OR UNSAFE use of this tool can result in serious bodily injury! is manual contains important information
about product function and safety. Please read and understand this manual BEFORE operating the tool. Please keep this
manual available for other users and owners before they use the tool. is manual should be stored in a safe place.
WARNING
Patents: www.exco.com/patents
Amigo 625 and 1000
L
I
S
T
E
D
CM
Cert. to CAN/CSA
Std. C22.2 No. 88
5021907
Amigo 1000
Amigo 625
Introductory
release in US only.
Contact Customer Service
for questions.
Amigo 625 Complies Complies
Amigo 1000 Complies Complies
L
I
S
T
E
D
CM
Cert. to CAN/CSA
Std. C22.2 No. 88
5021907

www.flexco.com
—2—
Table of Contents
Main Components Amigo™
.........................................................................3
Description .....................................................................................................4
Machine Specications .................................................................................4
General Safety Rules ...................................................................................... 5
Prepare for Use ..............................................................................................7
Machine Set Up ............................................................................................. 8
Platen Stop Set Up ....................................................................................... 10
Prepare Belt Ends for Splicing ...................................................................14
Prepare for Splice .........................................................................................23
Splice .............................................................................................................27
Operating Parameters .................................................................................37
Service and Maintenance............................................................................38
Troubleshooting ...........................................................................................48
Schematics .................................................................................................... 50
Replacement Parts ....................................................................................... 52
Belt Template Ordering Information ........................................................ 53
Warranty ....................................................................................................... 55

—3—
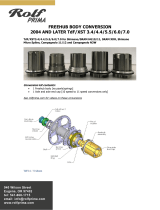
Main Components Amigo™
A
DETAIL A
SCALE 1 : 2
16
17
18
19
A
14
15
DETAIL A
1
2
3
4
6
7
13
12
11
10
9
8
5
1. Guard
2. Cutter Crank
3. Cutting Blade
4. Movable Platen
5. Position Locking Pin
6. Actuating Lever
7. Power Inlet
8. Clamp Thumb Nut
9. Belt Clamp Bar
10. Clamp Stud
11. Stationary Platen
12. Belt Template
13. Cutter Drive Shaft
14. Emitter
15. Thermocouple
16. Heating Mode Switch
17. Timer
18. Temperature Controller
19. Start/Stop Switch

www.flexco.com
—4—
Machine Specifications
Description
e Amigo™ is designed to cut and splice, thermoplastic
homogeneous (monolithic) conveyor belts. Belts
designed to be tension driven or those requiring a
positive drive may be fabricated using this machine.
Belt ends are prepared for splicing using integrated
belt cutter. Interchangeable templates ensure accurate
cut length and pitch of positive drive belts. Preheating
belt ends inside enclosed guarded heat zone ensures
quality repeatable splices in a wide variety of ambient
temperatures. Integrated contactless heating allows for
controlled melt amounts of belt ends.
Less than one minute of splice heat is oen required to
ensure a quality splice. Heat source retracts inside unit
and quickly cools simultaneously as molten belt ends
are spliced together. e Amigo™ is an ideal machine
for working on location, as well as in the workshop. A
transport case is included for convenient movement to
and from job sites.
171.7 mm
(6.76")
346.2 mm
(13.63")
Operating Conditions
• Ambient Temperature: -20°C to +40°C (4°F to +104°F)
• Minimum machine temperature: -10°C (14°F)
• Non-condensing/non-icing humidity
• Machine clearance (minimum): 300 mm (12") surrounding
machine
• Indoor use only
Storage & Transportation Conditions
• Ambient temperature: -25°C to +65°C (-13°F to 149°F)
• Non-condensing/non-icing humidity
Capacities
• Amigo 625 Maximum belt width: 625 mm (24.5")
• Amigo 1000 Maximum belt width: 1067 mm (42")
• Minimum belt length around press frame: 900 mm (36")
• Maximum belt thickness: 4 mm* (0.157")
* For splicing – Note! Belts greater than 4 mm may be spliced
but maximum thickness is somewhat dependent on material
composition.
Dimensions
Amigo™ Dimension Information
Amigo 625 L x W x H, mm (in) Weight, kg (lb)
Machine 1000 mm (39.4 in) x 315 mm (12.4 in) x 170 mm (6.7 in) 24.5 kg (54 lb)
Transport Case (Includes additional
Templates & support equipment) 1210 mm (47.7 in) x 490 mm (19.3 in) x 385 mm (15.2 in) 31 kg (68 lb)
Total 55.5 kg (122 lb)
Amigo 1000 L x W x H, mm (in) Weight, kg (lb)
Machine 1425 mm (56.1") x 315 mm (12.4") x 170 mm (6.7") 38.5 kg (85 lb)
Transport Case (Includes additional
Templates & support equipment) 1700 mm (66.9") x 490 mm (19.3") x 385 mm (15.2") 36.3 kg (80 lb)
Total 74.8 kg (165 lb)
Electrical Characteristics
Amigo 625 1-phase 115 vac 10 amps 1150 Watts
1-phase 230 vac 5.5 amps 1265 Watts
Amigo 1000 1-phase 115 vac 15 amps 1750 Watts
1-phase 230 vac 7.5 amps 1750 Watts

—5—
Signal words:
“DANGER” indicates an imminently hazardous
situation which, if not avoided, will result in death
or serious injury. is signal word is limited to
the most extreme situations.
“WARNING” indicates a potentially hazardous
situation which, if not avoided, could result in
death or serious injury.
“CAUTION” indicates a potentially hazardous
situation which, if not avoided, may result in
minor or moderate injury. It may also be used to
alert against unsafe practices.
Safety Symbol
is international safety symbol is used to
identify and call attention to specic
safety matters.
Safety Information
To avoid severe personal injury or property
damage, read carefully and understand the
following Safety Precautions.
General Safety Rules – Save These Instructions
Ensure machine, power cable and power source
are not positioned in standing water or exposed
to wetconditions.
Do not connect machine to power or operate
machine if machine is wet.
Service shall only be performed by a qualied
electrician. Power shall be removed before
service. Stored mechanical energy exists in
emitter tensioning system. Follow Lock-Out Tag-
Out procedures. Observe proper maintenance
procedures. Do not modify electrical circuit.
NOTE—Residual electrical power exists for a
time aer external power supply is disconnected.
DO NOT SERVICE until power supply fully
discharges. Wait until controller displays show no
power and go dark.
Never alter or remove safety devices.
Never contact emitter or supporting components
unless power is removed and unit shows no
residual power on controllers.
!WARNING
Do not use outdoors. is machine is designed
for indoor use only.
Inspect machine before each use. Ensure
machine and power cable are not damaged.
Machine shall not be operated with damaged
controllers, switches, emitter or other mechanical
components.
Avoid dropping or severe handling of machine
at all times, including during movement in
transport case.
If the electrical supply cord is damaged, it must
be replaced by a special cord available from the
manufacturer or it’s service agent.
1. WORK AREA
!DANGER
Do not operate power tools in explosive
atmospheres, such as in the presence of ammable
liquids, gases, or dust. Power tools create sparks
which may ignite the dust or fumes.
!CAUTION
Keep your work area clean and well lit.
Cluttered benches and dark areas inviteaccidents.
2. ELECTRICAL SAFETY
!DANGER
e Amigo™ is a single insulated machine and
needs a multiple wire grounded power cord and
grounded power supply system. Do not modify
electrical cables provided. Use only approved 20
amp minimum 115 vac, or 15 amp minimum 230
vac protected supply circuit.
!

www.flexco.com
—6—
General Safety Rules – Save These Instructions
Severe Burn Hazard. Operate only with emitter
guard in place. Premature opening of guard can
result in personal injury/burn. Observe proper
operating procedures. Guard, clamp beams,
emitter, emitter support components, clamp
thumb nuts, and other adjacent surfaces are hot
during and aer operation. Use caution when
removing guard and clamp bars.
Do not store solvents in Amigo™ transport case.
!CAUTION
Only operate Amigo™ with machine positioned on
a level, rm surface.
Disconnect plug from power source before
making any adjustments, changing accessories,
cutting belt, storing, or transporting machine.
Such preventive safety measures reduce risk of
starting machine accidentally.
NEVER use a machine which is defective or
operating abnormally. If machine appears to
be operating unusually, making strange noises,
or otherwise appears defective, stop using it
immediately and arrange for repairs.
Do not use machine if switch does not turn it on
or o. Any machine that cannot be controlled
with a switch is dangerous and must be repaired.
Check for misalignment or binding of moving
parts, breakage of parts, and any other condition
that may aect machine operation. If damaged,
have machine serviced before using.
e Amigo™ should not be used to cut and splice
materials other than thermoplastic monolithic
belting.
Maintain machine in clean condition. Remove
any oils, greases, or food product from outside
and inside machine.
Do not use power drivers with machine
cuttersystem.
Ensure Timer is changed from PREHEAT to
SPLICE time prior to initiating Splice cycle.
Failure to comply will result in damaged belt.
3. PERSONAL SAFETY
!WARNING
Use safety equipment. Always wear eye
protection. Dust mask, non-skid safety shoes,
hard hat, or hearing protection must be used for
appropriate conditions.
Stay alert, watch what you are doing, and use
common sense when operating a machine. Do
not use machine while tired or under inuence
of drugs, alcohol, or medication. A moment of
inattention while operating machines may result
in serious personal injury.
Dress properly. Do not wear loose clothing
or jewelry. Contain long hair. Keep your hair,
clothing, and gloves away from moving parts.
Loose clothes, jewelry, or long hair can be caught
in moving parts.
Two persons are required to li and move
machine, or to li machine and case (Amigo
1000).
When moving in transport case, ensure casters are
locked and blocked and case is strapped securely.
Abide by all instructions and warning labels.
is equipment is not to be used by children or
persons with reduced physical, sensory or mental
capabilities, or lack of experience and knowledge
of the equipment. Children must be supervised
and must not play with the appliance.
4. USE AND CARE
!WARNING
Read and understand Amigo™ operations manual
before using machine.
Cut Hazard. Wear cut resistant gloves. Ensure
proper cutting and weld skiving procedures and
safety practices are followed.

—7—
Prepare for Use
Parts required for use & storage
• Amigo™ Splice Press • 2 mm Hex Driver
• Transport Case & Tow Handle • Cutter Crank Handle
• Belt Skiver • Belt Templates
Recommended parts
• Cutting Blades (spare) • Emitter (spare)
• Friction Tape • Unibar® Cutter
Safety and PPE
• Safety Glasses • Cut Resistant Gloves
• Safety Shoes • Other PPE as warranted
by conditions

www.flexco.com
—8—
Machine Set Up
A
A2
Open transport case and li machine from case. Caution! Two persons
required to li and place machine. Position machine on even surface with
platens up and level. Do NOT apply power until belt is cut and clamped
in preparation for splicing. Ensure power inlet, controls, and cutter crank
areaccessible.
Rotate actuating lever to its operating position.
A1

—9—
www.flexco.com
Machine Set Up
Remove guard from machine.
Remove belt clamp bars from machine.
A3
A4

www.flexco.com
—10—
Platen Stop Set Up
B
B2
Ensure template and platen receiving slots are clean and debris free.
Templates are directional and are keyed to t in the proper direction. Insert
outside edge rst, push down on inside edge to secure in place.
On platen stop plate, loosen two socket head cap screws using a
5 mm hex driver. Repeat for platen stop plate on opposite end of platens.
B1

—11—
Platen Stop Set Up
Position belt with drive bars engaged in both templates. Rotate actuating
lever loosely between “Cut/Load” and “Splice” positions.
Install and tighten belt clamp bars, ensuring belt drive bars are fully seated
intemplates.
B3
B4

www.flexco.com
—12—
Platen Stop Set Up
B6
Move platen stop plate to contact xed platen face. Repeat for platen stop
plate on opposite end of platens – move to contact blade holder.
Tighten two socket head cap screws using 5 mm hex driver. Repeat for platen
stop plate on opposite end of platens.
B5

—13—
Platen Stop Set Up
Remove clamp bars and belt.
B7

www.flexco.com
—14—
Prepare Belt Ends for Splicing
C
C2
Ensure template and platen receiving slots are clean and debris-free.
Ensure only one template is installed.
C1

—15—
Prepare Belt Ends for Splicing
Rotate lever to cut/load position.
Lock in place with locking pin.
C3
C4

www.flexco.com
—16—
Prepare Belt Ends for Splicing
Engage cutter crank with cutter drive sha.
C5
C6
Drive cutter blade to machine side opposite controls. Caution! Use cut
resistant gloves during cutting operation. Ensure blade is parked at full travel
position of cutter, between clamp studs.

—17—
Prepare Belt Ends for Splicing
Engage belt with template. Position to cut out a problem belt area, or to
simply prepare belt end with a precise cut for splicing. Belt must fully cover
gap between platens. Note! Only belt ends prepared with the integrated
cutter are suciently accurate to accommodate splicing.
C7
For tension-driven at belt or positive drive belts with segmented drive
features, a preferred practice is to use Flexco Friction tape (Item No. 08604)
installed on clamp bars. Friction tape assists in xing the belt position during
the cutting and splicing operations. A damp cloth can be used to clean the
friction tape surface.
C8
FRICTION TAPE

www.flexco.com
—18—
Prepare Belt Ends for Splicing
C10
Install one clamp bar tightly over installed belt and template.
For positive drive belts, a preferred practice is to position belt fully against
template end nearest controls. is may provide additional lateral (belt
width) support to resist cutting loads.
C9

—19—
Prepare Belt Ends for Splicing
Loosely clamp remaining belt clamp bar. DO NOT TIGHTEN CLAMP
BAR. is clamp bar is installed to provide protection from cutter blade. It is
important that belt relief is allowed on loosely clamped side of cutting blade
during cutting process.
C12
Clamp Bar orientation. “Balance” clamp load evenly when tightening clamp
thumb nuts. is balanced load is particularly important when preparing
tension-driven at belt or belt possessing separated drive features. ALWAYS
TEST FOR UNIFORM CLAMPING by pulling the belt. If belt slip is
observed, readjust clamping thumb nuts to balance load. Clean friction tape
surface as required assist in preventing slip.
C11

www.flexco.com
—20—
Prepare Belt Ends for Splicing
Using cutter crank, apply consistent cranking speed to draw cutting blade
toward control end. Important! Do not stop cutting action, particularly
when blade is entering or exiting belt. Failure to comply will result in an
uneven cut.
C13
C14
Support belt to prevent belt from “peeling away” during cutting. Failure to
comply will result in an uneven cut where blade exits from belt. TIGHTLY
CLAMPED side of belt is now prepared for splicing.
/