2 E-flite Apprentice PNP Assembly Manual
Product Registration
Register your product online at:
www.e-fliterc.com/register/
Contents of Kit/Parts Layout
EFL2726 Wing Set
EFL2727 Fuselage
EFL2728 Tail Set
EFL2729 Cowl
EFL2730 Pushrod Set
EFL2731 Nose Gear
EFL2732 Main Landing Gear
EFL2733 Spinner
EFL2734 Motor Mount
EFL2735 5mm Prop Adapter
EFLA1030 30-Amp Pro Switch-mode
BEC Brushless ESC
EFLM7215 BL15 Outrunner, 840Kv motor
EFLP11080E 11 x 8 Electric Propeller
EFLR7140 13-gram Sub-Micro Servo
(used on elevator and ailerons)
EFLR7150 37-gram Standard Servo
(used on rudder)
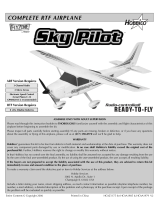
Introduction
E-flite’s Apprentice™ 15e Plug-N-Play™ is a 15-size
high-wing club trainer that comes with nearly
everything you need to go from purchase to the flying
field. No building required—just charge and install
your battery, mount the wing and tail surfaces and
fly by utilizing your own transmitter and receiver.
The Apprentice is made from durable, lightweight
Z-Foam™, making it tough enough to handle the
punishment of early training mishaps without getting
bent out of shape. When using the recommended
E-flite
®
11.1V 3200mAh battery, you can expect
extended flight times of 15 minutes or more.
The Apprentice is the perfect training aircraft thanks
to its gentle flight characteristics. Once the pilot has
learned the basics of flight, the Apprentice is capable
of performing loops, rolls, inverted flying and other
aerobatic maneuvers. It’s also equipped with tricycle
landing gear for better ground handling.
Learn to fly the basics and beyond with E-flite’s
Apprentice PNP.
Important Warranty Information
Please read our Warranty and Liability Limitations
section on Page 22 before building this product. If you
as the Purchaser or user are not prepared to accept the
liability associated with the use of this Product, you are
advised to return this Product immediately in new and
unused condition to the place of purchase.
Using the Manual
This manual is divided into sections to help make
assembly easier to understand, and to provide breaks
between each major section. In addition, check boxes
have been placed next to each step to keep track
of its completion. Steps with a single circle () are
performed once, while steps with two circles ( )
indicate that the step will require repeating, such as for
a right or left wing panel, two servos, etc.
Remember to take your time and follow the directions.
Table of Contents
Introduction ........................................................... 2
Important Warranty Information .............................. 2
Using the Manual ................................................... 2
Product Registration................................................ 2
Contents of Kit/Parts Layout .................................... 2
Required Radio Equipment ...................................... 3
Battery .................................................................. 3
Charger ................................................................ 3
Required Tools and Adhesives ................................. 3
Optional Accessories .............................................. 3
Note on Lithium Polymer Batteries ........................... 3
Charging the Flight Battery ..................................... 3
AR500 Receiver Installation .................................... 3
AR6200 Receiver Installation .................................. 4
Tail Installation ....................................................... 4
Landing Gear Installation ........................................ 6
Wing Installation .................................................... 6
Battery Installation .................................................. 9
Removing the Propeller ......................................... 10
Control Functions ................................................. 12
Centering the Control Surfaces and
Checking Control Direction .............................. 12
Reversing Direction of Flight Controls ..................... 17
Center of Gravity ................................................. 17
Range Test Your Radio .......................................... 18
Setting the Control Throws .................................... 18
Installing the Propeller .......................................... 20
Flying Your Apprentice ......................................... 22
Safety Precautions ................................................ 22
Safety Do’s and Don’ts for Pilots ............................ 22
Warranty Information ........................................... 22
CE Compliance Information for the
European Union .............................................. 24
2009 Official Academy of
Model Aeronautics Safety Code ....................... 24
Declaration of Conformity ..................................... 26
The Spektrum trademark is used with permission
of Bachmann Industries, Inc.