Page is loading ...

1
#66450
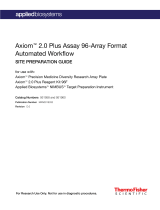
4 Outlet Electrical
Assembly Diagram
Parts/Hardware List
EL-1 Electric Outlet 1 EA
EL-2 Metal Bracket w/Cord Winder 1 EA
EL-3 Phillips Head Screw 2 EA
EL-4 Hex Nut 2 EA
Slide Metal Bracket over the
Electrical Outlet (EL-1) as shown.
(note that Metal Stop is at the end
with the electrical Plug-in.)
Attach Metal Bracket (EL-2) to
the Right or Left Leg Assembly
(P-1 or P-2) using 2 Phillips Head
Screws (EL-3) and 2 Hex Nuts
(EL-4) as shown in Optional
Electrical illustration.
Metal
Stop
Electrical
Plug-in
EL-1
This 4 Outlet Electrical is Part # 66450
and must be purchased separately.
Please contact our
Customer Service Department
Monday - Friday
8 a.m. - 5 p.m.
Central Standard Time
1-800-749-2258
EL-4
EL-2
EL-3
EL-3
Identify and Separate all the Parts
and Hardware.
1.)
2.)
3.)
Optional Electrical
Illustration
/