Page is loading ...

IMPORTANT
m southbe”d ~~n~~e~~~~
SERIAL #
A MIDDLEBY COMPANY DATE PURCHASED
OWNER’S MANUAL
INSTALLATION
USER’S GUIDE
SERVICE
PARTS
DEEP FAT FRYER MANUAL SUPPLEMENT
for
FRYER FILTER SYSTEM
MODEL FF-21-36, FF-21-42
These instructions should be read thoroughly before attempting installation. Set up,
installation and Performance Check should be performed by a qualified service
technician. The Manufacturer, Southbend (1100 Old Honeycutt Rd., Fuquay-Varina, North
Carolina 27526), informs you that unless the installation instructions for the above
described Southbend product are followed and performed by a qualified service
technician, (a person experienced in and knowledgeable concerning the installation of
commercial gas and/or electrical cooking equipment) then the terms and conditions of the
Manufacturer’s Limited Warranty will be rendered void and no warranty of any kind shall
atwb.
If the equipment has been changed, altered, modified or repaired by other than a
qualified service technician during or after the 12-month limited warranty period, then
the manufacturer shall not be liable for any incidental or consequential damages to any
person or to any property which may result from the use of the equipment thereafter.
Some States do not allow the exclusion or limitation of incidental or consequential
damages, so the above limitation or exclusion thereto may not apply to you.
In the event you have any questions concerning the installation, use, care, or service of
the product, write Customer Service Department, Southbend, 1100 Old Honeycutt Rd.,
Fuquay-Varina, North Carolina 27526.
FRYER FILTER SYSTEM
DEEP FAT FRYER
(Manual Section SR)

Congratulations! You have just purchased one of the finest pieces of heavy-duty, commercial
cooking
equipment on the market today.
You will find that your new equipment, like all Southbend equipment, has been designed and
manufactured to some of the toughest standards in the industry - those of Southbend Corporation.
Each piece of Southbend equipment has been carefully engineered and designs have been verified
through laboratory tests and field installations in some of the more strenuous commercial cooking
applications. With proper care and field maintenance, you will experience years of reliable, trouble-free
operation from your Southbend equipment. To get the best results, it’s important that you read this
manual carefully.
TABLE OF CONTENTS:
SECTION ONE - INSTALLKIION
Specifications . . . . . . . . . . . . . . . . . . . . . . . . . . . . . . . . . . . . . . . . . . . . . . . . . . . . . . . . . . . . . . . . . . . . . . . . . . . . . . ..~.........................................
Installation . . . . . . . . . . . . . . . . . . . . . . . . . . . . . . . . . . . . . . . . . . . . . . . . . . . . . . . . . . . . . . . . . . . . . . . . . . . . . . . . . . . . . . . . . . . . . . . . . . . . . . . . . . . . . . . . . . . . . . . . .......
:
Performance Check . . . . . . . . . . . . . . . . . . . . . . . . . . . . . . . . . . . . . . . . . . . . . . . . . . . . . . . . . . . . . . . . . . . . . . . . . . . . . . . . . . . . . . . . . . . . . . . . . . . . . . . . . . . . . . . .
2
SECTION TWO - USER’S GUIDE
warranty
. . . . . . . . . . . . . . . . . . . . . . . . . . . . . . . . . . . . . . . . . . . . . . . . . . . . . . . . . . . . . . . . . . . . . . . . . . . . . . . . . . . . . . . . . . . . . . ..“......
See Fryer Manual
Operation
. . . . . . . . . . . . . . . . . . . . . . . . . . . . . . . . . . . . . . . . . . . . . . . . . . . . . . . . . . . . . . . . . . . . . . . . . . . . . . . . . . . . . . . . . . . . . . . . . . . . . . . . . . . . . . . . . . . . . . . . .....“...
1
SECIION THREE - SERVICE
Adjustments/Service
. . . . . . . . . . . . . . ..~..............................................................................................
1
SECTION FOUR - PARTS
Parts List . . . . . . . . . . . . . . . . . . . . . . . . . . . . . . . . . . . . . . . . . . . . . . . . . . . . . . . . . . . . . . . . . . . . . . . . . . . . . . . . . . . . . . . . . . . . . . . . . . . . . . . . . . . ..~....................
1
NOTE: CONSULT DEEP FAT FRYER MANUAL - PT# 1161609 FOR ALL FRYER
INFORMATION
CAUTION:
POST IN PROMINENT LOCATION INSTRUCTIONS TO BE FOLLOWED LN
THE EVENT THE SMELL OF GAS IS DETECTED. THIS INFORMATION SHALL BE
OBiWNED FROM LOCAL GAS SUPPLIER
Retain this manual for future reference.
INTENDED FOR COMMERCIAL USE ONLY.
NOT FOR HOUSEHOLD USE.
WARNING - WARRANTY
WILL BE VOID IF
A. SERVICE WORK IS PERFORMED BY OTHER THAN QUALIFIED
TECHNICIAN.
B. OTHER THAN GENUINE SOUTHBEND REPLACEMENT PARTS ARE
INSTALLED.
FOR YOUR SAFETY
DO NOT STORE OR USE GASOLINE OR OTHER FLAMMABLE
VAPORS AND LIQUIDS IN THE VICINITY OF HIS OR ANY OTHER
APPLIANCE.
KEEP AREA AROUND APPLIANCES FREE AND CLEAR FROM
COMBUSTIBLES.
IN THE EVENT A GAS ODOR IS DETECTED, SHUT DOWN EQUIP-
MENT AT THE MAINSHUT OFF VALVE AND CONTACT THE LOCAL
GAS COMPANY OR GAS SUPPLIER FOR SERVICE.
m
southbend
A UIDDLEBY CONPANY
1100 Old Honeycutl Road
Fuquay-Varina. NC 27526
19191552-9161
kAX’(9i9) 55%9796
(600) 346-2566

FRYER FILTER SYSTEM
INSTALLATION
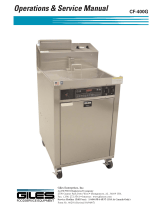
SPECIFICATIONS
FRYER FILTER
q
FF=?l-36 0 FF-21-42
FRONT VIEW
DIMENSIONS:
SIDE VIEW FRONT VIEW
+J*
Scale l/4” = 1 ft.
TOP VIEW
( ) = Millimeters
UTILITY INFORMATION
l/3 HF’ - 115
OR 230 VOLT
AMPS - 115
VOLT - 6.5
230 VOLT -
2.6
I
INSTALLATION
GENERAL:
THE UNIT WHEN INSTALLED MUST CONFORM WITH LOCAL CODES, OR IN THE ABSENCE OF
LOCAL CODES, WITH THE NATIONAL FUEL GAS CODE ANSI 2223.1.1984.
The unit must be installed in such a manner that the flow of combustion and ventilation air are not obstructed.
Provisions for an adequate air supply must also be provided.
ASSEMBLY INSTRUCTIONS:
For battery installation of units consult SECTIONAL RANGE FRONT MANIFOLD - BAITERY TYPE
OWNERS MANUAL - Part # 1161610. Follow instructions as outlined in Section 1 - Installation - pages 4
tlllu 11.
Individual Assembly Instructions for internal piping of drain line to filter wiII be furnished with each individual
battery.
FRYER FILTER SYSTEM
SECTION 1 - INSTALLATION
PAGE 1

WARNING:
THESE PROCEDURES MUST BE FOLLOWED BY QUALIFIED PERSONNEL OR
WARRANTY WILL BE VOIDED.
LEGS OR OPTIONAL CASTERS:
1. A set of legs or casters are packed in the unit. A threaded receptacle is fastened to the base frame at each
comer. Each leg or caster has a similar mating thread.
2. Raise unit sufficiently to allow legs or casters to be screwed into the receptacles. For safety, “shore up”
and support the unit with an adequate blocking arrangement strong enough to support load.
3. Lower unit gently. Never drop or allow the unit to fall.
4. The legs or casters can be adjusted to overcome and uneven floor.
5. After the unit has been leveled, tighten the lock nuts.
WARNING:
FOR AN APPLIANCE EQUIPPED WITH CASTERS, THE INSTALLATION SHALL BE
MADE WITH A CONNECTOR THAT COMPLIES WITH THE STANDARD FOR
CONNECTORS FOR MOVABLE GAS APPLIANCES, ANSI 22169-1979, AND ADDENDA
Z21.69a-1983, AND A QUICK-DISCONNECT DEVICE THAT COMPLIES WITH THE
STANDARD FOR QUICK-DISCONNECT DEVICES FOR USE WITH GAS FUEL, ANSI
221.41-1978, AND ADDENDA Z21.41a-19 81 AND Z21,41b-1983. ADEQUATE MEANS MUST
BE PROVIDED TO LIMIT THE MOVEMENT OF THE APPLIANCE WITHOUT
DEPENDING ON THE CONNECTOR AND THE QUICK-DISCONNECT DEVICE OR ITS
ASSOCIATED PIPING TO LIMIT THE APPLIANCE MOVEMENT.
WARNING:
IF DISCONNECTION OF THIS RESTRAINT IS NECESSARY TO REMOVE THE
APPLIANCE FOR CLEANING, ETC., RECONNECT IT WHEN THE APPLIANCE IS
MOVED TO ITS ORIGINALLY INSTALLED POSITION.
PERFORMANCE CHECK:
The following items should be checked before or within the first 30 days of operation by qualified service
technician.
1. Verify correct electrical characteristics.
2. Internal drain piping drains properly.
3. Check gas supply connection on front manifold.
4. Internal electrical connections.
5. Pump operates properly.
6. Advise user on cleaning procedures.
FRYER FILTER SYSTEM
INSTALLATION
PAGE 2

OPERATION
FRYER FILTER OPERATION
This section describes the cleaning process for your fryer know as the “Boil -Out”. A “Boil-Out” should be
performed on new equipment prior to actual cooking and every time shortening is removed from the fryer for
cleaning of the fry-kettle and replacement by fresh shortening.
WARNING
Please perform the steps of this procedure as described to avoid possible equipment damage,
violation of warranty provisions or personal injury.
1. Always use thermal oven mitts during this procedure to protect skin from bums due to splashing of hot
liquids.
2. Make sure the filter has been equipped with filter paper and powder and is correctly positioned.
3. If you are performing a “Boil Out” on a new fryer which DOES NOT contain shortening, go to Step 7,
otherwise proceed to Step 4.
4. If the shortening in the fryer is not in a heated state (at least 15O”F), go to Step 5. If the fryer has been in
operation and the shortening is in a heated state, place the thermostat in the off position and allow the
shortening to cool for 2 minutes before continuing.
5. If the shortening in the fryer is “Cold”, that is at room temperature, you must first heat the shortening
briefly so that it is liquid enough to be removed by the fryer’s filter system. Turn the temperature select
knob to 150°F and heat the oil until the burners go out. Stir the shortening well to insure that it is fully
dissolved. Stirring may cause the burners to come on again briefly. When the burners go out again, place
the thermostat in the off position and go to Step 5.
6. Insure that the thermostat is in the off position before proceeding.
WARNING
The next step of this procedure requires that the shortening be drained from the fry-kettle into
the fryer’s filter pan. Failure to insure that the fryer’s cook/filter switch is in the “Filter” position
prior to draining may result in fire on the exposed heating elements. Always insure that the
cook/filter switch is in the proper position.
7. Slowly open the drain valve handle beneath the fry-kettle. The drain is opened by turning it towards you.
Use care in opening this valve to avoid being splashed by hot oil. (You may find that the drain requires
insertion of the fryer clean out rod through the cold zone with the fryer in order to free the valve of
breading which may clog it.
8. Place oil pump switch in the “On” position and allow shortening to return to the fry-kettle and out through
the drain. Use this opportunity to “Wash-Down” breading which has accumulated in the bottom of the fry-
kettle. Use the larger pot brush supplied with the fryer to help “Wash-Down” this material into the filter-
pan below. Use care to avoid being splashed and burned by the hot oil.
9. After “Washing-Down” all accumulated breading and crumbs from the bottom of the fry-kettle, place the
oil pump switch in the “Off’ position and allow the shortening to accumulate in the filter pan.
10. When all the oil has drained out of the fryer, close the drain valve.
FRYER FILTER SYSTEM
SECTION 2 - USERS GUIDE
PAGE 1

WARNING
ALWAYS INSURE THAT THE CONTAINERS WHICH ARE USED FOR THIS STEP WILL
SAFELY HOLD HOT OIL. Plastic is generally not safe as it may melt and break. Metal
containers which do not leak are preferable to containers made of other materials. Failure to
exercise the above precautions may result in serious personal injury.
11. If you are going to discard the o&position an appropriate receptacle for the oil you are to discard near the
front of the fryer. REMEMBER, YOU WILL BE REMOVING APPROXIMAIELY 5 GALLONS OF
SHORTENING. Please insure that the container which you have selected will contain all of the
shortening. For ease in handling you may find it helpful to use more than a single container. The
shortening you will remove weighs about 40 pounds and is still very hot. Placing the discarded shortening
in two or more containers for removal makes for a lighter load and decreases the possibility of injury by
splashing.
12. Connect the discharge drain hose to the quick disconnect located at the pump motor. Always insure that
the hose coupling is securely mated at the quick disconnect fitting.
13. Position the wand end of the drain hose over the receptacle which you have positioned to receive the
waste oil from the filter. Always grasp the drain hose by the wooden sleeve near the wand end.
14. Place the oil pump switch in the “ON” position and allow the fryer filter system to pump the waste oil out
of the fryer through the drain hose.
15. When all waste oil has been removed from the fryer, return the oil pump switch to the“OFF” position.
16. Disconnect the drain hose from the fryer at the quick disconnect fitting below the diverter valve. Always
hold both ends of the drain hose in an upright position to avoid spillage of residual oil which may be
trapped in the hose. Carefully drain the hose into the receptacle which contains the waste oil from the
fryer.
17. Disconnect the filter pan hose from the back of the filter pan at the quick disconnect fitting located above
and to-the-left of the filter pan.
18. Remove oil drain outlet from oil drain piping by turning it in a clockwise direction.
19. Slide the filter pan forward and carefully remove it for cleaning. Note - We recommend that you use
Southbend Cleanser or an equivalent cleanser such Ajax or Comet to clean the filter pan. Avoid liquid
dishwashing detergents as they may leave residues which reduce shortening life.
20. Insure that the drain valve is closed.
21. Fill the fryer with water to the oil level mark located in the back of the fry-kettles interior.
22. Carefully add Southbend Boil Out to the water following the directions on the container.
CAUTION
If you choose to use a cleaner other than Southbend Boil Out to “Boil-Out” your fryer, pay
close attention to the instructions listed on the container. Many commercially available
cleaners are caustic chemicals which require special precautions for use. If used improperly
these chemicals may cause damage to your fryer and potential injury to the user.
23. Set the temperature control knob to 200°F.
FRYER FILTER SYSTEM
USERS GUIDE
PAGE 2

CAUTION
1
DO NOT UNDER ANY CIRCUMSTANCES LEAVE THE FRYER UNATTENDED
DURING THIS PROCEDURE AS HEAT MUST BE CAREFULLY MONITORED TO
I
PREVENT THE FRY-KETTLE FROM OVERFLOW DUE TO BOILING. OVERFLOW
OF THE FRY-KETTLE MAY RESULT IN SERIOUS EQUIPMENT DAMAGE.
24. Heat the cleaning solution for 20 minutes. Scrub the interior of the fry-kettle with the large pot brush
during this period to remove build-up.
25. Position a heat resistant pail beneath the drain outlet in the filter cabinet. Slowly open the drain valve.
Drain the cleaning solution from the fryer. Be careful not to over fill the container which will hold the
cleaning solution drained from the fryer.
26. Close the drain valve.
27. Rinse the inside of the fry-kettle with fresh water and repeat the drain procedure described in step 25.
28. Mop-out excess water from the fryer pot with a dry cloth.
29. Close the drain valve again.
30. Replace filter pan after thorough cleaning and attach the filter pan hose at the quick disconnect coupling.
31. Fill fryer with shortening to proper level. Shortening should be filled to the oil level marking the inside of
the fry pot.
CLEANING OF OIL FILTER PAN/REPLACEMENT OF FILTER PAPER
The following steps should be taken with the filter pan removed from the fryer. The filter pan should be
thoroughly cleaned during each “Boil-Out” procedure.
1.
Remove accumulated breading and residue from the surface of the filter paper with the metal crumb
shovel supplied with the fryer. Remove residue from the small ledge which surrounds the Hold-Down
frame.
2.
3.
Release the four Hold-Down latches which secure the frame which holds the filter paper in place.
Remove the Hold-Down frame from the filter pan and place it in the sink for cleaning. Note - Use only
Southbend Boil or a cleanser such as Ajax or Comet to clean the Hold-Down frame as well as the other
interior surfaces and components of the filter pan. LIQUID DISHWASHING DETERGENTS MAY
LEA, RESIDUES WHICH REDUCE SHORTENING LIFE.
4.
5.
6.
7.
8.
Beginning at one end of the filter pan, carefully roll-up the filter paper to be discarded and throw it away.
Remove the wire rack beneath the filter paper and placed it in the sink for cleaning.
Drain any remaining oil from the bottom of the filter pan into a proper waste receptacle. You must lift and
tilt the filter pan to accomplish this. The filter pan is somewhat heavy, so you may need assistance.
Clean the interior of the filter pan with one of the cleaners previously recommended. Clean beneath the oil
pick-up tube located in the bottom of the filter pan with a knife blade or other similar thin, flat instrument.
Rinse the pan interior and mop out excess water with a dry cloth or paper toweling.
Clean and rinse the wire rack and Hold-Down frame which you placed in the sink earlier. Dry them. The
filter pan is now ready for a re-assembly and installation of new filter paper.
FRYER FILTER SYSTEM
USERS GUIDE
PAGE 3

Remove the crumb and breading residue from the small ledge which surrounds the Hold-Down rack that
secures the filter paper in place.
Remove crumbs and breading residue from the top sheet of filter paper with the metal crumb shovel
supplied with the fryer.
Release the four Hold-Down latches on the frame assembly which secures the filter paper.
Remove the Hold-Down Frame.
Carefully remove the top sheet of filter paper by lifting its comer or edge and rolling it toward the other
end. Discard the paper.
6.
Lift the edge of the bottom sheet and slip a clean sheet of filter paper beneath it.
7.
Replace the Hold-Down rack above the filter paper and secure it with the four latches.
8.
Replace the filter in the fryer and secure its hose connection with the quick disconnect fitting.
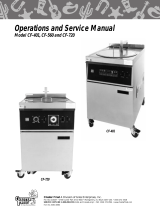
Drain
Pipe
Nipple
Filter Pan
Hold-Down
Rack with
Latchw
‘l%vo sheets of filter paper are used in the
filter pan. The filter pan must be removed
from the fryer to change the filter paper.
Both sheets should be changed following
a “Boil-Out”. During normal operation
the top sheet is discarded on a daily basis.
The bottom sheet is then placed on top of
a new sheet of filter paper and filter paper
is replaced in the filter pan with the Hold-
Down frame. The following simple steps
summarize the procedure for replacement
of filter paper on a daily basis:
StaInlass Ftexlble
Steel Hose #ll74294
I
Rlter Pan
OU Pick -up
Nlppk
/
Fidr Pan
Fldr Pan
Drain Rack
FRYER FILTER SYSTEM
USER GUIDE
PAGE 4

FILTERINGTHEFRYER
The fryer should be filtered regularly to promote longer oil life.
1. Use thermal oven mitts during this procedure to prevent burns from hot oil and metal surfaces of the fryer.
2. Insure that filter paper (2 pieces) is properly positioned in the filter pan as described on Page 4 under
the section detailing replacement of the filter paper.
3. Adjust the thermostat to the off position
WARNING
Failure to insure that the Thermostat is in the “Off” position during procedure may result in
equipment damage and/or personal iqjury.
4.
5.
6.
7.
8.
9.
Stir 8 ounces of Southbend filter powder in the hot oil. The filter powder helps extend shortening life by
removing impurities.
Allow the shortening to cool for 3 minutes after adding the filter powder.
Slowly open the fry pot drain valve beneath the fry-kettle. Be very careful to avoid being splashed by hot
oil.
You may may need to use a small diameter brush to ream out the drain line from inside the fry tank to
open any clogs which might develop as you drain the oil into the filter pan.
Connect the discharge drain hose to the quick disconnect located at the pump motor. Always insure that
the hose coupling is securely mated at the quick disconnect fitting. Insert hose (wand ) into quick release
fitting.
Position the wand end of the drain hose over the fry tank. Always grasp the drain hose by the wooden
sleeve near the wand end.
10. Place the oil pump switch in the “ON” position.
11. Leave the drain valve open and allow the filtered shortening to return to the fry-kettle and drain out the
bottom through the drain valve. Use a large brush to “Wash-Down” the fry tank with the hot shortening as
it circulates through the fry tank. Continue this for at least 2 minutes.
12. Close the fryer drain valve.
13. Allow the filtered shortening to return to the fry-kettle. The oil will begin to bubble as the pumping action
is completed and air fills the oil return lines. Place the pump switch in the“Off” position.
14. Insure that the fryer contains the proper shortening level.
15. Adjust the thermostat to your cooking temperature and heat the oil until it reaches the proper cooking
temperature.
16. Remove used filter paper and replace with new filter paper
FRYER FILTER SYSTEM
USERS GUIDE
PAGE 5

WARNING; HOT FRYING COMPOUND
CONTACT WITH HOT FRYING COMPOUND WILL CAUSE SEVER BURNS. ALWAYS USE
CAUTION, FRYING COMPOUND AT 200°F IS MORE DANGEROUS THAN BOILING WATER
I
MAINTENANCE
CONSULT DEEP FAT FRYER OWNERS hJANUAL, - PART # 11611609 FOR
CLEANING INSTRUCTIONS.
FRYER FILTER SYSTEM
USER’S GUIDE
PAGE 6

/
’ ADJUSTMENTS
SERVICE
WARNING:
ADJUSTMENTS AND SERVICE WORK MAY BE PERFORMED ONLY BY A QUALIFIED
TECHNICIAN WHO IS EXPERIENCED IN, AND KNOWLEDGEABLE WITH, THE
OPERATION OF COMMERCIAL GAS COOKING EQUIPMENT. HOWEVER, TO ASSURE
YOUR CONFIDENCE, CONTACT YOUR AUTHORIZED SERVICE AGENCY FOR
RELIABLE SERVICE, DEPENDABLE ADVICE OR OTHER ASSISTANCE, AND FOR
GENUINE FACTORY PARTS.
TROUBLE SHOOTING
DESCRIPTION
FUNCTION
1.
Quick Disconnect
For Filter Pan
#1174293
This Quick Disconnect fitting connects the stainless steel
braided hose from the filter pan to the fryer’s oil return lines.
The stainless hose must be disconnected at this fitting
prior to sliding the filter pan outward for cleaning or
removal. The fitting is operated by pushing upward on the
wooden ring and exerting downward pressure on the
connecting end of the stainless hose. For reconnection,
push upward on the wooden ring while inserting the
stainless hose. Release the wooden ring when the hose
fitting is fully inserted to lock it in position. Refer to Page 4
Item 4 for the location of this component.
2. Filter Pan
#1174289
3. Filter Pan Hold-Down
Bracket and Latches
#1174288
4. Drain Valve
#I1134799
5. Drain Line Piping Nipple
The Filter Pan contains the filter paper which serves to
removes breading and other impurities from the oil during
the filtering procedure. Oil is drained into the filter pan
where the fryer’s pumping action draws It thru the filter
paper and returns it to the cooking vessel by way of the
Filter Pan Hose.
The Hold-Down Bracket is contained in the filter pan and
serves to insure that the filter paper Is held tightly in place
by means of the four locking latches. The fryer’s filtering
action will be reduced or eliminated if these latches are not
properly secured.
Pulling this handle towards you allows shortening to drain
from the frying vessel into the filter pan. WARNING: MAKE
SURE THERMOSTAT IS IN “OFF” POSITION. Open the
valve slowly to avoid burns from splashing of hot oil.
Always, make sure that the valve Is closed prior to adding
shortening.
This Pipe-Nipple attaches to the drain piping to minimize
splashing of hot oil when the fry-kettle is filtered or drained.
The Pipe-Nipple must be removed before sliding the filter
pan out of the fryer.
FRYER FILTER SYSTEM
SECTION THREE-SERVICE
PAGE 1

DESCRIPTION
F’UNCTION
6. Quick Disconnect for
Oil Discharge Wand
#1174293
This Quick-Disconnect Fitting is used in conjunction with
the oil discharge wand to remove oil from the Fryer that is
to be discarded. The Quick Disconnect is operated in the
same manner as was explained in item 1 of this section.
OIL FIITRATION SYSTEM INOPERATIVE; PUMP DOES NOT RUN
1. If switch is in the “On” Position, use a multimeter to verify that the pump switch is functioning properly.
If switch is operative, refer to wiring diagram and locate the filter pump and motor assembly and use a
multimeter to check for proper voltage at the pump motor. If voltage is correct a defective pump motor is
indicated. Remove and replace the pump motor assembly. Otherwise refer to the wiring diagram at the
rear of this manual and isolate the defective wiring or wiring connection.
OIL FIU’RATION SYSTEM PUMPS SLOWLY
1.
2.
3.
4.
5.
Insure that filter paper is not clogged or tom.
Insure that hold-down frame in filter pan is latched at all four positions inside filter pan.
Insure that the 18” stainless steel flexible hose which leads from filter pan to quick-disconnect fitting is
securely locked inside quick-disconnect fitting. If hose will not lock in quick-disconnect, remove and
replace quick-disconnect fitting.
Examine the 18” stainless steel flexible hose described above for signs of crimping or collapse. If
crimping or collapse is noted, remove and replace it.
If no defect is found in the 18” stainless steel flexible steel hose, disconnect pump from filter lines and
insure that no obstructions exist in the plumbing leading to the pump, if all lines are clear, remove and
replace the filter pump assembly.
FRYER FILTER SYSTEM
SERVICE PAGE 2

PARTS
FRYER FILTER SYSTEM
PARTS
WARNING:
INSTALLATION OF OTHER THAN GENUINE SOUTHBEND PARTS WILL VOID THE
WARRANTY ON THIS EOUIPMENT.
The serial plate is located on the back of the door - upper left comer.
Replacement parts may be ordered either through a Southbend Authorized Parts Depot or a Southbend
Authorized Service Agency.
When ordering, please supply the Model Number, Serial Number, Part Number, Description, plus Finish, Qpe
of Gas and Electrical Characteristics, as applicable.
For parts not listed consult a Southbend Authorized Parts Depot or Southbend Authorized Service Agency. If
necessary, please consult Southbend Escan Parts Department for assistance.
FIOURE KSY NO.
PART
NO. DESCRIPTION
1173416
fllbfP~r(lOOShwbperb~~)
1173418 nlbf Pwa!u (25 Lb. be@.)
1173417 FywBallDul
1
1 117424288 FiIWPMHOidDOWlR8CkWMlLdChM
1
2 1174288 nlbrPM
3
4
3
1 1174290 -P
1
3 1174191 FllwPmDminRack
3
4
2
1 1174202 011 Return Wuxl
3
2 1174283 MIQuWD-
1
4 1174204 18'slalnbM sloe1 FMble Hose
3
3
FIG. 1 DISASSEMBLED VIEW
Filter Pan
oil Pick up
yppie
Stainless Flexibte
Steel Hose Y1174294
Pan
Hold-Down
Rack with
Latches
11174288
I
@ Fitter Pan
Xl 174299
\
0 Fitter Pan
Dnin Rack
Xl 174291
FRYER
FILTER SYSTEM
SECTION 4 - PARTS
PAGE 1

FIG. 2
a
UNIT SHOW
FIG. 3
FRYER FILTER S
PARTS

DEEP FAT FRYER
MANUAL SUPPLEMENT
FOR FRYER FILTER SYSTEM
r
I
A product with the Southbend name Incorporates the best In durability and low
maintenance. We all recognize however, that replacement parts and occasional
professional service may be necessary to extend the useful life of this unit. When
mvbe la needed, contact a Southbend Authorized Service Agency, or your dealer.
To avoid contusion, always refer to the model number, serial number, and type of
your unit.
southbend
A NIDDLEBV
CONPANY
1100 Old Honeycutt Road
Fuquay-Vanna. NC 27526
(919) 552-9161
PART
Utho:9YSA
FAX (919) 552.9796
NUMBER 1174296
(600) 346-2556
/