Martin M1 Installation guide

Category
Floodlights
Type
Installation guide

Martin M1 is an all-in-one lighting console that combines the power of a larger desk with the agility of a smaller one. With its intuitive user interface, comprehensive programming capabilities, and multiple connectivity options, the M1 is ideal for controlling a wide range of lighting fixtures in various applications, from small clubs to large-scale productions.

Martin M1 is an all-in-one lighting console that combines the power of a larger desk with the agility of a smaller one. With its intuitive user interface, comprehensive programming capabilities, and multiple connectivity options, the M1 is ideal for controlling a wide range of lighting fixtures in various applications, from small clubs to large-scale productions.

Martin M1
Safety and Installation Guide
I © 2010 Martin Professional A/S
Martin M1 Safety and Installation Guide
©2010 Martin Professional A/S. Information subject to change without notice. Martin Professional A/S and all
affiliated companies disclaim liability for any injury, damage, direct or indirect loss, consequential or economic
loss or any other loss occasioned by the use of, inability to use or reliance on the information contained in this
manual. The Martin logo, the Martin name and all other trademarks in this document pertaining to services or
products by Martin Professional A/S or its affiliates and subsidiaries are trademarks owned or licensed by
Martin Professional A/S or its affiliates or subsidiaries.
P/N 35000233 - Rev. B
Table of Contents
......................................................................................1
Dimensions
......................................................................................4
Introduction
................................................................................................................................... 5Technical Support
................................................................................................................................... 5Safety Information
................................................................................................................................... 6Included Items
......................................................................................7
Setup and Assembly
................................................................................................................................... 7Unpacking
................................................................................................................................... 7Placement
................................................................................................................................... 8Power Connections
......................................................................................9
Connections
................................................................................................................................... 9Front panel
................................................................................................................................... 9Back panel
......................................................................................10
Service
......................................................................................11
Specifications
1 © 2010 Martin Professional A/S
Martin M1 Safety and Installation Guide
Dimensions
All dimensions are in millimeters
Martin M1 closed screen
2 © 2010 Martin Professional A/S
Martin M1 Safety and Installation Guide
Martin M1 open screen
3 © 2010 Martin Professional A/S
Martin M1 Safety and Installation Guide
4 © 2010 Martin Professional A/S
Martin M1 Safety and Installation Guide
Introduction
Thank you for purchasing the Martin M1 Lighting Control System.
M1 is the next generation of Martin Controllers. With the full power of a larger desk and the agility of a
small one, it is the ultimate all-in-one lighting console.
Please read this Safety and Installation Guide carefully. Visit the Martin website www.martin.com for further
documentation including the user manual for the M1 and access to our user forums.
5 © 2010 Martin Professional A/S
Martin M1 Safety and Installation Guide
Technical Support
For a complete list of Technical Support phone numbers, see the Martin website at http://www.martin.
com/service/hotline.asp
Safety Information
This product is for professional use only. It is not for household use. It presents risks of lethal or
severe injury due to electric shock. Read this user manual before powering or installing the M1 , follow
the safety precautions listed below and observe all warnings in this manual and printed on the
product.
If you have questions about how to operate the product safely, please contact your Martin supplier or
call the Martin 24-hour service hotline on +45 8740 0000, or in the USA on 1888-tech-180.
Connect the product electrically to ground (earth).
Use only a source of AC power that complies with local building and electrical codes and has
both overload and ground-fault protection.
Use the supplied power cords and chose the correct one for the country of operation. Use of
the factory provided power cable is mandatory for operation in the US and Canada.
Replace fuses with ones of the same type and rating only. Never attempt to bypass a fuse.
Disconnect the product from power immediately if the power cable or any cover or component
is wet or not in perfect condition. Do not reconnect to power until the damaged item has been
repaired or replaced.
Do not expose the product to rain or moisture.
Allow free unobstructed airflow to the sides of the product. Do not block the ventilation slots.
Do not use the product if the ambient temperature exceeds 40°C (10 F)
Refer any service operation not described in this manual to a qualified technician.
Do not modify the product or install other than genuine Martin parts.
Only transport in suitable packaging or a custom fitted road case. Transportation damage is not
covered under warranty.
Caution: Risk of Fire and Electrical Shock. Use only in dry locations.
Caution: Risk of Explosion if Battery is replaced by an incorrect type. Dispose of used batteries
according to local environmental regulations.
6 © 2010 Martin Professional A/S
Martin M1 Safety and Installation Guide
Included Items
Each Martin M1 contains the following items:
M1 Contoller
1.5 m (4.9 ft.) power cable, 3-pin IEC P/N 11501012 (for use outside the US and Canada)
1.5 m (4.9 ft.) power cable, 3-pin IEC P/N 11501502 (with NEMA 15-5P plug for use within
the US and Canada)
Two 2 AT fuses, installed
User manual (Part number 35000233)
7 © 2010 Martin Professional A/S
Martin M1 Safety and Installation Guide
Setup and Assembly
Unpacking
Open the shipping box carefully and stow away all included foam pieces and protective covers. Store
them for re-use.
The M1 should never be shipped in any other container than the factory-provided box or a custom
manufactured protective case.
Placement
The M1 controller requires a stable mounting position that provides support for all 4 rubber feet on the
bottom of the console.
Place the console carefully onto the surface and fold open the attached screen.
Apply some weight with a hand on the rubber hand rest when operating the hinge mechanism. The
hinges are strongly damped and the controller could tip over if the screen is not opened carefully.
8 © 2010 Martin Professional A/S
Martin M1 Safety and Installation Guide
Power Connections
Martin M1 is rated 100-240V 50/60Hz, operates over 90-264V 50/60Hz. Do not connect it to
power outside this range.
The provided IEC cable is not fitted with a country-specific plug.
Please install a plug that meets local and national electric codes and is suitable for the country's
specific power outlet types.
A 3-prong grounding-type plug must be installed following the plug manufacturer’s instructions. The
table below shows some possible pin identification schemes; if the pins are not clearly identified, or if
you have any doubts about proper installation, consult a qualified electrician.
A cable with a NEMA 15-5P plug is provided for use of the M1 in the US and Canada. The approved
cable must be used in North America.
Wire color (standard EU code)
Pin
Symbol
brown
live
L
blue
neutral
N
yellow/green
ground
1.
Check the Power Switch and ensure that is set to the OFF position.
2.
Insert the provided power cable into the MAINS IN connector and connect the cable to a properly
protected and grounded power outlet.
3.
Turn on the M1 by toggling the power switch to ON.
In addition to the IEC inlet the M1 also provides a IEC outlet port to connect a monitor or a
MaxModule device.
Do not exceed a current-draw of 4A on the IEC outlet port.
9 © 2010 Martin Professional A/S
Martin M1 Safety and Installation Guide
Connections
Front panel
The surface panel offers a USB device socket in the top right corner. This connector is ideally suited
for USB memory sticks or a USB desklamp.
On the front of the console are two additional USB device sockets for additional peripherals like
keyboard or mouse.
USB connections on the front panel are not suitable for boot operations (e.g. installation of an
operating system). Use the USB connectors on the back of the console instead.
Do not exceed a current of 500ma on a USB device port.
Back panel
Mains IN
IEC C14 Power Input
Mains Out
IEC C13 Power Output (4A)
Desklight
XLR 3-Pin female, 12V, 200ma for Littlite Type gooseneck desklights
DMX 1-4
XLR 5-pin female DMX Outputs, RDM compatible
DMX IN
XLR 5-pin male DMX Input
Wing Out 1
Wing Out 2
RJ45 Ethercon connections for MaxModules. Do not connect standard Ethernet
devices to these ports.
Midi In/Out/
Thru
Optional MIDI connections, 5-pin DIN
USB
USB device connections (max. 500ma.)
Network
RJ45 Gigabit Remote network connection
EtherDMX
RJ45 Gigabit DMX Ethernet connection
VGA
15-pin monitor connection
DVI
DVI-Digital monitor connection
Line Out
3.5mm stereo jack
Line In
3.5mm stereo jack
10 © 2010 Martin Professional A/S
Martin M1 Safety and Installation Guide
Service
The Martin M1 is designed as a rugged, roadworthy device. Occasional cleaning is the only service
required of the user. For any other service-related concerns, please contact your Martin dealer or visit
www.martin.com.
Any service not described in this User Manual must be carried out by a qualified Martin technician.
The M1 requires periodic cleaning, as does any computer. The schedule depends heavily on the
operating environment; please consult a Martin service technician for recommendations if needed.
As with any computer, never spray the cleaner directly onto the desk, always spray onto a lint-free
cloth and wipe clean.
Important! Excessive dust and smoke fluid build-up can degrade performance and cause
overheating and damage to the M1 that is not covered by the warranty.
11 © 2010 Martin Professional A/S
Martin M1 Safety and Installation Guide
Specifications
Physical
Length: 823 mm
Width: 464 mm
Height, screen closed: 178 mm
Height, screen opened 395 mm
Weight: 14.4 kg
Operating Temperature: 0° - 40° Celsius
IP Rating: IP20
Connections
- Front: 2 x USB host socket
- Front panel: 1 x USB host socket
- Rear:
- AC power input: I.E.C. male socket
- AC power output: I.E.C. female socket
(Total current draw of all devices linked via AC power outlet: max. 4A)
- Midi (optional) : DIN-5 female socket (Midi in, thru, out)
- Mouse, keyboard: PS2 socket
- EtherDMX data: RJ-45 socket (does not accept Neutrik EtherCon connectors in housing)
- Remote Network data: RJ-45 socket (does not accept Neutrik EtherCon connectors in housing)
- USB: 4 x USB device socket
- Serial: 9-pin D-Sub male
- VGA: 15-pin D-Sub female
- Sound: 3.5 mm audio phone jack + SPDIF
- DVI
- DMX-out data (full RDM): 4 x 5-pin locking XLR female socket
- DMX-in data: 5-pin locking XLR male socket
- LINK USB data outputs: 2 x Neutrik RJ-45 socket
(accepts Neutrik EtherCon connectors in housing)
- LAMP output: 2 x 3-pin locking XLR female socket
Electrical:
AC-Power: rated 100-240V 50/60Hz, operates over 90-264V 50/60Hz
Power supply unit: Auto-sensing Switchmode
Main fuses: Two 2AT (slow blow) (CAUTION: DOUBLE POLE/NEUTRAL FUSING)
Total current draw of all devices linked via AC power outlet: max. 4A
Lamp output: 2 x 12V PWM
Total Current: Max. 0.75 A
Total Power: Max. 80 W
Hardware
Industrial 13.1” TFT 16:9 touch screen (1280x800 pixel)
Internal SATA 2.5 hard disk drive
Industrial motherboard with Intel processor
2GB RAM
Integrated Graphics
2 x dimmable XLR desk lamp connections
12 © 2010 Martin Professional A/S
Martin M1 Safety and Installation Guide
Software
Industrial Windows Embedded OS
OS Installation via USB storage device or USB optical drive.
Show backup on hard disk or USB storage device (not included)
Support for ELO Accutouch USB touchscreens
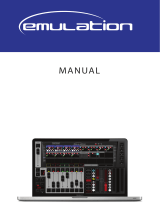
Functional
High resolution folding touch screen
Digital LCD buttons for fast and direct parameter access
Multiple wing attachment (Maxxyz Modules)
4 x DMX Universe direct from the console, up to 12 Universe with optional license
Maxxyz Manager Software for programming and triggering via time and calendar schedules
Customizable Graphical User Interface with context sensitive toolbars and integrated help menu
Powerful effects engine
Controls up to 6144 parameters
1000 cuelists with fader control
1000 cuelists with playback control buttons
Two separate playback sections
Parallel execution of multiple cuelists
Submaster, Groupmaster and Override functionality
Parameter and time-fanning functionality
Auto update for presets and cues
On-the-fly global timing adjustments
Control and Programming
Protocol: DMX512 (RDM), Artnet 2
4 DMX universes, expandable to 12
2048 channels, expandable to 6144
No limit to number of DMX channels per fixture
Extensive fixture library for all known manufacturers
65000 presets for each group of functions (P/T, color, gobo, etc.)
Effect generator for automated programming of complex effects
Customizable highlight and lowlight function to identify individual fixtures
Relative or absolute programming
Fan function for all channels (including timing parameters)
On-the-fly global timing changes
Virtual cuelists
Macros
Wait, follow and link cues
HTP, LTP, chase, timecode, submaster and group master playback functionality
Individual parameter timings
Intuitive patch feature
Fixture type cloning
All channels with 16-bit resolution
13 © 2010 Martin Professional A/S
Martin M1 Safety and Installation Guide
Control/User Interface
Main Playback
10 x 60mm playback faders, each with four function-assignable buttons
Sub Playback
24 playbacks
12 x 40mm playback faders with one assignable button
12 x single assignable buttons
2 x Scrollwheel for Bank changes
12 x customizable multipurpose keys
Playback Select button
Master GO Section with Go, Pause, Snap, Release
4 x digital rotary encoders with push function and status LED for fixture parameter control
5 x dynamically labeled digital LCD buttons for parameter groups, effect parameters, fanning, global
timings
Grand master fader and button
Blind/preview button
Customizable highlight/lowlight function
Customizable parameter defaults
Next/last fixtures/groups
Trackball with pan/tilt control switch
Left/right mouse button
Numerical keypad surrounded
Large command keys
Playback
Assign a cue, cuelist or effect to any playback fader
100 playback banks, each containing 10 playbacks
100 sub playback banks, each containing 24 playbacks
No limit to cues per cuelist
100 pages of 100 playbacks activated by touch screen button
Full 16-bit fading for high-resolution fixtures
Individual fade in/fade out times for all playbacks
Manual override available at all times
Live 0-1000% override of global cue timings
Live programmer timing
Cuelists can be executed in tracking or non-tracking mode
Included Items
1.5 m (4.9 ft.) power cable, 3-pin IEC P/N 11501012 (for use outside US and Canada)
1.5 m (4.9 ft.) power cable, 3-pin IEC P/N 11501502 (with NEMA 15-5P plug for use within the US and
Canada)
User software + documentation CD P/N 39201505
Ordering Information
M1 ts Console P/N 90732040
M1 DMX License 2048 channels P/N 39808013
  • Page 1 1
  • Page 2 2
  • Page 3 3
  • Page 4 4
  • Page 5 5
  • Page 6 6
  • Page 7 7
  • Page 8 8
  • Page 9 9
  • Page 10 10
  • Page 11 11
  • Page 12 12
  • Page 13 13
  • Page 14 14
  • Page 15 15

Martin M1 Installation guide

Category
Floodlights
Type
Installation guide

Martin M1 is an all-in-one lighting console that combines the power of a larger desk with the agility of a smaller one. With its intuitive user interface, comprehensive programming capabilities, and multiple connectivity options, the M1 is ideal for controlling a wide range of lighting fixtures in various applications, from small clubs to large-scale productions.

Ask a question and I''ll find the answer in the document

Finding information in a document is now easier with AI