Page is loading ...
Drill
드릴
Máy khoan
Bor
D 10VST
•
D 10VST
(
L
)
Handling instructions
취급 설명서
Hướng dẫn sử dụng
Petunjuk pemakaian
Read through carefully and understand these instructions before use.
본 설명서를 자세히 읽고 내용을 숙지한 뒤 제품을 사용하십시오.
Đọc kỹ và hiểu rõ các hướng dẫn này trước khi sử dụng.
Bacalah dengan cermat dan pahami petunjuk ini sebelum menggunakan perkakas.

2
12
34
5
1
2
3
4
5
6
7
4
!
0
9
8
@
3
4
English
한국어
1
Drill chuck
드릴 척
2
Chuck wrench
척 렌치
3
Tighten
조임
4
Loosen
풀기
5
Sleeve
슬리브
6
Ring
링
7
Open end wrench
오픈 엔드 렌치
8
Switch trigger
스위치 트리거
9
Rotational change lever
회전식 전환 레버
0
mark
표시
!
mark
표시
@
Stopper
스토퍼
Tiếng Việt
Bahasa Indonesia
1
Mâm cặp máy khoan
Cengkam bor
2
Chìa vặn mâm cặp
Pemutar cengkam
3
Siết chặt
Menguatkan
4
Nới lỏng
Melonggarkan
5
Khớp nối trong
Lengan
6
Vành đai ngoài
Cincin
7
Chìa vặn hai đầu
Kunci pas
8
Cần khởi động
Pemicu sakelar
9
Cần chuyển đổi chế độ xoay
Tuas pengubah putar
0
Dấu
Penanda
!
Dấu
Penanda
@
Nút hãm
Penyetop
3

English
4
GENERAL POWER TOOL SAFETY WARNINGS
WARNING
Read all safety warnings and all instructions.
Failure to follow the warnings and instructions may result in
electric shock, fi re and/or serious injury.
Save all warnings and instructions for future reference.
The term “power tool” in the warnings refers to your mains-
operated (corded) power tool or battery-operated (cordless)
power tool.
1) Work area safety
a) Keep work area clean and well lit.
Cluttered or dark areas invite accidents.
b) Do not operate power tools in explosive
atmospheres, such as in the presence of
fl ammable liquids, gases or dust.
Power tools create sparks which may ignite the dust
or fumes.
c) Keep children and bystanders away while
operating a power tool.
Distractions can cause you to lose control.
2) Electrical safety
a) Power tool plugs must match the outlet.
Never modify the plug in any way.
Do not use any adapter plugs with earthed
(grounded) power tools.
Unmodifi ed plugs and matching outlets will reduce
risk of electric shock.
b) Avoid body contact with earthed or grounded
surfaces, such as pipes, radiators, ranges and
refrigerators.
There is an increased risk of electric shock if your
body is earthed or grounded.
c) Do not expose power tools to rain or wet
conditions.
Water entering a power tool will increase the risk of
electric shock.
d) Do not abuse the cord. Never use the cord for
carrying, pulling or unplugging the power tool.
Keep cord away from heat, oil, sharp edges or
moving parts.
Damaged or entangled cords increase the risk of
electric shock.
e) When operating a power tool outdoors, use an
extension cord suitable for outdoor use.
Use of a cord suitable for outdoor use reduces the
risk of electric shock.
f) If operating a power tool in a damp location
is unavoidable, use a residual current device
(RCD) protected supply.
Use of an RCD reduces the risk of electric shock.
3) Personal safety
a) Stay alert, watch what you are doing and use
common sense when operating a power tool.
Do not use a power tool while you are tired
or under the infl uence of drugs, alcohol or
medication.
A moment of inattention while operating power tools
may result in serious personal injury.
b) Use personal protective equipment. Always
wear eye protection.
Protective equipment such as dust mask, non-skid
safety shoes, hard hat, or hearing protection used for
appropriate conditions will reduce personal injuries.
c) Prevent unintentional starting. Ensure the
switch is in the off position before connecting to
power source and/or battery pack, picking up or
carrying the tool.
Carrying power tools with your fi nger on the switch or
energising power tools that have the switch on invites
accidents.
d) Remove any adjusting key or wrench before
turning the power tool on.
A wrench or a key left attached to a rotating part of the
power tool may result in personal injury.
e) Do not overreach. Keep proper footing and
balance at all times.
This enables better control of the power tool in
unexpected situations.
f) Dress properly. Do not wear loose clothing or
jewellery. Keep your hair, clothing and gloves
away from moving parts.
Loose clothes, jewellery or long hair can be caught in
moving parts.
g) If devices are provided for the connection of
dust extraction and collection facilities, ensure
these are connected and properly used.
Use of dust collection can reduce dust-related
hazards.
4) Power tool use and care
a) Do not force the power tool. Use the correct
power tool for your application.
The correct power tool will do the job better and safer
at the rate for which it was designed.
b) Do not use the power tool if the switch does not
turn it on and off .
Any power tool that cannot be controlled with the
switch is dangerous and must be repaired.
c) Disconnect the plug from the power source and/
or the battery pack from the power tool before
making any adjustments, changing accessories,
or storing power tools.
Such preventive safety measures reduce the risk of
starting the power tool accidentally.
d) Store idle power tools out of the reach of children
and do not allow persons unfamiliar with the
power tool or these instructions to operate the
power tool.
Power tools are dangerous in the hands of untrained
users.
e) Maintain power tools. Check for misalignment or
binding of moving parts, breakage of parts and
any other condition that may aff ect the power
toolʼs operation.
If damaged, have the power tool repaired before
use.
Many accidents are caused by poorly maintained
power tools.
f) Keep cutting tools sharp and clean.
Properly maintained cutting tools with sharp cutting
edges are less likely to bind and are easier to control.
g) Use the power tool, accessories and tool bits
etc. in accordance with these instructions,
taking into account the working conditions and
the work to be performed.
Use of the power tool for operations diff erent from
those intended could result in a hazardous situation.
5) Service
a) Have your power tool serviced by a qualifi ed
repair person using only identical replacement
parts.
This will ensure that the safety of the power tool is
maintained.
PRECAUTION
Keep children and infi rm persons away.
When not in use, tools should be stored out of reach of
children and infi rm persons.
English
5
PRECAUTIONS ON USING DRILL
1. Use auxiliary handle(s), if supplied with the tool.
Loss of control can cause personal injury.
2. Hold power tool by insulated gripping surfaces,
when performing an operation where the cutting
accessory may contact hidden wiring or its own
cord. Cutting accessory contacting a "live" wire may
make exposed metal parts of the power tool "live" and
could give the operator an electric shock.
3. Hold the drill securely when using.
4. Do not wear gloves made of stuff liable to roll up such as
cotton, wool, cloth or string, etc.
5. Prior to drilling into walls, ceilings or fl oors, ensure there
are no electric cables or conduits inside.
6. Do not use the tool for tightening or loosening of screws,
bolts, etc.
Doing so may cause damage to the tool or personal
injury.
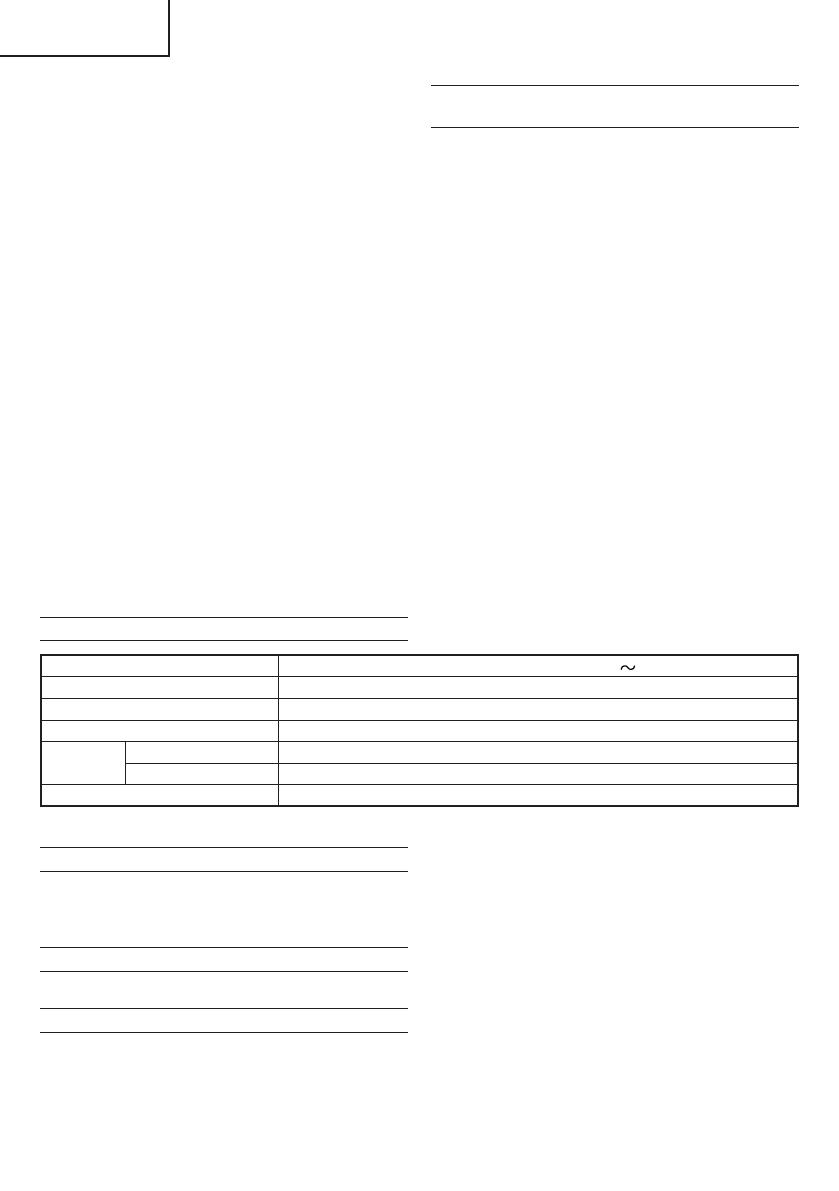
SPECIFICATIONS
Voltage (by areas)* (110 V, 220 V, 230 V, 240 V)
Power input 450 W*
No load speed 0 – 3200 /min
Drill chuck capacity 10 mm
Capacity
Steel 10 mm
Wood 25 mm
Weight (without cord) 1.2 kg
* Be sure to check the nameplate on product as it is subject to change by areas.
STANDARD ACCESSORIES
○ Chuck wrench (Spec. only for keyless chuck) ..............1
Standard accessories are subject to change without notice.
APPLICATIONS
○ Boring holes in metal, wood and plastic.
PRIOR TO OPERATION
1. Power source
Ensure that the power source to be utilized conforms
to the power requirements specifi ed on the product
nameplate.
2. Power switch
Ensure that the power switch is in the OFF position. If the
plug is connected to a receptacle while the power switch
is in the ON position, the power tool will start operating
immediately, inviting serious accident.
3. Extension cord
When the work area is removed from the power source.
Use an extension cord of suffi cient thickness and rated
capacity. The extension cord should be kept as short as
practicable.
4. Selecting the appropriate drill bit:
○ When boring metal or plastic
Use ordinary metalworking drill bits.
○ When boring wood
Use ordinary woodworking drill bits.
However, when drilling 6.5 mm or smaller holes, use a
metalworking drill bit.
5. Mounting and dismounting of the bit
For keyed chuck
(Fig. 1)
(1) Open the chuck jaws, and insert the bit into the chuck.
(2) Place the chuck wrench in each of the three holes in the
chuck, and turn it in the clockwise direction (viewed from
the front side). Tighten securely.
(3) To remove the bit, place the chuck wrench into one of
the holes in the chuck and turn it in the counterclockwise
direction.
For keyless chuck (Fig. 2)
(1) Open the chuck jaws, and insert the bit into the chuck.
To open the chuck jaws, hold the ring while turning the
sleeve in the counterclockwise direction (viewed from the
front side).
(2) Firmly grasp the ring and turn the sleeve in the clockwise
direction. Tighten securely.
(3) To remove the bit, fi rmly grasp the ring and turn the
sleeve in the counterclockwise direction.
(4) If it is hard to loosen the sleeve, fi x the spindle using the
open-end wrench, hold the sleeve fi rmly, and turn it in the
loosening direction (counterclockwise when viewed from
the front). (Fig. 3)
6. Check the rotational direction (Fig. 4)
The bit rotates clockwise (viewed from the rear side) by
turning the rotational change lever to R-mark.
The rotational change lever is returned to the L-mark to
turn the bit counterclockwise.
(The
and marks are provided on the body.)
HOW TO USE
1. Switch operation
○ When the trigger is depressed, the tool rotates. When the
trigger is released, the tool stops.
○ The rotational speed of the drill can be controlled by
varying the amount that the trigger switch is pulled.
Speed is low when the trigger switch is pulled slightly and
increases as the trigger switch is pulled more.
○ Pulling the trigger and pushing the stopper, it keeps
the switched-on condition which is convenient for
continuous running. When switching off , the stopper can
be disconnected by pulling the trigger again. (Fig. 5)
2. Drilling
○ When drilling, start the drill slowly, and gradually
increasing speed as you drill.
○ Always apply pressure in a straight line with the bit. Use
enough pressure to keep drilling, but do not push hard
enough to stall the motor or defl ect the bit.
○ To minimize stalling or breaking through the material,
reduce pressure on drill and ease the bit through the last
part of the hole.

English
6
○ If the drill stalls, release the trigger immediately, remove
the bit from the work and start again. Do not click the
trigger on and off in an attempt to start a stalled drill. This
can damage the drill.
○ The larger the drill bit diameter, the larger the reactive
force on your arm.
Be careful not to lose control of the drill because of this
reactive force.
To maintain fi rm control, establish a good foothold, hold
the drill tightly with both hands, and ensure that the drill is
vertical to the material being drilled.
MAINTENANCE AND INSPECTION
1. Inspecting the drill bits
Since use of an abraded drill bits will cause motor
malfunctioning and degraded effi ciency, replace the drill
bits with a new one or resharpening without delay when
abrasion is noted.
2. Inspecting the mounting screws
Regularly inspect all mounting screws and ensure that
they are properly tightened. Should any of the screws be
loose, retighten them immediately. Failure to do so could
result in serious hazard.
3. Maintenance of the motor
The motor unit winding is the very “heart” of the power
tool. Exercise due care to ensure the winding does not
become damaged and/or wet with oil or water.
4. Inspecting the carbon brushes
For your continued safety and electrical shock protection,
carbon brush inspection and replacement on this tool
should ONLY be performed by a HITACHI AUTHORIZED
SERVICE CENTER.
5. Replacing supply cord
If the replacement of the supply cord is necessary, it has
to be done by Hitachi Authorized Service Center to avoid
a safety hazard.
6. Service parts list
CAUTION
Repair, modifi cation and inspection of Hitachi Power
Tools must be carried out by a Hitachi Authorized Service
Center.
This Parts List will be helpful if presented with the tool to
the Hitachi Authorized Service Center when requesting
repair or other maintenance.
In the operation and maintenance of power tools, the
safety regulations and standards prescribed in each
country must be observed.
MODIFICATIONS
Hitachi Power Tools are constantly being improved
and modifi ed to incorporate the latest technological
advancements.
Accordingly, some parts may be changed without prior
notice.
NOTE
Due to HITACHI’s continuing program of research and
development, the specifi cations herein are subject to change
without prior notice.

7

8
○
○
○
○

9
○
○
○
○
○
○
○
○

10
한국어
일반적인 안전 수칙
경고!
모든 안전 경고 사항과 지침을 읽어 주십시오.
안전 경고 사항과 지침을 따르지 않을 시에는 감전 사고나
화재가 발생할 수 있으며 심각한 부상을 입을 수도 있습니다.
차후 참조할 수 있도록 모든 경고 사항과 지침을
보관하 십시오.
경고 사항에 나오는 '전동 툴'이란 용어는 플러그를 콘센트에
연결해 유선 상태로 사용하는 제품 또는 배터리를 넣어 무선
상태로 사용하는 제품을 가리킵니다.
1) 작업 공간 안전
a) 작업 공간을 깨끗하게 청소하고 조명을 밝게
유지하십시오.
작업 공간이 정리되어 있지 않거나 어두우면 사고가
날 수 있습니다.
b) 인화성 액체나 기체 또는 먼지 등으로 인해 폭발
위험이 있는 환경에서는 전동 툴을 사용하지
마십시오.
전동 툴을 사용하다 보면 불꽃이 튀어서 먼지나
기체에 불이 붙을 수 있습니다.
c) 어린이를 비롯하여 사용자 외에는 작업장소에
접근하지 못하도록 하십시오.
주의가 산만해지면 문제가 생길 수 있습니다.
2) 전기 사용시 주의사항
a) 전동 툴 플러그와 콘센트가 일치해야 합니다.
플러그를 절대로 변형하지 마십시오.
접지된 전동 툴에는 어댑터 플러그를 사용하지
마십시오.
플러그를 변형하지 않고 알맞은 콘센트에 꽂아
사용하면, 감전 위험을 줄일 수 있습니다.
b) 파이프, 라디에이터, 레인지, 냉장고 등 접지된
표면에 몸이 닿지 않도록 주의하십시오.
작업자의 몸이 접지되면, 감전될 위험이 있습니다.
c) 전동 툴에 비를 맞히거나 젖은 상태로 두지 마십시오.
물이 들어가면 감전될 위험이 있습니다.
d) 코드를 조심해서 다루십시오. 전동 툴을 들거나
당기거나 콘센트에서 뽑으려고 할 때 코드를
잡아당기면 안 됩니다.
열, 기름, 날카로운 물건, 움직이는 부품 등으로부터
코드를 보호하십시오.
코드가 파손되거나 엉키면 감전될 위험이
높아집니다.
e) 실외에서 전동 툴을 사용할 때는 실외 용도에 적합한
연장선을 사용하십시오.
실외 용도에 적합한 코드를 사용해야 감전 위험이
줄어듭니다.
f) 눅눅한 곳에서 전동 툴을 작동해야 하는 경우
누전 차단기(RCD)로 보호된 전원 공급 장치를
사용하십시오.
RCD를 사용하면 감전 위험을 줄일 수 있습니다.
3) 사용자 주의사항
a) 전동 툴을 사용할 때는 작업에 정신을 집중하고,
상식의 범위 내에서 사용하십시오.
약물을 복용하거나 알코올을 섭취한 상태 또는
피곤한 상태에서는 전동 툴을 사용하지 마십시오.
전동 툴을 사용할 때 주의가 흐트러지면 심각한
부상을 입을 수 있습니다.
b) 개인 보호 장비를 사용하십시오. 항상 눈 보호
장구를 착용해야 합니다.
먼지 보호 마스크, 미끄럼 방지 신발, 안전모, 청각
보호 장비 등을 사용하면 부상을 줄일 수 있습니다.
c) 실수로 툴 을 가 동하 지 않 도록 주 의하 십시오 . 전 원 및 /
또는 배터리 팩을 연결하거나 툴을 들거나 운반하기
전에 스위치가 OFF 위치에 있는지 확인하십시오.
손가락을 스위치에 접촉한 채 전동 툴을 들거나
스위치가 켜진 상태로 전원을 연결하면 사고가 날 수
있습니다.
d) 전원을 켜기 전에 조정 키 또는 렌치를 반드시
제거해야 합니다.
전동 툴의 회전 부위에 키 또는 렌치가 부착되어
있으면, 부상을 입을 수 있습니다.
e) 작업 대상과의 거리를 잘 조절하십시오. 알맞은
발판을 사용하고 항상 균형을 잡고 있어야 합니다.
그렇게 하면 예기치 못한 상황에서도 전동 툴을 잘
다룰 수 있습니다.
f) 알맞은 복장을 갖추십시오. 헐렁한 옷이나 장신구를
착용하면 안 됩니다. 머리카락, 옷, 장갑 등을
움직이는 부품으로부터 보호하십시오.
헐렁한 옷이나 장신구, 긴 머리카락이 부품에 딸려
들어갈 수도 있습니다.
g) 분진 추출 및 집진 장비에 연결할 수 있는 장치가
제공되는 경우, 그러한 장치가 잘 연결되어 있고
제대로 작동하는지 확인하십시오.
이러한 장치를 사용하면, 먼지와 관련된 사고를 줄일
수 있습니다.
4) 전동 툴 사용 및 관리
a) 전동 툴을 아무 곳에나 사용하지 마십시오. 용도에
알맞은 전동 툴을 사용하십시오.
적절한 전동 툴을 사용하면, 정상 속도로 안전하고
효과적으로 작업을 수행할 수 있습니다.
b) 스위치를 눌렀을 때 전동 툴이 켜지거나 꺼지지
않으면 사용하지 마십시오.
스위치로 작동시킬 수 없는 전동 툴은 위험하므로,
수리를 받아야 합니다.
c) 전동 툴을 조정하거나 부속품을 바꾸거나 보관할
때는 반드시 전원에서 플러그를 빼거나 전동 툴에서
배터리 팩을 분리해야 합니다.
이러한 안전 조치를 취해야 전동 툴이 갑자기 켜지는
위험을 피할 수 있습니다.
d) 사용하지 않는 전동 툴은 어린이의 손이 닿지 않는
곳에 보관하고, 사용법을 잘 모르는 사람이 사용하지
못하도록 하십시오.
전동 툴은 미숙련자가 다루기에는 매우 위험한
물건입니다.
e) 전동 툴을 잘 관리하십시오. 움직이는 부품이 잘못
결합되어 있거나 꽉 끼어 움직이지 못하게 되어 있지
않은지 점검하십시오. 또한 전동 툴의 작동에 영향을
미칠 수 있는 기타 파손이 없는지 확인하십시오.
파손된 부분이 있는 경우, 사용하기 전에
수리하십시오.
전동 툴을 제대로 관리하지 못해서 생기는 사고가
많습니다.
f) 절삭 툴은 날카롭고 청결한 상태로 관리하십시오.
절삭 날을 날카로운 상태로 잘 관리하면, 원활하게
잘 움직이며 다루기도 훨씬 편합니다.
g) 작업 환경과 수행할 작업의 성격을 고려해서
설명서를 참조하여 전동 툴과 부속품, 툴 비트 등을
사용하십시오.
원래 목적과 다른 용도로 전동 툴을 사용하면 위험한
사고가 날 수 있습니다.
5) 서비스
a) 자격을 갖춘 전문가에게 서비스를 받고, 항상 원래
부품과 동일한 것으로 교체해야 합니다.
그렇게 하면 전동 툴을 보다 안전하게 사용할 수
있습니다.

한국어
11
사양
전압(지역별로 차이가 있음)
*
(110 V, 220 V, 230 V, 240 V)
소비 전력 450 W
*
무부하 속도 0 - 3200 /분
드릴 척 작업 능력 10 mm
작업 능력
강철 10 mm
목재 25 mm
중량(코드 제외) 1.2 kg
* 지역별로 차이가 있을 수 있으므로, 제품 명판의 기재내용을 반드시 확인하십시오.
기본 부속품
○ 척 렌치(키 없는 척에만 적용되는 규격) .................1
기본 부속품은 예고 없이 변경될 수 있습니다.
용도
○ 금속, 목재 및 플라스틱에 구멍 뚫기.
사용 전 주의사항
1. 전원
사용 전원이 제품 명판에 표시된 전원 요건과 부합하는지
확인하십시오.
2. 전원 스위치
전원 스위치가‘OFF’위치에 있는지 확인하십시오. 전원
스위치가‘ON’위치에 있는 상태로 플러그를 꽂으면,
제품이 갑자기 작동하기 시작해서 심각한 사고가 날 수
있습니다.
3. 연장선
작업 공간에 전원이 없으면, 두께가 충분한 정격 용량의
연장선을 사용하십시오. 연장선은 가능한 한 짧을수록
좋습니다.
4. 적합한 드릴 비트 선택
○ 금속 또는 플라스틱에 구멍을 뚫을 때
일반 금속 작업용 드릴 비트를 사용하십시오.
○ 목재에 구멍을 뚫을 때
보통 목재 작업용 드릴 비트를 사용하십시오.
그러나 6.5 mm 이하의 구멍을 뚫을 때 금속 작업용
드릴 비트를 사용하십시오.
5. 비트의 장착과 제거
키 있는 척의 경우 (그림 1)
(1) 척 조를 열고 비트를 척에 삽입하십시오.
(2) 척 렌치를 척에 있는 세 개의 구멍 각각에 넣고
시계 방향으로 돌리십시오(앞쪽에서 볼 때). 단단히
조이십시오.
(3) 비트를 제거하려면 척 렌치를 척에 있는 구멍들 가운데
하나에 넣고 시계 반대 방향으로 돌리십시오.
키 없는 척의 경우 (그림 2)
(1) 척 조를 열고 비트를 척에 삽입하십시오.
척 조를 열려면 슬리브를 시계 반대 방향으로 돌리면서
링을 고정하십시오(앞쪽에서 볼 때).
(2) 링을 단단히 잡고 슬리브를 시계 방향으로 돌리십시오.
단단히 조이십시오.
(3) 비트를 제거하려면 링을 단단히 잡고 슬리브를 시계 반대
방향으로 돌리십시오.
(4) 슬리브를 풀기 어려울 경우, 오픈 엔드 렌치를 사용하여
스핀들을 고정하고 슬리브를 단단히 잡고 푸는 방향으로
돌리십시오(정면에서 볼 때 시계 반대 방향). (그림 3)
6. 회전 방향 점검(그림 4)
비트는 회전식 전환 레버를 R 표시쪽으로 돌리면 시계 방
향으로(뒤쪽에서 볼 때) 회전합니다.
회전식 전환 레버가 L 표시쪽으로 돌아가 비트를 시계 반
대 방향으로 회전시킵니다.
(
및 표시는 바디에 있습니다.)
사용법
1. 스위치 작동
○ 트리거를 누르면 툴이 회전합니다. 트리거를 놓으면 툴이
정지합니다.
○ 작동 스위치를 누르는 양을 조절해 드릴의 회전 속도를
조절할 수 있습니다.
작동 스위치를 살짝 누르면 속도가 감소하고 작동
스위치를 더 많이 누르면 속도가 증가합니다.
○ 트리거를 잡아당기고 밀면 연속 작동에 편리한 전원
켜짐 상태가 유지됩니다. 스위치를 끄면 트리거를 다시
잡아당겨 스토퍼를 분리할 수 있습니다. (그림 5)
2. 드릴링
○ 드릴링할 때, 드릴을 느리게 시동한 후 드릴링 작업을
하면서 속도를 서서히 높이십시오.
주의사항
어린이나 노약자가 가까이 오지 못하도록 하십시오.
전동 툴을 사용하지 않을 때는 어린이나 노약자의 손이 닿지
않는 곳에 보관해야 합니다.
임팩트 드릴 사용 시의 주의사항
1. 함께 제공될 경우 보조 핸들을 사용하십시오.
통제력을 상실하면 상해를 입을 수 있습니다.
2. 커팅 액세서리가 숨은 배선 또는 자체 코드와 접촉할
수 있을 경우 작업할 때 전동 툴을 절연된 그립 면을
잡아 고정하십시오. 커팅 액세서리가 "전기가 흐르는"
전선에 접촉하면 전동 툴의 노출 금속부에 "전기가 흘러"
조작자가 감전될 수 있습니다.
3. 사용 시 드릴을 단단히 잡으십시오.
4. 면, 모, 천 또는 끈과 같이 말려 올라가기 쉬운 재료로
만든 장갑을 착용하지 마십시오.
5. 벽, 천장 또는 바닥에 구멍을 뚫기 전에 전력 케이블 또는
관로가 매립되어 있지 않은지 확인하십시오.
6. 이 툴을 사용해 나사, 볼트 등을 조이거나 풀지 마십시오.
툴이 손상되거나 상해를 입을 수 있습니다.

12
한국어
○ 항상 비트로 직선으로 힘을 가하십시오. 충분한 힘을
가해 드릴링하되 모터가 정지되거나 비트가 비끼게 될
정도로 세게 밀지 마십시오.
○ 모터 정지 또는 작업물 파손을 최소화하려면, 드릴에
가하는 힘을 줄이고, 비트 속도를 늦춰 구멍을
뚫으십시오.
○ 드릴이 정지할 경우, 트리거를 즉시 해제하고 비트를
작업물에서 제거한 후 다시 시작하십시오. 정지한
드릴을 시동하기 위해서 트리거를 눌러 켰다 껐다 하지
마십시오. 드릴이 손상될 수 있습니다.
○ 드릴 비트 직경이 클수록 팔에 가해지는 반동력이
큽니다.
반동력에 의해 드릴 통제력을 잃지 않도록 주의하십시오.
드릴 통제력을 유지하려면, 바른 자세로 서서 드릴을
양손으로 단단히 잡고 드릴을 드릴링할 작업물에 수직이
되게 하십시오.
관리 및 검사
1. 드릴 비트 검사
마모된 드릴 비트를 사용하면 모터가 오작동하여
손상되므로, 마모가 발견되는 즉시 새 드릴 비트로
교체하거나 다시 날카롭게 갈아 주십시오.
2. 부착 나사 검사
정기적으로 모든 부착 나사를 검사하고 잘 고정되어
있는지 확인합니다. 느슨한 나사가 있는 경우, 즉시 꽉
조여야 합니다. 그렇게 하지 않으면 심각한 사고가 날 수
있습니다.
3. 모터 유지보수
모터 유닛 권선은 전동 툴의 "핵심"입니다. 적절히
관리하여 권선이 손상되지 않거나 오일 또는 물에 젖지
않게 하십시오.
4. 카본 브러시 검사
지속적인 안전 및 감전 보호를 위해서는 이 공구의
카본 브러시 검사 및 교환은 히타치 공인 서비스 센터에
의해서만 수행되어야 합니다.
5. 전원 코드 교체
전원 코드 교체가 필요할 경우, 안전 위험을 방지하기
위해서 공식 Hitachi 서비스가 전원 코드를 교체해야
합니다.
6. 서비스 부품 정보
주의
Hitachi 전동 툴의 수리, 변경 및 검사는 반드시 공식
Hitachi 서비스 센터를 통해서 해야 합니다.
공식 Hitachi 서비스 센터에 수리 또는 기타 점검을
요청할 때 툴과 함께 부품 정보를 제공하면 도움이
됩니다.
전동 툴을 사용하거나 점검할 때는 각국의 안전 수칙 및
규정을 준수해야 합니다.
변경
Hitachi 전동 툴은 개선 및 수정을 통해 끊임없이 최신
기술 발전을 반영하고 있습니다.
따라서 일부 부품은 사전 예고 없이 변경될 수 있습니다.
참고
HITACHI는 지속적인 연구개발 프로그램을 진행하고
있으므로, 본 설명서의 사양은 사전 예고 없이 변경될 수
있습니다.

Tiếng Việt
13
CÁC NGUYÊN TẮC AN TOÀN CHUNG
CẢNH BÁO!
Hãy đọc tất cả các cảnh báo an toàn và tất cả các
hướng dẫn.
Việc không tuân theo các cảnh báo và hướng dẫn có thể
dẫn đến bị điện giật, cháy và/hoặc bị thương nghiêm trọng.
Giữ lại tất cả các cảnh báo và hướng dẫn để tham
khảo trong tương lai.
Thuật ngữ "dụng cụ điện" có trong các cảnh báo đề cập
đến dụng cụ đ
iện (có dây) điều khiển bằng tay hoặc dụng
cụ điện (không dây) vận hành bằng pin.
1) Khu vực làm việc an toàn
a) Giữ khu vực làm việc sạch và đủ ánh sáng.
Khu vực làm việc tối tăm và bừa bộn dễ gây tai nạn.
b) Không vận hành dụng dụ điện trong khu vực
dễ cháy nổ, chẳng hạn như nơi có chất lỏng dễ
cháy, khí đốt hoặc bụi khói.
Các dụng d
ụ điện tạo tia lửa nên có thể làm bụi khói
bén lửa.
c) Không để trẻ em và những người không phận
sự đứng gần khi vận hành dụng dụ điện.
Sự phân tâm có thể khiến bạn mất kiểm soát.
2) An toàn về điện
a) Phích cắm dụng cụ điện phải phù hợp với ổ
cắm. Không bao giờ được cải biến phích cắm
dưới mọ
i hình thức. Không được sử dụng
phích tiếp hợp với dụng cụ điện nối đất (tiếp
đất).
Phích cắm nguyên bản và ổ cắm điện đúng loại sẽ
giảm nguy cơ bị điện giật.
b) Tránh để cơ thể tiếp xúc với các bề mặt nối đất
hoặc tiếp đất như đường ống, lò sưởi, bếp ga
và t
ủ lạnh.
Có nhiều nguy cơ bị điện giật nếu cơ thể bạn nối
hoặc tiếp đất.
c) Không để các dụng cụ điện tiếp xúc với nước
mưa hoặc ẩm ướt.
Nước thấm vào dụng cụ điện sẽ làm tăng nguy cơ
bị điện giật.
d) Không được lạm dụng dây dẫn điện. Không
bao giờ nắm dây để xách, kéo hoặc rút dụng cụ
điện. Để dây cách xa nơi có nhiệt độ cao, trơn
trượt, vật sắc cạnh hoặc bộ phận chuyển động.
Dây bị hư hỏng hoặc rối sẽ làm tăng nguy cơ bị điện
giật.
e) Khi vận hành dụng cụ điện ở ngoài trời, hãy sử
dụng dây nối thích hợp cho việc sử dụ
ng ngoài
trời.
Sử dụng dây nối ngoài trời thích hợp làm giảm nguy
cơ bị điện giật.
f) Nếu không thể tránh khỏi việc vận hành dụng
cụ điện ở một nơi ẩm thấp, thì hãy sử dụng thiết
bị dòng điện dư (RCD) được cung cấp để bảo
vệ.
Việc sử dụng một RCD làm giảm nguy cơ bị đi
ện
giật.
3) An toàn cá nhân
a) Luôn cảnh giác, quan sát những gì bạn đang
làm và phán đoán theo kinh nghiệm khi vận
hành dụng dụ điện.Không được sử dụng dụng
cụ điện khi mệt mỏi hoặc dưới ảnh hưởng của
rượu, ma túy hoặc dược phẩm.
Một thoáng mất tập trung khi vận hành dụng cụ
điện có thể dẫn đến chấn thương cá nhân nghiêm
trọng.
b) Sử
dụng thiết bị bảo vệ cá nhân. Luôn luôn đeo
kính bảo vệ mắt.
Thiết bị bảo vệ như mặt nạ ngăn bụi, giày an toàn
chống trượt, nón bảo hộ lao động, hoặc thiết bị bảo
vệ thính giác được sử dụng trong các điều kiện
thích hợp sẽ làm giảm các thương tích cá nhân.
c) Ngăn chặn việc vô tình mở máy. Đảm bảo rằng
công tắc đ
ang ở vị trí tắt trước khi kết nối đến
nguồn điện và/hoặc bộ nguồn pin, thu gom
hoặc mang vác công cụ.
Việc mang vác các công cụ điện khi ngón tay của bạn
đặt trên công tắc hoặc tiếp điện cho các công cụ điện
khiến cho công tắc bật lên sẽ dẫn đến các tai nạn.
d) Tháo mọi khóa điều chỉnh hoặc chìa vặn đai ốc
ra trước khi bật d
ụng cụ điện.
Chìa vặn đai ốc hoặc chìa khóa còn cắm trên một
bộ phận quay của dụng dụ điện có thể gây thương
tích cá nhân.
e) Không với tay quá xa. Luôn luôn đứng vững và
cân bằng.
Điều này giúp kiểm soát dụng cụ điện trong tình
huống bất ngờ tốt hơn.
f) Trang phục phù hợp. Không mặc quần áo rộng
lùng thùng hoặc đeo trang sức. Giữ tóc, quần áo
và gă
ng tay tránh xa các bộ phận chuyển động.
Quần áo rộng lùng thùng, đồ trang sức hoặc tóc dài
có thể bị cuốn vào các bộ phận chuyển động.
g) Nếu có các thiết bị đi kèm để nối máy hút bụi và
các phụ tùng chọn lọc khác, hãy đảm bảo các
thiết bị này được nối và sử dụng đúng cách.
Việc sử dụng các thiết bị này có thể làm giảm độc
hại do bụi gây ra.
4) Sử d
ụng và bảo dưỡng dụng cụ điện
a) Không được ép máy hoạt động quá mức. Sử
dụng đúng loại dụng cụ điện phù hợp với công
việc của bạn.
Dụng cụ điện đúng chủng loại sẽ hoàn thành công
việc tốt và an toàn hơn theo đúng tiêu chí mà máy
được thiết kế.
b) Không sử dụng dụng cụ điện nếu công tắc
không t
ắt hoặc bật được.
Bất kỳ dụng cụ điện nào không thể điều khiển được
bằng công tắc đều rất nguy hiểm và phải được sửa
chữa.
c) Luôn rút phích cắm ra khỏi nguồn điện và/hoặc
bộ nguồn pin khỏi các công cụ điện trước khi
thực hiện bất kỳ điều chỉnh, thay đổi phụ tùng,
hoặc c
ất giữ dụng cụ điện nào.
Những biện pháp ngăn ngừa như vậy giúp giảm
nguy cơ dụng cụ điện khởi động bất ngờ.
d) Cất giữ dụng cụ điện không sử dụng ngoài tầm
tay trẻ em và không được cho người chưa quen
sử dụng dụng cụ điện hoặc chưa đọc hướng
dẫn sử dụ
ng này vận hành dụng cụ điện.
Dụng cụ điện rất nguy hiểm khi ở trong tay người
chưa được đào tạo cách sử dụng.
e) Bảo dưỡng dụng cụ điện. Kiểm tra đảm bảo các
bộ phận chuyển động không bị xê dịch hoặc
mắc kẹt, các bộ phận không bị rạn nứt và kiểm
tra các điều kiện khác có thể
ảnh hưởng đến
quá trình vận hành máy. Nếu bị hư hỏng, phải
sửa chữa dụng cụ điện trước khi sử dụng.
Nhiều tai nạn xảy ra do bảo quản dụng dụ điện kém.
f) Giữ các dụng cụ cắt sắc bén và sạch sẽ.
Dụng cụ cắt có cạnh cắt bén được bảo quản đúng
cách sẽ ít khi bị kẹt và dễ đ
iều khiển hơn.
g) Sử dụng dụng cụ điện, các phụ tùng và đầu cài,
v.v…đúng theo những chỉ dẫn này, lưu ý đến các
điều kiện làm việc và công việc phải thực hiện.
Vận hành dụng cụ điện khác với mục đích thiết kế
có thể dẫn đến các tình huống nguy hiểm.

14
Tiếng Việt
5) Bảo dưỡng
a) Đem dụng cụ điện của bạn đến thợ sửa chữa
chuyên nghiệp để bảo dưỡng, chỉ sử dụng các
phụ tùng đúng chủng loại để thay thế.
Điều này giúp đảm bảo duy trì tính năng an toàn
của dụng cụ điện.
PHÒNG NGỪA
Giữ trẻ em và những người không phận sự tránh xa
dụng cụ.
Khi không sử
dụng, các dụng cụ điện phải được cất
giữ tránh xa tầm tay trẻ em và người không phận sự.
PHÒNG NGỪA KHI SỬ DỤNG MÁY KHOAN
ĐỘNG LỰC
1. Sử dụng (các) tay nắm phụ nếu kèm theo máy.
Mất kiểm soát máy có thể gây ra thương tích cá nhân.
2. Giữ dụng cụ điện ở phần tay cầm cách điện khi thực
hiện công việc mà phụ tùng cắt có thể tiếp xúc với
các dây điện ngầm hoặc dây của chính dụng cụ. Phụ
tùng cắt khi tiếp xúc với dây dẫn “có điện” có thể làm cho
các bộ phận kim loại hở
của dụng cụ trở thành “có điện”
và gây giật điện cho người vận hành.
3. Giữ chặt máy khoan khi vận hành.
4. Không được đeo găng tay làm bằng vật liệu dễ cuốn lại
như sợi bông, len, vải hoặc xơ, v.v…
5. Trước khi khoan vào tường, trần hoặc sàn nhà, hãy đảm
bảo là không có dây cáp hoặc ống dẫn điện chạy ngầm
bên trong.
6. Không sử dụng dụng cụ để b
ắt vít hoặc nới lỏng đinh ốc,
bulông, v.v…
Việc này có thể gây hư hỏng cho dụng cụ hoặc gây chấn
thương cho người.
THÔNG SỐ KỸ THUẬT
Điện áp (theo khu vực)*
(110 V, 220 V, 230 V, 240 V)
Công suất
450 W*
Tốc độ không tải
0 – 3200 /phút
Công suất mâm cặp máy khoan
10 mm
Công suất
Thép 10 mm
Gỗ 25 mm
Trọng lượng (không tính dây)
1,2 kg
* Lưu ý luôn kiểm tra nhãn mác trên sản phẩm vì thông số này có thể thay đổi theo khu vực.
CÁC PHỤ TÙNG TIÊU CHUẨN
○ Chìa vặn mâm cặp (Thông số dành riêng cho mâm cặp
không dùng chìa) ......................................................... 1
Phụ tùng tiêu chuẩn có thể thay đổi mà không báo trước.
ỨNG DỤNG
○ Khoan lỗ trên kim loại, gỗ và nhựa.
TRƯỚC KHI VẬN HÀNH
1. Nguồn điệne
Đảm bảo rằng nguồn điện sử dụng phù hợp với yêu cầu
nguồn điện có trên nhãn mác sản phẩm.
2. Công tắc điện
Đảm bảo rằng công tắc điện nằm ở vị trí OFF. Nếu nối
phích cắm với ổ cắm trong khi công tắc điện ở vị trí ON,
dụng cụ điện sẽ b
ắt đầu hoạt động ngay lập tức và có
thể gây tai nạn nghiêm trọng.
3. Dây nối dài
Khi khu vực làm việc ở cách xa nguồn điện, sử dụng một
dây nối đủ dày và điện dung phù hợp. Kéo dây nối càng
ngắn càng tốt.
4. Chọn mũi khoan thích hợp
○ Khi khoan kim loại hoặc nhựa
Sử dụng mũi khoan kim loại thông thường.
○ Khi khoan gỗ
Sử dụng mũi khoan gỗ thông thường.
Tuy nhiên, khi khoan lỗ
6,5 mm hoặc nhỏ hơn, sử dụng
mũi khoan kim loại.
5. Lắp và tháo mũi khoan.
Đối với mâm cặp dùng chìa (Hình 1)
(1) Mở vấu mâm cặp, và gắn mũi khoan vào mâm cặp.
(2) Gắn chìa vặn mâm cặp lần lượt vào từng lỗ trong ba lỗ
trên mâm cặp và vặn theo chiều kim đồng hồ (nhìn từ
phía trước). Siết chặt.
(3) Để tháo mũi khoan, gắn chìa vặn mâm cặp lần lượt vào
từng lỗ trong ba lỗ trên mâm cặp và vặn ngược chiều
kim đồng hồ.
Đối với mâm cặp không dùng chìa
(Hình 2)
(1) Mở vấu mâm cặp, và gắn mũi khoan vào mâm cặp.
Để mở vấu mâm cặp, giữ chặt vành đai ngoài đồng thời
vặn khớp nối trong ngược chiều kim đồng hồ (nhìn từ
phía trước).
(2) Giữ chặt vành đai ngoài và vặn khớp nối trong theo
chiều kim đồng hồ. Siết chặt.
(3) Để tháo mũi khoan, giữ chặt vành đai ngoài và vặn khớp
nối trong ng
ược chiều kim đồng hồ.
(4) Nếu khó nới lỏng khớp nối trong, hãy chỉnh cần trục
bằng cách sử dụng chìa vặn hai đầu, giữ khớp nối trong
thật chặt và vặn theo hướng nới lỏng (ngược chiều kim
đồng hồ nếu nhìn từ phía trước). (Hình 3)
6. Kiểm tra hướng xoay (Hình 4)
Mũi khoan xoay theo chiều kim đồng hồ (nhìn từ phía
sau) khi đẩy cần chuyển đổi chế độ xoay sang vị
trí R.
Gạt cần chuyển đổi chế độ xoay lại về vị trí L để mũi
khoan xoay ngược chiều kim đồng hồ.
(Dấu
và được khắc trên thân máy).

Tiếng Việt
15
CÁCH SỬ DỤNG
1. Điều chỉnh công tắc
○ Khi ấn cần khởi động, dụng cụ sẽ xoay.
Khi nhả cần khởi động, dụng cụ ngừng.
○ Tốc độ xoay của máy khoan có thể được kiểm soát bằng
cách thay đổi lực kéo công tắc khởi động.
Khi kéo nhẹ công tắc khởi động thì tốc độ xoay thấp và kéo
công tắc khởi động mạnh hơn thì tốc độ xoay tăng lên.
○ Kéo công t
ắc khởi động đồng thời đẩy nút hãm, thao tác
này giúp duy trì điều kiện vận hành thuận tiện khi máy
hoạt động liên tục. Khi tắt máy, nhả nút hãm bằng cách
kéo cần khởi động lần nữa. (Hình 5)
2. Khoan
○ Khi khoan, hãy bắt đầu khoan chậm rãi và tăng dần đến
khi đạt tốc độ như mong muốn.
○ Luôn tác dụng lực theo một đường thẳng với mũi khoan.
Sử dụng đủ lực
để duy trì quá trình khoan nhưng không
được đẩy quá mạnh vì sẽ làm động cơ chết máy hoặc
làm lệch mũi khoan.
○ Để tránh dụng cụ bị kẹt hoặc làm bể vỡ vật liệu, hãy
giảm lực tác dụng lên máy khoan và nới lỏng mũi khoan
qua phần cuối của lỗ.
○ Nếu máy khoan bị kẹt, hãy nhả công tắc khởi động ra
ngay lập tức, lấy mũi khoan ra khỏi vật liệu và bắ
t đầu
lại. Đừng cố gắng nhấn nút bật hoặc tắt công tắc để khởi
động lại máy khoan đang bị kẹt. Thao tác này có thể gây
hư hỏng cho máy khoan.
○ Mũi khoan có kích thước càng lớn thì phản lực lên tay
càng mạnh.
Hãy cẩn thận đừng để mất kiểm soát máy khoan vì phản
lực này.
Để giữ chặt dụng cụ, hãy tạo thế đứng vững, giữ máy
khoan chặt bằ
ng cả hai tay và đảm bảo là máy khoan
nằm thẳng theo chiều dọc với vật liệu cần khoan.
BẢO DƯỠNG VÀ KIỂM TRA
1. Kiểm tra các mũi khoan
Vì sử dụng mũi khoan đã mòn sẽ gây trục trặc cho động
cơ và giảm năng suất, do đó hãy thay mới mũi khoan
hoặc mài mũi khoan ngay khi nhận thấy mũi khoan bị
mài mòn.
2. Kiểm tra các đinh ốc đã lắp
Thường xuyên kiểm tra tất cả các đinh ốc đã lắp và
đảm bảo rằng chúng được siết chặt. Nếu có bất kỳ đinh
ố
c nào bị nới lỏng, siết chặt lại ngay lập tức. Nếu không
làm như vậy có thể gây nguy hiểm nghiêm trọng.
3. Bảo dưỡng động cơ
Cuộn dây động cơ là "trái tim" của dụng cụ điện. Kiểm
tra và bảo dưỡng để đảm bảo cuộn dây không bị hư
hỏng và/hoặc ẩm ướt do dính dầu nhớt hoặc nước.
4. Kiểm tra chổi than
Để bảo v
ệ an toàn lâu dài và tránh sốc điện, việc kiểm tra
và thay mới chổi than CHỈ được thực hiện bởi TRUNG
TÂM DỊCH VỤ ỦY QUYỀN HITACHI.
5. Thay dây nguồn
Nếu cần thay mới dây nguồn, bạn phải mang đến Trung
tâm Bảo hành Ủy quyền của Hitachi để đảm bảo an
toàn.
6. Danh sách phụ tùng bảo dưỡng
CẢNH BÁO
Sửa chữa, biến cải và kiểm tra Dụng cụ điện Hitachi phải
được thực hiện bởi một Trung tâm Dịch vụ Ủy quyền
của Hitachi.
Cung cấp Danh sách phụ tùng kèm theo dụng cụ cho
Trung tâm dịch vụ ủy quyền Hitachi là rất hữu ích khi yêu
cầu sửa chữa hoặc bảo dưỡng.
Trong khi vận hành và bảo trì dụng cụ điện, phải tuân
theo các nguyên tắc an toàn và tiêu chuẩn quy định của
từng quốc gia.
SỬA ĐỔI
Dụng cụ điện Hitachi không ngừ
ng được cải thiện và
sửa đổi để thích hợp với các tiến bộ kỹ thuật mới nhất.
Theo đó, một số bộ phận (vd: mã số và/hoặc thiết kế) có
thể được thay đổi mà không cần thông báo trước.
CHÚ Ý
Do chương trình nghiên cứu và phát triển liên tục của
Hitachi, các thông số kỹ thuật nêu trong tài liệu này có thể
thay đổi mà không thông báo trước.

16
/
“”
() ()
1)
a)
b)
c)
2)
a)
b)
c)
d)
e)
f)
(RCD)
3)
a)
b)
c)
/
d)
e)
f)
g)
4)
a)
b)
c) /
d)
e)
f)
g)

17
5)
a)
1.
2.
"
"
""
3.
4.
5. ,
6.
()* (110 , 220 , 230 , 240 )
450 *
0 – 3200/
10 .
10 .
25 .
()1.2 .
*
○ () ...........................1
○ ,
1.
2.
OFF
ON
3.
4. :
○
○
6.5 .
5.
( 1)
(1)
(2) 1 3 (
)
(3) 1 3
( 2)
(1)
()
(2)
(3)
(4)
(
) ( 3)
18
6. ( 4)
()
R
L
(
)
1.
○
○
○
( 5)
2.
○
○
○
○
○
1.
2.
3.
/
4.
""
5.
6.

Bahasa Indonesia
19
PERINGATAN UMUM KESELAMATAN
PENGGUNAAN PERKAKAS LISTRIK
PERINGATAN
Bacalah semua peringatan keselamatan dan semua
petunjuk.
Tidak mematuhi peringatan dan petunjuk dapat
mengakibatkan sengatan listrik, kebakaran, dan/atau cedera
serius.
Simpan semua peringatan dan petunjuk untuk rujukan
di masa yang akan datang.
Istilah “perkakas listrik” dalam peringatan merujuk pada
perkakas listrik yang dioperasikan dengan daya listrik
(dengan kabel) atau perkakas listrik yang dioperasikan
dengan daya baterai (tanpa kabel).
1) Keselamatan area kerja
a) Jaga agar area kerja tetap bersih dan
berpencahayaan cukup.
Area yang berantakan atau gelap dapat mengundang
kecelakaan.
b) Jangan operasikan perkakas listrik pada
lingkungan yang mudah meledak, seperti
di tempat yang memiliki cairan yang mudah
terbakar, gas, atau debu.
Perkakas listrik menghasilkan percikan api yang
dapat menyalakan debu atau gas.
c) Jauhkan anak-anak dan orang-orang yang ada
di sekitar saat mengoperasikan perkakas listrik.
Gangguan dapat mengakibatkan Anda kehilangan
kendali.
2) Keselamatan listrik
a) Colokan perkakas listrik harus sama dengan
stopkontak.
Jangan pernah sama sekali mengubah colokan
karena alasan apa pun.
Jangan pakai colokan adaptor apa pun dengan
perkakas listrik yang dibumikan (diardekan).
Colokan yang tidak dimodifi kasi dan outlet yang
cocok akan mengurangi risiko sengatan listrik.
b) Hindari sentuhan tubuh dengan permukaan
yang dibumikan atau diardekan, seperti pipa,
radiator, kompor dan kulkas.
Risiko sengatan listrik semakin besar jika tubuh Anda
dibumikan atau diardekan.
c) Jauhkan perkakas listrik dari hujan atau kondisi
basah.
Air yang masuk ke dalam perkakas listrik dapat
meningkatkan risiko sengatan listrik.
d) Jangan menyalahgunakan kabel. Jangan pernah
sekali-kali memakai kabel untuk mengangkut,
menarik, atau melepaskan colokan perkakas
listrik.
Jauhkan kabel dari panas, minyak, tepi yang
tajam, atau benda-benda yang bergerak.
Kabel yang rusak atau semrawut meningkatkan risiko
sengatan listrik.
e) Saat mengoperasikan perkakas listrik di luar
ruangan, pakai kabel ekstensi yang sesuai untuk
digunakan di luar ruangan.
Penggunaan kabel yang cocok untuk penggunaan di
luar ruang mengurangi risiko sengatan listrik.
f) Jika mengoperasikan perkakas listrik di
lingkungan yang lembap tidak dapat dihindari,
gunakan pasokan listrik yang terlindungi oleh
perangkat arus residual (RCD).
Penggunaan RCD mengurangi risiko sengatan listrik.
3) Keselamatan pribadi
a) Tetaplah waspada, lihat apa yang Anda kerjakan,
dan gunakan akal sehat saat mengoperasikan
perkakas listrik.
Jangan gunakan perkakas listrik saat Anda lelah
atau di bawah pengaruh obat-obatan, alkohol,
atau pengobatan.
Hilangnya perhatian sesaat saat mengoperasikan
perkakas listrik dapat mengakibatkan cedera pribadi
yang serius.
b) Penggunaan peralatan pelindung pribadi. Pakai
selalu pelindung mata.
Peralatan pribadi seperti masker debu, sepatu
keselamatan anti licin, topi proyek, atau pelindung
pendengaran yang dipakai untuk kondisi yang sesuai
akan mengurangi cedera pribadi.
c) Cegah penyalaan yang tidak diinginkan.
Pastikan sakelar berada di posisi mati sebelum
menyambungkan ke sumber dan/atau paket
baterai, mengangkat atau membawa perkakas.
Membawa perkakas listrik dengan jari pada
sakelar atau menyalakan perkakas listrik daya
yang sakelarnya masih aktif dapat mengundang
kecelakaan.
d) Lepaskan tombol kunci penyesuai atau kunci
pas sebelum menyalakan perkakas listrik.
Kunci pas atau kunci yang dibiarkan terpasang
pada bagian perkakas listrik yang berputar dapat
mengakibatkan cedera pribadi.
e) Jangan menjangkau secara berlebihan. Jaga
agar posisi kaki tetap kokoh dan seimbang
sepanjang waktu.
Hal ini akan memungkinkan kendali perkakas listrik
yang lebih baik jika situasi yang tidak diharapkan terjadi.
f) Berpakaian dengan benar. Jangan memakai
pakaian yang longgar atau perhiasan. Jauhkan
rambut, pakaian, dan sarung tangan dari bagian-
bagian yang bergerak.
Pakaian yang longgar, perhiasan, atau rambut yang
panjang dapat terperangkap dalam bagian-bagian
yang bergerak.
g) Jika perangkat untuk mengambil dan
mengumpulkan debu disediakan, pastikan
perangkat tersebut telah tersambung dan
digunakan dengan benar.
Penggunaan alat pengumpul debu dapat mengurangi
bahaya terkait debu.
4) Penggunaan dan perawatan perkakas listrik
a) Jangan gunakan perkakas listrik secara paksa.
Gunakan perkakas listrik yang sesuai untuk
penggunaan Anda.
Perkakas listrik yang sesuai akan melakukan
fungsinya dengan benar dan lebih aman sesuai
dengan kegunaannya.
b) Jangan gunakan perkakas listrik jika sakelar
tidak bisa dinyalakan dan dimatikan.
Perkakas listrik mana saja yang sakelarnya rusak
tidak dapat dikendalikan dan membahayakan serta
harus diperbaiki.
c) Lepaskan colokan dari sumber daya dan/atau
baterai dari perkakas listrik sebelum melakukan
penyesuaian, mengganti aksesori, atau
menyimpan perkakas listrik.
Tindakan keselamatan pencegahan seperti itu
mengurangi risiko menyalanya perkakas listrik
secara tidak sengaja.
d) Simpan perkakas listrik yang tidak dipakai dari
jangkauan anak-anak dan jangan izinkan orang yang
tidak mengerti penggunaan perkakas listrik atau
petunjuk ini untuk mengoperasikan perkakas listrik.
Bahasa Indonesia
20
Perkakas listrik berbahaya jika berada di tangan
pengguna yang tidak terlatih.
e) Merawat perkakas listrik. Periksa bagian yang
tidak selaras atau macet, komponen yang
patah, dan kondisi lain apa pun yang dapat
memengaruhi pengoperasian perkakas listrik.
Jika rusak, perbaiki perkakas listrik sebelum
digunakan.
Banyak kecelakaan terjadi karena perkakas listrik
yang tidak dirawat dengan baik.
f) Jaga agar alat pemotong tetap tajam dan bersih.
Alat potong yang dirawat dengan baik dengan bilah
potong yang tajam kecil kemungkinannya macet dan
lebih mudah dikontrol.
g) Gunakan perkakas listrik, aksesori, mata
bor dll. sesuai dengan petunjuk ini, dengan
mempertimbangkan kondisi kerja dan pekerjaan
yang akan dilaksanakan.
Penggunaan perkakas listrik untuk pengoperasian
yang berbeda dengan yang diinginkan dapat
mengakibatkan situasi berbahaya.
5) Servis
a) Servislah perkakas listrik Anda oleh teknisi
perbaikan yang berkualifi kasi hanya
menggunakan komponen pengganti yang
identik.
Hal ini akan memastikan terjaganya keselamatan
penggunaan perkakas listrik.
TINDAKAN PENCEGAHAN
Jauhkan anak-anak dan orang yang tidak terkait.
Saat tidak dipakai, alat harus disimpan di luar
jangkauan anak-anak dan orang yang tidak terkait.
TINDAKAN PENCEGAHAN SAAT
MENGGUNAKAN BOR
1. Gunakan handel tambahan, apabila diberikan
bersama perkakas.
Kehilangan kendali dapat menyebabkan cedera pribadi.
2. Pegang bor listrik pada permukaan genggam
berinsulasi ketika melaksanakan pengoperasian di
mana aksesori pemotongannya dapat bersentuhan
dengan kabel tersembunyi atau kabelnya sendiri.
Aksesori pemotongan yang bersentuhan kabel "hidup"
dapat membuat bagian logam perkakas listrik yang
tersingkap menjadi "hidup" dan operator tersengat listrik.
3. Pegang bor dengan aman ketika menggunakannya.
4. Jangan menggunakan sarung tangan yang terbuat dari
bahan yang mudah tergulung seperti katun, wol, kain
atau tali, dll.
5. Sebelum mengebor dinding, langit-langit atau lantai,
pastikan tidak ada kabel listrik atau saluran pipa di
dalamnya.
6. Jangan menggunakan alat ini untuk mengencangkan
atau melonggarkan sekrup, baut, dll.
Jika tidak maka dapt menyebabkan kerusakan pada alat
atau cidera pribadi.
SPESIFIKASI
Voltase (menurut wilayah)* (110 V, 220 V, 230 V, 240 V)
Daya input 450 W*
Kecepatan tanpa beban 0 – 3200 /min
Kapasitas cengkam bor 10 mm
Kapasitas
Baja 10 mm
Kayu 25 mm
Berat (tanpa kabel) 1,2 kg
* Pastikan untuk memeriksa pelat nama pada produk karena dapat berubah bergantung wilayahnya.
AKSESORI STANDAR
○ Pemutar cengkam (Spesifi kasi. hanya untuk kepala
mesin bor tanpa pengunci) ..........................................1
Aksesori standar dapat berubah tanpa pemberitahuan.
PENGGUNAAN
○ Mengebor lubang dalam logam, kayu, dan plastik.
SEBELUM PENGGUNAAN
1. Sumber listrik
Pastikan bahwa sumber listrik yang akan digunakan
mematuhi persyaratan daya yang ditetapkan pada pelat
nama produk.
2. Sakelar daya
Pastikan bahwa sakelar daya berada dalam posisi MATI.
Jika colokan dihubungkan ke stopkontak saat tombol
sakelar dalam posisi HIDUP, perkakas listrik akan segera
menyala dan bisa mengakibatkan cedera serius.
3. Kabel ekstensi
Ketika area kerja jauh dari sumber listrik. Gunakan kabel
ekstensi dengan ketebalan yang cukup dan kapasitas
yang sesuai. Kabel ekstensi harus dibuat sependek
mungkin.
4. Memilih mata bor yang tepat
○ Saat mengebor logam atau plastik:
Pakai mata bor untuk pengerjaan logam seperti biasa.
○ Ketika mengebor kayu:
Pakai mata bor untuk pekerjaan kayu seperti biasa.
Namun saat mengebor lubang 6,5 mm atau lebih kecil,
pakai mata bor untuk pekerjaan logam.
/