Page is loading ...

INSTALLATION AND OWNER’S MANUAL
RTS5 20/40/60 MINUTE TIMER
*Compatible with Flex100H, VHR70R, VHR100R, VHR150 and VHR150R
OVERVIEW
The RTS5 is a low voltage remote timer switch that can be used with
a compatible HRV / ERV to activate its highest ventilation rate for 20,
40 or 60 minute.
It is designed to t in a single-gang box and comes with screws to
mount the RTS5 to it and a Decora® plate.
INSTALLATION
Selecting the correct wire
We suggest you use a 2-wire, 18 gauge insulated copper wire to connect the RTS5 to the HRV / ERV. We suggest that the wire have a clear indication to
differentiate the two wires in order to facilitate maintaining the polarity of the wires during wiring.
Installing the wire
This wire should not be installed so that it runs along high voltage wires in order to avoid electro-magnetic interference.
Up to 5 RTS5 can be installed in parallel. Ideal locations are bathrooms, the kitchen and the laundry room.
We suggest installing a steel single-gang electrical box to facilitate installation.
Wiring the control
Ensure that the HRV / ERV is unplugged before continuing to
avoid damaging it.
1. Insert the stripped end of the wire into the + and – of the terminal
block on the back of the RTS5.
2. Secure in place with a pen-type screwdriver.
3. Note the wire’s polarity, i.e. which wire is connected to + and -.
4. Remove the 6-position, green terminal connector inside the HRV /
ERV by gently pulling it out.
5. Pass the other end of the wire through the bushing located on the
top of the HRV/ ERV and push the wire down into the cabinet so it
reaches the terminal connector position.
6. Insert the stripped end of the wire into the T+ and T- positions of the
terminal connector. Secure with a pen-type screwdriver.
*Ensure you maintain polarity; T+ is connected to + position on
the RTS5 terminal block.
7. Re-connect the terminal connection in the HRV / ERV.
Push
20 min
40 min
60 min

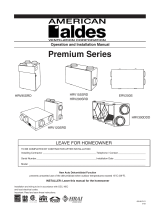
Securing the RTS5 to the wall
1. Mount the RTS5 to the single-gang box using the provided screws.
2. Mount the Decora® plate onto the RTS5 using the provided screws.
OPERATING THE RTS5
• Pressing the PUSH button once will activate the highest ventilation rate of the HRV / ERV for 20 minutes. Once pressed, the green light will
ash once, and remain on for approximately 20 minutes.
• Pressing the PUSH button twice within a second will activate the highest ventilation rate of the HRV / ERV for 40 minutes. Once pressed, the
green light will ash twice, and remain on for approximately 40 minutes.
• Pressing the PUSH button three times within a second will activate the highest ventilation rate of the HRV / ERV for 60 minutes. Once pressed,
the green light will ash three times, and remain on for approximately 60 minutes.
• Pressing the PUSH button while there’s a steady green light will cancel the timer.
• Once the time expires or if the timer is canceled, the HRV / ERV will return to its normal ventilation capacity, as set on the principal ventilation
control and the green light will turn off.
TROUBLESHOOTING
MOUNTING PLATE
ELECTRICAL BOX
Not included
MACHINE SCREW
Symptom Solution
No light turns on Check polarity of wires
When I press a second, or third time, the light turns off Ensure that your HRV/ERV is listed in the compatibility section of this manual
You must press the button a second or third time less than 1 second after pressing it the
rst time
Fantech reserves the right to modify, at any time and without notice any or all of its products’ features,
designs, components and specications to maintain their technological leadership position
Item #: 406486
Rev Date: 2015-05-12
/