Page is loading ...

1-Clean the back of your vehicle, unscrew your license
plate and place it inside the Cargo Saddlebag’s interior
license plate sleeve (Fig 7).
2-Load the Cargo Saddle-
bag on the ground. The load
capacity of the carrier is
~100 lbs. Don’t exceed the
load rating of your vehicle’s
attachment points.
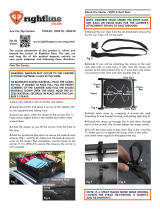
1-Loop the (2) long side straps around the vehicle’s lug-
gage rack; either the rear cross bar or the (2) side rails.
If using the rear cross bar (Fig10), it may be necessary to
move the cross bar towards the rear of the vehicle. If using
the side rails (Fig11) run each strap from the inside to the
outside of each rail.
Assemble The Bottom Pole Frame
Attach The Carrier - WITH A Roof Rack
Attach The Carrier - WITHOUT A Roof Rack
Cargo Saddlebag Set Up Guide
The correct attachment of this product is critical and
beyond the control of Rightline Gear. The safe use
and long life of this product depends entirely on
your good judgment and following these directions.
Fig 1
Fig 2
Fig 10
Fig 3
Fig 11
Fig 7
Continue with the section titled “Adjusting The Main Straps”.
1-Run (2) of the poles through the pole guides into the
sewn pole pockets (Fig 2).
3-Run the remaining (2)
poles through the Velcro
pole pockets, through the
pole guides and into the
junctions (Fig 4).
4-Make sure the individual segments of the pole frame
are rmly locked together by checking the pole buttons
(Fig 5).
5-Fold the Velcro closures over the ends of the (2) pole
pockets (Fig 6).
Sewn
Pole
Pockets
Velcro
Pole
Pockets
Pole Guides
Pole Guides
Cross Pole/Junction
Assembly
Fig 4
Fig 5
Fig 6
2-Attach the cross pole/junction assembly onto the ends of
these poles (Fig 3).
Pack The Carrier
1-Open the vehicle’s rear hatch door just enough to run
the belt strap around the inside of the door. Make sure
the strap is not twisted. Hold the (2) strap ends tight and
close the door over the strap. Let the (2) strap ends hang
down (Fig 8).
2-Attach the Cargo Saddlebag to the vehicle per the
instructions in the following sections. Buckle the belt strap
around the carrier. Tighten the belt strap by adjusting the
tri-glide (Fig 9).
Attach The Belt Strap*
1-Add the Rightline Gear Saddlebag Car Clips (Fig 12)
(sold separately) to the long side straps (Fig 13). Please
see the Saddlebag Car Clips directions for more detail.
Fig 8
*The belt strap is optional if you attach the bottom straps
to your vehicle (see “Attach The Bottom Straps”).
Tri-glide
Buckle
Fig 9

1-Run the (2) bottom straps
through the guides on the
bottom of the carrier and
around the tow hitch, bum-
per, or frame behind the
bumper (Fig 18).
• Emergency access to the rear door and/or window
of your vehicle will be extrememly limited when using
the Cargo Saddlebag. No occupants in the vehicle
should require entry/exit through the rear door while
this product is attached.
• Make sure that you have a clear view through the
rear window before driving.
• Keep the Cargo Saddlebag and its straps away
from the vehicle’s hot exhaust system.
• The rear door, window, windshield wiper, and back
up camera/alarm may not be operable while the
Cargo Saddlebag is attached.
2-Buckle each strap’s end together (Fig 19). Adjust each
strap’s tri-glide so that no excess strap will ap in the wind
(Fig 20).
LIMITED WARRANTY
Rightline Gear warrants that for one (1) year, from the
date of purchase that all products will be free of ma-
terial defect and Rightline Gear will repair or replace
any defective or damaged product free of charge if
it is returned in original condition by the consumer to
Rightline Gear or the place of purchase. Claims of de-
fective material and/or workmanship must be made
in a timely manner. Safe and maintenance-free use
of this product depends upon the consumer’s or user’s
proper installation of the product and good judgment
in its use. Rightline Gear is not responsible for the con-
sumer’s or user’s use or misuse of this product. Dam-
age to Purchaser’s vehicle or any other vehicle caused
by Purchaser’s improper use of this product may cause
serious injury or death. The Purchaser acknowledges
that Rightline Gear has no control over the attachment
of its products to vehicles or the attachment of items
to the Rightline Gear products. Accordingly, Rightline
Gear cannot assume responsibility for any damage to
any property arising out of the improper attachment
or use of its products.
RIGHTLINE GEAR SPECIFICALLY DISCLAIMS ANY AND
ALL OTHER WARRANTIES WHETHER EXPRESS OR IM-
PLIED, INCLUDING BUT NOT LIMITED TO WARRANTY
OF MERCHANTABILITY AND WARRANTY OF FITNESS
FOR A PARTICULAR PURPOSE. RIGHTLINE GEAR FUR-
THER DISCLAIMS ANY WARRANTY OR OTHER PROM-
ISE THAT GIVES RISE TO ANY SORT OF CONSE-
QUENTIAL, EXTRAORDINARY, PUNITIVE, EXEMPLARY,
SUBSEQUENT, OR NONECONOMIC DAMAGES OR
ATTORNEY FEES. THE CONSUMER OR USER’S SOLE
REMEDY AGAINST RIGHTLINE GEAR FOR ANY DEFECT
IN THIS PRODUCT IS LIMITED TO FULL RETURN OF THE
PURCHASE PRICE.
RIGHTLINE GEAR SPECIFICALLY ENCOURAGES
COMPLIANCE WITH ALL MOTOR VEHICLE LAWS,
AND EXPRESSLY DISCLAIMS ANY AND ALL LIABIL-
ITY FOR FAILURE TO COMPLY WITH SAME.
www.rightlinegear.com
Fig 19
Fig 20
Attach The Bottom Straps
Fig 18
SAFETY NOTES:
Protected by US Patent 7,475,799
4-Move each strap’s tri-glide as far toward the strap’s
loose end as possible (Fig 16). On some vehicles, the tri-
glide may need to be moved to the other side of the pad
(Fig 15). Tie off any extra strap so that it will not ap in
the wind. To easily adjust the tri-glide’s position on a strap,
take the tension off the strap by lifting that end of the
Cargo Saddlebag slightly or by momentarily unbuckling
the strap.
3-Adjust the overall length of the straps so that the bottom
of the carrier is level with the top of the bumper (Fig 7).
2-Buckle the long side straps into the short side straps (Fig
17). Test that the buckles are fully engaged.
1-Make sure the roof protection pads (Fig 15 or Fig 16)
are face down on the top rear corner of the vehicle.
Adjust The Main Straps
Tri-Glide
Fig 17Fig 16
Pad
Fig 14 Fig 15
Tri-Glide
Pad
2-Place the Car Clips in the gap between the vehicle’s rear
hatch door and roof (Fig 14 and Fig 15).
Fig 13
Tri-Glide
Saddlebag
Car Clip
Strap
Strap
End
Male
Buckle
Pad
Fig 12
/