Page is loading ...

Directions For: Saddlebag Car Clips
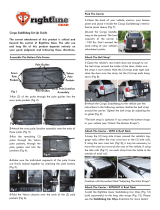
Add the Saddlebag Car Clips (Fig 1) to the side straps of
the Rightline Gear Cargo Saddlebag to attach the carrier
to vehicles WITHOUT a roof rack (Fig 2).
1- Place the Cargo Saddlebag top side up. Extend one of
the long side straps out. Make sure the strap is not twisted
(Fig 3 and Fig 4).
2-Remove the male buckle from the strap. Make sure the
other parts are positioned as shown (Fig 5).
3-Add the Saddlebag Car Clip and the male buckle onto
the strap (Fig 6). Make sure the strap goes through the
correct side of the buckle (Fig 6 Close-Up)
Fig 1 Fig 2
The correct attachment of this product is critical and
beyond the control of Rightline Gear. The safe use
and long life of this product depends entirely on
your good judgment and following these directions.
Fig 4
Fig 3
Male
Buckle
Pad
Tri-glide
Strap End
Strap
Male
Buckle
Male
Buckle
Fig 7
Fig 6
4-Run the strap back through the buckle, the Saddlebag
Car Clip, the pad, and the tri-glide. (Fig 7).
5-Repeat steps 1-4 for the second long side strap.
Male
Buckle
Pad
Tri-glide
Strap End
Strap
Pad
Pad
Tri-glide
Tri-glide
Strap
Strap
Strap End
Strap End
Grooves
Saddlebag
Car Clip
Saddlebag
Car Clip
Fig 5
Fig 6 Close-Up
Male
Buckle
Saddlebag
Car Clip
Top Side

LIMITED WARRANTY
Rightline Gear warrants that for one (1) year, from the
date of purchase that all products will be free of ma-
terial defect and Rightline Gear will repair or replace
any defective or damaged product free of charge if it is
returned in original condition by the consumer to Rightline
Gear or the place of purchase. Claims of defective mate-
rial and/or workmanship must be made in a timely man-
ner. Safe and maintenance-free use of this product de-
pends upon the consumer’s or user’s proper installation of
the product and good judgment in its use. Rightline Gear
is not responsible for the consumer’s or user’s use or misuse
of this product. Damage to Purchaser’s vehicle or any
other vehicle caused by Purchaser’s improper use of this
product may cause serious injury or death. The Purchaser
acknowledges that Rightline Gear has no control over the
attachment of its products to vehicles or the attachment of
items to the Rightline Gear products. Accordingly, Right-
line Gear cannot assume responsibility for any damage
to any property arising out of the improper attachment or
use of its products.
RIGHTLINE GEAR SPECIFICALLY DISCLAIMS ANY AND
ALL OTHER WARRANTIES WHETHER EXPRESS OR IM-
PLIED, INCLUDING BUT NOT LIMITED TO WARRANTY OF
MERCHANTABILITY AND WARRANTY OF FITNESS FOR A
PARTICULAR PURPOSE. RIGHTLINE GEAR FURTHER DIS-
CLAIMS ANY WARRANTY OR OTHER PROMISE THAT
GIVES RISE TO ANY SORT OF CONSEQUENTIAL, EX-
TRAORDINARY, PUNITIVE, EXEMPLARY, SUBSEQUENT, OR
NONECONOMIC DAMAGES OR ATTORNEY FEES. THE
CONSUMER OR USER’S SOLE REMEDY AGAINST RIGHT-
LINE GEAR FOR ANY DEFECT IN THIS PRODUCT IS LIM-
ITED TO FULL RETURN OF THE PURCHASE PRICE.
RIGHTLINE GEAR SPECIFICALLY ENCOURAGES COM-
PLIANCE WITH ALL MOTOR VEHICLE LAWS, AND
EXPRESSLY DISCLAIMS ANY AND ALL LIABILITY FOR
FAILURE TO COMPLY WITH SAME.
www.rightlinegear.com
8-Buckle the long side straps into the short side straps (Fig
10), testing that the buckle is fully engaged.
6-Place the Saddlebag Car Clips in the gap between the
vehicle’s rear hatch door and roof (Fig 8).
7-Make sure the protective pads are face down on the top
rear corner of the vehicle (Fig 9).
Fig 10
Fig 8
Fig 9
Please see the Cargo Saddlebag Set Up Guide for additional
instructions.
/