Page is loading ...

1-10
ASSEMBLY INSTRUCTIONS
Easy Pieces Single Drawer End Table / Nightstand
#77242 - Espresso Finish
&86720(56(59,&($1'5(3/$&(0(173$576
)25)$67(56(59,&(213$57625+(/33/($6(*272285:(%6,7($7:::$'(3786&20
25&$//72//)5(($'(3786)25$66(0%/<48(67,216
021)5,$07230(67&/26('+2/,'$<6
,)<28&$//3/($6(+$9(21+$1'
x 352'8&71$0($1'672&.180%(5
x :+(1$1':+(5(7+(81,7:$6385&+$6('
x 32180%(5)5207+(%277202)7+,63$*(
,):($5(%86<+(/3,1*27+(5&86720(563/($6(/($9(<281$0($1'180%(5
725(&(,9($5(7851&$//
<2855(7$,/(50$<$/623529,'(6(59,&(253$576
+(/3)8/29(5$//
x 6$9(7+(6(,16758&7,216+((76$1'7+(%2;817,/<28$5(6$7,6),(':,7+7+($66(0%/<
x '2127*/8(7+(3$5762)7+(81,772*(7+(581/(66<28+$9(7(67('7+($66(0%/<),567
x 3(5)2507+($66(0%/<21$&/($1+$5'685)$&(86,1*7+()/$77(1('&$572125$72:(/
723527(&77+(685)$&($1'7+(),1,6+2)7+(81,7'2127$66(0%/(21&$53(7
9,6,7:::$'(3786&20725(*,67(5<285352'8&7$1'6((7+(
&203/(7($'(3786/,1(5(*,675$7,21,65(48,5(')253$5765(48(676
7+$1.<28)25<285385&+$6($1':(/&20(72$'(3786
127,&(7+(:5,77(1,16758&7,216CONTAINED +(5(,1$5(&23<5,*+7('

,$ &,,),,),'$,&, $$,!(&+,$ &$,
,),("&(",$,&$, $,"$,,)&,+,,,$$,
$,"&"$&$,",,&(", +, "(&,, "(,("&(",",&(",&",
,&,*&",",)&,(",")", #&$,
,($,",),")"$,$%
,")",$$,",&, &,&, , "&&,+(",&$,",,"$,,"$(
+,$,")", "&$,&,$$,),$&",+(",&$
*.G ([," >K[3)" [I))[
W/([ C-4[7[([ )2Q"4[ 4[3[
Q44([[ L-X+[4)08[ -)&[)(4*7[
*-W7[43O(['([W7F1[
([
([
/; " ([4P[/4[)$43[)([
D4[4: %[E7 I "" 33V14[
")I[*/ 4[ Q#9[(4H4/ 7[=U4[4J*4(34[
W(< )([([)/[34(34[
[/4K[
334&Q"4[ B&[/W43[
A(3*)-7= )([([I/4N)$ ([
)375[IUMP[U4"*[YSX1[/; "4/[
!44*[7U4 /[*/ 43[ /43)(R"4[()I[
YSW /4[) ( ([=6&[ 4*@[
I 7P[?4[M[("[3B*[334&Q"[
ZYTW334&Q"4[YSW3H4r
@@@@@@@@@@@@@@@@@@@@@@@@@@@@@@@@@@@@@@@@@@@@@@@@@@@@@@@@@@@@@@@@@@@@@@@@@@
2
NOTICE: 7+(:5,77(1 ,16758&7,216
CONTAINED
+(5(,1$5( &23<5,*+7('

These tools are not supplied by the manufacturer.
Safety and Care Advice
· Check you have all the components and tools listed on pages 3 & 4.
· Remove all fittings from the plastic bags and separate them into their groups.
· Keep children and animals away from the work area, small parts could choke if swallowed.
· Make sure you have enough space to layout the parts before starting.
· Do not stand or put weight on the product, this could cause damage.
· Assemble the item as close to its final position (in the same room) as possible.
· Opened box can be used to protect your floor or counter during assembly.
· Assembly is easier for drawer parts on a counter.
· Parts of the assembly will be easier with 2 people.
· We do not recommend the use of power drill/drivers for inserting screws, as this could
damage the unit.
· Only use hand screwdrivers.
· Dispose of all packaging carefully and responsibly.
35 min
0DQXDO
3KLOOSVKHDG
6FUHZGULYHU
+DPPHU
1R3RZHU7RROV
33HUIRUPWKHHQWLUHDVVHPEO\RQDFOHDQ
KDUGVXUIDFHXVLQJWKHIODWWHQHGER[RUD
WRZHOWRSURWHFWWKHVXUIDFHDQGWKHXQLWV
ILQLVK'2127DVVHPEOHRQFDUSHW
&DUSHWFUHDWHVWRRPXFKERXQFHPDNLQJ
DVVHPEO\GLIILFXOWDQGFRXOGOHDGWR
GDPDJHRIWKHSDUWV
PLEASE NOTE:
'2:(/63$57$9$5<(9(5626/,*+7/<,)$'2:(/3$57$,6/226(,
:(35()(5<28&$//28572//)5(( 180%(5)25$'',7,21$/'2:(/6
96*/8,1*7+('2:(/
,)<28&+226(72*/8(7+(3$576 &203/(7(/<7(677+($66(0%/<),567
:('21276833/<*/8(
30
NOTICE: 7+(:5,77(1 ,16758&7,216
CONTAINED
+(5(,1$5( &23<5,*+7('

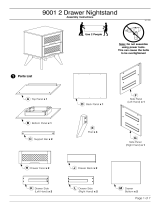
Top
Right side panel
Left side panel
Bottom crossbar
Top crossbar
Rear legs
Right front leg
Left front leg
Shelf
Back panel
Right drawer side
Left drawer side
Drawer back
Drawer bottom
Drawer front
40
NOTICE: 7+(:5,77(1 ,16758&7,216
CONTAINED
+(5(,1$5( &23<5,*+7('
Back
panel nail
Screw
Screw
Screw
Dowel
Knob
G x 01
M4 x 25mm
Screw

"
',
"
"
"
"
@
0
B
!
Ax 28
b
0
"
"
"
"
"
"
"
Helpful
I
B
CLOSE UP VIEW
a
50
NOTICE: 7+(:5,77(1 ,16758&7,216
CONTAINED
+(5(,1$5(
&23<5,*+7('

3
4
C x 06
3,5 x 30mm
C
C
C
C
C
C
C
C
C
C
08
06
03
07
06
02
C
C
Front
Front
RIGHT SIDE PANEL -
ATTACH RIGHT SIDE
LEGS
LEFT SIDE PANEL -
ATTACH
LEFT SIDE
LEGS
_______________________________________________________
C x 06
3,5 x 30mm
60
NOTICE: 7+(:5,77(1 ,16758&7,216
CONTAINED
+(5(,1$5(
&23<5,*+7('

5
6
C x 06
3,5 x 30mm
C
C
C
C
C
C
C
C
05
09
04
01
C
C
C
C
BACK OF UNIT
Front
TIP: This step is
easier with two
people.
Pre-
drilled
"Pocket
Hole"
_______________________________________________________
C x 06
3,5 x 30mm
TIP: Turning the
unit upside
down provides a
better angle to
tighten the
screws.
70
NOTICE: 7+(:5,77(1 ,16758&7,216
CONTAINED
+(5(,1$5( &23<5,*+7('

7
F x 14
8
C x 01
3,5 x 30mm
C
F
F
F
F
F
F
F
F
F
F
F
F
F
F
10
F
F
F
10
05
Helpful Tip
Use all back panels nails.
Evenly spaced, they help
make the unit strong.
TIP: This step is
easier with the
unit upside
down.
_______________________________________________________
80
NOTICE: 7+(:5,77(1 ,16758&7,216
CONTAINED
+(5(,1$5(
&23<5,*+7('

Helpful Tip
To help you assemble the drawer
''square'', use the drawer back #13
to stabilize the sides. Pull out after
sides are attached, and slide in the
drawer bottom.
Helpful Tip
Push the runner all the way
forward until it touches the
drawer front.
TIP: To make this step easier, place
the drawer upside down on a counter
with the drawer front hanging off the
edge. This will allow the drawer box to
lay flat and provide better control for
tightening the screws.
90
NOTICE: 7+(:5,77(1 ,16758&7,216
CONTAINED
+(5(,1$5( &23<5,*+7('
M4 x 25mm
Screw

11
Hold the front end of the drawer
sides, tilt the back of the drawer
upwards to get the wheels on the
drawer past the wheels on the
unit. Once, the wheels are clear,
level out the drawer and slide it in.
____________________________________________________________________________________________________
COMPLETED ASSEMBLY!
THANK YOU FOR YOUR PURCHASE, AND WELCOME TO ADEPTUS!
USE AND CARE INSTRUCTIONS:
CARE INSTRUCTIONS:
• NORMAL USE: WIPE WITH A CLEAN CLOTH.
• OR WHEN NEEDED TO CLEAN SCUFFS: WIPE CLEAN WITH A SLIGHTLY DAMP CLOTH AND A
MILD CLEANER. THEN WIPE DRY WITH A CLEAN CLOTH. DO NOT USE HARSH CHEMICALS.
• FROM TIME TO TIME, CHECK THAT ALL OF THE SCREWS ON THE UNIT ARE STILL TIGHT.
USE:
• SMOOTH RUNNING, ROOMY DRAWER FOR STORAGE OF BEDSIDE OR LIVING ROOM ITEMS.
100
NOTICE: 7+(:5,77(1 ,16758&7,216
CONTAINED
+(5(,1$5( &23<5,*+7('
/