Page is loading ...

REALVISION
™
© 2017 Raymarine UK Limited
Document number: 88067-1
Date: 04-2017
English (en-US)
RV-100 3D Transom Transducer
Installation instructions


Importantinformation
Obtainthecompletedocumentationforyourproduct
Thesuppliedprinteddocumentationisasubsetofthefulldocumentationavailableforyourproduct.
Important:ThelatestversionsofallEnglishandtranslatedhandbooksareavailableonthe
Raymarinewebsite.Pleasecheckthewebsitetoensureyouhavethelatestandcomplete
documentationandsafetyinformationforyourproduct.
www.raymarine.com/manuals
CertifiedInstallation
RaymarinerecommendscertifiedinstallationbyaRaymarineapprovedinstaller.Acertified
installationqualifiesforenhancedproductwarrantybenefits.ContactyourRaymarinedealerfor
furtherdetails,andrefertotheseparatewarrantydocumentpackedwithyourproduct.
Warning:Productinstallationandoperation
•Thisproductmustbeinstalledandoperatedinaccordancewiththeinstructions
provided.Failuretodosocouldresultinpersonalinjury,damagetoyourvessel
and/orpoorproductperformance.
•RaymarinerecommendscertifiedinstallationbyaRaymarineapprovedinstaller.
Acertifiedinstallationqualifiesforenhancedproductwarrantybenefits.Contact
yourRaymarinedealerforfurtherdetails,andrefertotheseparatewarranty
documentpackedwithyourproduct.
Warning:Highvoltages
Thisproductmaycontainhighvoltages.DoNOTremoveanycoversorotherwise
attempttoaccessinternalcomponents,unlessspecificallyinstructedinthe
documentationprovided.
Warning:Switchoffpowersupply
Ensurethevessel’spowersupplyisswitchedOFFbeforestartingtoinstallthis
product.DoNOTconnectordisconnectequipmentwiththepowerswitched
on,unlessinstructedinthisdocument.
Warning:Transduceroperation
Onlytestandoperatethetransducerinthewater.DoNOToperateoutofwater
asoverheatingmayoccur.
Caution:Serviceandmaintenance
Thisproductcontainsnouserserviceablecomponents.Pleasereferall
maintenanceandrepairtoauthorizedRaymarinedealers.Unauthorizedrepair
mayaffectyourwarranty.
Wateringress
Wateringressdisclaimer
AlthoughthewaterproofratingcapacityofthisproductmeetsthestatedIPXstandard(refertothe
product’s
Technical Specification
),waterintrusionandsubsequentequipmentfailuremayoccurif
theproductissubjectedtocommercialhigh-pressurewashing.Raymarinewillnotwarrantproducts
subjectedtohigh-pressurewashing.
Disclaimer
Raymarinedoesnotwarrantthatthisproductiserror-freeorthatitiscompatiblewithproducts
manufacturedbyanypersonorentityotherthanRaymarine.
3

Raymarineisnotresponsiblefordamagesorinjuriescausedbyyouruseorinabilitytousethe
product,bytheinteractionoftheproductwithproductsmanufacturedbyothers,orbyerrorsin
informationutilizedbytheproductsuppliedbythirdparties.
Declarationofconformity
RaymarineUKLtd.declaresthatthisproductiscompliantwiththeessentialrequirementsofEMC
directive2004/108/EC.
TheoriginalDeclarationofConformitycertificatemaybeviewedontherelevantproductpageat
www.raymarine.com.
Warrantyregistration
ToregisteryourRaymarineproductownership,pleasevisitwww.raymarine.comandregisteronline.
Itisimportantthatyouregisteryourproducttoreceivefullwarrantybenefits.Y ourunitpackage
includesabarcodelabelindicatingtheserialnumberoftheunit.Y ouwillneedthisserialnumber
whenregisteringyourproductonline.Y oushouldretainthelabelforfuturereference.
Productdisposal
DisposeofthisproductinaccordancewiththeWEEEDirective.
TheWasteElectricalandElectronicEquipment(WEEE)Directiverequirestherecyclingofwaste
electricalandelectronicequipment.
IMOandSOLAS
Theequipmentdescribedwithinthisdocumentisintendedforuseonleisuremarineboatsand
workboatsNOTcoveredbyInternationalMaritimeOrganization(IMO)andSafetyofLifeatSea
(SOLAS)CarriageRegulations.
Technicalaccuracy
Tothebestofourknowledge,theinformationinthisdocumentwascorrectatthetimeitwas
produced.However,Raymarinecannotacceptliabilityforanyinaccuraciesoromissionsitmay
contain.Inaddition,ourpolicyofcontinuousproductimprovementmaychangespecifications
withoutnotice.Asaresult,Raymarinecannotacceptliabilityforanydifferencesbetweentheproduct
andthisdocument.PleasechecktheRaymarinewebsite(www.raymarine.com)toensureyouhave
themostup-to-dateversion(s)ofthedocumentationforyourproduct.
4

Applicableproducts
Thisdocumentisapplicabletothefollowingproducts:
RV–100RealVision™3DTransomMountTransducer
PartnumberDescriptionConstruction
A80464RV-100RealVision™3DTransomMountTransducer
Plastic
•TheRV-100isaRealVision™3Dtransducer,capableofproducing3Dsonarimages.
•ThetransducercanbeconnectedtoRealVision™3DvariantMFDsrunningLightHouse™3software.
Note:AdditionalmountingoptionsareavailablefortheRV-100RealVision™3Dtransducer.These
include:
•PartnumberA80479:RealVision™3DTransducerStepMount
•PartnumberA80480:RealVision™3DTransducerJackPlateMount
•PartnumberA80482:RealVision™3DTransducerJackPlateSpacerKit
Forfurthermountinginformation,refertothedocumentationsuppliedwiththeseproducts.
Toolsrequired
Thefollowingtoolsarerequiredtoinstallthetransducer.
5

1.Powerdrill
2.Pozidrivescrewdriver
3.Pairof14mmwrenches
4.Marine-gradeneutralcurepolyurethanesealant(non-acetateandnon-siliconebased)
5.3.5mmdrillbit*
6.Adhesivetape
7.25mm(1inch)Holesaw(onlyrequiredifyouareroutingthecablethroughabulkhead.)
Note:
*Dependingonthethicknessandmaterialofthemountingsurface,youmayrequireadifferent
diameterdrillbit.
Screwssuppliedare:stainless-steeltappingDIN7049-ST,withdiameter4.2mm(equivalenttoa
No.8screw,diameter0.164inch).Threescrewsoflength18mmareprovidedforattachingthe
mountingbracket;fourscrewsoflength13mmareprovidedforattachingtheescutcheonplate.
Warning:Marine-gradesealant
Onlyusemarine-gradeneutralcurepolyurethanesealants.DoNOTusesealants
containingacetateorsilicone,whichcancausedamagetoplasticparts.
6

Testingthetransducer
Transduceroperationshouldbecheckedbeforeinstallation.
1.Connectthetransducertothemultifunctiondisplay’stransducerconnection.
2.Fullysubmergethetransducerinwater.
3.Powerupthedisplay.
4.OpenaFishfinderapplicationonyourdisplay.
5.Ifrequired,selecttherelevanttransducer/channelfromtheChannelselectionpage(
Menu>
Channel).
6.Checkthataccuratedepthandtemperaturereadingsaredisplayed.
7.IfyouexperiencedifficultiesobtainingreadingsthencontactRaymarineT echnicalSupport.
Warning:Transduceroperation
Onlytestandoperatethetransducerinthewater.DoNOToperateoutofwater
asoverheatingmayoccur.
Selectingalocationforthetransducer
Theguidelinesbelowshouldbefollowedwhenselectingalocationforthetransducer.
Note:Thetransducerisnotsuitableformountingonvesselswherethetransomisaftofthe
propeller(s).
Forbestperformancethetransducermustbeinstalledinalocationwiththeleastturbulenceand
aeration.Themosteffectivewaytodeterminethisisbycheckingthewaterflowaroundthetransom
whilstunderway.
•Mountclosetothekeel(centerline),inapositionwherethetransducerelementwillbefully
submergedwhenthevesselisplaningandturning.
•Mountasuitabledistancefromthepropeller(s)toavoidwake.
•Mountinalocationwherenoloadwillbeappliedtothetransducerduringlaunching,lifting,
traileringandstorageoftheboat.
•Forclockwiserotatingpropellers,mountthetransduceronthestarboardside,for
counter-clockwise,mountontheportside.
•Onatwinenginevesselmountthetransducerbetweentheengines.
•Turbulencecanbecausedbyanumberofotherfactorssuchassteps(1),ribs(2),rowsofrivets(3)
andstrakes(4).Theturbulenceappearsaftoftheselocations.
7

•Airtrappedunderthefrontofthevesselcantravelunderthehullandappearasaerationaft.
Note:Optimumtransducerlocationwillvarydependingonvesseltype.Optimumtransducer
heightandangleshouldbeobtainedbytestingthetransducerwiththevesselinthewater.
Transducerdimensions—RV-100
•RV-100cablelength:8m(26.2ft).
8

Mountingthetransommountbracket
Thetransducermustbemountedonthetransomusingthemountingbracketprovided.Thesteps
belowdescribetheinitialmountingstepsrequiredinordertotestyourtransducersperformance.
Aftertestingthetransduceryoumustfinishthemountingfollowingtheinstructionsinthe
Finishing
the transducer mounting
section.
1.Fixthetransducermountingtemplatetotheselectedlocation,usingmaskingorself-adhesive
tape.
1Transducermountingtemplate
2
Waterline
3Mountingawayfrompropeller
2.Ensurethetemplateisparalleltothewaterline.
3.Drill2xholesfortheadjustmentslotscrewsasindicatedonthetemplate.
Note:T ohelppreventchippingofthemountingsurface,usepainter’stapetomaskthedrillarea.
Note:DoNOTdrillthethirdmountingholeatthisstage.
4.Fillthe2holeswithmarinegradesealant.
5.Usingapozi-drivescrewdriverandthescrewsprovided,securethetransommountbracket
usingthe2adjustmentslots.
Note:Thethirdlockingscrewisnotuseduntilthetransducerhasbeensuccessfullytested.
9

Mountingthetransducer
Thetransducermustbemountedonthetransomusingthemountingbracketprovided.Thesteps
belowdescribetheinitialmountingstepsrequiredinordertotestyourtransducer’sperformance.
Aftertestingthetransduceryoumustfinishthemountingfollowingtheinstructionsinthe
Finishing
the transducer mounting
section.
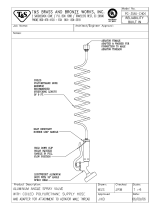
Note:Beforestartingthisprocedure,checkthattheplasticchock(marked‘A’intheillustration)
isalreadypositionedinfrontofthetransducercable.Ifitisnot,pushthechockintothecorrect
position,aligningtheholeinthechockwiththeholesinthetransducerhanger.
1.Positionthetransducerhangerbetweenthemountingbracketarms,ensuringthatthetransducer
cableisroutedbetweenthearms,andthecenterholeisalignedwiththeholesinthearms.
2.Slidetheflangedmountingboltthroughthemountingbracketassembly.
3.Screwtheflangednylocnutontotheendofthemountingbolt,andhand-tighten.
4.Usingapairof14mmwrenches,tightenthenutontothemountingboltuntilthetransducer
hangerstaysinposition,butcanstillbeadjustedbyhand.
10

5.Positionthetransducerhangersothatthebottomfaceofthetransducerwillbeparallelwiththe
waterlineandtightenthemountingboltuntilthehangerisheldfirmlyinplace.
Thetransducerpositionwillbeadjustedfurtherduringtesting.
Note:DonotadjusttheM5screwlocatedontopofthetransducerhanger.Thisscrewlocatesthe
transducercorrectlyonthehanger,andmustnotbeadjustedunlessspecificallydirectedtodoso
(forexample,whenusingtheStepMountaccessory).
11

Cablerouting
Cableroutingrequirementsforthetransducercable.
Important:T oavoidinterference,thecablemustberoutedasfarawayfromVHFradioantenna
cablesaspossible.
Important:Thetransducercable’sconnectorissuppliedwithaseparatelockingcollarassembly,
usedtosecurethecablefirmlytoyourmultifunctiondisplay.Ensurethatyouroutethecableallthe
waytoyourmultifunctiondisplaybeforeattachingthelockingcollar.
•Checkthatthecableislongenoughtoreachtheequipmentitwillbeconnectedto.Thefollowing
optionalextensioncablesareavailableifrequired:
–RealVision™transducerextensioncable3m(9.8ft)(partnumberA80475)
–RealVision™transducerextensioncable5m(16.4ft)(partnumberA80476)
–RealVision™transducerextensioncable8m(26.2ft)(partnumberA80477)
•Ensurethereisenoughslackinthetransducercable,atthetransducerend,toallowthetransducer
topivotupanddown.
•Securethecableatregularintervalsusingcableclips(notsupplied).
•Anyexcesscableshouldbecoiledupataconvenientlocation.
12

Mountingtheescutcheonplate
Y ourRV-100transducerissuppliedwithanescutcheonplate.
Ifyouhavechosentoroutethetransducercablethroughthetransomorthroughabulkhead,you
canusetheescutcheonplatetocovertheholerequiredtoaccommodatethecable.Theplateis
designedtofitovera25mm(1inch)diameterhole.
Afteryouhavethreadedthetransducercablethroughtheholeinthetransomorbulkhead,attach
theescutcheonplateasshown,takingcarethatthecableisnottrappedbetweentheescutcheon
plateandthemountingsurface.
Note:Toavoidpossibledamagetothetransducercable,round-offtheedgesoftheholethatthe
cablepassesthroughusingafile.
13

Attachingtheconnectorlockingcollar
Thetransducercable’sconnectorissuppliedwithaseparatelockingcollarassembly,usedtosecure
thecablefirmlytoyourmultifunctiondisplay.
Thisproceduredescribeshowtoattachthelockingcollartotheconnector.Thelockingcollarparts
aresuppliedinaseparatebag,intheboxwithyourtransducer.
Important:Ensurethatyouroutethecableallthewaytoyourmultifunctiondisplaybefore
attachingthelockingcollar.
1.Slidethelockingcollarovertheendoftheconnector,thenpushittowardsthecable-endof
theconnector.
Important:Ensurethatthelugsonthelockingcollar(labelled‘A’intheillustration),areclosestto
theplug-endoftheconnector.
2.Slidethesplit-ringovertheendoftheconnector,thenpushittowardsthecable-endofthe
connector.
Important:Ensurethatthetabsonthesplit-ring(labelled‘B’intheillustration),areclosesttothe
cable-endoftheconnector.
14

The split - ring slides easily for approximately 1 cm onto the connector, before butting up against
the connector moulding.
3.Carefullyinsertthepointedendofthesuppliedtoolintothesplit-ring’sgap(labelled‘C’inthe
illustration).
15

The tool widens the gap in the split ring, enabling the split ring to be pushed further back onto
the connector in the following step.
Important:Alwaysusethesuppliedtoolwhenattachingthesplitring.Thesplitringmaybecome
overstretchedandbreakifyoutrytoattachitwithoutusingthetool.
4.Usethetooltogentlyleverthesplitringoverthemouldingontheconnectoruntilitsnapsinto
positionapproximately0.5cmfurtherbacktowardsthecable-endoftheconnector.
Y ou can now remove the tool. The split - ring stays in position on the connector, but rotates freely.
5.SlidetheO-ringovertheendoftheconnector,andensurethatitisseatedsquarelyagainstthe
connectormoulding,adjacenttothesplit-ring.
16

6.Slidethelockingcollartowardstheplug-endoftheconnector,rotatingthecollarasnecessary
toensurethatthelugsonthelockingcollar(labelled‘D’intheillustration)passthroughthe
channels(labelled‘E’)inthesplit-ring.
17

The locking collar slides easily towards the plug - end of the connector, before butting up against
the split - ring moulding.
7.Graspthebodyoftheconnectorwithonehand,thenwiththeotherhand,pullthelockingcollar
firmlytowardstheplug-endoftheconnector.
18

As you pull the locking collar, it clicks into place over the split - ring. The locking collar stays in
position on the connector, but rotates freely.
Makingconnections
Followthestepsbelowtoconnectthecable(s)toyourproduct.
1.Ensurethatthevessel'spowersupplyisswitchedoff.
2.Ensurethatthedevicebeingconnectedtotheunithasbeeninstalledinaccordancewiththe
installationinstructionssuppliedwiththatdevice.
3.Ensuringcorrectorientation,pushthecableconnectorfullyontothecorrespondingconnector
ontheunit.
4.Turnthelockingcollarclockwisetosecurethecable.
RealVision™3Dtransducerextensioncable
Forbestperformance,cablerunsshouldbekepttoaminimum.However,forsomeinstallationsit
maybenecessarytoextendthetransducercable.
•3m(9.8ft),5m(16.4ft),and8m(26.2ft)transducerextensioncablesareavailable(partnumbers:
3m-A80475,5m-A80476,8m-A80477).
•Itisrecommendedthatamaximumoftwocableextensionsareused,withthetotalcablelength
notexceeding18m.
Testingandadjustingthetransducer
Oncetheinitialmountingprocedureshavebeencarriedout,thetransducermustbetestedpriorto
finishingthemounting.
Thetestingshouldbecarriedoutwithyourvesselinthewater,withadepthgreaterthan0.7m(2.3
ft)butlessthanthemaximumdepthrangeofthetransducer.
1.OpentheSonarapplicationonyourdisplay,andselecttheSonarchannel.
Afterafewsecondsthebottomshouldbevisibleonscreenandadepthreadingdisplayed.
2.Startmovingyourvesselatalowspeed,ensuringyouhaveadepthreadingandaclearimageis
displayed.
3.Graduallyincreasethevesselspeedwhilstcheckingthedisplay,iftheimagebecomespooror
thebottomismissingatlowerspeedsthenthetransducerneedstobeadjusted.
19

4.Angleandheightadjustmentsshouldbemadeinsmallincrementsandre-testedeachtimeuntil
youobtainoptimumperformance.
For best performance, you should ensure that the bottom half of the transducer assembly is
positioned so that it is lower than the lowest point of the hull in the vicinity of the transducer. In
the following illustrations, the dashed line indicates the lowest point of the hull in the vicinity of
the transducer.
5.Loosenthemountingbolttoadjustthetransducerangle.
6.Loosenthe2mountingbracketscrewstoadjustthetransducerheight.
7.Re-tightenthemountingboltandmountingscrewsbeforere-testing.
Note:
•Itmaynotalwaysbepossibletoobtaindepthreadingsathigherspeedsduetoairbubbles
passingunderthetransducer.
•Itmaybenecessarytomakeseveraladjustmentstothetransducerbeforeobtainingoptimum
performance.
•Ifthetransducerrequiresrepositioningensurealloldholesarefilledwithmarinegradesealant.
20
/