Signet 4630 User manual

Type
User manual
1. Maintenance 4630 p.31 3.2 Cleaning p.35   p.44
1.1 Cleaning p.31   p.36   p.45
  p.32      p.46
  p.33    14. Ordering 4630 
2. Maintenance 2630 p.34   p.40   
  p.34   p.41 16. Ordering 2630 
  p.34   p.42   
  p.35   p.43
  p.35   p.44

*3-4630.090*
3-4630.090 Rev F 02/12 English
English

C!
1. Follow instructions carefully to avoid personal injury.
2. 
3. Mounting the Chlorine System in an outdoor box, in areas with elevated
temperatures, may cause damage to the system if the enclosure's internal

4. Do not alter product construction.
5. For use with clean fresh water only.
6. 
7. 
personnel only.
  p.2   p.5   p.10
2.  p.2   p.6   p.11
3.  p.3      p.11
  p.3   
  p.4   p.9

  p.12      p.20
  p.12      p.21
  p.13   p.19   p.21
  p.14   p.19   p.21
  p.16   p.20   p.22
     p.20   p.23


1.  p.26   p.26   

1.  p.24   p.25

1.     p.29   p.30

2 
 

 
Step 1. 
Step 2. 
Step 3. 
Step 4. 

Step 5. 

Step 6. 


 
chlorine

chlorine calibration and set up procedure.
 


 
 


Step 9. 


Step 10. Verify the inlet and drain ball valves are in the open position


Step 11.  for

Step 12. 


1. Chlorine panel assembly
a. Built-in pressure regulator 15 to 120 psi.
b. 3/8 inch hose barb connectors.
 
a. 1 spare membrane cap
b. 1 bottle of electrolyte solution
 
d. 1 syringe
 
 
a. English panel assembly manual
b. CD with multi-language manuals
 
d. Drill template
 
6. Customer supplied
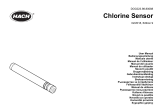
 
 
Sensor access plugs

3


treatment applications.

 

 
Connect to a water source and plug it in.
 

 
 

sensors.
 


 
 
for chlorine reading accuracy.
 
 
 


section.
 
 
 
 
 
165 mm




76 mm



Ø 7 mm

25 mm

Ø 13 mm


 

4 
 


sensor electronics


Flow cell O-rings
Vent
Cap
Output conduits
Transmitter


Flow rate indicator
Flow range limits
Flow regulator with strainer

Drain port

Sampling port

electronics





2000-3825*

2000-2525*

2000-3804*

4300-5225*
Chlorine electrode


5

Disc spring

Spacer ring





Flat washer
Flat washer*

Knurled thumb nut

Flow cell bolt 

 
Flow cell nut 6
Flat washer 15
Disc spring 9
Knurled thumb nut 3
Flow cell bolt 6
Flow cell nut
Flat washer




Flow Cell Rebuild Kit


 


3-4630.392

6 
 

 
 Mount the panel according to local electrical, building, and or plumbing codes and seismic

 The panel must be mounted vertically in an upright position.
 

 
 Bright light can promote algae growth.
 Keep panel system electronics and enclosure away from dripping water.
 


7
Input for
100-240 VAC




.


 



 
of the electrical box using the appropriate conduit adapters to maintain


 
building installation.
 
easy reach of the operator.
 

Terminal  Description
 Voltage adjustment 
increases output voltage
 Operation indicator 
is on
 DC output terminals 

  



 Open the electrical box by loosening the four corner screws of the front
cover.
 
of the electrical box using the appropriate conduit adapters to maintain


 

 

 


 The panel system is pre-wired with an auto switching power supply that

 
 
building installation.
 
easy reach of the operator.
 
 

+

Part # 7300-0024 (159 001 693) shown.
Actual power supply may differ from Figure 2.
Follow all local and government recommendations and methods for installation of
electrical connections to and between the system and other devices.
8 


.


Ground

wire here to help eliminate possible noise.
 
 
Relay 1 
 
C Common


Relay 2

Follow all local and government recommendations and methods
for installation of electrical connections to and between the
system and other devices.

 
connections. Do not wire directly to the transmitter.
 
 
power or other high voltage wiring.
 

connected. Replace the jumper if you later remove your loop

jumper wire from its two terminals.
 The panel system uses an active loop output wired to the

 
 

PLC Terminals
Channel 2
4 to 20 mA
Channel 1
4 to 20 mA
+
-
+
-
1 2 3 4 5 6 7 8 9 10
+ - + -
NC C NO NC C NO
LOOP 1
LOOP 2
GROUND
RELAY 1
RELAY 2
GND


loop device


 
9
 
Loop 2 -
Loop 2
+
System Power Loop 1 -
System Power Loop 1
+
AUX Power -
AUX Power
+
Relay 2 (N.O.)
Relay 2 (COM)
Relay 2 (N.C.)
Relay 1 (N.O.)
Relay 1 (COM)
Relay 1 (N.C.)
Ground
Digital (S
3
L)
V+
Ground
Digital (S
3
L)
V+
Transmitter
Terminals
Signet Chlorine Sensor Electronics
3-2650-7 (159 001 670)
10
9
8
7
6
5
4
3
2
1
GND
10
9
8
7
6
5
4
3
2
1
GND
NO
COM RELAY 2
NC
NO
COM RELAY 1
NC
– LOOP 2
+ LOOP 2
– LOOP 1
+ LOOP 1
EARTH GROUND
Black
White
Yellow
Red
Signet pH Sensor Electronics
3-2750-7 (159 001 671)
Black
Black
Black
Black
Black
Black
Black
Black
Red
Black
White
Red
Black
White
GND
N
L
– V
+V
Power Supply
24 VDC
Terminal
Block
3-8630-3P (159 001 673) Customer Wiring
10 

 

®




®
Connection to Sensor Electronics




3-2724-00




3-2750-7


3-2650-7


11
IN
OUT
pH Cl

OK



 Drain

Sampling port

 
 
Use hose clamps.

 Turn off inlet valve  when stopping

 


by gravity, not system pressure.


is automatically shut off when disconnected.


adjusted using the Flow Cell ball valve. ( The
inlet hose barb will also need to be changed. Contact

12 
 
 
 
 
Step 1. 
 to select the  menu.
to select the  menu.
Step 2. 


Step 3.
Step 4. 

Step 5.

Step 6. 


value of the item being edited and will return you
to Step 3.


saving the last setting to return to view menu.


FCl: 2.67 ppm
7.10 pH 25.3 °C

FCl = free chlorine.
Cl Raw: 103.8 nA
pH Raw: -5.9 mV

For reference only.
Loop 1 10.68 mA
Loop 2 8.56 mA
View of current loop 1 and loop 2 output.
Last CAL:
10-18-10
View of the last calibration date. Editable in the Calibrate Menu.

 The View Menu is displayed during normal operation.
 
view.
 
 
 
 
 
 
C!
 
 
1. 
13




Step 1.
ENTER
ENTER
2s
ENTER
ENTER


5s

 
ENTER
ENTER
Step 6.
ENTER
ENTER

This is the edit mode.

The 

to 10-18-09.


Step 5.









Step 2.


value of the item being edited and return you to
Step 3.


saving the last setting to return to the View Menu.

Example
Step 3.


Refer to pages 3 and 4 for complete listing of these items.




Step 4.



into edit mode.
Cl Zero
Calibration: >
CALIBRATE:----
Enter Key Code
CALIBRATE:---
Enter Key Code
CALIBRATE:--
Enter Key Code
CALIBRATE:-
Enter Key Code
Cl Zero
Calibration:
>
Last Cal:
09-18-09
Last Cal:
1
9-18-09
Last Cal:
1
9-18-09
Last Cal:
1
0-18-09
Last Cal:
Saving
Last Cal:
10-18-09
Last Cal:
09-18-09 >
Last Cal:
09-18-09
>
14 
Cl Zero
Calibration: >



Cl In Process
Calibration: >

Cl Temperature
Calibration:
>
Enter process temperature from a reference thermometer: °C or °F. Units are set up in the
Options Menu. Example on Section 15.
Reset Cl to
Factory Cal: >
This menu resets Cl readings, Zero Calibration 

pH Standard
Calibration: >

Example on Section 13.
pH Slope
Calibration: >

units apart. Example on Section 13.
Reset pH to
Factory Cal: >


Chlorine Units:
ppm >

Loop 1 Source:
Chlorine >
Example on Section 16.
Loop 1 Rng: ppm
0.00 5.00 >
Select the minimum and maximum values for the current loop output. Units are derived from

Loop 2 Source:
pH
>

Loop 2 Rng: pH
00.0 14.00 >
Select the minimum and maximum values for the current loop output. Units are derived from

 

Factory settings shown



For greater accuracy it is recommended that the initial calibration of the system should be in the following order:
1. Temperature
2. 

3. Chlorine sensor

 

 
The menus below are displayed here in the order seen when scrolling down through the Calibrate Menu.
The next two pH calibration screens will be shown only when a valid pH sensor is detected.



edit mode

settings
ENTER
ENTER
2s
ENTER
ENTER

15
If Pulse Mode was chosen:
Relay 2 Mode:
Off >

To disable this relay choose Off.
Relay 2 Source:
pH >

screens below do not appear if Relay 2 Mode is set to Off.
Relay 2 Setpnt:
0.00 pH >


Relay 2 Hys:
0.20 pH
>


Relay 2 Delay:
0.0 secs >
Set the time delay for Relay 2 to activate after reaching the Setpoint.
Range: 0 to 6400 seconds.
If Low or High Mode was chosen:
Relay 1 Hys:
0.20 ppm >

Relay 1 Delay:
0.0 secs >
Set time delay for Relay 1 to activate after reaching the setpoints set in Relay 1 Range.
Relay1 Rng: ppm
0.00 5.00 >
Enter the range where Relay 1 will activate above and below this setpoint.
Relay1 PlsRate:
120 pulses/min >
Set the maximum pulse rate. Range: 1 to 400 pulses/min.
Relay 1 Mode:
Off >

functions are inactive and not visible. Example on Section 16.3.
Relay 1 Source:
Chlorine
>

Relay 1 Source:
Chlorine
>

Relay 1 Source:
Chlorine
>

Relay 1 Setpnt:
0.00 ppm >


Relay 1 Hys:
0.20 ppm >


Relay 1 Delay:
0.0 secs
>
Set the time delay for Relay 1 to activate after reaching the Setpoint.
Range: 0 to 6400 seconds.

If Low or High Mode was chosen:
If Window Mode was chosen:
Relay1 Rng: ppm
0.00 5.00 >
Enter the range where Relay 1 will activate above and below this setpoint.
Verify all relay settings if the Relay Source is changed.

16 




Contrast:
3 >

Cl Sensor Type:
Free Cl >
Select the chlorine sensor: Free Cl.
pH Input
Sensor >


Temp Display:
°C >
Choose units of °C or °F.
Averaging:
Off >


Manual pH Value
7.000 pH

If Manual pH input was chosen:
Relay2 Rng: pH
0.00 14.0 >
Enter the range where Relay 2 will activate above and below this setpoint.
Relay2 PlsRate:
120 pulses/min
>
Set the maximum pulse rate. Range: 1–400 pulses/min.
If Pulse Mode was chosen:
Find New
Sensor(s):
>

Last Cal
10-18-09 >
Edit the calibration date.

Relay 2 Rng: ppm
0.00
5.00 >
Enter the range where Relay 2 will activate above and below this setpoint.
Relay 2 Hys:
0.20 ppm
>

Relay 2 Delay:
0.0 secs >
Set the time delay for Relay 2 to activate after reaching the setpoints set in the
Relay 2 Range.
If Window Mode was chosen:
Relay 2 Source:
pH >

Relay 2 Source:
pH >



to enter Edit Mode

to save your settings
ENTER
ENTER

to scroll through the menus
5s

ENTER
ENTER

17




Zero Cal: ppm&nA
xxx.xx xxxx.x

Temp at Cal:
xxxx.x °C

pH at Cal:
xxx.xx pH

In Proc: ppm&nA
xxx.xx xxxx.x

Temp Offset:
xxxx.x °C
Temperature offset calculated from user entered temperature calibration from Calibrate Menu.
Elapsed Time:
xxxxx. hrs
Total hours of operation.
Low & High: °C
-xxxx.x +xxxx.x

Test Loop 1:
>


Test Loop 2:
>


Test Relay 1:
>


Test Relay 2:
>


Read Sens Data:
No
>


Cl Sensor S/N:
xxxxxxxxx
View the sensor serial number.
Cl Type & Range:
2630 xxx.x ppm

If Yes was chosen:
Loop 1 Adjust:
4.00 mA
>


Loop 1 Adjust:
20.00 mA >

Loop2 Adjust:
4.00 mA >

Loop2 Adjust:
20.00 mA >

Decimal:
***.**
>
Select the decimal point for the display. Maximum of 2 decimal places.

18 
 
System Start-up: Step 3
If a pH sensor is part of the system, use the GF Calibration Kit 3-2700.395 (159 001 605) prior to initially installing the sensor and
during its normal lifetime. If a pH sensor is not available but pH determination is necessary, measure process pH with a separate
test and enter the value in the Options Menu. Next step: Chlorine Sensor Conditioning (see section 6, page 19).
View Menu
Calibrate Menu
FCl: 2.67 ppm
7.11 pH 25.3°C
pH Standard
Calibration: >
ENTER
ENTER
2s
ENTER
ENTER

5X
pH Standard Cal:
07.00 pH/ 0 mV

entered here
6
5
Step 4






 
 

connected.
1. 

2. 


3. 
electrode between buffers
4. 


5. Go to the Calibrate Menu.
6. pH Standard menu.
7. 
8. 
in; in this case.
9. 
10. 
 
1. 
it in distilled water.
2. 

units apart.
3. 


4. menu.
5. 
6. 
in; 4.01 in this case.
7. 
8. 
9. 
10. 

View Menu
Calibrate Menu
pH Slope
Calibration: >
pH Slope Cal:
04.01 pH/ +177 mV
ENTER
ENTER

entered here
4
6
5




pH Standard Cal:
07.00 pH/ 0 mV
19
 

can be entered manually and will be used to calculate the chlorine
measurements.


1. Go to the Options Menu.
2. menu.
3. 
4. Choose  and press Enter.
5. menu.
6. 
7. .
8. 
9. Exit to the View Menu.

 
System Start-up: Step 4
A new chlorine sensor or one that has had the electrolyte or membrane replaced must be conditioned to generate stable and
accurate readings. To condition a chlorine sensor, the sensor and sensor electronics must be installed and powered and must

Next step: Calibrating Chlorine (see section 7, page 20).
pH Input
Sensor
>
pH Input
Manual >
pH Input
Sensor Manual
Manual pH Value
7.220 pH
Manual chosen


Options Menu
Step 2
5
4
ENTER
ENTER
ENTER
ENTER

1. 

2. 
The membrane cap must be replaced every time the electrolyte is changed.
20 
 
System Start-up: Step 5
Chlorine sensors need to be calibrated for accuracy. After the 4 hour conditioning period, Temperature Calibration, Zero Point
!"""
Next step: Setting Output Settings (see section 8, page 21).
 
The chlorine sensor needs to be calibrated against two chlorine

point calibration is very stable. Calibration must be done with every
new sensor and any time a membrane cap is replaced.
1. 
devices that connect to the transmitter.
2. 
with the electronics still attached.
3. 
4. 
Stirring the sensor in water is not necessary, but allows the


5. Go to the Calibrate Menu.
6.  one menu to the menu.
7. 

can only be saved as displayed.
8. 
or press to escape without changes.
9. Exit to the View Menu.
10. 

11. 


Cl Zero:
Calibration >
Zero Cal: ppm&nA
0.20 / 001.0

Calibrate Menu
ENTER
ENTER

Zero Cal.
Step 6



 
The temperature element inside the chlorine sensor needs to be
calibrated. Use a reference thermometer at the same temperature
and in the same medium as the immersed sensor.


remove the cell plug to insert the thermometer. Replace the plug after
TC Calibration.

1. Go to the Calibrate Menu.
2.  3 menus to the menu.
3. 
4. Enter the temperature reading. .
5. 
6. Exit to the View Menu.
Step 2
4
Cl Temperature
Calibration: >
Cl Temp: Cal
+025.3 °C

Calibrate Menu

ENTER
ENTER

  • Page 1 1
  • Page 2 2
  • Page 3 3
  • Page 4 4
  • Page 5 5
  • Page 6 6
  • Page 7 7
  • Page 8 8
  • Page 9 9
  • Page 10 10
  • Page 11 11
  • Page 12 12
  • Page 13 13
  • Page 14 14
  • Page 15 15
  • Page 16 16
  • Page 17 17
  • Page 18 18
  • Page 19 19
  • Page 20 20
  • Page 21 21
  • Page 22 22
  • Page 23 23
  • Page 24 24
  • Page 25 25
  • Page 26 26
  • Page 27 27
  • Page 28 28
  • Page 29 29
  • Page 30 30
  • Page 31 31
  • Page 32 32
  • Page 33 33
  • Page 34 34
  • Page 35 35
  • Page 36 36
  • Page 37 37
  • Page 38 38
  • Page 39 39
  • Page 40 40
  • Page 41 41
  • Page 42 42
  • Page 43 43
  • Page 44 44
  • Page 45 45
  • Page 46 46
  • Page 47 47
  • Page 48 48

Signet 4630 User manual

Type
User manual

Ask a question and I''ll find the answer in the document

Finding information in a document is now easier with AI