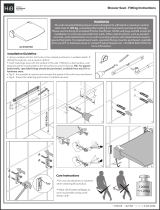
STEP
05
Thank you for purchasing this Novum product.
Please read through these instructions carefully and refer back to them during
installation to ensure that your product is fitted safely and that it retains its high
quality finish.
Please retain this leaflet for future reference.
Before drilling, ensure there are no hidden cables or pipes in the wall.
Care Instructions
Do not use abrasives or solvents when cleaning this product.
Wipe off all water spillages as soon as possible using a soft cloth.
Tools Required for Installation
1. Pencil
2. Tape Measure / Ruler
3. Level
Installing your furniture
STEP
01
User defined height
STEP
03
or
STEP
02
Before drilling, ensure there are no hidden
cables or pipes behind the mounting points.
Using a suitable drill bit, drill holes in the
marked positions to a suitable depth.
If fitting to a tiled surface, wall plugs
should be inserted below the tile
surface to avoid cracking.
NB. For plasterboard walls, specialist
heavy duty fixings should be
purchased, available from any DIY or
hardware store.
STEP
04
Top screw: Higher or lower
adjustment
Bottom screw: Longer or
shorter adjustment
For units with adjustable
hangers
FI #03 001 Ver No. . 2.0 July 2017
Horizontal Line
Screw position
Silicone
Silicone
Wall Wall
Wall Wall
4. Drill & Suitable Drill Bits
5. Screw Driver
6. Silicone

Adjustment Screw A
Adjustment Screw B
STEP
02
Before drilling, ensure there are no hidden
cables or pipes behind the mounting points.
Using a suitable drill bit, drill holes in the
marked positions to a suitable depth.
If fitting to a tiled surface, wall plugs
should be inserted below the tile
surface to avoid cracking.
NB. For plasterboard walls, specialist
heavy duty fixings should be
purchased, available from any DIY or
hardware store.
Btw unit
The BTW unit has been designed to make fitting as simple as possible, this
unit can be used on its own or next to the full range of Novum bathroom
furniture units.
If used next to a washbasin unit, the BTW unit should sit neatly next to the
washbasin unit and slightly under the basin. Use a good quality bathroom
sealant to make a waterproof joint between the washbasin and the BTW unit
top.
Fit the pan and cistern (not supplied) according to the manufacturers
instructions. Care should be taken when cutting the hole for cistern lever and
for the pan outlet, use a fine tooth saw and be careful to reseal the edge of
the cut panel to stop any water ingress.
Installing your storage unit or
Cabinet
STEP
01
STEP
03
HiB Novum, Building 3, North London Business Park, Oakleigh Road South,
New Southgate, London, N11 1GN
t: 020 8441 0352 f: 020 8441 0219 e: [email protected]
hibnovum.co.uk
How to remove and adjust the drawer(s)
Removing:
Open the drawer and remove the
retaining screw on the drawer
bottom on both sides.
The drawer can now be
removed.
Rotating the gromit on both sides
of the drawer allows you to adjust
the heights of the drawer.
Adjusting:
Loosen the retaining screws.
This will allow you to rotate the
gromit on both sides of the
drawer to adjust the height of the
drawer.
When the draws have been
adjusted, retighten the retaining
screws.
User defined height
Horizontal line
Screw position
Wall Wall
B
AA
How to adjust cabinet door(s)
-
 1
1
-
 2
2
HiB Serene Cloakroom Fitting Instructions
- Type
- Fitting Instructions
- This manual is also suitable for
Ask a question and I''ll find the answer in the document
Finding information in a document is now easier with AI
Related papers
Other documents
-
Croydex WC836005YW Installation guide
-
Habitat Cornelia 2 Door Sideboard Oak | User manual
-
Habitat Jenson 3 Door 2 Drawer Tall Wardrobe User manual
-
 Croydex AD107041YW Installation guide
-
 Croydex WC450822 User manual
-
GFW GFW 2 Wall Mounted Bedside Table Set User manual
-
 Roper Rhodes System Series User manual
-
 Croydex MM710200E User manual
-
Habitat 3117529 Kirk 3+3 Drawer Chest User manual
-
 Croydex WC450505 User manual


