Page is loading ...

USER'S MANUAL
Color LCD Monitor
P1710A
P1910A
TOSHIBA CORPORATION
Owner’s Record
The model number and serial number are on the
back of your monitor. Record these numbers in the
spaces below Refer to these numbers whenever you
communicate with your Toshiba dealer about this
monitor.
V.2.0
Model Number:
Serial Number:
Part Number:
Leading Innovation

1 2
For information on our latest products and peripheral devices, refer to the following Website:
http://www.toshibasecurity.com
If the URL changes, refer to the Toshiba website (http://www.toshiba.com/).
Important Information
WARNING:
TO REDUCE THE RISK OF FIRE OR ELECTRIC SHOCK, DO NOT EXPOSE THIS APPLIANCE TO
RAIN OR MOISTURE.
The lightning ash with arrowhead symbol, within an equilateral triangle, is intended to alert
the user to the presence of uninsulated "dangerous voltage" within the product's enclosure
that may be of sufcient magnitude to constitute a risk of electric shock to persons.
The exclamation point within an equilateral triangle is intended to alert the user to the presence
of important operating and maintenance (servicing) instructions in the literature accompanying
the appliance.
CAUTION TO REDUCE THE RISK OF ELECTRIC SHOCK:
DO NOT REMOVE COVER. NO USER SERVICEABLE PARTS INSIDE. REFER SERVICING TO QUALIFIED
SERVICE PERSONNEL.
FIELD INSTALLATION MARKING:
THIS INSTALLATION SHOULD BE MADE BY A QUALIFIED SERVICE PERSON AND SHOULD CONFORM
TO ALL LOCAL CODES.
WARNING: TO REDUCE THE RISK OF ELECTRIC
SHOCK, DO NOT REMOVE COVER (OR BACK).
NO USER-SERVICEABLE PARTS INSIDE.
REFER SERVICING TO QUALIFIED SERVICE
PERSONNEL.
RISK OF ELECTRIC
SHOCK DO NOT OPEN
WARNING
Table of Contents
Important Information 2
Dear Customer, 3
Important Safeguards 3
Disclaimer 6
Usage Limitation 6
Notes on Use and Installation 6
Monitor Installation 7
1.Desktop intstallation 7
2.Wall Mount Installation 7
3.Rack mount installation 8
AC Adapter 9
LCD panel 10
Components 10
External View and Physical Description 10
Input and Output connectors 11
Setup for Monitor 12
1.Front control panel 12
2.Selection of input signal 13
3. Adjustment of contrast and Brightness 13
4.Lock a switch and unlock 13
5.Menu function 13
6.VGA / DVI Menu and denition of functions 14
7.Composite Video OSD Menu and denition of functions 16
P1710A / P1910A Specication 19
LIMITED WARRANTY

3 4
USA - FCC Statement
FCC Declaration of Conformity Statement
Product name: Color LCD Monitor
Model number: P1710A P1910A
The Toshiba Color LCD Monitor complies with Part 15 of the FCC Rules. Operation is subject to the following two
conditions: (1) this device may not cause harmful interference, and (2) this device must accept any interference
received, including interference that may cause undesired operation.
The party responsible for compliance to these rules is:
TOSHIBA AMERICA INFORMATION SYSTEMS, INC.
9740 IRVINE BLVD., IRVINE, CA 92618-1697
TEL: (949) 583-3000
NOTE:
This equipment has been tested and found to comply with the limits for a Class B digital device, pursuant to Part
15 of the FCC Rules. These limits are designed to provide reasonable protection against harmful interference
in a residential installation. This equipment generates, uses and can radiate radio frequency energy and, if not
installed and used in accordance with the instructions, may cause harmful interference to radio communications.
However, there is no guarantee that interference will not occur in a particular installation. If this equipment does
cause harmful interference to radio or television reception, which can be determined by turning the equipment off
and on, the user is encouraged to try to correct the interference by one or more of the following measures:
- Reorient or relocate the receiving antenna.
- Increase the separation between the equipment and receiver.
- Connect the equipment into an outlet on a circuit different from that to which the receiver is connected.
- Consult the dealer or an experienced radio/TV technician for help.
CAUTION:
Changes or modications to this equipment not expressly approved by Toshiba America Information Systems,
Inc. could void the user’s authority to operate this equipment.
Dear Customer,
Thank you for purchasing the Color LCD Monitor. Before using the monitor, read this User's Manual carefully to
ensure correct usage. Once you have nished reading this User's Manual, keep it in a convenient place for future
reference.
The design, specications, software, and User's Manual contents are subject to change without prior notice.
Important Safeguards
1. Read Instructions
Read all the safety and operating instructions before operating the product.
2. Retain Instructions
Retain the safety instructions and user's manual for future reference.
3. Warnings
Comply with all warnings on the product and in the user's manual.
4. Follow Instructions
Follow all operating and use instructions.
5. Cleaning
Disconnect this monitor from the power supply before cleaning.
6. Attachments
Do not use attachments not recommended by the monitor manufacturer as they may pose safety risks.
7. Water and Moisture
Do not use this monitor near water. Some examples are: near a bath tub, wash bowl, kitchen sink, or laundry
tub, in a wet basement, or near a swimming pool.
8. Accessories
Do not place this monitor on an unstable cart, stand, tripod, bracket or table. The monitor may fall, causing
serious injury to a person, or serious damage to the product. Use only with stand, tripod, bracket, or table
recommended by the manufacturer, or sold with the monitor. Any mounting of the product should follow the
manufacturer's instructions, and should use a mounting accessory recommended by the manufacturer.
9. Ventilation
This monitor should never be placed near or over a radiator or heat register. If this product is placed in a
built in installation verify that there is proper ventilation so that the monitor temperature operates within the
recommended temperature range.
10. Power Sources
This monitor should be operated only from the type of power source indicated on the information label. If you
are not sure of the type of power supply at your location, consult your product dealer.
11. Power-Cord Protection
Power cords should be routed so that they are not likely to be walked on or pinched by items placed upon or
against them. Pay particular attention to cords at plugs, screws and the point where they exit the product.
12. Installation
Install this monitor on a secure part of the ceiling or wall. If installed on an unsecured location, the monitor
could fall causing injury and damage.
13. Lightning
For additional protection on this monitor during a lightning storm, or when it is left unattended and unused for
long periods of time, unplug it from the wall outlet and disconnect the power supply and cable system. This
will prevent damage to the monitor due to lightning and powerline surges. If lightning occurs, do not touch the
unit or any connected cables in order to avoid electric shock.
14. Overloading
Do not overload the power supply or extension cords as this can result in a risk of re or electric shock.
15. Object and Liquid Entry
Never push objects of any kind into this monitor through openings as they may touch dangerous electrical
points or short-out parts that could result in a re or electrical shock. Never intentionally spill liquid of any kind
on the monitor.
16. Heat
Keep the product away from direct sunlight, re or a heat source such as a heater, radiators, or other
products (including ampliers) that produce heat. This may reduce the product lifetime or result in re.

5 6
17. Connecting
When you connect this product to other equipment, turn off the power and unplug all of the equipment from
the wall outlet. Failure to do so could cause damage to this product. Read the owner’s manual of the other
equipment carefully and follow the instructions when making any connections.
18. LCD panel
Do not press on or jolt the LCD panel. Doing so may cause the LCD panel glass to break and injury may
occur. Should the LCD panel be broken and liquid leaks out, do not inhale or swallow it. Doing so may cause
poisoning. If you have got it into your mouth, wash it out and consult your doctor. If your hands or clothes
have touched it, wipe them with alcohol and a cleaning cloth and then wash them well.
19. Servicing
Do not attempt to service this monitor yourself as opening or removing covers may expose you to dangerous
electrical or other hazards. Refer all servicing to qualied service personnel.
20. Damage Requiring Service
Disconnect this monitor from the power supply and refer servicing to qualied service personnel under the
following conditions.
a. When the power-supply cord or plug is damaged.
b. If liquid has been spilled, or objects have fallen into the monitor.
c. If the monitor has been submerged in water.
d. If the monitor does not operate normally by following the operating instructions in the user's manual.
Adjust only those controls that are covered by the user's manual as an improper adjustment of other
controls may result in damage and will often require extensive work by a qualied technician to restore
the monitor to its normal operation.
e. If the monitor has been dropped or the cabinet has been damaged.
f. When the monitor exhibiting a distinct change in performance which indicates a need for service.
g. Other trouble.
21. Replacement Parts
When replacing parts be sure the service technician uses parts specied by the manufacturer or have the
same characteristics as the original part. Unauthorized substitutions may result in re, electric shock or other
hazards.
22. Safety Check
Upon completion of any service or repairs to this monitor, ask the service technician to perform safety checks
to determine that the monitor is in proper operating condition.
The cold cathode fluorescent lamp contains a small amount of mercury. When the monitor reached the end
of its useful life, dispose of the used monitor by the approved method in your area, or ask a qualied service
technician to properly dispose of the monitor.
NOTE:
The lamp(s) inside this product contain mercury. Disposal may be regulated due to
environmental considerations. For disposal or recycling information, contact your local
authorized dealer or the Electronics Industries Alliance at
www. eiae. org
Disclaimer
We disclaim any responsibility and shall be held harmless for any damages or losses incurred by the user in any
of the following cases:
1. Fire, earthquake or any other act of God; acts by third parties; misuse by the user, whether intentional or
accidental; use under extreme operating conditions.
2. Malfunction or non-function resulting in indirect, additional or consequential damages, including but not
limited to loss of expected income and suspension of business activities.
3. Incorrect use not in compliance with instructions in this user's manual.
4. Malfunctions resulting from misconnection to other equipment.
5. Repairs or modications made by the user or caused to be made by the user and carried out by an
unauthorized third party.
6. Notwithstanding the foregoing, Toshiba's liabilities shall not, in any circumstances, exceed the purchase
price of the product.
Usage Limitation
The product is not designed for any "critical applications." "Critical applications" means life support systems,
exhaust or smoke extraction applications, medical applications, commercial aviation, mass transit applications,
military applications, homeland security applications, nuclear facilities or systems or any other applications where
product failure could lead to injury to persons or loss of life or catastrophic property damage.
Accordingly, Toshiba/TAIS disclaims any and all liability arising out of the use of the product in any critical
applications.
Notes on Use and Installation
Treat the monitor with care
Dropping or subjecting the monitor to intense vibration may cause it to malfunction.
Avoid Volatile Liquid
Do not use volatile liquids, such as an insect spray, near the unit. Do not leave rubber or plastic products
touching the unit for a long time. They will leave marks on the nish. Do not use a chemically saturated cloth.
Never touch internal parts
Do not touch the internal parts of the monitor other than the parts specied.
Keep the monitor installation away from video noise
If cables are wired near electric lighting wires or a TV set, noise may appear in images. In this event relocate
cables or reinstall equipment.
Check the ambient temperature and humidity
Avoid using the monitor where the temperature is hotter or colder than the specified operating range. Doing
so could affect the internal parts or cause the image quality to deteriorate. Special care is required to use the
monitor at high temperature and humidity.
Should you notice any trouble
If any trouble occurs while you are using the monitor, turn off the power and contact your dealer. If you continue
to use the monitor when there is something wrong with it, the trouble may get worse and an unpredictable
problem may occur.

7 8
Monitor Installation
1.Desktop intstallation
Observe the following safety precautions:
(1) Read and Follow the pedestal assembly instructions.
CAUTION:
Before beginning pedestal assembly, carefully lay the front of the LCD Panel face down on a at, cushioned
surface such as a quilt or blanket. Leave the bottom of the unit protruding over the edge of the surface and assemble the
pedestal mentioned below.
(2) Place the LCD monitor on a sturdy, level surface that can support the weight of the monitor.
Viewing Angle:
For the user’s convenience, the LCD screen may be tilted according to their viewing requirements. The
monitor can be tilted forward up to 25 degrees or backward up to 5 degrees.
2.Wall Mount Installation
If you decide to wall mount your LCD monitor, always use VESA wall bracket appropriate for the size and
weight of the LCD monitor.
VESA Mounting Pattern:
Hole Pattern (HxV): 100x100 mm
Screw Size: M4
(5) Follow the instructions provided with your wall bracket. Before proceeding, make sure the appropriate
bracket(s) are attached to the wall and the back of the monitor.
① Extreme care should always be used when attaching the
pedestal stand to avoid damage to the LCD panel.
Insert the back stand to the pedestal until it clicks.
Check that the back stand and pedestal are rmly attached
and that the back stand is rmly attached to the LCD monitor.
3.Rack mount installation
If you decide to the Rack mount your LCD monitor, always use a dedicated rack mount bracket below.
P1710A: ERK-17
P1910A: ERK-19
Note: Rack mount bracket is not included. It is sold separately.
1)
CAUTION:
Two people are required for installation.
2) Unplug and remove any cables and/or other component connectors from the monitor.
3) Remove the screws and back stand. Remove the rivets on the side of monitor.
4) Always use the screws supplied by the rack mount bracket, and secure the bracket to the monitor.
5) Follow the instructions provided with your rack. And secure the monitor to the rack by appropriate
screws.
(1)
CAUTION:
Two people are required for installation.
(2) Unplug and remove any cables and/or other component
connectors from the monitor.
(3) Remove the screws and back stand shown.
(4) Always use the screws supplied or recommended by
the wall mount manufacturer.
Note:
Use appropriate screws up to 12mm long with
at washer and spring washer.

9 10
AC Adapter
Precautions for Use
Be sure to use only the supplied AC adapter. Using a different AC adapter may cause the
monitor to malfunction, heat up, or catch re. Before using the AC adapter, carefully read and
observe the Important Safeguards ( → page 3) and the notes below.
Plug the AC adapter into the 100-240V AC outlet. If inserting it into other than 100-240V AC outlet, it may
result in electric shock or re hazard.
Do not repair, modify or disassemble the AC adapter. It may result in electric shock or re hazard.
Keep the Plug free from any dust or dirt. Neglecting to do so may cause a re due to deterioration of the
insulation. Pull out the power plug from the outlet before cleaning.
Do not cover or wrap the AC adapter with a cloth or place it near heating devices. It may cause re or
malfunction of the unit.
Protect the power cord from being:
• damaged, modied for extension, or subjected to extreme heat.
• pulled, located under heavy objects, or pinched.
• bent, twisted, or bundled.
Neglecting to do so may cause electric shock or re hazard.
Do not expose this AC adapter to water.
Install the AC adapter properly on a wall or ceiling after plugging in the AC adapter. Avoid dropping the AC
adapter, failing to do so may cause serious personal injury or death.
Do not allow the connectors on the AC adapter to come into contact with any other metal object as this may
result in short circuit.
To connect the AC adapter, rmly insert the plug end of the cable into the AC adapter jack.
Do not insert the plug into other jacks as this may cause a malfunction.
When removing the connection cable, disconnect the cable by holding its plug. Do not disconnect the cable
by pulling on the cable.
Do not drop the AC adapter or subject it to strong impact.
Do not use the AC adapter in hot and humid places.
Do not use the supplied AC adapter with devices other than this monitor.
Temperature increasing on the surface of the adapter is normal. Before moving the adapter to another
location, unplug it from the wall outlet, and wait until its temperature decreases.
Buzzing noises may come from inside. This does not indicate malfunction.
Using the AC adapter near a radio, TV, cell phone, or any wireless devices/equipment may cause
interference. Use the adapter at sufcient distances from these devices.
Be sure to use the supplied AC adapter. Using different AC adapter may cause re hazard or the monitor to
malfunction.
Specications
Model: EA10521E-120 ( This is for P1710A and P1910A )
Power source: 100-240V AC 1.8A, 50/60 Hz
Rated output: 12V DC 3.5A
Ambient temperature guaranteed for performance: 0° C to 40° C (32° F to 104° F)
Storage temperature: -20° C to 85° C (-4° F to 185° F)
Maximum external dimensions (Length x width x height): 120 x 60 x 35 mm (4.72 x 2.36 x 1.38 inches)
DC cord length: 1500 mm (59 inches)
LCD panel
The following symptoms are technical limitations of LCD Display technology and are not an indication of
malfunction; therefore, Toshiba is not responsible for perceived issues resulting from these symptoms.
An afterimage (ghost) may appear on the screen if a xed, nonmoving image is displayed for a long period
of time. The afterimage is not permanent and will disappear in a short period of time.
The LCD panel contained in this Monitor is manufactured using an extremely high level of precision
technology; however, there may be an occasional pixel (dot of light) that does not operate properly (does
not light, remains constantly lit, etc.). This is a structural property of LCD technology, is not a sign of
malfunction, and is not covered under your warranty. Such pixels are not visible when the picture is viewed
from a normal viewing distance.
The uorescent tube which illuminates the panel from the inside will deteriorate with use. When the LCD
becomes dim, ickers, or does not illuminate, contact your dealer for replacement.
The brightness of the LCD monitor differs slightly depending on the viewing angles. Adjust the angle to
obtain the best viewing.
Components
Color LCD Monitor x1
Accessories
• AC adapter x 1
• Power cord x 1
• VGA Cable x 1
• Pedestal x 1
• User’s Manual x 1
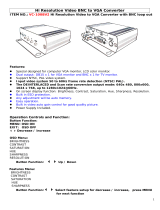
External View and Physical Description
P1710A
P1710A
LCD Panel
Threaded
hole for
rack mount
bracket
Input and output connectors
Threaded hole for VESA
wall bracket
Back stand
Pedestal
inch(mm)
15.193 (385.89)
13.425 (341)
7.874 (200)
9.449 (240)
3.031
(77)
2.165
(55)
10.764 (273.4)
13.224 (335.89)
13.224 (406.75)
2.789
(70.85)
Mono Speaker Front control panel

11 12
Input and Output connectors
DC 12V IN:
Input connector of power. Connect to the output cable of AC adapter.
DVI IN:
Input connector of DVI-D format RGB.
Type TDMS Digital RGB.
Input impedance 100Ω (differential)
Note:
• DVI-D doesn’t support audio signal. Connect audio cable separately.
• DVI-D doesn’t support analog RGB and digital component signals. If you convert this connector to HDMI,
it is able to support digital RGB only.
• This monitor doesn’t support HDCP(High-bandwidth Digital Content Protection) signal. Don’t connect to
the HDMI connector of DVD player.
VGA IN:
Input connector of analog RGB.
Type Analog RGB (VGA)
Input impedance 75Ω
BNC 1 IN:
Input connector of Video. (BNC connector)
Type Composite video (NTSC or PAL)
Input impedance 75Ω
Note: This video channel is shown as “AV” on the screen.
BNC 1 OUT:
Output connector of Video.(BNC connector)
Type Composite video (NTSC or PAL)
Output impedance 75Ω
BNC 2 IN:
Input connector of Video. (BNC connector)
Type Composite video (NTSC or PAL)
Input impedance 75Ω
Note: This video channel is shown as “AV1” on the screen.
BNC 2 OUT:
Output connector of Video.(BNC connector)
Type Composite video (NTSC or PAL)
Output impedance 75Ω
AUDIO IN:
Input connector of Audio. (RCA Jack)
Input 0.5Vrms @1KHz (Mono)
AUDIO OUT:
Output connector of Audio. (RCA Jack)
Output Maximum 0.85Vrms @1KHz (Mono)
Note: Audio output signal is controlled by the volume in the OSD.
Setup for Monitor
1.Front control panel
①
Power Switch: Push to switch power on/off.
②
LED Indicator: Power light indicator.
③
[+ Mode]
: This switch has multi-function mentioned below.
(1) Push to change input Source. (VGA, DVI, AV, AV1)
(2) Push to select Picture, Setup or PC in Menu.
(3) Push to increase the value of Menu selected.
④
[− Auto]
: This switch has multi-function mentioned below.
(1) VGA signal auto adjustment.
(2) Push to select Picture, Setup or PC in OSD Menu.
(3) Push to decrease the value of Menu selected.
⑤
[
]
: This switch has multi-function mentioned below.
(1) Select Menu upwards.
(2) Push this switch to adjust contrast directly,
and push
[+ Mode]
or
[− Auto]
to change the value of contrast.
P1910A
P1910A
LCD Panel
Threaded
hole for
rack mount
bracket
Input and output connectors
Threaded hole for VESA
wall bracket
Back stand
Pedestal
inch(mm)
7.874 (200)
16.7 (424.19)
14.933 (379.3)
9.449 (240)
2.913
(74)
2.283
(58)
11.969 (304)
14.547 (369.49)
17.219 (437.35)
Mono Speaker Front control panel

13 14
⑥
[
]
: This switch has multi-function mentioned below.
(1) Select Menu downwards.
(2) Push this switch to adjust brightness directly,
and push
[+ Mode]
or
[− Auto]
to change the value of brightness.
⑦
[ Menu ]
: Call or close the Menu. Push to return to the previous item
2.Selection of input signal
(1) Push the
[+ Mode]
switch.
(2) The following OSD is shown. Push the
[
]
or
[
]
switch to select input signal.
(3) Push the
[+ Mode]
switch again.
(4) Push the
[ Menu ]
switch to clear.
3. Adjustment of contrast and Brightness
(1) Push the
[
]
or
[
]
switch.
(2) The adjustment window is shown. Push the
[+ Mode]
or
[− Auto]
switch to adjust to the appropriate
value.
(3) Push the
[ Menu ]
switch to clear this window. (Or, adjustment window will disappear within 10 seconds
automatically.)
4.Lock a switch and unlock
(1) Push the
[ Menu ]
and
[
]
switch at once.
(2) “LOCK” is shown on the screen. And all switches are suspended.
(3) Push the
[ Menu ]
and
[
]
switch at once again.
(4) “UNLOCK” is shown on the screen and released.
5.Menu function
(1) Push the
[ Menu ]
switch.
(2) The Menu is divided into three tabs, Picture, Setup and PC.
They will appear under selected source signal.
• VGA: Picture, Setup and PC tab will be shown.
• DVI, AV, and AV1: Picture and Setup tab will be shown.
(3) Push the
[
]
or
[
]
switch to select menu item.
(4) Push the
[+ Mode]
or
[− Auto]
switch to change the value of selected item.
(5) Push the Menu switch to accept and return to the previous item.
6.VGA / DVI Menu and denition of functions
(1) VGA / DVI – Picture tab
* Above items and value are subject to change without notice *
Menu Value Denition of functions
Brightness 0~100
Adjust the luminance level of the
screen image
Contrast 0~100
Adjust the contrast level of the
screen image
Sharpness(*) 0~100
Adjust the sharpness of the screen
image
Color(*) 0~100
Adjust the saturation of color of the
screen image
Color Temp.
User (individual setting)
sRGB(6500K)/7500k/9300K
Push
[+]
or
[−]
switch to choose the
color temperature (If you set “User”,
the following settings become
effective.)
Color Temp R 0~100
Adjust color value of Red of the
screen image
Color Temp G 0~100
Adjust color value of Green of the
screen image
Color Temp B 0~100
Adjust color value of Blue of the
screen image
(*) DVI input only.
Source
VGA
DVI
AV
AV1
Brightness
<
Contrast
<
Sharpness
<
Hue
<
Color
<
Display Mode
<
Color Temp
<
Color Temp R
<
Full
User
>
>
>
>
>
>
>
>
50
50
0
50
50
50
Picture Setup PC

15 16
(2)VGA / DVI - Setup tab
* Above items and value are subject to change without notice *
Menu Value Denition of functions
OSD H-Position 0~100
Adjust the horizontal position of
Menu on the screen
OSD V-Position 0~100
Adjust the vertical position of Menu
on the screen
OSD Time Out 5~60
Adjust the time-out period from
Menu mode
Volume 0~100
Push
[+]
or
[−]
switch to control the
speaker volume
Language
English, a couple of Chinese,
German, French, Spanish, Italian
Select your language of OSD
Backlight High, Middle, Low
Push
[+]
or
[−]
switch to adjust the
back light of LCD
N.R. 0~100
Push
[+]
or
[−]
switch to adjust the
level of noise reduction of the screen
image
PIP Set 0~100
Push
[+]
switch to enter the sub-
menu
Reset Off, High, Middle, Low
Push
[+]
switch to reset to the
default value
(3) VGA – PC tab (VGA input only)
* Above items and value are subject to change without notice *
Menu Value Denition of functions
Image H Position 0~100 Adjust the horizontal position of the screen image
Image V Position 0~100 Adjust the vertical position of the screen image
Phase 0~63 Adjust the phase right to display clear image on the screen
Clock 0~90 Adjust the clock right to display clear image on the screen
Auto Adjust Push
[+]
or
[−]
to set automatic adjustment of monitor setting
Note: These adjustments work for VGA input only.
7.Composite Video OSD Menu and denition of functions
(1) AV, AV1 (Video) – Picture tab
Image H Position
<
Image V Position
<
Phase
<
Clock
<
Auto Adjust
>
>
>
>
>
50
50
0
40
Picture Setup PC
OSD H Position
<
OSD V Position
<
OSD Time out
<
Volume
<
Language
<
Back Light
<
N.R.
<
PIP Set
>
English
High
Middle
>
>
>
>
>
>
>
50
82
60
50
Picture Setup PC
Brightness
<
Contrast
<
Sharpness
<
Hue
<
Color
<
Display Mode
<
Color Temp
<
Color Temp R
<
Full
User
>
>
>
>
>
>
>
>
50
50
50
50
50
51
Picture Setup
* Above items and value are subject to change without notice *

17 18
Menu Value Denition of functions
Brightness 0~100 Adjust luminance level of the screen image
Contrast 0~100 Adjust contrast level of the screen image
Sharpness(*) 0~100 Adjust the sharpness of the screen image
Hue 0~100
Adjust the hue of color of the screen image
(NTSC video only)
Color(*) 0~100 Adjust the saturation of color of the screen image
Display Mode Full, 4:3, 16:9, Over, Under, 1:1 Adjust the display scan mode
Color Temp. Warm/Cool/User
Push
[+]
or
[−]
button to choose the color
temperature
Color Temp R 0~100 Adjust color value of Red of the screen image
Color Temp G 0~100 Adjust color value of Green of the screen image
Color Temp B 0~100 Adjust color value of Blue of the screen image
(2) AV, AV1 – Setup
*
Above items and value are subject to change without notice *
Note: This setup is the same as VGA / DVI - Setup tab on page 15.
(3) PIP mode Setup
OSD H Position
<
OSD V Position
<
OSD Time out
<
Volume
<
Language
<
Back Light
<
N.R.
<
PIP Set
>
English
High
Middle
>
>
>
>
>
>
>
50
82
60
50
Picture Setup
Setup / PIP Set
Source
<
Multi Picture
<
PIP Position
<
PIP Swap
>
>
>
>
VGA
Small
PIP Position 1
* Above items and value are subject to change without notice *
Menu Value Denition of functions
Source (1)
Push
[+]
or
[−]
switch to select the source on sub
screen
Multi picture
None, Small, Middle, Large, POP
(2)
Push
[+]
or
[−]
to select the PIP mode and size of
PIP screen
PIP Position PIP Position 1, 2, 3, 4, and 5 (3)
Push
[+]
or
[−]
to select the position of PIP
screen
PIP Swap
Under PIP mode, push
[+]
to swap main screen
for PIP screen
(1) For this selection, there will be a difference in the source value you selected on the main screen.
Note: If you select composite video on the main screen, you cannot select other composite video on the
PIP screen.
(2) None: PIP mode OFF
Small: Full width at fth maximum
Middle: Full width at fourth maximum
Large: Full width at third maximum
POP: Split screen
(3) Position 1: Upper left
Position 2: Lower left
Position 3: Middle
Position 4: Upper right
Position 5: Lower right
Note: When PIP window is shown, if you select VGA input, the auto adjust doesn’t work.

19 20
P1710A / P1910A Specication
Model Number P1710A P1910A
Panel Size 17.0” 19.0”
Aspect Ratio 5:4 5:4
Resolution / Scan
640 x 480 @ 60/73/75 640 x 480 @ 60/73/75
800 x 600 @ 56/60/72/75 800 x 600 @ 56/60/72/75
1024 x 768 @ 60/70/75 1024 x 768 @ 60/70/75
1280 x 1024 @ 60/75 1280 x 1024 @ 60/75
Brightness 380cd/m2 (Typ.) (1) 250cd/m2 (Typ.) (1)
Contrast 1000:1(Typ.) (1) 1000:1(Typ.) (1)
Panel Viewing Angle(H/V) 170° / 170°(Typ.) (1) 170° / 170°(Typ.) (1)
Response Time 5ms(Typ.)(1) 5ms(Typ.) (1)
Display color 16.7M 16.7M
Sync. Format NTSC / PAL
Frequency (Horizontal) VGA/DVI: 31.5K - 80KHz, Video: 15750 / 15625Hz (NTSC/ PAL) (2)
Frequency (Vertical) VGA/DVI: 56Hz -75Hz, Video: 50 / 60Hz (2)
Interfaces
Video Interface Video Input x 2 (BNC), Video Output x 2 (BNC)
Termination 75 ohm (Auto Termination)
Graphic Interface Analog RGB Input x 1(D-Sub 15), Digital RGB (DVI-D) Input x 1
Audio Interface Audio Input x 1, Audio Output(volume engaged) x 1
Built-in Speakers 1W x 1
PIP YES
OSD Language
English, Traditional Chinese, Simplied Chinese, French, German,
Spanish, Italian
VESA Mounting VESA 100
Weight (NET) 10.2lb (4.6kg) 10.9lb (4.8kg)
External Dimensions (WxHxD)
15.2x16.0x9.4 inch
(386x407x240 mm)
16.7x17.2x9.4 inch
(424x437x240 mm)
Safety & EMI
AC adapter : UL, CUL, FCC/B
Monitor : FCC/B
Power supply 12V DC ± 10 %
Current Consumption (max.) 12V DC / 3A 12V DC / 2A
Temp (Oper.) 32°F – 104°F (0°C-40°C)
Humidity 20% ~ 80%
Accessories Pedestal, AC Adapter, Power cord, VGA cable, User’s Manual
Design and Specications are subject to change without notice.
(1) These values of specication are from panel spec.
(2) It is not guaranteed for all the specied range.
MEMO

21 22
MEMO MEMO

LIMITED WARRANTY
COLOR LCD MONITOR
The Imaging Systems Division of Toshiba America information Systems, Inc. ("ISD") makes the following limited warranties with regard to this
COLOR LCD MONITOR ("Product"). These limited warranties extend to the Original End-User ("You[r]").
One (1) Year Limited Warranty of Labor and Parts
ISD warrants that this Product will perform in accordance with specications
for a period of one (1) year from the date of purchase by Original End-User. During this one (1) year period, ISD will repair or replace the
Product, if it does not perform as warranted. In order to take advantage of this Limited Warranty, You must: (a) deliver the Product to an
ISD Authorized Service Provider ("ASP"): and (b) pay all transportation and insurance charges for shipment of the Product to the ASP. ISD
reserves the right to substitute factory refurbished parts in place of those in need of repair.
User’s Guide (User's manual):
You should read the User’s Guide (User's manual) thoroughly before operating this Product. Before
seeking warranty service, you should check the troubleshooting guide in the User's Guide (User’s manual) and follow the instructions to
correct the problem.
How to Obtain Warranty Service Step-by-step Procedures:
To obtain warranty service, You should:
1. Contact Toshiba America Information Systems Inc. Technical Support at (877) 855-1349 for operation or installation assistance.
2. A technical support specialist will help diagnose the problem. If the product requires a hardware repair,
Toshiba support will provide a RMA to repair or replace the product.
3. Arrange for shipment of the Product to the Toshiba Exchange Center and include the RMA number you received
from technical support.
4. Securely pack the Product in the original carton and external shipping pack, include a letter explaining
the problem with a copy of the bill of sale or proof of purchase.
5. Prepay all transportation and insurance costs.
Questions?
If you have any questions, please check our web site at http://www.toshibasecurity.com
Your Responsibilities:
This Limited Warranty is subject to the following conditions:
1. You must provide the bill of sale or proof of purchase at the time that warranty service is required.
2. You must notify Toshiba America Information Systems Inc. Technical Support at (877) 855-1349 within (30) days
after you discover that the product does not perform in accordance with the specications during the Limited Warranty period.
3. All Warranty Service of this product must be by an ISD Authorized Service Provider.
4. You must pack the Product in its original carton using the original packing material. Then insert the original carton
containing the Product into another carton with additional packing material before shipping the Product to an ASP.
DISCLAIMERS: ALL OTHER EXPRESS OR IMPLIED WARRANTIES ON THIS PRODUCT, INCLUDING THE IMPLIED
WARRANTIES OF MERCHANTABILITY AND FITNESS FOR A PARTICULAR PURPOSE, ARE HEREBY DISCLAIMED.
SOME STATES DO NOT ALLOW THE EXCLUSION OF IMPLIED WARRANTIES OR LIMITATIONS ON HOW LONG AN
IMPLIED WARRANTY LASTS. SO THE ABOVE LIMITATIONS MAY NOT APPLY TO YOU. IF THIS PRODUCT IS NOT IN
GOOD WORKING ORDER AS WARRANTED ABOVE, YOUR SOLE AND EXCLUSIVE REMEDY SHALL BE THE REPAIR OF
REPLACEMENT OF THE PRODUCT. IN NO EVENT WILL ISD OR ITS PARENT COMPANY OR ANY ASP BE LIABLE TO YOU
OR ANY THIRD PARTY FOR ANY DAMAGES IN EXCESS OF THE PURCHASE PRICE OF THE PRODUCT. THIS LIMITATION
APPLIES TO DAMAGES OF ANY KIND, INCLUDING ANY DIRECT OR INDIRECT DAMAGES, LOST PROFITS, LOST
SAVINGS OR OTHER SPECIAL, INCIDENTAL, EXEMPLARY OR CONSEQUENTIAL DAMAGES, WHETHER FOR BREACH OF
CONTRACT, TORT OR OTHERWISE, OR WHETHER ARISING OUT OF THE USE OF OR INABILITY TO USE SUCH PRODUCT,
EVEN IF TAIS, ITS PARENT COMPANY, OR AN ASP HAS BEEN ADVISED OF THE POSSIBILITY OF SUCH DAMAGES OR OF
ANY CLAIM BY ANY OTHER PARTY. SOME STATES DO NOT ALLOW THE EXCLUSION OR LIMITATION OF INCIDENTAL OR
CONSEQUENTIAL DAMAGES FOR SOME PRODUCTS, SO THE ABOVE LIMITATIONS OR EXCLUSIONS MAY NOT APPLY TO
YOU.
THIS WARRANTY GIVES YOU SPECIFIC LEGAL RIGHTS, AND YOU MAY ALSO HAVE OTHER RIGHTS WHICH MAY VARY
FROM STATE TO STATE.
THIS LIMITED WARRANTY SHALL BE VOID IF THE PRODUCT OR PARTS HAVE BEEN SUBJECTED TO MISUSE,
ABUSE, ACCIDENT, IMPROPER INSTALLATION, IMPROPER MAINTENANCE, OR USE IN VIOLATION OF ISD'S WRITTEN
INSTRUCTIONS, OR WHERE THE PRODUCT HAS BEEN ALTERED OR MODIFIED WITHOUT ISD'S PRIOR AUTHORIZATION,
OR UPON THE REMOVAL OR ALTERATION OF ISD'S FACTORY SERIAL NUMBER. LABOR SERVICE CHARGES FOR
PRODUCT INSTALLATION, SET UP AND ADJUSTMENT OF CONTROLS ARE NOT COVERED BY THIS LIMITED WARRANTY.
No person, agent, distributor, dealer, authorized service provider, or company is authorized to change, modify, or extend the terms of this
Limited Warranty in any manner whatsoever. The time within which an action must be commenced to enforce any obligation of ISD arising
under this Limited Warranty or under any statute, or law of the United States or any state thereof, is hereby limited to one (1) year from the
date You discovered the problem. This limitation does not apply to impelled warranties arising under state law. Some states do not permit
limitation of the time within which You may bring an action beyond the limits provided by state law, so the above provision may not apply to
You. This Limited Warranty gives You specic legal rights and you may also have other rights which vary from state to state.
TOSHIBA AMERICA INFORMATION SYSTEMS, INC.
Imaging Systems Division
/