MURPHY DOOR 100TA User manual

Type
User manual

MURPHY DOOR 100TA: Conceal your valuables seamlessly with our top-of-the-line hidden door solution. Expertly crafted to blend flawlessly with your bookshelf, this innovative door provides secure and discreet access to your hidden room.

MURPHY DOOR 100TA: Conceal your valuables seamlessly with our top-of-the-line hidden door solution. Expertly crafted to blend flawlessly with your bookshelf, this innovative door provides secure and discreet access to your hidden room.

A
C
E
G
H
B
D
F
MurphyDoor.com888-458-5911
12
Mechanical Key Lock
Our most popular locking system, the Mechanical Key Lock is a dead-bolt
locking system that extends a metal rod into the bottom threshold and
top jamb or your frame. The key insert is installed just above the fixed
shelf, but also has the option of being installed below the fixed shelf for
a more hidden application.
Lock Mechanism
(2) 1" Phillips Flat Head Screws
(2) Keys
(6) Lock Bar Brackets
(12) 1/2" Phillips Head Screws
(2) Strike Plates for In-swing Door - (1) Strike Plate for Out-swing Door
(2 or 4) 1/2" Phillips Flat Head Screws - depending on swing direction
(2) Lock Bars
Cylinder
Bezel
Stopping Block (Out-swing door only)
(2) 1-1/4" Phillips Screws
Using an 11/16" drill bit, drill a hole in the side of the bookcase,
opposite the hinges, just above or below the xed shelf.
Insert the cylinder and bezel into the lock mechanism.
2
MurphyDoor.com888-458-5911
3
5
4
6
87
Place the lock into the hole with the cylinder on the inside of
the bookcase.
Slide (3) lock bar brackets onto the top lock bar and place the
bar in the lock.
Attach using (2) 1" Phillips at head screws.
Position the top bracket one nger-width from the top of the
door and secure with (2) 1/2" Phillips head screws.
Position the center bracket halfway between the two brackets
and secure with (2) 1/2” Phillips head screws.
Secure the bottom bracket four ngers above the lock using
(2) 1/2" Phillips head screws.
3
MurphyDoor.com888-458-5911
9
11
10
12
1413
The bottom lock bar will be to long to position in the lock, but
the brackets can be placed without the bar. Position and secure
the bottom bracket 1 nger from the bottom of the door, the
top bracket four ngers below the lock, and the middle bracket
halfway between with (6) 1/2” Phillips head screws.
Using the position you have marked, pre-drill the holes and
secure the strike plate using (2) 1/2" Philips at head screws.
For Pre-assembled Doors the process begins here. Slide the
bottom lock bar into the brackets and mark where it makes
contact with the bottom jamb when the door is closed.
NOTE: Applying a small bit of paint to the end of the lock bar is an
easy way to mark the position.
Use your drill and a chisel to bore out the slot allowing space
for the lock bar to enter.
Position the top lock bar so that it clears the jamb. Mark
where it contacts the top jamb when the door is closed.
For an In-swing door, use the same procedure to install the
upper strike plate.
4
MurphyDoor.com888-458-5911
15
17
16
18
19 20
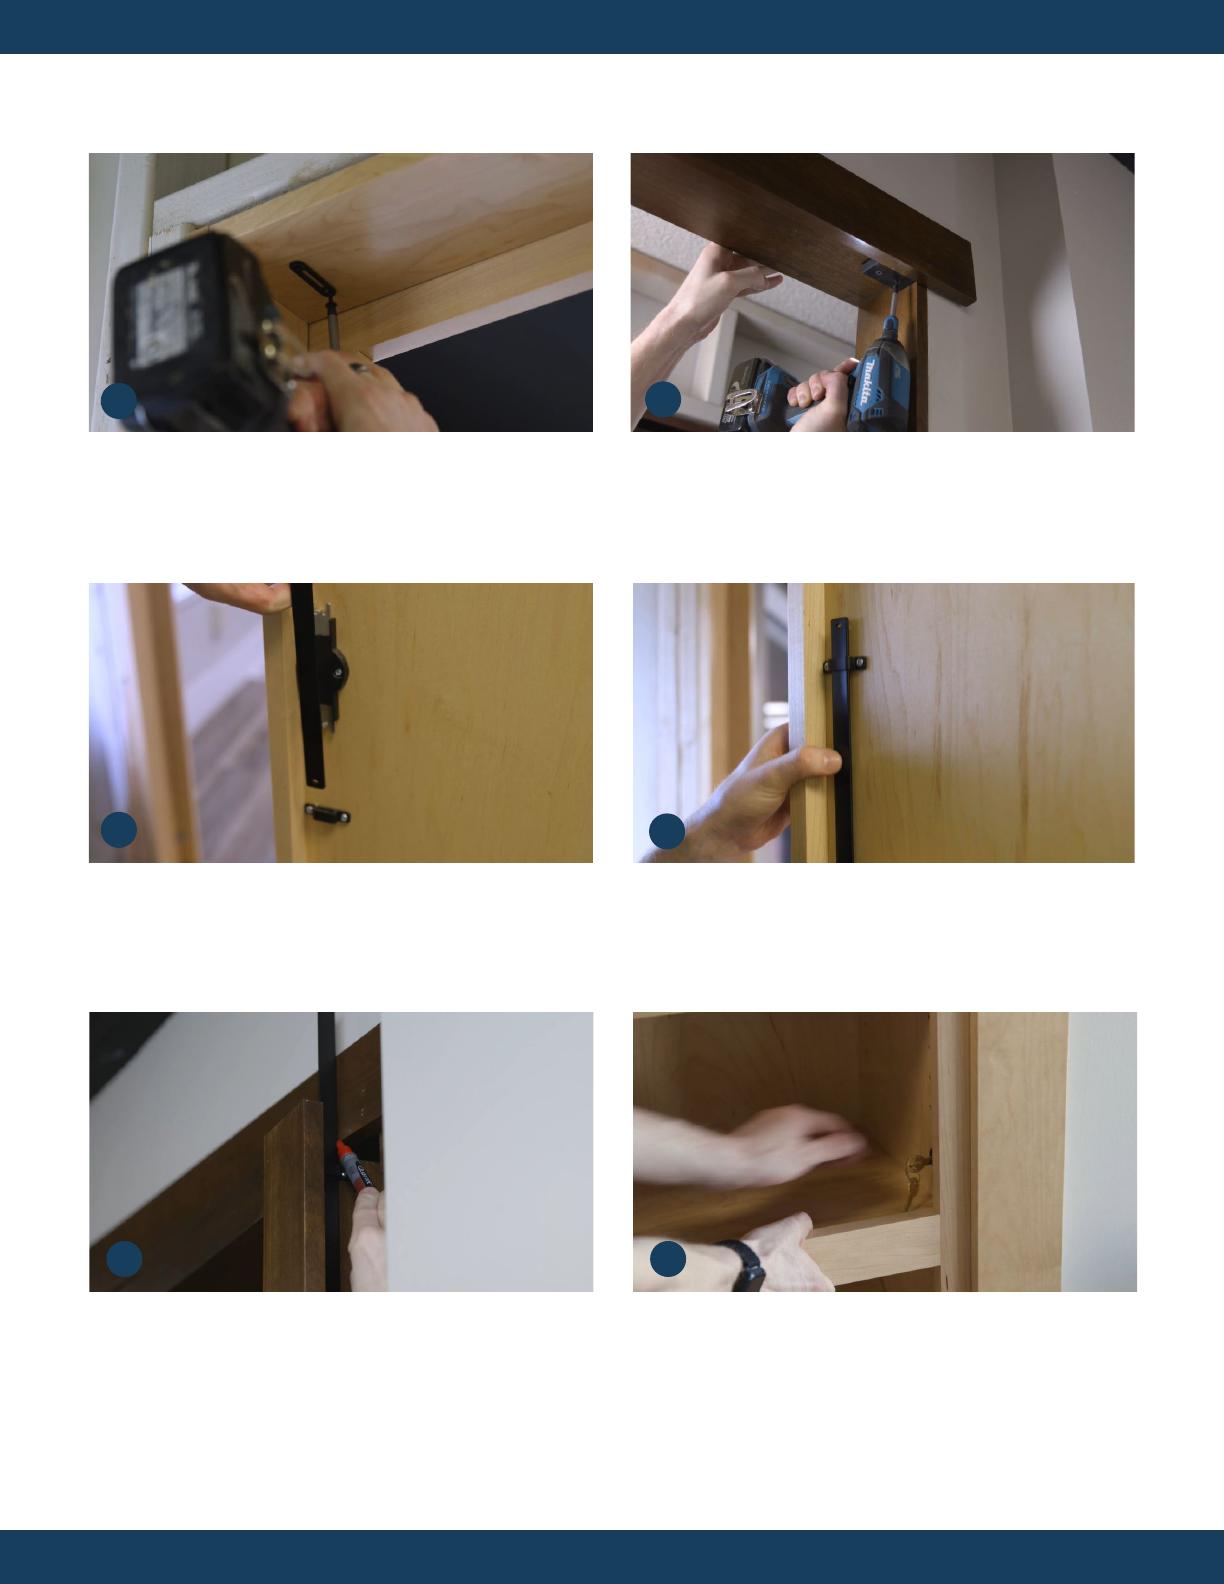
Secure the upper strike plate with (2) 1/2” Phillips at head
screws and bore out the slot for the lock bar.
Insert the bottom lock bar, upside down, with the hole
toward the bottom. Close the door and slide the bar into the
strike plate. Mark the bar where it meets the black plastic
bottom part of the lock. Cut the bar making certain not to
cut the end with the hole.
For an Out-swing door, secure the stopping block, in the
corner, ush with the front of the jamb using (2) 1 1/4"
Philips screws.
For an In-swing door, repeat the process inserting the top
lock bar, upside down in the brackets, hole toward the top.
Close the door and slide the bar into the strike plate. Mark
the bar where it meets the top of the lock. Cut the bar making
certain not to cut the end with the hole.
For an Out-swing door, insert the top bar, non-hole side up,
and t it in the lock. Close the door and mark the lock bar
where it clears the top jamb. Cut the bar making certain not
to cut the end with the hole.
Attach the cut lock bars to the lock mechanism and ensure
that it works.
Note: If the bar doesn’t fall neatly into the strike plate, you
can apply a small bend to position it better.
Congratulations.
This concludes the Mechanical Key Lock installation.
  • Page 1 1
  • Page 2 2
  • Page 3 3
  • Page 4 4

MURPHY DOOR 100TA User manual

Type
User manual

MURPHY DOOR 100TA: Conceal your valuables seamlessly with our top-of-the-line hidden door solution. Expertly crafted to blend flawlessly with your bookshelf, this innovative door provides secure and discreet access to your hidden room.

Ask a question and I''ll find the answer in the document

Finding information in a document is now easier with AI