Page is loading ...

PRINTED IN USA
FORM NO. 45350 (10/07/16)
OWNERS MANUAL
MANUEL DU PROPRIÉTAIRE
MANUAL DEL USUARIO
Model No.
Modèle N°
Modelo Nro:
TANDEM AXLE CART
CHARIOT À ESSIEUX EN TANDEM
CARRITO DE EJE EN TÁNDEM
the fastest way to purchase parts
www.speedepart.com
• Safety
• Assembly
• Operation
• Maintenance
• Parts
CAUTION:
Read Rules for
Safe Operation
and Instructions
Carefully
ATTENTION :
Lire avec attention les règles
d’utilisation sécuritaire et les
instructions.
PRECAUCIÓN :
Lea cuidadosamente las
instrucciones y las reglas para
una operación segura
45-03504
IMPORTANT!
The wheel bearings are not pre lubricated. The wheel hubs must be lled
with grease after the wheels are assembled to the axle.
IMPORTANTE!
Les roulements de roues sont livrés non graissés. Il faut impérativement
remplir de graisse les moyeux de roues après le montage des roues sur
leurs axes.
¡IMPORTANTE!
Los cojinetes de las ruedas no están prelubricados. Los cubos de las
ruedas deben estar llenos de grasa después de montar las ruedas al eje.
Call 1-800-448-9282 for missing parts or assembly help.
• Seguridad
• Armado
• Funcionamiento
• Mantenimiento
• Piezas
• Sécurité
• Assemblage
• Fonctionnement
• Entretien
• Pièces de rechange

2
SAFETY RULES
Remember, any power equipment can cause injury if operated improperly or if the user does not understand how to
operate the equipment. Exercise caution at all times when using power equipment.
Look for this symbol to point out important
safety precautions. It means — attention!
Become alert! Your safety is involved.
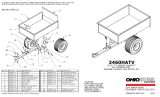
1. Tailgate Guides (2)
2. Corner Caps (2)
3. Foot Pedal Latch
4. Hitch Bracket
5. Latch Stand Bracket
6. Wheel Support
CARTON CONTENTS
CAUTION: Vehicle braking and stability
may be affected with the addition of an
accessory or an attachment. Be aware of
changing conditions on slopes.
1. Read this owners manual before attempting to assemble or operate the cart.
2. Read the vehicle owners manual and know how to operate your vehicle, before using the cart attachment.
3. Do not at any time carry passengers in this cart. It has not been designed to carry passengers.
4. Never allow children to operate the vehicle or the cart attachment.
5. Do not allow adults to operate the vehicle or cart attachment without proper instructions.
6. Always begin with the transmission in rst (low) and gradually increase speed as conditions permit.
7. Tow the cart at reduced speed over rough terrain and hillsides or near creeks and ditches to prevent tipping over and
loss of control. Do not drive too close to a creek or ditch.
8. Vehicle braking and stability will be affected with the attachment of this cart. Do not ll cart to maximum weight
capacity without checking the capability of the towing vehicle to safely pull and stop with the cart attached.
9. Before operating vehicle on any grade (hill) refer to the safety rules in the vehicle owner's manual concerning safe
operation on slopes. Refer also to the slope guide on page 9 of this manual. Stay off steep slopes!
10. Do not tow this cart on highways or on public thoroughfares.
11. Follow maintenance and lubrication instructions as outlined in this manual.
7. Tailgate
8. Front Panel
9. Tailgate Reinforcement Bracket
10. Draw Bar Tongue
11. Axle
12. Cart Body (2)
13. Wheels (4)
14. Walking Beam (2)
15. Front Rail
16. Side Rail (2)
1 7. Rail Brace (7)
ENGLISH
1
3
5
4
2
11
13
6
10
7
9
8
12
14
15
16
17
23548
23502
23492
25112
23484
28258
23014
62458
42697
48951
48950
64873
25114
25106
25107
25111
24497

3
HARDWARE PACK
REF QTY DESCRIPTION
A 1 Hex Bolt, 5/16-18 x 4"
B 8 Curved Head Bolt
C 1 Hex Bolt, 3/8" x 1"
D 12 Truss Hd. Bolt, 5/16" x 3/4"
E 13 Hex Bolt, 1/4" x 3/4"
F 21 Hex Bolt, 1/4" x 5/8"
G 10 SEMS Nut, 5/16"
H 34 Nylock Nut, 1/4"
I 1 Nylock Nut, 3/8"
J 13 Nylock Nut, 5/16"
K 13 Flat Washer, 1/4"
L 2 Flat Washer, 5/16"
REF QTY DESCRIPTION
M 12 1" Thin Washer, (8 pcs. extra)
N 4 1" Thick Washer
O 1 Spring
P 6 Cotter Pin, 9/64" x 1-1/2" Lg.
Q 1 Hair Cotter Pin 1/8"
R 4 Spacer
S 1 Hitch Pin
T 2 Protective Edging
U 2 Vinyl Cap
V 1 Spring Puller Tool
W 6 Hub Cap
FC
D
K
N
Q
P
SHOWN FULL SIZE
A
W
R
I
G
J
T
V
B
E
L
H
O
U
S
NOT SHOWN FULL SIZE
M
47407
44947
43001
43814
43866
43343
43081
46980
HA21362
47408
47622
47810
43884
46289
44481
43012
43088
47189
46220
43601
43501
43014
48949

4
ASSEMBLY INSTRUCTIONS
FIGURE 1
5. Position the tailgate reinforcement bracket on outside
of cart as shown in gure 3. Assemble to the bottom
of the cart body using four 5/16" x 3/4" truss head
bolts (D) and 5/16" nylock nuts (J). Do not tighten
yet. See gure 2.
6. Position the tailgate guides on the inside of the cart
bodies with guide channels to the front. Assemble
using four 1/4" x 5/8" hex bolts (F) and 1/4" nylock
nuts (H). Do not tighten yet. See gure 2.
7. At this time, with the cart body halves pulled together,
tighten the truss head bolts assembled in step 5 and
then tighten the hex bolts assembled in steps 6 and
7. Do not tighten the bolts that were assembled in
step 4.
FIGURE 2
FIGURE 3
TOOLS REQUIRED FOR ASSEMBLY
(1) Screwdriver
(1) Pliers
(2) 7/16" Wrenches
(2) 1/2" Wrench
(2) 9/16" Wrenches
(1) Grease Gun with general purpose grease
1. Remove the hardware pack and all loose parts
from the carton. Be sure the carton is empty before
discarding.
2. Lay out all parts as shown. Extra pieces of some
items may be included in hardware pack.
NOTE: To prevent scratching paint, cover work surface
with a mat or cardboard.
3. Position cart body halves upright on a smooth level
surface such as a garage oor or a paved driveway.
See gure 1.
4. Assemble halves together using ve 1/4" x 5/8" (F) hex
bolts and 1/4" nylock nuts (H) as shown in gure 1. Do
not tighten yet.
CAUTION: Do not leave the cart
unattended in the upright position. A falling
cart can cause personal injury! Pay close
attention to the stability of the cart while
it remains in an upright position. For best
stability, assemble on a smooth, level surface.
8. Carefully turn the cart over so that the tailgate
reinforcement bracket is on the bottom. See gure 3.
1/4" x 5/8" HEX BOLT (F)
1/4" NYLOCK NUT (H)
1/4" x 5/8"
HEX BOLT (F)
5/16" x 3/4"
TRUSS HEAD
BOLT (D)
5/16" NYLOCK
NUT (J)
1/4" NYLOCK
NUT (H)
TAILGATE
REINFORCEMENT
BRACKET
TAILGATE GUIDE
1/4" x 5/8"
HEX BOLT (F)
(45-0351 only)
1/4" NYLOCK NUT (H)
(45-0351 only)
TAILGATE
REINFORCEMENT
BRACKET

5
FIGURE 5
FIGURE 6
FIGURE 4
FIGURE 7
9. Assemble the front panel over the end of the cart
using six 1/4" x 5/8" (F) hex bolts and 1/4" nylock
nuts (H) as shown in gure 4. Leave two holes in the
bottom of the panel empty as shown. Pull the cart
body halves together and tighten the bolts in the
bottom of the front panel, then tighten the bolts in the
sides. See gure 4.
10. Tighten the bolts assembled in step 4 to fasten the
bottom of the cart together.
11. Assemble the latch stand bracket to the cart so that
the aligning tab is at the bottom of the bracket. Use
four 1/4" x 5/8" hex bolts (F) and 1/4" nylock nuts (H).
Tighten. See gure 5.
12. Assemble a corner cap to each front corner using
one 1/4" x 5/8" hex bolt (F) and 1/4" nylock nut (H)
per cap. TIGHTEN. See gure 5.
13. Assemble the wheel support to the cart using eight
5/16" x 3/4" truss head bolts (D) and 5/16" nylock
nuts (J) as shown in gure 6. Heads of bolts go on
the inside of the cart. Tighten.
14. Lower the cart to rest upside down on its top ange
with the wheel support facing up. See gure 7.
15. Lay the drawbar tongue (open side facing up) onto
the Wheel Support and the Latch Stand Bracket.
Slide the axle through the wheel support and the
tongue. See gure 7.
1/4" x 5/8"
HEX BOLTS (F)
1/4" NYLOCK NUT (H)
1/4" NYLOCK
NUT (H)
LEAVE HOLES OPEN FOR
LATCH STAND BRACKET
1/4" x 5/8"
HEX BOLT (F)
LATCH STAND BRACKET
(Aligning tab at bottom)
1/4" x 5/8"
HEX BOLT (F)
1/4" NYLOCK
NUT (H)
CORNER
CAP
1/4" NYLOCK
NUT (H)
5/16"
NYLOCK
NUT (J)
WHEEL
SUPPORT
5/16" x 3/4" TRUSS
HEAD BOLT (D)
AXLE
DRAW BAR
TONGUE
LATCH STAND
BRACKET

6
FIGURE 8
FIGURE 9
FIGURE 10
16. Place the foot pedal latch through the slot in the
tongue. Insert the 5/16" x 4" hex bolt (A) through one
side of the tongue. Assemble a (SEMS) hex nut (G),
the lever and another (SEMS) hex nut (G) onto the
hex bolt. Insert the hex bolt through the opposite side
of the tongue and assemble a 5/16" nylock nut (J)
onto the end of the hex bolt. Tighten so that the hex
bolt can still rotate freely. Tighten the two (SEMS) hex
nuts (G) against each side of the foot pedal latch so
that it is centered in the slot. See gure 8.
1 7. Hook the short end of the spring (O) into the hole in
the foot pedal latch. Use the spring puller tool (V) to
hook the long end of the spring into the square hole
in the tongue. The spring puller tool (V) can be stored
when nished. See gure 9.
FIGURE 11
18. Assemble the end of the hitch bracket (two holes) up
through the slot at the front of the drawbar tongue.
Fasten it to the tongue using the 3/8" x 1" hex bolt (C)
and 3/8" nylock nut (I). Tighten. See gure 10.
19. Assemble the hitch pin (S) through the hitch bracket
and the tongue and secure it with the 1/8" hair cotter
pin (Q). See gure 10.
20. Assemble a 1" thin washer (M), a walking beam and
another 1" thin washer (M) onto the pivot axle. Insert
a cotter pin (P) into the axle and spread the ends.
Press a hub cap (W) onto the at washer. Repeat on
the other end of the pivot axle. See gure 11.
NOTE: Eight extra 1" at washers are provided to take up
end play if necessary.
5/16"
NYLOCK
NUT (J)
5/16" x 4"
HEX BOLT (A)
FOOT PEDAL LATCH
FOOT
PEDAL
LATCH
5/16" SEMS
NUTS (G)
5/16" SEMS
NUTS (G)
LONG END
OF SPRING (O)
FOOT
PEDAL
LATCH
SPRING PULLER
TOOL (V)
3/8" x 1"
HEX BOLT (C)
3/8" NYLOCK
NUT (I)
HITCH
BRACKET
1/8" HAIR
COTTER
PIN (Q)
HITCH PIN (S)
WALKING BEAM
1/8" x 1-1/2"
COTTER PIN (P)
1" THIN WASHER (M)
HUB CAP (W)

7
FIGURE 12
2 1. Assemble a 1" thin washer (M), a spacer (R), a 1"
thick washer (N), a wheel with the valve stem facing
out, and another 1" thin washer (M) onto a wheel
axle. Insert a cotter pin (P) into the axle and spread
the ends. Repeat for the other three wheels. See
gure 12.
NOTE: Eight extra 1" thin washers are provided to take
up end play if necessary.
22. Press a hub cap (W) onto the at washer on each of
the four wheels. See gure 12.
23. Check tire pressure (max. psi printed on tire).
24. Pump the wheel hubs full of general purpose grease.
FIGURE 14
29. Insert the ends of the side rails into the front rail so
that the holes align. See gure 15.
30. Assemble the side rails to the rail braces on the sides
of the cart using six curved head bolts (B) and 5/16"
SEMS nuts (G). Tighten all loose nuts and bolts. See
gure 15.
3 1. Assemble the front rail to the rail brace on the front
of the cart using two curved head bolts (B), 5/16" at
washers (L) and 5/16" SEMS nuts (G). Tighten all
loose nuts and bolts. See gure 15.
32. Assemble two vinyl caps (U) onto the ends of the side
rails. See gure 15.
FIGURE 15
FIGURE 13
PROTECTIVE EDGING (T)
IMPORTANT: Make sure the drawbar tongue is locked
to the latch stand bracket by the foot pedal latch.
25. Turn cart over onto its wheels.
26. Press the protective edging (T) strips onto the ends of
the tailgate. See gure 13.
2 7. Slide the tailgate down into the tailgate guides so
that the holes in the bottom of the tailgate t over the
screws in the bottom of the cart bed. See gure 13.
ASSEMBLING RAILS
28. Assemble seven rail braces to the top ange on the
sides and the front of the cart bed. Use thirteen 1/4"
x 3/4" hex bolts (E), 1/4" at washers (K) and 1/4"
nylock nuts (H). Do not tighten yet. See gure 14.
SPACER (R)
1/8" x 1-1/2"
COTTER PIN (P)
1" THIN
WASHER (M)
1" THICK
WASHER (N)
1" THIN
WASHER (M)
HUB CAP (W)
WHEEL
1/4" x 3/4"
HEX BOLT (E)
1/4" FLAT
WASHER (K)
1/4" NYLOCK
NUT (H)
CURVED HEAD
BOLT (B)
5/16" SEMS
NUT (G)
VINYL
CAP (U)
5/16" FLAT
WASHER (L)

8
OPERATION MAINTENANCE
1. Check for loose fasteners before each use.
2. At the beginning of each season, lubricate the latch,
the latch pivot bolt, and the bearings in the walking
beams with a light machine oil.
3. Grease the wheel bearings periodically. Use general
purpose grease.
4. Keep tires lled to the pressure recommended on the
tires.
1. Refer to the vehicle operator's manual for instructions
on safe operation on slopes.
2. Always operate at reduced speed on slopes.
3. Do not operate an ATV towing the cart on a slope
greater than 15 degrees.
4. Do not operate a tractor towing the cart on a slope
greater than 10 degrees. Use the slope guide on page
9 of this manual.
9. To dump material from the cart, remove the tailgate
by lifting it straight up and out from between the
guides. Release the spring latch on the tongue by
pulling the foot pedal latch forward, away from the
cart. The cart bed will then tilt backwards to empty
its contents. After emptying, pull the front of the bed
down toward the cart tongue until the latch snaps into
place. Replace the tailgate if desired.
DO NOT EXCEED WEIGHT CAPACITY OF 1,000 LBS.
One cubic foot of dirt weighs approximately 80 lbs.
CAUTION: Vehicle braking and stability
may be affected with the addition of an
accessory or an attachment. Be aware of
changing conditions on slopes.
NOTE
CAUTION: To avoid possible injury,
before releasing the latch be sure that no
one is near the cart.
CAUTION: Do not exceed the towing
capacity of the vehicle. Follow any weight
limitations listed in the vehicle operator's
manual.
5. For best handling and traction, distribute the weight of
the load evenly in the cart.
6. Always test to make sure your vehicle has adequate
towing and braking capabilities when towing a load
in your cart. Use extra caution when operating on
slopes.
7. Operate at reduced speed when towing a load.
8. Do not exceed 20 m.p.h., or your vehicle's maximum
safe towing speed, whichever is less. Refer to your
vehicle operator's manual.

9
SLOPE GUIDE FOR TRACTORS
(Keep this sheet in a safe place for future reference.)
Use this guide to determine if a slope is safe for the operation of your tractor and cart. Refer
also to the instructions in your vehicle owners manual.
CAUTION: DO NOT OPERATE YOUR TRACTOR AND CART ON
A SLOPE IN EXCESS OF 10 DEGREES. BE SURE OF YOUR
TRACTOR'S TOWING AND BRAKING CAPABILITIES BEFORE
OPERATING ON A SLOPE. AVOID ANY SUDDEN TURNS OR
MANEUVERS WHILE ON A SLOPE.
A POWER POLE
A CORNER OF A BUILDING
OR A FENCE POST
FOLD ALONG DOTTED LINE, REPRESENTING A 10 DEGREE SLOPE
SIGHT AND HOLD THIS LEVEL WITH A VERTICAL TREE

13
UN POTEAU ÉLECTRIQUE
LE COIN DE TOUT ÉDIFICE
UN PIQUET DE CLÔTURE
PLIEZ SELON LES POINTILLÉS, REPRÉSENTANT UNE PENTE DE 10 DEGRÉ
S
PLACEZ CETTE FEUILLE À NIVEAU CONTRE UN ARBRE DROIT
GUIDE DE CALCUL D’UNE PENTE
(Conservez cette feuille en lieu sûr pour référence future.)
.euqromer al ed te ruetcart ertov ed noitasilitu’l ruop eriatirucés tse etnep enu is renimretéd ed nfia ediug ec zesilitU
Voir également les instructions incluses dans votre manuel d’utilisation du tracteur.
-
ATTENTION: NE PAS UTILISER LE TRACTEUR ET LA REMORQUE SUR
UNE PENTE INCLINÉE À PLUS DE 10 DEGRÉS. VÉRIFIEZ LA TRAC
TION ET LE FREINAGE DE VOTRE TRACTEUR AVANT DE CONDUIRE
SUR UNE PENTE. ÉVITEZ TOUTE MANOEUVRE BRUSQUE LORSQUE
VOUS CONDUISEZ SUR UNE PENTE.

18
REPAIR PARTS FOR CART MODEL NO. 45-03504
11
2
17
17
20
40
12
17
40
9
5
26
12
6
11
10
A
17
40
7
8
24
1
3
40
4
40
20
28
17
1
23
22
29
B
B
25
27
18
28
21
21
41
13
15
14
16
45
46
45
46
32
A
30
31
31
15
42
15
14
16
35
38
39
21
33
40
44
44
43
34
34
46
35
21
15

19
REPAIR PARTS FOR CART MODEL NO. 45-03504
* Purchase Common Hardware Locally
REF PART NO DESCRIPTION QTY.
1 25112 Cart Body 2
2 23502 Tailgate 1
3 62458 Tailgate Reinforcement Bracket 1
4 23548 Tailgate Guide 2
5 23492 Front Panel 1
6 25106 Wheel Support 1
7 24497 Latch Stand Bracket 1
8 28258 Foot Peddle Latch 1
9 23014 Hitch Bracket 1
10 25114 Draw Bar Tongue 1
11 25107 Axle, 1" Dia. 1
12 23484 Front Corner Cap 2
13 42697 Wheel 4
14 43501 Cotter Pin, 9/64" Dia. x 1-1/2" * 6
15 43601 Washer, Flat 1" (Thin) 20
16 43014 Hub Cap 6
17 43866 Hex Bolt, 1/4-20 x 5/8" * 21
18 43343 Hair Cotter Pin, 1/8 (#4) * 1
20 43814 Truss Hd. Bolt, 5/16-18 x 3/4" * 12
21 46980 Hex Nut, 5/16-18 (SEMS) 10
22 43001 Hex Bolt, 3/8-16 x 1" * 1
24 HA21362 Nylock Nut, 3/8-16 * 1
25 47408 Extension Spring 1
26 47622 Spring Puller Tool 1
27 47407 Hex Bolt, 5/16-18 x 4" * 1
28 47810 Nylock Nut, 5/16-18* 13
29 43884 Hitch Pin 1
30 64873 Walking Beam (Includes #44488) 2
31 44488 Flange Bearing 4
32 46289 Spacer 4
33 25111 Rail Brace 7
34 44481 Vinyl Cap 2
35 44947 Curved Hd. Bolt, 5/16-18 x 1-5/8" 8
38 43012 Hex Bolt, 1/4-20 x 3/4" 13
39 43088 Flat Washer, 1/4" 13
40 47189 Nylock Nut, 1/4" 34
41 46220 Washer, 1.01" x 1.38" x .120" 4
42 48949 Protective Edging Strip 2
43 48951 Front Rail 1
44 48950 Side Rail 2
45 81040 Flange Bearing (Included with #13 wheel) 8
46 81409 Roller Bearing (Included with #13 wheel) 8
47 43081 Flat Washer, 5/16" 2
45350 Owner's Manual 1

REPAIR PARTS
Agri-Fab, Inc.
303 West Raymond
Sullivan, IL. 61951
217-728-8388
www.agri-fab.com
the fastest way to purchase parts
www.speedepart.com
©2003 Agri-Fab, Inc.
This document (or manual) is protected under the U.S. Copyright Laws and the copyright laws of foreign countries,
pursuant to the Universal Copyright Convention and the Berne convention. No part of this document may be reproduced
or transmitted in any form or by an means, electronic or mechanical, including photocopying or recording, or by any
information storage or retrieval system, without the express written permission of Agri-Fab, Inc. Unauthorized uses and/or
reproductions of this manual will subject such unauthorized user to civil and criminal penalties as provided by the United
States Copyright Laws.
/