Page is loading ...

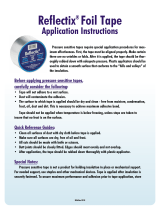
3M
™
VentureClad
™
Insulation Jacketing Products on Insulation Ducts
Recommended Installation Guide
Duct Insulation Jacketed with Factory
and Field Installed 3M
™
VentureClad
™
Products
Revision 0
Prepared July, 2017

Installation Guide Manual for 3M
™
VentureClad
™
Products on Insulated Rectangular Ducts, Revision 0
1 of 71
Table of Contents
1. Scope ....................................................................................................................................... Page 2
2. Notes ........................................................................................................................................ Page 3
3. Insulated rectangular ducts (Figs. 1–19c) .............................................................................. Page 4
4. Insulated rectangular duct reducers (Figs. 20–40) ............................................................ Page 25
5. Insulated rectangular ducts, 90° elbows (Figs. 41–52) ......................................................Page 46
6. Insulated rectangular duct supports (Figs. 53–60) ............................................................ Page 58
7. Repairs to rips and tears in 3M
™
VentureClad
™
on Insulated Ducts (Figs. 61–63) ............Page 66
8. Using caulk to seal penetrations (Figs. 64–65) ...................................................................Page 69
Product Key
1577CW
Smooth silver aluminum with adhesive
1577CW-E
Embossed silver aluminum with adhesive
1577NA
Smooth silver aluminum without adhesive
1577CW-CM/WM/BM
Smooth silver aluminum, white, or black with adhesive and a membrane
1579GCW
Heavy duty, smooth silver aluminum with adhesive
1579GCW-E
Heavy duty, embossed silver aluminum with adhesive
1579GNA
Heavy duty, smooth silver aluminum without adhesive
1579GCW-CM/WM
Smooth silver aluminum and white with adhesive and a membrane

Installation Guide Manual for 3M
™
VentureClad
™
Products on Insulated Rectangular Ducts, Revision 0
2 of 71
1. Scope
a. Using 3M
™
VentureClad
™
products 1577CW, 1579GCW, and 1579GNA, the following
recommended installation guidelines apply when installing these materials to rigid or semi‐rigid
duct insulation materials. It will apply to either factory or field jacketing. “CW” products have a
pressure sensitive adhesive, covered with a release liner, over their entire inside surface. “NA”
products have no adhesive.
b. 1577CW, 1579GCW, and 1579GNA are suitable for both indoor and outdoor applications but not
for below ground, buried applications. It is recommended that either 1577CW pressure sensitive
tape be used for sealing all 1579GCW and 1579GNA seams, whether they are lap or butt joints, or
the more flexible 1578CW tape. The 1577CW tape may be used for both securement and sealing
the 3M
™
VentureClad
™
that is part of the insulation sections /segments against both water and
water vapor intrusion. The 1578CW tape is only to be used for sealing the 3M
™
VentureClad
™
that
is part of the insulation sections / segments against water and water vapor intrusion in
recommended locations. 4-inch wide seaming tape should be considered the standard if not
recommended otherwise.
c. Although the figures within this manual show the 3M
™
VentureClad
™
and 3M
™
Venture Tape
™
products with an embossed and smooth aluminum finish, they are also available in other colors.
d. Insulation materials for which these procedures are applicable include, but are not necessarily
limited to, the following: polystyrene, polyisocyanurate, phenolic foam, cellular glass, flexible
elastomeric, polyolefin, faced or unfaced fiberglass, mineral wool, molded expanded perlite,
flexible aerogel, and calcium silicate.
e. These procedures assume the ducts will operate at below ambient temperatures and therefore
include sealing against water vapor intrusion. For below ambient applications, where condensation
control is required, it may be beneficial to select a 3M
™
VentureClad
™
product with a high
emittance (i.e., > 0.5) to reduce the insulation thickness required to prevent surface condensation.
Since all the 3M
™
VentureClad
™
products covered by this manual will have a low water vapor
permeance, no additional vapor retarder needs to be used so long as the 3M
™
VentureClad
™
is
sealed tightly at all locations.
f. The maximum use temperature of the Natural Aluminum 3M
™
VentureClad
™
products is 300°F
(149°C). The maximum use temperature of the Membrane 3M
™
VentureClad
™
products is 248°F
(120°C). The pipe service temperature itself may be much higher on above ambient service. In
those cases, the exposure temperature of the 3M
™
VentureClad
™
should be controlled to below
300°F by the design and installation of the insulation system.
g. Proper adhesion of the materials is paramount in the long term success of the jacketing and the
tape products. It is recommended that for both the 3M
™
VentureClad
™
and the 3M
™
Venture Tape
™
installation, the installer keep the adherent surfaces free of dust, dirt, grease, and water, including
water from surface condensation. It is recommended that the application is to seal immediately
once this adhesive is exposed by removing the release liner.

Installation Guide Manual for 3M
™
VentureClad
™
Products on Insulated Rectangular Ducts, Revision 0
3 of 71
2. Notes that apply to the installation of 3M™ VentureClad™ jacketing
on insulated air handling ducts:
Note 1: The guidelines in this manual do not purport to address all engineering issues associated with the use of
3M
™
VentureClad
™
jacketing products and duct insulation system design. It is the responsibility of the facility owner
to have (1) qualified structural engineers perform calculations, as required, to make certain that the duct securement
is sufficient, accounting for the weight of the insulation system; (2) qualified mechanical engineers determine the
insulation meets the required thermal requirements and (3) qualified corrosion engineers to specify type and
thicknesses of insulation materials and coatings to protect the metal surfaces from corrosion under insulation.
Note 2: Users of this manual should use only trained, skilled, and experienced insulation workers. The guidelines
included in this manual are not of sufficient detail to advise the installer of all techniques required to install insulation
systems correctly.
Note 3: The guidelines in this manual do not purport to address all of the safety concerns, if any, associated with
the use of 3M
™
VentureClad
™
Products. At a minimum, 3M recommends that the insulation workers wear safety
goggles and protective gloves for all work with 3M
™
VentureClad
™
and 3M
™
Venture Tape
™
. However, it is the
responsibility of the user of this manual to establish appropriate safety and health practices and determine the
applicability of regulatory limitations prior to use.
Note 4: 3M strongly recommends the facility owner/operator to conduct regular duct insulation system maintenance.
Outdoor, damaged insulation systems can perform poorly allowing ingress of water from rain or melting snow or, on
below ambient systems, water vapor intrusion with subsequent condensation. Wet insulation will not perform thermally
on a par with that provided by the insulation material’s manufacturer; further, it can lead to corrosion under insulation.
The best prevention of these problems is a proactive insulation system maintenance program that includes sealing of
the 3M
™
VentureClad
™
jacketing.
Note 5: 3M generally recommends the use of either 3M
™
Venture Tape
™
1577CW or 1578CW as a seaming tape, where
necessary, with 3M
™
VentureClad
™
1579GCW products. In situations where extremely tight corners are required, the
more flexible, 3M
™
Venture Tape
™
1578CW product is acceptable.
Note 6: Water shed, for North America only—3M recommends that air duct designers follow the guidelines given in
Section 3.4 (page 6.5) of SMACNA’s “HVAC Duct Construction Standard—Metal and Flexible” for sloping of the top
surface for the purposes of rain water drainage. In lieu of this, the insulation workers can insert dowel rods between
the top horizontal duct surfaces and the bottom of the insulation boards, insulating those top surfaces, to create a
slope, prior to applying the 3M
™
VentureClad
™
. The rods can be placed on one edge for smaller ducts or in the
middle of larger ducts. Contractors in other countries should follow their local industry guidelines and requirements
for insulated outdoor ducts.

Installation Guide Manual for 3M
™
VentureClad
™
Products on Insulated Rectangular Ducts, Revision 0
4 of 71
3. Insulated Rectangular Ducts
Prior to adding 3M
™
VentureClad
™
, ducts should first be insulated. Typically, they are insulated with a fiberglass
board faced with FSK or some other factory applied facing. Before applying 3M
™
VentureClad
™
, all seams
should first be taped with an aluminum foil based 3M
™
Venture Tape
™
such as 1525CW FSK tape, 1520CW
aluminum foil tape, or 1517CW aluminum foil tape. These boards are also typically first installed and held in
place using pins and speed washers (as shown on Figure 1 below). Be certain that the pins have been cut as
close as possible to the speed washers. The 3M
™
VentureClad
™
should be applied over top of the pins and
washers after first applying 3M
™
Venture Tape
™
foil tape over each pin-washer combination. See Figure 2.
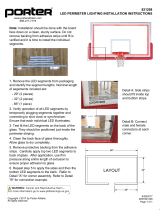
Figure 1 shows an insulated, rectangular duct with an insulation board which should
be factory faced. As shown, the exposed pins and washers will first need to be
covered, prior to installing 3M
™
VentureClad
™
jacketing, to protect against later
puncturing of that jacketing.
Fig. 1

Installation Guide Manual for 3M
™
VentureClad
™
Products on Insulated Rectangular Ducts, Revision 0
5 of 71
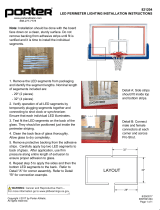
Figure 2 shows the process of covering the pins and washers, used to secure the insulation
board, using 3M
™
Venture Tape
™
. 3M recommends the use of 3" (75mm) wide FSK or
aluminum foil based 3M
™
Venture Tape
™
cut into 3" (75mm) long strips.
Fig. 2
3" x 3" strips of 3M
™
Venture Tape
™
used to cover washers
3M
™
Venture Tape
™
Small strips of 3M
™
Venture Tape
™
covering washers

Installation Guide Manual for 3M
™
VentureClad
™
Products on Insulated Rectangular Ducts, Revision 0
6 of 71
Figure 3 sequence of cutting and applying four cut sheets of 3M
™
VentureClad
™
to a section
along the insulated duct: (1) bottom (2) first vertical side (3) second vertical side and (4) top,
all using 3" (75mm) overlaps. Note that the 3 inch (75mm) overlap on (2) and (3), as well as on
(4), are conservative 3M recommendations that should result in longer term performance of
the 3M
™
VentureClad
™
jacket system. 3M recommends that the insulation contractor not trim
the bottom edges of pieces 2 and 3, where they come in contact with piece 1. Instead, when
pieces 2 and 3 are longer than necessary, 3M recommends that pieces 2 and 3 be folded
over onto piece 1 to prevent the need for trimming.
Fig. 3
Sequence of cutting and applying 3M
™
VentureClad
™

Installation Guide Manual for 3M
™
VentureClad
™
Products on Insulated Rectangular Ducts, Revision 0
7 of 71
Figure 4 shows an installer cutting a sheet of 3M
™
VentureClad
™
from the roll. In this case,
the sheet dimensions will be the width of the roll x the width of the insulated duct. This cut
sheet will be applied to the bottom of the insulated duct after first removing several inches
of the release liner. Note the 3 inch (75mm) overlaps and hence the 6 inches (150mm)
greater length).
Fig. 4
Cutting bottom piece of 3M
™
VentureClad
™
to width
of insulated duct + 6" (3" overlap on each side)

Installation Guide Manual for 3M
™
VentureClad
™
Products on Insulated Rectangular Ducts, Revision 0
8 of 71
Figure 5 shows the installer starting to remove the release liner to expose the pressure
sensitive adhesive. He should only pull the release liner back 3–4 inches (75–100mm), then
start applying it to the face of the insulated duct, as shown in Figure 6.
Fig. 5
Peeling back the release liner part way from front edge

Installation Guide Manual for 3M
™
VentureClad
™
Products on Insulated Rectangular Ducts, Revision 0
9 of 71
Figure 6 shows the installer working underneath the insulated duct. He will apply this first
sheet of 3M
™
VentureClad
™
(piece 1) to the insulated duct bottom (where the speed washers
have already been covered with 3M
™
Venture Tape
™
).
Fig. 6
Applying 3M
™
VentureClad
™
to bottom of duct

Installation Guide Manual for 3M
™
VentureClad
™
Products on Insulated Rectangular Ducts, Revision 0
10 of 71
Figure 7 shows the installer using a squeegee to press the entire surface of the installed
3M
™
VentureClad
™
piece 1, on the bottom surface of the insulated duct, to assure that
there is good adhesion of the 3M
™
VentureClad
™
jacket to the insulation.
Fig. 7
Using a squeegee to press 3M
™
VentureClad
™
onto bottom of duct
3M
™
VentureClad
™

Installation Guide Manual for 3M
™
VentureClad
™
Products on Insulated Rectangular Ducts, Revision 0
11 of 71
Figure 8 shows the installer cutting his second sheet (piece 2 or 3) of 3M
™
VentureClad
™
, this
one to be applied to one of the two vertical sides. Note that its minimum dimension is equal
to the insulated duct height + 3 inches (75mm).
Fig. 8
Cutting side piece of 3M
™
VentureClad
™
from roll
that is height + 3" long

Installation Guide Manual for 3M
™
VentureClad
™
Products on Insulated Rectangular Ducts, Revision 0
12 of 71
Figure 9 shows the installer applying the cut sheet of 3M
™
VentureClad
™
to the vertical side
(piece 2). Note that he first lines up the top edge of the 3M
™
VentureClad
™
with the top edge
of the insulated duct, then works his way down the side, peeling back the release liner in
steps, then applying that section with the exposed adhesive.
Fig. 9
Applying 3M
™
VentureClad
™
to side of insulated duct.
Note that 3M
™
VentureClad
™
will overlap top by 3"

Installation Guide Manual for 3M
™
VentureClad
™
Products on Insulated Rectangular Ducts, Revision 0
13 of 71
Figure 10 shows the installer using the squeegee to make certain that the 3M
™
VentureClad
™
is
fully adhered to the vertical side of the insulated duct (piece 2).
Fig. 10
Using a squeegee to press 3M
™
VentureClad
™
onto insulation surface

Installation Guide Manual for 3M
™
VentureClad
™
Products on Insulated Rectangular Ducts, Revision 0
14 of 71
Figure 11 shows the installer installing 3M
™
VentureClad
™
on the second of the two vertical
sides (piece 3) of the insulated duct.
VentureClad overlaps
3" at top
Fig. 11
Apply 3M
™
VentureClad
™
to other side
3M
™
VentureClad
™
overlaps 3"
at top

Installation Guide Manual for 3M
™
VentureClad
™
Products on Insulated Rectangular Ducts, Revision 0
15 of 71
Figure 12 shows the installer cutting a sheet of 3M
™
VentureClad
™
for the top of the insulated
duct (piece 4).
Fig. 12
Cutting top piece of 3M
™
VentureClad
™
from roll
that is width + 6" long

Installation Guide Manual for 3M
™
VentureClad
™
Products on Insulated Rectangular Ducts, Revision 0
16 of 71
Figure 13 shows the installer lining up the 3M
™
VentureClad
™
top sheet with the duct’s edges
(piece 4). After being installed, this sheet of 3M
™
VentureClad
™
should overlap each vertical
side by 3 inches (75mm).
Fig. 13
Applying the 3M
™
VentureClad
™
to top of insulated duct.
Edges should overlap each vertical side by 3"

Installation Guide Manual for 3M
™
VentureClad
™
Products on Insulated Rectangular Ducts, Revision 0
17 of 71
Figure 14 shows the installer using the squeegee to smooth out the 3M
™
VentureClad
™
and to
assure himself that the 3M
™
VentureClad
™
has completely adhered to the top surface of the
insulated duct (piece 4).
Fig. 14
Using a squeegee to press 3M
™
VentureClad
™
onto
insulation top surface
3M
™
VentureClad
™
overlaps
3" on both sides

Installation Guide Manual for 3M
™
VentureClad
™
Products on Insulated Rectangular Ducts, Revision 0
18 of 71
Figure 15 shows the location where a cut strip of 4 inch (100mm) wide 1577CW 3M
™
Venture
Tape
™
will be applied to reinforce one of the 3M
™
VentureClad
™
1579GCW joints. This step is
unnecessary when using the lighter weight 1577CW 3M
™
VentureClad
™
. Note that the more
flexible 1578CW 3M
™
Venture Tape
™
may also be used to seal the 3M
™
VentureClad
™
seams.
Fig. 15
Cut a piece of 3M
™
Venture Tape
™
to fit the length of
the joint — peel off release liner
1577CW 3M
™
Venture Tape
™

Installation Guide Manual for 3M
™
VentureClad
™
Products on Insulated Rectangular Ducts, Revision 0
19 of 71
Figure 16 shows the cut strip of 4 inch (100mm) wide 1577CW 3M™ Venture Tape™ being
applied to reinforce a joint when using 1579GCW 3M
™
VentureClad
™
. Be certain to run over
the tape with a squeegee after applying it to the 3M
™
VentureClad seam. Note that the more
flexible 1578CW 3M
™
Venture Tape
™
may also be used to seal the 3M
™
VentureClad
™
seams.
Fig. 16
Taping 1579CGW VentureClad Joints
Taping 1579CGW 3M
™
VentureClad
™
Joints
Using: 1577CW
3M
™
Venture Tape
™
/