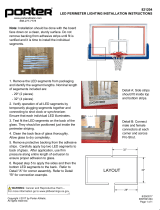
32"
29"
66"
LAYOUT
Note:
Installation should be done with the board
face down on a clean, sturdy surface. Do not
remove backing from adhesive strips until fit is
verified and it is time to install the individual
segments.
1. Remove the LED segments from packaging
and identify the segment lengths. Nominal length
of segements included are:
- 29" (2 pieces)
- 32" (2 pieces)
- 66" (1 piece)
2. Verify operation of all LED segments by
temporarily plugging segments together and
connecting to shot clock or synchronizer.
Ensure that each individual LED illuminates.
3. Test fit the LED segments on the back of the
glass. They should be positioned just inside the
perimeter striping.
4. Clean the back face of glass thoroughly.
Allow glass to dry completely.
5. Remove protective backing from the adhesive
strips. Carefully apply top two LED segments to
back of glass. After application, use firm
pressure along entire length of extrusion to
ensure proper adhesion to glass.
6. Repeat step 5 to apply the sides and then the
bottom LED segments to the bank. Refer to
Detail "A" for corner assembly. Refer to Detail
"B" for connection example.
Detail A: Side strips
should fit inside top
and bottom strips.
Detail B: Connect
male and female
connectors at each
corner.
www.porterathletic.com
Copyright
2017 by Porter Athletic.
All rights reserved.
888-277-7778
8/29/2017
INST821208
Page 1 of 1
821208
LED PERIMETER LIGHTING INSTALLATION INSTRUCTIONS
WARNING: Cancer and Reproductive Harm –
For more information go to www.p65warnings.ca.gov
F
/