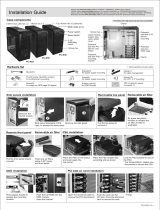
Case View
Power switch
Reset switch
M/B tray
PSU
support bracket
with rubber pad
Foot cushion
Bottom panel
Foot -L
Foot -S
Bottom panel
M/B tray
PSU support bracket
with rubber pad
Foot -S
Slim ODD tray
Foot -L
Hardware list
Rubber ring (2)
for cable
Rubber pad (2)
for PSU support bracket
Thumb screw (16)
Screw (4) M3 x 5mm
to M/B assembling
Screw 3x6mm (4)
for slim ODD tray
Stand off (4)
for M/B assembling
Foot cushion (8)
Hex wrench (1)
for M/B stand-off
Clamp (1)
for cable mangement
LED rubber rings (2)
LED cable (1)
Screw (4)
for PSU mounting
Round nut (8)
B C
E F
Screw (16)
for foot
D
A
G
Screw (4) M2 x 4mm
for slim ODD
H
Screw (4) #6-32 x 6mm
for 3.5 HDD
I
Mini-ITX Spider Test Bench
Case components
1

M/B tray with rubber rings M/B tray with LED rubber rings Assemble LED cable
Place the HDD into the M/B tray,
and use “ H ” screw to secure
Place the slim ODD into the tray, and use the “ G “ screw to secure
Use the “ E “ screw to secure
slim ODD tray on the M/B tray
Foot-L with foot cushion
Use the “ B “ screw to secure
M/B tray on the bottom panel
Use “ I / F “ (round nut / screw) to
secure foot-S on the M/B tray
Use the “ B “ screws to secure the
foot-S and adjust the angle
Use “ I / F “(round nut / screw) to
secure foot-S on the foot-L
Mini-ITX Spider Test Bench
2

Use the “ B “ screws to secure the
foot and adjust the angle
Bottom panel with clamp
(to tidy up the cables)
PSU support bracket with
rubber pad
Use the “ D “ screws to secure the
PSU support bracket with PSU
Use the “ B “ screws to secure the
PSU with M/B tray and adjustable
Place the M/B on the stand-off and
fastened by the ” A ” screws
Place the “ C ”stand-off on the
M/B tray fix points
Tool: Hex wrench
* Angle & height adjustable
Mini-ITX Spider Test Bench
3
Page is loading ...
Page is loading ...
Page is loading ...
Page is loading ...
Page is loading ...
Page is loading ...
Page is loading ...
Page is loading ...
Page is loading ...
-
 1
1
-
 2
2
-
 3
3
-
 4
4
-
 5
5
-
 6
6
-
 7
7
-
 8
8
-
 9
9
-
 10
10
-
 11
11
-
 12
12
Lian Li T1R User manual
- Category
- Computer cases
- Type
- User manual
Ask a question and I''ll find the answer in the document
Finding information in a document is now easier with AI
in other languages
- français: Lian Li T1R Manuel utilisateur
- español: Lian Li T1R Manual de usuario
- Deutsch: Lian Li T1R Benutzerhandbuch
Related papers
Other documents
-
ACE Ecco250 Installation guide
-
Chenbro Micom RM12800H-101 Datasheet
-
iStarUSA S-917 Owner's manual
-
BE QUIET! SILENT BASE 800 Specification
-
thomann KB-15WNDM Operating instructions
-
 Lancool PC-K62 Datasheet
-
NZXT H440 Specification
-
Phanteks PRO User manual
-
Phanteks Enthoo Luxe User manual
-
Xigmatek Pantheon Installation guide


