Page is loading ...

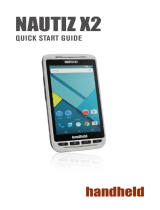
NAUTIZ X2
MANUAL

Ver 1.0 2
CONTENT
1. Introduction ..................................................................................................................................................................... 4
1.1 Appearance of Nautiz X2 ........................................................................................................................................... 4
1.2 Installing the Battery .................................................................................................................................................. 5
1.3 Removing the Battery ................................................................................................................................................ 5
1.4 Inserting a SIM Card .................................................................................................................................................. 6
1.5 Inserting a TF Card .................................................................................................................................................... 6
1.6 Charging .................................................................................................................................................................... 7
2. Using the Nautiz X2 ......................................................................................................................................................... 8
2.1 Powering On/Off the Nautiz X2.................................................................................................................................. 8
2.2 Locking and Unlocking the Nautiz X2 ........................................................................................................................ 8
2.3 Keys ........................................................................................................................................................................... 8
2.4 Home Screen ............................................................................................................................................................. 9
2.5 Status Icons and Indicators ..................................................................................................................................... 10
2.6 Basic Settings .......................................................................................................................................................... 11
2.6.1 Date and Time Settings ..................................................................................................................................... 11
2.6.2 Display Settings ................................................................................................................................................ 12
2.6.3 Ringtone Settings.............................................................................................................................................. 13
2.6.4 Security Settings ............................................................................................................................................... 14
2.6.5 Language and Input Method Setting ................................................................................................................ 14
2.6.6 Shortcuts .......................................................................................................................................................... 15
2.6.7 Widgets ............................................................................................................................................................. 15
3. Call Function ................................................................................................................................................................. 16
3.1 Making a Call ........................................................................................................................................................... 16
3.2 Contacts .................................................................................................................................................................. 17
3.3 SMS and MMS ........................................................................................................................................................ 18
3.4 Email ........................................................................................................................................................................ 18
4. Network Connection and Connection ........................................................................................................................... 20
4.1 Wi-Fi Network Connection ...................................................................................................................................... 20
4.2 Bluetooth ................................................................................................................................................................. 20
4.3 GPS ......................................................................................................................................................................... 22
4.4 Connecting the Nautiz X2 to a PC ........................................................................................................................... 22
4.5 Synchronization ....................................................................................................................................................... 23
5. Enabling the Scan Function .......................................................................................................................................... 24
6. Enabling the NFC Function ........................................................................................................................................... 25
7. Managing the Nautiz X2 ................................................................................................................................................ 26
7.1 Installing Applications .............................................................................................................................................. 26
7.2 Uninstalling Applications ......................................................................................................................................... 26
7.3 Managing Applications ............................................................................................................................................ 27
8. Precautions and Troubleshooting ................................................................................................................................. 28
8.1 Precautions .............................................................................................................................................................. 28

Ver 1.0 3
8.2 Troubleshooting ....................................................................................................................................................... 29
Appendix ........................................................................................................................................................................... 31

Ver 1.0 4
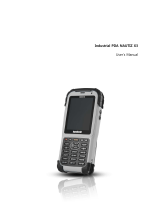
1. INTRODUCTION
1.1 Appearance of Nautiz X2
FIGURE 1-1 FRONT VIEW OF NAUTIZ X2
FIGURE 1-2 REAR VIEW OF NAUTIZ X2

Ver 1.0 5
1.2 Installing the Battery
1. Push the battery to the bottom of the battery compartment and press it downwards.
2. Push the battery cover lock to the right to lock the battery cover.
1.3 Removing the Battery
1. Push the battery cover lock to the left.
2. Pull up the battery cover from the groove at the upper end of the battery cover.
NOTE: The Nautiz X2 adapts integrated design for the battery and battery cover.

Ver 1.0 6
1.4 Inserting a SIM Card
Insert a SIM card by following the direction in the figure below.
NOTE: Micro SIM cards are applicable to the Nautiz X2. After replacing a SIM card, restart the Nautiz X2.
1.5 Inserting a TF Card
1. Push the card cover by following the OPEN direction marked on the card cover.
2. Open the card cover upwards and insert a TF card, as shown in the figure below.
3. Close the card cover, as shown in the figure below.
4. Pull back the card cover by following the LOCK direction marked on the card cover.

Ver 1.0 7
NOTE: TF cards, namely Micro SD cards, are applicable to the Nautiz X2. After replacing a TF card, restart the Nautiz X2.
1.6 Charging
You can charge a battery in the following ways:
1. Bottom charging cable;
2. 1-slot charging & communication stand (to be purchased separately).
Description of charging indicator:
When the battery is in the charging status, the charging indicator is in red.
When the battery is fully charged, the charging indicator is in green.
When the battery volume is low:
1. A message indicating that the battery volume is less than 20% is displayed on the screen.
2. The Nautiz X2 gives out a low battery prompt tone.
3. The charging indicator blinks in red.
The following operations can help obtain a longer standby duration of the Nautiz X2.
Shorten the time to sleep by selecting Settings > Display > Sleep.
Set the screen brightness to a small value by selecting Settings > Display > Brightness.
Disable functions that are not frequently used, for example, GPS, Bluetooth, Wi-Fi and 3G communication.

Ver 1.0 8
2. USING THE NAUTIZ X2
2.1 Powering On/Off the Nautiz X2
After installing a SIM card and a battery and charging the Nautiz X2 completely, you can use the Nautiz X2.
1. To power on the Nautiz X2, press the On/Off key on the right for some time. The Nautiz X2 vibrates,
displays the startup screen and enters the Android OS after the guide progress is complete. It takes some time
for the Nautiz X2 to initialize. Please wait patiently.
2. To power off the Nautiz X2, press the On/Off key on the right for some time. A dialog box that provides
shutdown options is displayed. Click Power Off.
2.2 Locking and Unlocking the Nautiz X2
Locking the Nautiz X2
Press the On/Off key momentarily to lock the Nautiz X2. If you do not perform any operation for the Nautiz X2
within the default locking time, the Nautiz X2 is automatically locked.
Unlocking the Nautiz X2
Press the On/Off key momentarily and slide the unlock key to the right on
the screen.
2.3 Keys
The Nautiz X2 provides a physical keypad that consists of four keys, as shown in the figure below.
On the physical keypad of the Nautiz X2, keys are respectively home key, multitask key, scan key, and back key from
left to right.
Home key: used to go back to the home screen.
Task manager: used to switch between / close running apps.
Scan key: used to scan.
Return key: used to return to the previous operation screen.
Return key
Scan key
Task manager
Home key

Ver 1.0 9
2.4 Home Screen
By default, the Nautiz X2 has one home screen. You can add home screens by placing applications to the home screen
and slide to the left or right to switch to another home screen. On the home screen, click the icon of any application to
open the application.
You can freely add or delete the icon of an application in the blank of the home screen.
If you click the application tray, all applications can be viewed.
Application tray

Ver 1.0 10
2.5 Status Icons and Indicators
Status icons and indicators are in the status bar at the upper part of the screen and show device status and
notifications.
Icon
Description
Icon
Description
WLAN
Signal strength
Bluetooth
Flight mode
USB connection
Network access restricted
Missed calls
USB debugging
New messages
Charging
Modem logs
Battery full
Silent mode
Multiple notification icons, which are beyond the
scope of display
Application permission
EDGE
Connection between USB and PC
pea pod
NOTE: As software is upgraded continuously, status indicators may be different from those displayed on the Nautiz X2. The actual
status indicators prevail.

Ver 1.0 11
2.6 Basic Settings
2.6.1 Date and Time Settings
To change the date and time in the Nautiz X2, do as follows:
1. Find the following icon.
2. Select Settings > Date & time > Set date or Set time.

Ver 1.0 12
2.6.2 Display Settings
1. Find the following icon.
2. Select Settings > Display > Lock screen notification/Wallpaper/Brightness/Auto-rotate
screen/Sleep/Interactive screensaver/Font size/Cast screen.

Ver 1.0 13
2.6.3 Ringtone Settings
1. Find the following icon.
2. Select Settings > Audio profiles > General/Silent/Meeting/Outdoor. Click different modes and set the
ringtone in the modes.

Ver 1.0 14
2.6.4 Security Settings
1. Find the following icon.
2. Select Settings > Backup & reset > Factory data reset.
The Nautiz X2 starts to restore factory settings.
If you perform the preceding operation, the following data will be cleared:
Account
Data and settings of the system and applications
Downloaded applications
The following data will not be cleared:
Current system software and bound applications
Files in the SD card, for example, music and photos
2.6.5 Language and Input Method Setting
1. Find the following icon.
2. Select Settings > Language & input, click Language, select a language, click Default, and select an input method.

Ver 1.0 15
2.6.6 Shortcuts
You can add shortcut icons on the home screen of the Nautiz X2.
On the home screen, click the icon of application tray, press and hold an icon and drag it to the home screen.
2.6.7 Widgets
You can add widgets such as clock, music player and calendar on the home screen of the Nautiz X2.
On the home screen, press and hold a blank space. The entry for setting wallpaper and widgets is displayed. Click a
widget and drag it to a blank space.
Click the icon of a widget to open the widget.

Ver 1.0 16
3. CALL FUNCTION
3.1 Making a Call
1. Find the following icon.
2. Enter a phone number.
3. To make a call.
4. To terminate the call.
Keypad for dialing
Call records
Contacts
Voice call

Ver 1.0 17
3.2 Contacts
1. Find the following icon.
2. Click Contacts to open the list of contacts.
3. To add a contact, click ->
4. To import or export contacts, press the menu key and click Import/Export.
5. To edit or delete a contact, select the contact, press the menu key and click Edit/Delete

Ver 1.0 18
3.3 SMS and MMS
1. Find the following icon.
2. Click enter a receiver and text to be sent.
3. Click to send the message.
4. On the message editing page, press the menu key, click Add subject to convert the message into a
multimedia message. After editing the message, click
to send the message.
NOTE: Click to add attachments such as photo, video and audio.

Ver 1.0 19
3.4 Email
You can send or receive emails.
1. Find the following icon.
2. Enter an email address and password and click Next.
3. Set Inbox checking frequency and click Next.
4. Create a name for the account and click Next. The email receiving page is displayed.
To synchronize or delete an account, do as follows:
1. On the home screen, click Settings.
2. Under the ACCOUNTS option, click POP3 to open added accounts and click the name of an account to be
synchronized or deleted. On the Sync page, click in the upper right corner and select Sync now or
Remove account.

Ver 1.0 20
Click to enable Wi-Fi and
search for networks
4. NETWORK CONNECTION AND CONNECTION
4.1 Wi-Fi Network Connection
1.
Find the following icon
.
2.
Select Settings >
WIRELESS
& NETWORKS
>
WLAN
.
3.
Click
Enable/disable WLAN
. The Nautiz X2 starts to search for networks. If WLAN is enabled, click
Scan
. The Nautiz X2 lists networks in the range of search.
4.
Click a network and enter the password in the dialog box that is displayed.
5.
Click
Connect
. The Wi-Fi connection is completed.
4.3
4.2 Bluetooth
After you enable the Bluetooth function on the Nautiz X2, you can establish wireless connections with other Bluetooth
devices such as computers and mobile phones. In the scope without solid obstacles, the effect of Bluetooth
connections is good.
1. Find the following icon.
2. Select Setting > WIRELESS & NETWORKS > Bluetooth.
3. Click the icon for enabling/disabling Bluetooth to enable Bluetooth and search for other Bluetooth devices.
4. In the list of searched devices, click a device to pair the device.
Click to connect the network
/