Brother TD-4750TNWB User guide

Category
Label printers
Type
User guide

This manual is also suitable for

User's Guide
TD-4650TNWB/4650TNWBR/TD-4750TNWB/4750TNWBR
TD-4650TNWB/4650TNWBR
TD-4750TNWB/4750TNWBR
User's Guide (English)
User's Guide TD-4650TNWB/4650TNWBR/TD-4750TNWB/4750TNWBR
© 2020 Brother Industries, Ltd. All rights reserved.
Version 04
ENG
i
Copyright Information
The copyright in this manual, the software, and firmware in the printer described
therein are owned by Brother. All rights reserved.
Information in this document is subject to change without notice and does not
represent a commitment on the part of the company. No part of this manual may
be reproduced or transmitted in any form or by any means, for any purpose
other than the purchaser’s personal use, without the expressed written
permission of the company.
Trademarks
The Bluetooth
®
word mark and logos are registered trademarks owned by the
Bluetooth SIG, Inc. and any use of such marks by Brother Industries, Ltd. is
under license.
Wi-Fi
®
is a registered trademark of Wi-Fi Alliance
®
.
CG Triumvirate is a trademark of Agfa Corporation. CG Triumvirate Bold
Condensed font is under license from the Monotype Corporation. All other
trademarks are the property of their respective owners.
Any trade names and product names of companies appearing on Brother
products, related documents and any other materials are all trademarks or
registered trademarks of those respective companies.
ii
Contents
1. Introduction ........................................................................................................ 1
1.1 Product Introduction .............................................................................................. 1
1.2 Additional Product Reference ............................................................................... 1
2. Operations Overview ......................................................................................... 2
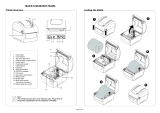
2.1 Unpack the printer and check the components .................................................... 2
2.2 Printer Overview ................................................................................................... 3
2.2.1 Front View ................................................................................................ 3
2.2.2 Interior View .............................................................................................. 4
2.2.3 Rear View ................................................................................................. 5
2.3 Connect the Power Cord ...................................................................................... 6
2.4 Control Panel ........................................................................................................ 7
2.5 LED Indicator ........................................................................................................ 8
3. Set Up Your Printer ............................................................................................ 9
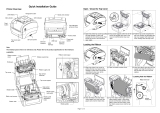
3.1 Load the Ribbon ................................................................................................... 9
3.2 Load the Media ................................................................................................... 11
3.2.1 Load Label Roll ....................................................................................... 11
3.2.2 Install the External Roll Holder (Optional) .............................................. 14
3.2.3 Install the Label Roll When Using the Cutter Module (Dealers only) ...... 16
3.2.4 Install the Label Roll When Using the Label Peeler (Dealers only) ........ 18
4. Printing ............................................................................................................. 21
4.1 Printer Driver Installation ..................................................................................... 21
4.1.1 USB Connection (Windows/Mac/Linux) .................................................. 21
4.1.2 Bluetooth Connection (Windows) ........................................................... 22
4.1.3 Wi-Fi Network Connection (Windows) .................................................... 22
4.1.4 Wired Network Connection (Windows) ................................................... 23
4.2 Creating and Printing Labels Using BarTender ................................................. 24
5. Operation ......................................................................................................... 26
5.1 Power-on Utilities ................................................................................................ 26
5.1.1 Ribbon and Gap/Black Mark Sensor Calibration .................................... 27
5.1.2 Gap/Black Mark Sensor Calibration, Self-Test, and Entering
Dump Mode ............................................................................................ 27
5.1.3 Printer Initialization ................................................................................. 31
5.1.4 Media Sensor Calibration (for the Black Mark Sensor) .......................... 32
5.1.5 Media Sensor Calibration (for the Gap Sensor) ..................................... 32
5.1.6 Skip the AUTO.BAS program ................................................................. 32
iii
6. LCD Overview .................................................................................................. 33
6.1 Access the Main Menu ....................................................................................... 33
6.2 Main Menu Overview .......................................................................................... 34
6.3 Setting Menu ....................................................................................................... 35
6.3.1 FBPL Settings ......................................................................................... 35
6.3.2 ZPL2 Settings ......................................................................................... 37
6.4 Sensor Settings ................................................................................................... 39
6.5 Interface Settings ................................................................................................ 40
6.5.1 Serial Communication Settings .............................................................. 41
6.5.2 Ethernet Settings .................................................................................... 41
6.5.3 Wi-Fi Settings ......................................................................................... 42
6.5.4 Bluetooth Settings .................................................................................. 43
6.5.5 RFID (Radio Frequency Identification) Settings ..................................... 44
6.6 Advanced Settings .............................................................................................. 50
6.7 File Manager ....................................................................................................... 51
6.8 Diagnostic Functions .......................................................................................... 52
7. Brother Printer Management Tool (BPM) ........................................................ 53
7.1 Start the BPM ...................................................................................................... 53
7.2 Auto-Calibrating the Media Sensor using the BPM ........................................... 54
8. Setting up the RFID ......................................................................................... 55
8.1 Introduction ......................................................................................................... 55
8.2 RFID Calibration (available for TD-4650TNWBR and
TD-4750TNWBR only) ....................................................................................... 56
8.2.1 Select the Antenna Position ................................................................... 56
8.2.2 RFID Calibration Procedure ................................................................... 56
9. Product Specifications ..................................................................................... 59
10. Troubleshooting ............................................................................................... 62
10.1 Common Problems ............................................................................................. 62
10.2 RFID Error Messages ......................................................................................... 65
11. Maintenance .................................................................................................... 67
1
1. Introduction
1.1 Product Introduction
The sleek design of the TD-4650TNWB/4650TNWBR/4750TNWB/4750TNWBR label printer
can handle up to 984 ft (300 m) of ribbon and label rolls. Its internal 5" (127 mm) label capacity
can be further expanded with an External Roll Holder to handle 8" (203.2 mm) rolls, designed
for industrial label printers. The printer's movable Black Mark Sensor is compatible with a wide
range of label media.
The printer uses its high-performance, high-quality, built-in Monotype Imaging
®
TrueType font
engine with the CG Triumvirate Bold Condensed smooth scalable font. It also provides a
choice of eight different sizes of the alphanumeric bitmap font. The printer's flexible firmware
design allows users to download additional TrueType fonts from a computer to print custom
labels. It also supports most of the standard barcode formats and can print fonts and barcodes
in four directions.
1.2 Additional Product Reference
For information on how to write custom programs for your Label Printer, see the Command
Reference Manuals on your model's Manuals page at support.brother.com.
2
2. Operations Overview
2.1 Unpack the printer and check the components
Note
Keep the packaging materials in case you must ship the printer.
The components included in the box:
1. Printer Unit
2. 1" (25.4 mm) Ribbon Paper Core
3. Two 1" (25.4 mm) Ribbon Spindles
4. Power Cord
5. External Universal Switching Power Supply
6. USB Cable
If any components are missing, contact the product manufacturer's customer service or your
local dealer.
1
2
3
4
5
6
3
2.2 Printer Overview
2.2.1 Front View
1. LED Indicator
2. LCD
3. Feed/Pause Button (controls the icon on the right side of the LCD)
4. Roll Compartment Cover Open Tab
5. Label Output Slot
6. Navigation Buttons
7. Menu Button (controls the icon on the left side of the LCD)
1
2
5
7
6
4
2.2.2 Interior View
1.
Roll Compartment Cover
8.
Ribbon Supply Hub
2.
Ribbon Rewind Spindle
9.
Media Adapter
3.
Print Head
10.
Gap Sensor
4.
Ribbon Supply Spindle
11.
Media Guide Tips
5.
Roll Guides
12.
Black Mark Sensor
6.
Platen Roller 13. RFID Antenna Slider (TD-4650TNWBR
and TD-4750TNWBR only)
7.
Ribbon Rewind Hub
WARNING
DO NOT touch rotating parts. There is a risk of injury if your finger is caught in the
rotating gear. Turn off the product before touching any metal parts.
1
4
5
2
3
6
10
12
13
7
8
11
9
5
2.2.3 Rear View
1. Power Switch
2. Power Port
3. USB Port (USB 2.0/Hi-Speed mode)
4. USB Host Port
5. RS-232 Serial Port
6. Ethernet Port
Note
For more information, see 9. Product Specifications.
1
2
3
6
5
4
6
2.3 Connect the Power Cord
Note
Before you plug the Power Cord into the Power Port, make sure the printer's Power Switch
is in the OFF position.
Place the printer on a flat, secure surface.
For more information, see 9. Product Specifications.
1. Plug the Power Cord into the Power Port at the rear of the printer, and then plug the other
end into the AC power outlet (electrical socket).
2. Connect the printer to the computer with the provided USB cable.
3. Push the “-” side of the Power Switch to turn on the printer.
7
2.4 Control Panel
No. Description Functionality
1 Soft Buttons
Menu Button (Left):
- Opens the LCD menu in Ready Mode.
- Selects the left icon in the LCD footer.
Feed/Pause Button (Right):
- Ejects one label length of the media in Ready Mode.
- Selects the right icon in the LCD footer.
- Pauses a print job.
The LED flashes in green. To resume the print job, press
the button again.
2
Navigation
Buttons
Select menu items.
Pressing the Up and Down arrows together locks or unlocks
the control panel.
1
2
8
2.5 LED Indicator
LED Color Description
Green (Lit) The power is on and the printer is ready to use.
Green (Flashing) The printer is downloading data from a computer.
The printer is paused.
Amber The printer is removing data.
Red (Lit) The Print Head is open.
There is a problem with the Cutter Module.
Red (Flashing) There is a memory error or printing error (for example:
jammed paper,
no paper, no ribbon).
9
3. Set Up Your Printer
3.1 Load the Ribbon
1. Press the tabs located on each side
of the printer, and then lift the Roll
Compartment Cover.
2. Use one of the following paper
cores:
For 1" (25.4 mm) and 0.5"
(12.7 mm) paper cores with
notches, you do not need to install
the ribbon spindles.
For 1" (25.4 mm) paper core
without notches, insert the ribbon
spindles into the paper core and
ribbon.
Note
Follow these directions when
installing the ribbon spindle.
10
3.
a. First, insert the right side of the
Ribbon Rewind Spindle (marked “R”)
into the Ribbon Rewind Hub. Then,
insert the left side of the Ribbon
Rewind Spindle into the hole on the
left side of the Ribbon Rewind Hub.
b. Insert the right side of the Ribbon
Supply Spindle (marked “R”) into the
Ribbon Supply Hub. Then, insert the
left side of the Ribbon Supply
Spindle into the hole on the left side
of the Ribbon Supply Hub.
4. Thread the ribbon through the Print
Head and adhere the leader of the
ribbon onto the Ribbon Rewind
Paper Core.
IMPORTANT
Do not dispose of the Ribbon
Rewind Paper Core when replacing
the ribbon roll. This part is
necessary for the ribbon roll
replacement.
5. Using the Ribbon Rewind Gear,
rotate the Ribbon Rewind Hub until
the ribbon plastic leader is
thoroughly wound and the black
section of the ribbon covers the Print
Head.
a.
b.
11
3.2 Load the Media
3.2.1 Load Label Roll
1. Press the tabs located on each
side of the printer, and then lift the
Roll Compartment Cover.
2. Slide both Roll Guides outwards.
3. Insert the paper roll with the labels
facing up, as shown in the
illustration.
Push down and slide the lock tab to
lock the Roll Guides into place.
Note
Make sure that the label print side
is facing up.
12
4. Slide the Media Guide Tips to the correct position.
Note
For black mark media or media with notches or holes used to indicate the label length,
the Black Mark sensor is moveable. Slide the Media Guide Tips to the correct position.
For RFID models, slide the green RFID Antenna Slide to the correct position.
5. Place the paper, printing side face up, through the media sensor and place the first label’s
leading edge onto the Platen Roller. Adjust the green Media Guide Tips to fit the label width.
6. Press down on both sides of the Roll
Compartment Cover to close it gently.
7. Use the LCD menu or the Brother
Printer Management Tool (BPM) to
set the media sensor type and
calibrate the selected sensor.
Note
For more information about sensor
calibration, see section
7.2. Auto-Calibrating the Media
Sensor using the BPM.
M
edia Guide Tips
Black
Mark
S
ensor
RFID
Antenna Slide
(
TD-
4650TNWBR and
TD
-4750TNWBR)
13
Convert 1" (25.4 mm) to 1.5" (38.1 mm) Core Roll Guides
1. Use a 3/32" (2.5 mm) hex key
(purchased separately) to remove
the Media Adapter located on both
sides of the Roll Guides.
2. Reverse the direction of the Media
Adapter and align it with the Roll
Guide.
Note
The Roll Guide can be converted
from a 1" core to 1.5" core by
reversing the Media Adapter.
For 1" core For 1.5" core
3. Reinstall the Media Adapter and
use the hex key to secure it onto
the Roll Guides.
14
3.2.2 Install the External Roll Holder (Optional)
1. Tighten the screws on the metal
fittings of the extended plate.
2. Attach the extended plate to the
bottom of the printer.
3. Insert a 3" (76.2 mm) Label Spindle
into a paper roll. Then, install it on
the External Roll Holder.
Note
Make sure that the label print side
is facing up.
4. Feed the media through the feed
slot in the back of the printer.
3" (76.2 mm)
Label Spindle
15
5. Open the Roll Compartment Cover.
Slide the Roll Guides outwards,
and then align the paper width with
the Roll Guides. Push down and
slide the lock tab to lock the Roll
Guides into place.
6. Install the label roll as described in
section 3.2.1 Load Label Roll
.
7. Feed the media through the media
sensor. Adjust the Media Guide
Tips to fit the label width.
8. Use the Brother Printer
Management Tool (BPM) or LCD
menu to set the media sensor type
and calibrate the selected sensor.
Note
Calibrate the Gap/Black Mark Sensor every time you change the media.
For more information about sensor calibration, see section 7.2 Auto-Calibrating the Media
Sensor using the BPM.
Media Guide Tips
16
3.2.3 Install the Label Roll When Using the Cutter Module (Dealers only)
1. Press the tabs located on each
side of the printer, and then lift the
Roll Compartment Cover.
2. Install the label roll as described in
section 3.2.1 Load Label Roll
.
3. Use the Brother Printer
Management Tool (BPM) to set the
media sensor type and calibrate
the selected sensor.
4. Feed the label roll through the
media sensor. Adjust the Media
Guide Tips to fit the label width.
5. Push the label roll through the
Cutter Output Slot.
Note
Make sure that the label print side
is facing up.
Media Guide Tips
  • Page 1 1
  • Page 2 2
  • Page 3 3
  • Page 4 4
  • Page 5 5
  • Page 6 6
  • Page 7 7
  • Page 8 8
  • Page 9 9
  • Page 10 10
  • Page 11 11
  • Page 12 12
  • Page 13 13
  • Page 14 14
  • Page 15 15
  • Page 16 16
  • Page 17 17
  • Page 18 18
  • Page 19 19
  • Page 20 20
  • Page 21 21
  • Page 22 22
  • Page 23 23
  • Page 24 24
  • Page 25 25
  • Page 26 26
  • Page 27 27
  • Page 28 28
  • Page 29 29
  • Page 30 30
  • Page 31 31
  • Page 32 32
  • Page 33 33
  • Page 34 34
  • Page 35 35
  • Page 36 36
  • Page 37 37
  • Page 38 38
  • Page 39 39
  • Page 40 40
  • Page 41 41
  • Page 42 42
  • Page 43 43
  • Page 44 44
  • Page 45 45
  • Page 46 46
  • Page 47 47
  • Page 48 48
  • Page 49 49
  • Page 50 50
  • Page 51 51
  • Page 52 52
  • Page 53 53
  • Page 54 54
  • Page 55 55
  • Page 56 56
  • Page 57 57
  • Page 58 58
  • Page 59 59
  • Page 60 60
  • Page 61 61
  • Page 62 62
  • Page 63 63
  • Page 64 64
  • Page 65 65
  • Page 66 66
  • Page 67 67
  • Page 68 68
  • Page 69 69
  • Page 70 70
  • Page 71 71
  • Page 72 72
  • Page 73 73

Brother TD-4750TNWB User guide

Category
Label printers
Type
User guide
This manual is also suitable for

Ask a question and I''ll find the answer in the document

Finding information in a document is now easier with AI