Page is loading ...

rev - 10/30/17
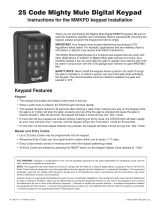
Moving Gate
Area
Driveway
10'
10'
10'
10'
NEVER INSTALL
any control device
within gray area
NEVER install the keypad portion of this
system where a person can reach through
the gate to activate it, or where a person can
touch the gate while activating the keypad.
The recommended minimum distance
between the gate and keypad is 10 ft.
©2017 GTO Access Systems, LLC
Printed in China for GTO
Wireless Estate Intercom
Installation Manual
Kit Includes:
A. Keypad
B. Keypad Cover
C. Jumper (required for hard-wired installation)
D. Keypad Battery Cover
E. Base Unit
F. Base Unit Rechargeable Battery
G. Transformer
H. Screws for mounting Keypad Cover
How it Works:
A visitor without an entry code presses the CALL button on
the keypad. The base (indoor) unit and the keypad will ring.
A user at the base (indoor) unit answers the call by pressing
the PUSH TO ANSWER/TALK button. The user at the base
unit then presses the GRANT PERMISSION button to allow
the visitor to operate the gate. The keypad’s GRANTED
light comes on, indicating that the visitor can now push any
number key on the keypad to open the gate.
Visitors with access codes simply use their code to operate
the gate. Temporary codes can be programmed to expire
within a set number of days.
WIRELESS
A
C
E
F
G
H
D
B
PROFESSIONAL RESIDENTIAL
ACCESS
SYSTEMS
WARNING
GTO Access Systems, LLC • 3121 Hartsfield Road • Tallahassee, Florida 32303
Telephone (850) 575-0176 • Fax (850) 575-8912 • www.gtoinc.com • www.gtoaccess.com

Estate Intercom/Keypad Features
Keypad
• The keypad illuminates and beeps at the press of any key. At night, the keypad will illuminate when the proximity sensors
detect motion near the keypad face.
• When a valid code is entered, the STATUS light will blink rapidly, the keypad will beep three times, and the GRANTED
light turns green.
• The keypad remains active for 40 seconds after entering a valid code: pressing any key on the keypad while the gate is
in motion will stop the gate; pressing any key while the gate is stopped will cause the gate to reverse direction. After 40
seconds, the keypad will
beep 3 three times and go into “idle” mode, and the GRANTED light will turn off.
• If more than 20 key presses are entered without matching an Entry Code, the STATUS light will flash rapidly, an error tone
will sound for 1 second, and the keypad will go into “lock-down” mode for 40 seconds.
• If more than 10 seconds elapse between key presses, the keypad will beep 3 three times and go into “idle” mode.
Master and Entry Codes
• Up to 100 Entry Codes may be programmed into the keypad.
• Temporary Entry Codes can be programmed to expire within one to seven (1–7) days.
• Entry Codes remain stored in memory even when the keypad batteries go dead.
• All Entry Codes are deleted by pressing the RESET button on the keypad; Master Code defaults to “1234.”
Base Unit
• The base unit is powered by a rechargeable battery (included); the charge is maintained by the transformer.
• The base unit can be disconnected from the transformer allowing it to be moved anywhere within range.
• Up to three additional base units can be added to the system.
NOTE: The keypad, not the base station, initiates the call and operates the gate. The base station is for answering
calls and granting “permission” for the gate to be opened.
INTERCOM/KEYPAD SPECIFICATIONS
Frequency 318 MHz from keypad to gate opener
915 MHz from keypad to base station
Memory – Keypad Stores up to 100 four-digit entry codes
Power Consumption – Keypad 60 mA when relay is closed
Power Supply – Keypad Four C batteries (plus 8-24V DC/AC for hard-wired installations)
Power Supply – Base Unit 9 Vdc 300 mA transformer; 3.6V Ni-MH 800 mA rechargeable battery
pack
Range from Keypad to Base Unit 500’ wireless
Range from Reypad to Gate Opener 50’ wireless 100’ wired using 16 AWG wire
Relay Output – Keypad Momentary, normally open dry contact closes for 2 seconds upon
activation
Relay Output Rating – Keypad 12 or 24 Vdc 100 mA
Wiring – Keypad Power & Relay Output 16 AWG stranded low voltage direct burial wire

1
Keypad and Base Unit Overview
Front
Interior
Calling Light:
7XUQV5('ZKHQFDOOLQJWXUQV
*5((1ZKHQFDOOLVDQVZHUHG
Granted Light:
7XUQV*5((1ZKHQDFFHVV
SHUPLVVLRQLVJUDQWHG
Program Button:
8VHGWRSURJUDP(QWU\&RGHV
Status Light:
%OLQNVRQFHZKHQDQ\NH\LV
SUHVVHGSURYLGHVYLVXDOIHHGEDFN
ZKHQSURJUDPPLQJNH\SDG
3
DEF
9
WXY
6
MNO
2
0
CALL
4
GHI
7
PRS
1
ABC
8
TUV
5
JKL
Presence
Sensors
123456789
ETD
+
0
-
ID SET RESET
REQUIRES 4 “C”
SIZE BATTERIES
123456789
ETD
+
0
-
ID SET RESET
REQUIRES 4 “C”
SIZE BATTERIES
Relay Output:
8VHGWRFRQQHFWWKHNH\SDGWRJDWH
RSHQHUFRQWUROERDUGKDUGZLUHG
LQVWDOODWLRQV
Power Input:
7RFRQQHFWNH\SDGWRJDWHRSHQHUSRZHU
VRXUFHKDUGZLUHGLQVWDOODWLRQV
DIP Switches:
0DWFKNH\SDG',3VZLWFKVHWWLQJVWR
(QWU\7UDQVPLWWHU¶V',3VZLWFKVHWWLQJV
Jumper:
2)):LUHOHVVPRGH0+]HQDEOH
215HOD\RXWKDUGZLUHGLQVWDOODWLRQV
0+]GLVDEOH
Reset Button:
3UHVVWKLVEXWWRQIRUVHFRQGVWR
SURJUDPNH\SDGWR0DVWHU&RGHGHIDXOW
³´DQGGHOHWHDOORWKHUFRGHV
ID Set Button:
8VHGWRV\QFDGGLWLRQDOEDVHXQLWVZLWK
NH\SDG
Battery Holder and Cover:
8VH³&´EDWWHULHV
Face
POWER
Keypad
Batt Low
Grant Permission
Push To Answer/Talk
End Call
DV 9V
Power Light:
*5((1FKDUJLQJ5('EDWWHU\
SRZHUPRGHXQSOXJJHGIURP
WUDQVIRUPHU%OLQNLQJ5('ORZ
EDWWHU\
Push To Answer/Talk Button:
7RDQVZHUFDOOIURPNH\SDGSUHVV
DQGKROGWRWDONUHOHDVHWROLVWHQ
Grant Permission Button:
0XVWEHSUHVVHGEHIRUHWKHSHUVRQ
DWWKHNH\SDGFDQSUHVVDQ\NH\WR
RSHQWKHJDWH
End Call Button:
7HUPLQDWHVWKHFDOO
Keypad Battery Indicator
Light:
21ZKHQNH\SDGEDWWHU\LVORZ
Power Jack:
Connect transformer to charge the
EDWWHU\
ID SET
VOLUME
POWER
OFF
ON
Volume Control:
&RQWUROVYROXPHOHYHORIVSHDNHU
Battery Access Cover:
5HFKDUJHDEOH9ROW1L0+EDWWHU\
LQFOXGHG
ID Set Button:
8VHGWRV\QFDGGLWLRQDOEDVHXQLWVZLWK
NH\SDG
ON/OFF Switch:
7XUQ2))WRFRQVHUYHEDWWHU\SRZHU
Bottom
1. Install Keypad and Base Unit Batteries
Step 1:8QORFNWKHERWWRPRIWKHNH\SDGDQGVHSDUDWHLWIURPLWVFRYHU5HPRYHEDWWHU\FRYHUDQGLQVWDOOIRXU³&´EDWWHULHV
requiredQRWLQFOXGHG5HSODFHWKHEDWWHU\FRYHU
Step 2:5HPRYHWKHEDVHXQLWEDWWHU\FRYHUXVLQJDVPDOOSKLOOLSVKHDGVFUHZGULYHU,QVWDOOWKHUHFKDUJHDEOH1L0+EDWWHU\
LQFOXGHG5HSODFHEDWWHU\FRYHU
ID SET

2
2. Connect the Transformer and Test Base Unit
Step 1:
)LQGDFRQYHQLHQWORFDWLRQQHDUDQ$&RXWOHWWRPRXQWRUSODFHWKH
EDVHXQLW
Step 2:
3OXJWKHWUDQVIRUPHULQWRWKHRXWOHWDQGFRQQHFWLWWRWKHEDVHXQLW
7KHEDVHXQLWFDQEHGLVFRQQHFWHGIURPWKHWUDQVIRUPHUIRUXVHLQ
DQRWKHUORFDWLRQ7KHEDWWHU\ZLOOODVWDSSUR[LPDWHO\IRXUKRXUVZKHQ
XQSOXJJHGIURPWKHWUDQVIRUPHUYou can turn the base unit OFF to
conserve battery power, however it will not receive a signal.
Step 3:
7HVWWKHEDVHXQLWE\SUHVVLQJWKH&$//EXWWRQRQWKHNH\SDG7KH
EDVHXQLWZLOOULQJ
Charge battery for 12 hours
before using the system for
the first time.
POWER
Keypad
Batt Low
Grant Permission
Push To Answer/Talk
End Call
DV 9V
Transformer
110 Vac outlet
3. Install and Test Keypad
For wirelessDSSOLFDWLRQVWKHNH\SDGmustEHLQOLQHRIVLJKWRIandQRPRUHWKDQIWDZD\IURPWKHJDWHRSHQHU
UHFHLYHU7HVWWKHNH\SDGUDQJHEHIRUHSHUPDQHQWO\PRXQWLQJLW
Step 1:$WWKHJDWHVHWWKHNH\SDG',3VZLWFKHVWRPDWFK\RXU
(QWU\7UDQVPLWWHU¶V',3VZLWFKVHWWLQJVNOTE: If you have not
adjusted your gate opener’s Entry Transmitter from the factory
setting, see the “Personalize Transmitter Settings” section in your
gate opener’s installation manual.
Step 2:7HVWWKHNH\SDGXVLQJWKHGHIDXOW0DVWHU&RGH³´,W
ZLOODFWLYDWHWKHJDWH
Step 3:7HVWWKHNH\SDGUDQJHE\SUHVVLQJWKH&$//EXWWRQ<RX
ZLOOKHDUWKHEDVHXQLWULQJLQJWKURXJKWKHNH\SDGVSHDNHU
Step 4:0RXQWWKHNH\SDGFRYHUXVLQJWKHVFUHZVSURYLGHG
NOTE: a metal housing or metal object can affect range
Step 5:6OLGHWKHNH\SDGLQWRWKHFRYHUDQGORFNLW
You will need to hard-wire your keypad to the gate opener if you:
• Do NOT have a GTO Entry Transmitter.
• Have a GTO Access Systems GP Series gate opener.
• Live in an area with high radio frequency interference.
Skip to page 5 for instructions.
123456789
ETD
+
0
-
ID SET RESET
If you use this button
to operate gate, put
the 9th DIP Switch
in the “0” position
Dual Button Entry Transmitter
1 2 3 4 5 6 7 8 9
ECE
A23S 12V
ALKALINE BATTERY
+
0
–
LED
Single Button Entry Transmitter
If you use this button
to operate gate, put
the 9th DIP Switch in
the “+” position
Change the Keypad’s DIP Switch Settings NOT
the Entry Transmitter Dip Switch Settings

3
Program New Master Code
1. Press and Release Program Button:
2. Enter current Master Code:
(example: the factory default Master Code)
3. Press and Release Program Button:
4. Enter the Function Code:
5. Press and Release Program Button:
6. Enter the new Master Code:
7. Press and Release Program Button:
8. Enter the new Master Code again:
9. Press and Release Program Button:
Program Button
Status Light
= Your 4-digit code.
4. Program the Keypad
• A Master Code is needed to add, remove, or program Entry Codes.
• Factory default Master Code is “1234.”
• Keypad can only enter “program” mode from “idle” mode.
• Keypad will beep three times before going into “idle” mode (more than 10 seconds
between key presses).
Add New Entry Code
1.
2. Master Code
3.
4. Function Code
5.
6. New Entry Code
7.
Delete Entry Code
1.
2. Master Code
3.
4. Function Code
5.
6. Code to be deleted
7.
Delete All Entry Codes
1.
2. Master Code
3.
4. Function Code
5.
Add Temporary Entry Code
*In step 4, you will need to enter a number from 1 through 7
to indicate the number of days until the Entry Code expires.
1.
2. Master Code
3.
4.
Function Code & # of days Code will be active*
5.
6. Temporary Entry Code
7.
Programming Confirmed: Keypad will beep 3 times.
Error Message: Status light will flash rapidly, error tone will sound for
1 second and keypad will return to “idle” mode (changes not saved).
• Entry Code is not 4 digits.
• New Master Codes don’t match (“Program New Master Code”).
• Memory is full (already 100 codes).
• No matching code is found (“Delete Entry Code”).

4
5. Sync Additional Base Units (optional)
,I\RXSXUFKDVHGDGGLWLRQDOEDVHXQLWV)0%&\RXPXVWV\QFHDFKDGGLWLRQDOXQLWZLWKWKHNH\SDGVRWKH\FDQ
FRPPXQLFDWH
Step 1: ,QVWDOOWKHEDWWHU\DQGWXUQWKHEDVHXQLW21
Step 2: 3UHVVDQGUHOHDVHWKH³,'6(7´EXWWRQRQWKHNH\SDG
Step 3: 3UHVVDQGUHOHDVHWKHQXPEHURQWKHNH\SDGWKDW
FRUUHVSRQGVWRWKHEDVHXQLW\RXDUHDGGLQJ<RXZLOOKHDUD
QXPEHURIEHHSVFRUUHVSRQGLQJWRWKHQXPEHU\RXSUHVVHG)RU
H[DPSOHLI\RXDUHDGGLQJDVHFRQGEDVHXQLWWRWKHV\VWHPSUHVV
³´WKHNH\SDGZLOOEHHS7:2WLPHV,I\RXDUHDGGLQJDWKLUG
EDVHXQLWSUHVV³´WKHNH\SDGZLOOEHHS7+5((WLPHVHWF
Step 4: 3UHVVWKH³,'6(7´EXWWRQRQWKHEDVHXQLWXQWLOLWEHHSV
WKHQUHOHDVH<RXZLOOKHDUEHHSVIURPWKHEDVHXQLWDQGEHHSV
IURPWKHNH\SDGZKLFKPHDQVWKHEDVHXQLWDQGNH\SDGDUH
V\QFHG
IMPORTANT: Base units need to be placed at least 10 feet
apart to prevent interference
6. Test the Intercom
IMPORTANT:7KHEDVHXQLWDQGWKHNH\SDGFDQQRWEHZLWKLQIHHWRIHDFKRWKHUZKHQRSHUDWLQJ,IXQLWVDUHFORVHU
WKDQIHHWWKHVLJQDOZLOOEHLQFRQVLVWHQWDQGHPLWIHHGEDFN
+DYHVRPHRQHSUHVVWKH&$//EXWWRQRQWKHNH\SDG:KHQWKHEDVHXQLWLQVLGHWKHKRXVHULQJV
SUHVVWKH$16:(5
EXWWRQDQGWDONWRWKHSHUVRQDWWKHJDWHWRFKHFNWKHFRQQHFWLRQDQGUDQJH7KHQSUHVVWKH*5$173(50,66,21EXWWRQ
DQGKDYHWKHSHUVRQSUHVVDQ\NH\RQWKHNH\SDGWRDFWLYDWHWKHJDWH
Using the Wireless Estate Intercom
NOTE: The keypad, not the base station, initiates the call and operates the gate. The base station is for answering calls
and granting “permission” for the gate to be opened.
Using the Intercom
3UHVVWKH&$//EXWWRQRQWKHNH\SDGWRULQJWKHEDVHXQLWLQVLGHWKHKRXVH
7KHEDVHXQLWZLOOULQJZKHQLWUHFHLYHVD&$//IURPWKHNH\SDGKROGWKH$16:(5EXWWRQWRWDONWRWKHYLVLWRU
UHOHDVHWKH$16:(5EXWWRQWROLVWHQ3UHVVWKH*5$173(50,66,21EXWWRQWRDOORZWKHYLVLWRUWRRSHQWKHJDWH
E\SUHVVLQJDQ\QXPEHUNH\RQWKHNH\SDG7KH(1'&$//EXWWRQWHUPLQDWHVWKHFDOO
$IWHUWKHNH\SDG¶V*5$17('OLJKWWXUQVJUHHQSUHVVDQ\QXPEHUNH\WRRSHQWKHJDWH
Using Entry Codes
:KHQDYDOLGFRGHLVHQWHUHGWKH67$786OLJKWZLOOEOLQNUDSLGO\DQGWKHNH\SDGZLOOEHHSWLPHV
7KHNH\SDGUHPDLQVDFWLYHIRUVHFRQGVDIWHUHQWHULQJDYDOLGFRGHSUHVVLQJDQ\NH\RQWKHNH\SDGZKLOHWKHJDWHLV
LQPRWLRQZLOOVWRSWKHJDWHSUHVVLQJDQ\NH\ZKLOHWKHJDWHLVVWRSSHGZLOOFDXVHWKHJDWHWRUHYHUVHGLUHFWLRQ$IWHU
VHFRQGVWKHNH\SDGZLOO
EHHSWKUHHWLPHVDQGJRLQWR³LGOH´PRGH
,IPRUHWKDQNH\SUHVVHVDUHHQWHUHGZLWKRXWPDWFKLQJDQ\(QWU\&RGHVWKH67$786OLJKWZLOOÀDVKUDSLGO\WKH
HUURUWRQHZLOOVRXQGIRUVHFRQGDQGWKHNH\SDGZLOOJRLQWR³ORFNGRZQ´PRGHIRUVHFRQGV
,IPRUHWKDQVHFRQGVHODSVHEHWZHHQNH\SUHVVHVWKHNH\SDGZLOOEHHSWKUHHWLPHVDQGJRLQWR³LGOH´PRGH
Intercom ID Codes
This keypad and base unit are synced at the factory to communicate with each other. This
base unit is considered to be “unit #1” when adding more base units to the system.
ID SET button
ID SET
VOLUME
POWER
OFF
ON
Keypad - Inside
Base Unit – Bottom
Keypad - Front
ID SET button
3
DEF
9
WXY
6
MNO
2
0
CALL
4
GHI
7
PRS
1
ABC
8
TUV
5
JKL
123456789
ETD
+
0
-
ID SET RESET

5
123456789
ETD
+
0
-
ID SET RESET
Hard-wire
from
Gate Opener
Power Supply
from
Opener
Battery
#
1
#
2
POWER
RELAY
Jumper ON
wireless mode
Jumper OFF
wired mode
HARD-WIRED INSTALLATION
<RXZLOOQHHGWZRSDLUVRIJDXJH$:*VWUDQGHGGLUHFWEXULDOORZYROWDJHZLUHRB509RQHSDLUWRKDUGZLUHWKH
FRPPXQLFDWLRQEHWZHHQWKHNH\SDGDQGWKHJDWHRSHQHUWKHRWKHUWRH[HQGWKHOLIHRIWKHIRXU³&´EDWWHULHV127(7KH
IRXU³&´EDWWHULHVDUHUHTXLUHGIRUUHOLDEOHRSHUDWLRQRIWKHNH\SDG
Step 1:7XUQWKHJDWHRSHQHU¶VSRZHUVZLWFK2))
Step 2: 'HWHUPLQHKRZWKHZLUHVZLOOHQWHUWKHNH\SDGHJIURPWKHEDFNWKURXJKD
KROHGULOOHGLQWKHSRVWUXQQLQJWKHZLUHRQWKHSRVWVXUIDFH'ULOODKROHLQWKHEDFNRI
WKHNH\SDGFRYHUDQGSXOOWKHZLUHLQWRWKHFRYHU7KHQPRXQWWKHFRYHUWRWKHSRVWXVLQJ
WKHVFUHZVSURYLGHG5XQZLUHWKURXJK39&SLSHIURPWKHJURXQGWRNH\SDGDQGIURPWKH
JURXQGWRWKHRSHQHUFRQWUROERDUGWRSURWHFWLWIURPODZQPRZHUVRUJUD]LQJDQLPDOV
Step 3::LUHWKHNH\SDGWRWKHJDWHRSHQHUFRQWUROERDUG6WULS´RIIWKHHQGVRIRQH
SDLURIORZYROWDJHZLUHV$WWDFKWKHZLUHVWRWKHWHUPLQDOEORFNPDUNHG5(/$<RQWKHNH\SDGFRQWUROERDUGDVVKRZQ
7KHQFRQQHFWZLUHWRWKH&<&/(WHUPLQDORQWKHJDWH
RSHQHUFRQWUROERDUGDQGZLUHWRWKH&20WHUPLQDORQ
WKHJDWHRSHQHUFRQWUROERDUG
127(,I\RXKDYHDPRO 1000/2000/SL1000/SL2000
gate openerFRQQHFWZLUHWRWKH:+7DFFHVVRU\
WHUPLQDODQGZLUHWRWKH*51DFFHVVRU\WHUPLQDO
5HIHUWR\RXUJDWHRSHQHULQVWUXFWLRQPDQXDOIRUPRUH
GHWDLOVRQZLULQJWKHJDWHRSHQHUFRQWUROERDUG
Step 4: :LUHWKHNH\SDGWRWKHEDWWHU\6WULS´RII
WKHHQGVRIWKHVHFRQGSDLURIORZYROWDJHZLUHV$WWDFK
WKHZLUHVWRWKHWHUPLQDOEORFNPDUNHG32:(5RQWKH
NH\SDGFRQWUROERDUGDVVKRZQ&RQQHFWWKHRWKHUHQGRI
WKHZLUHVWRWKHRSHQHU¶VEDWWHU\RQHHQGWRWKH326,7,9(
5('WHUPLQDODQGWKHRWKHUWRWKH1(*$7,9(%/$&.
WHUPLQDO
Step 5:&RQQHFWWKHMXPSHUEHWZHHQWKHWZRWHUPLQDOVRQ
WKHNH\SDGFRQWUROERDUG21DVVKRZQ
Step 6:6OLGHWKHNH\SDGLQWRWKHFRYHUDQGORFN
Step 7: 5HSODFHWKHJDWHRSHQHUFRQWUROERDUGFRYHUDQGWXUQ
WKHSRZHUVZLWFK21
Step 8:3URJUDPWKHNH\SDGSDJH
Drill Hole

Troubleshooting
Pressing the keypad CALL button does not ring the base unit:
&KHFNWKHEDWWHULHVLQWKHNH\SDGDQGUHSODFHWKHPLIQHFHVVDU\
0DNHVXUHWKHEDVHXQLWLVWXUQHGRQDQGWKHYROXPHLVWXUQHGXS
7U\PRYLQJWKHNH\SDGDQGWKHEDVHXQLWFORVHUWRHDFKRWKHUQRFORVHUWKDQIW
3HUIRUP³6\QF´SURFHGXUHEHORZWKLVZLOOUHTXLUHWZRSHRSOH:
D 2SHQWKHNH\SDGDQGORFDWHWKH³,'6(7´EXWWRQDERYHWKHEDWWHULHV/RFDWHWKH³,'6(7´EXWWRQRQWKHERWWRP
RIWKHEDVHXQLW
E 0DNHVXUHWKH³DQWHQQDWRDQWHQQD´GLVWDQFHEHWZHHQWKHNH\SDGDQGWKHEDVHXQLWLVDWOHDVWIHHW
F 3UHVVWKH³,'6(7´EXWWRQRQWKHNH\SDGXQWLO\RXKHDUDEHHSWKHQUHOHDVH
G 3UHVVWKH³,'6(7´EXWWRQRQWKHEDVHXQLWIRUDSSUR[LPDWHO\VHFRQGVWKHQUHOHDVH<RXZLOOKHDU21(EHHS
IURPWKHEDVHXQLWDQG7:2IURPWKHNH\SDGZKLFKPHDQVWKHNH\SDGDQGEDVHXQLWDUHV\QFKHG
H 7HVWWKHV\VWHPE\SUHVVLQJWKH&$//EXWWRQRQWKHNH\SDGWRVHHLIWKHEDVHXQLWUHFHLYHVWKHVLJQDO2QFHWKH
V\VWHPLVZRUNLQJ\RXZLOOQHHGWRV\QFDGGLWLRQDOEDVHVWDWLRQVVHHSDJH
The Master Entry Code does not open the gate and the GRANTED light does not turn green.
&KHFNWKHEDWWHULHVLQWKHNH\SDGDQGUHSODFHWKHPLIQHFHVVDU\
3URJUDPWKHNH\SDGSDJH
The Master Entry Code does not open the gate and the GRANTED light turns green.
:,5(/(66,QVWDOODWLRQ
9HULI\WKDW\RXU(QWU\7UDQVPLWWHURSHUDWHVWKHJDWH
9HULI\WKDWWKH.H\SDG',3VZLWFKHVDUHPDWFKHGWRWKH(QWU\7UDQVPLWWHU',36ZLWFKHVSDJH
0DNHVXUHWKH-803(5LQWKHNH\SDGLV127LQVWDOOHGSDJH
:,5(',QVWDOODWLRQ
%HVXUHWKHZLUHVDUHVHFXUHO\FRQQHFWHGWRWKHJDWHRSHQHUFRQWUROERDUGSDJH
0DNHVXUHWKH-803(5LQWKHNH\SDGLVLQVWDOOHGSDJH
You’ve forgotten the Master Entry Code:
The following will remove all Entry Codes from the keypad and program the Master Code back to factory default.
3UHVVDQGKROGWKH5(6(7EXWWRQLQWKHNH\SDGIRUWZRVHFRQGV0DVWHU(QWU\&RGHLVQRZ³´
3URJUDPWKHNH\SDGSDJH
Limited One Year Warranty
*72$FFHVV6\VWHPV//&³*72´JDWHRSHQHUDFFHVVRULHVDUHZDUUDQWHGE\WKHPDQXIDFWXUHUDJDLQVWGHIHFWVLQZRUNPDQVKLSIRUDSHULRGRIRQH\HDUIURPWKH
GDWHRISXUFKDVHSURYLGHGUHFRPPHQGHGLQVWDOODWLRQSURFHGXUHVKDYHEHHQIROORZHG
,QWKHFDVHRISURGXFWIDLOXUHGXHWRGHIHFWLYHPDWHULDORUPDQXIDFWXUHUZRUNPDQVKLSZLWKLQWKHRQH\HDUZDUUDQW\SHULRGWKHDFFHVVRU\ZLOOEHUHSDLUHGRUUHSODFHG
DWWKHPDQXIDFWXUHU¶VRSWLRQDWQRFKDUJHWRWKHFXVWRPHULIUHWXUQHGIUHLJKWSUHSDLGWR*72$FFHVV6\VWHPV//&+DUWV¿HOG5G7DOODKDVVHH)/
IMPORTANT: Call 850/575-4144 or fax 850/575-8950 for a Return Goods Authorization (RGA) number before returning goods to factory. Products received
at the factory without an RGA will not be accepted.
5HSODFHPHQWRUUHSDLUHGSDUWVDUHFRYHUHGE\WKLVZDUUDQW\IRUWKHUHPDLQGHURIWKHRQH\HDU
ZDUUDQW\SHULRGRUVL[PRQWKVZKLFKHYHULVJUHDWHU*72ZLOOSD\WKHVKLSSLQJFKDUJHVHTXDOWR8QLWHG3DUFHO6HUYLFH*5281'UDWHIRUUHWXUQ
WRWKHRZQHURILWHPVUHSDLUHGXQGHUZDUUDQW\
7KHPDQXIDFWXUHUZLOOQRWEHUHVSRQVLEOHIRUDQ\FKDUJHVRUGDPDJHVLQFXUUHGLQWKHUHPRYDORIWKHGHIHFWLYHSDUWVIRUUHSDLURUIRUWKHUHLQVWDOODWLRQRIWKRVHSDUWVDIWHU
UHSDLU7KLVZDUUDQW\VKDOOEHFRQVLGHUHGYRLGLIGDPDJHWRWKHSURGXFWVZDVGXHWRLPSURSHULQVWDOODWLRQRUXVHFRQQHFWLRQWRDQLPSURSHUSRZHUVRXUFHWDPSHULQJ
RULIGDPDJHZDVFDXVHGE\OLJKWQLQJHOHFWULFDOSRZHUVXUJHZLQG¿UHÀRRGLQVHFWVRURWKHUQDWXUDODJHQW
$IWHUWKHRQH\HDUZDUUDQW\SHULRG*72RURQHRILWVDXWKRUL]HGVHUYLFHFHQWHUVZLOOPDNHDQ\QHFHVVDU\UHSDLUVIRUDQRPLQDOIHH&DOO*72DWIRU
PRUHLQIRUPDWLRQ7KLVZDUUDQW\JLYHV\RXVSHFL¿FOHJDOULJKWVDQG\RXPD\DOVRKDYHRWKHUULJKWVZKLFKPD\YDU\IURPVWDWHWRVWDWH7KLVZDUUDQW\LVLQOLHXRIDOO
RWKHUZDUUDQWLHVH[SUHVVHGRULPSOLHG127(9HUL¿FDWLRQRIWKHZDUUDQW\SHULRGUHTXLUHVFRSLHVRIUHFHLSWVRURWKHUSURRIRISXUFKDVH3OHDVHUHWDLQWKRVHUHFRUGV
If you have any questions or concerns, please contact our Technical Service Department
Monday thru Friday 8:00 a.m. to 7:00 p.m. (ET) at 1-800-543-1236 or 850-575-4144
GTO Access Systems, LLC • 3121 Hartsfield Road • Tallahassee, Florida 32303
Telephone (850) 575-0176 • Fax (850) 575-8912 • www.gtoinc.com
7KHFRQWHQWVRIDOOPDWHULDODYDLODEOHRQWKLVLQVWDOODWLRQPDQXDODUHFRS\ULJKWHGE\*72$FFHVV6\VWHPV//&³*72´XQOHVVRWKHUZLVHLQGLFDWHG$OOULJKWVDUHUHVHUYHGE\*72DQG
FRQWHQWPD\QRWEHUHSURGXFHGGRZQORDGHGGLVVHPLQDWHGSXEOLVKHGRUWUDQVIHUUHGLQDQ\IRUPRUE\DQ\PHDQVH[FHSWZLWKWKHSULRUZULWWHQSHUPLVVLRQRI*72$Q\UHSULQWLQJRI*72
SXEOLFDWLRQVLVE\SHUPLVVLRQRQO\&RS\ULJKWLQIULQJHPHQWLVDYLRODWLRQRIIHGHUDOODZ*72*723520LJKW\0XOHDUHUHJLVWHUHGWUDGHPDUNVRI*72$FFHVV6\VWHPV//&*72
$FFHVV6\VWHPVLVDWUDGHPDUNRI*72$FFHVV6\VWHPV//&7KHVHPDUNVDUHWKHH[FOXVLYHSURSHUW\RI*72$FFHVV6\VWHPV//&³*72´$OOULJKWVDUHUHVHUYHGE\*72DQGWKHVH
PDUNVPD\QRWEHXVHGLQDQ\IRUPZLWKRXWWKHSULRUZULWWHQSHUPLVVLRQRI*72

C5@4-:E;@41>-:@1::-;>@>-:?95@@1>
Cet équipement doit être installé et utiliséavec une distance minimale de cm entre leradiateur
ISEDC RSS warning
7KLVGHYLF
HFRP SOLHVZLWK,6('&OLFHQFHH[HPSW566VWDQGDUGV2SHUDWLRQLV
VXEMHFWWRWKHIROORZLQJWZRFRQGLWLRQVWKLVGHYLFHP D\QRW FDXVHLQWHUIHUHQFH
DQGWKLVGHYLFHPXVWDFFHSWDQ\LQWH UIHUHQFHLQFOXGLQJLQWHUIHUHQFHWKDWPD\
FDXVHXQGHVLUHGRSHUDWLRQRIWKHGHYLFH
Le présent appareil est conforme aux CNR d'ISEDC applicables aux appareils radio
exempts de licence.
L'exploitation est autorisée aux deux conditions suivantes:
(1) l'appareil ne doit pas produire de brouillage, et
(2) l'utilisateur de l'appareil doit accepter tout brouillage radioélectrique subi, même
si le brouillage est susceptible d'en compromettre le fonctionnement.
ISEDC Radiation Exposure Statement:
7KLVHTXLS PHQWFRPSOLHVZLWK,6('&5)UDGLDWLRQH[SRVXUHOLPLWVVHWIRUWKIRUDQ
XQFRQWUROOHGHQYLURQP HQW7KLVWUDQVPLWWHUPXVWQRWEHFRORFDWHGRU RSHUDWLQJLQ
FRQMXQFWLRQZLWKDQ\RWKHUDQWHQQDRUWUDQVPLWWHU
Rapport d'exposition de la radiation d' ISEDC :
&HWpTXLSHPHQWHVWFR QIRUPHDX[OLP LWHVGH[SRVLWLRQGDWLRQGHUDGLGHO,6('&UI
GpWHUPLQpHVSRXUXQHQYLURQQHP HQWQRQFRQW U{Op&HWpP HWWHXUQHGRLWSDVrWUH
&RSODFpRXIRQFWLRQQDQWGDQVODFRQMRQFWLRQDYHFDXFXQHDXWUHDQWHQQHRXpPHWWHXU
This equipment should be installed and operated with minimum distance cm between the
radiator& your body.
& votre corps.
’
connected.
ͲͲ
20
20
%.%*)2+*-/,!..!(!).
&45?1=A5<91:@/;9<851?C5@4>-05-@5;:1D<;?A>18595@??1@2;>@42;>-:A:/;:@>;8810
1:B5>;:91:@ :0 A?1>? 9A?@ 2;88;C @41 ?<1/525/ ;<1>-@5:3 5:?@>A/@5;:? 2;> ?-@5?2E5:3 $
1D<;?A>1/;9<85-:/1&45?@>-:?95@@1>9A?@:;@.1/;8;/-@10;>;<1>-@5:35:/;:6A:/@5;:
Any Changes or modifications not expressly approved by the party responsible for compliance
could void the user s authority to operate the equipment.
This device complies with part 15 of the FCC Rules. Operation is subject to the following two
conditions: (1) This device may not cause harmful interference, and (2) this device must accept
any interference received, including interference that may cause undesired operation.
Note: This equipment has been tested and found to comply with the limits for a Class B digital
device, pursuant to part 15 of the FCC Rules. These limits are designed to provide reasonable
protection against harmful interference in a residentia l installation. This equipment generates
uses and can radiate radio frequency energy and, if not installed and used in accordance with the
instructions, may cause harmful interference to radio communications. However, there is no
guarantee that interference will not occur in a particular installation. If this equipment does
cause harmful interference to radio or television reception, which can be determined by turning
the equipment off and on, the user is encouraged to try to correct the interference by one or
more of the following measu res:
ͲͲ Reorient or relocate the receiving antenna.
ͲͲ Increase the separ a tion between the equipment and receiver.
ͲͲ Connect the equipment into an outlet on a circuit different from that to which the receiver is
Consult the dealer or an experienced radio/TV technician for help.
This equipment should be installed and operated with minimum distance cm between the
radiator& your body.
20
/