Page is loading ...

SYSTEM
ADMINISTRATOR’S
GUIDE
TCADTP1SA Rev. AL 9/20
© 2015 Avery Dennison Corp.
All rights reserved.
Classification: Avery Dennison - Public
Printer
Solutions
Avery Dennison
®
Monarch
®
Tabletop
Printer 1

Classification: Avery Dennison - Public
Each product and program carries a respective written warranty, the only warranty on which the
customer can rely. Avery Dennison Corp. reserves the right to make changes in the product, the
programs, and their availability at any time and without notice. Although Avery Dennison Corp.
has made every effort to provide complete and accurate information in this manual, Avery
Dennison Corp. shall not be liable for any omissions or inaccuracies. Any update will be
incorporated in a later edition of this manual.
2015 Avery Dennison Corp. All rights reserved. No part of this publication may be reproduced,
transmitted, stored in a retrieval system, or translated into any language in any form by any
means, without the prior written permission of Avery Dennison Corp.
Trademarks
Monarch and MPCL are trademarks of Avery Dennison Retail Information Services LLC.
Avery Dennison® is a trademark of Avery Dennison Corp.
EPCglobal, Inc.™ and Electronic Product Code™ (EPC) are trademarks of GS1/GS1US.

Classification: Avery Dennison – Public TOC-i
TABLE OF CONTENTS
GETTING STARTED ..................................................................................................................... 1-1
Audience ................................................................................................................................ 1-1
Using the Control Panel ........................................................................................................... 1-1
Display Icons ...................................................................................................................... 1-1
Selecting a Function ............................................................................................................ 1-2
Exiting a Function ................................................................................................................ 1-2
Printing a Test Label ............................................................................................................... 1-2
Removing the Cover ............................................................................................................ 1-3
SETTING SUPPLY OPTIONS ........................................................................................................ 2-1
Setting the Supply Type .......................................................................................................... 2-2
Setting the Ribbon .................................................................................................................. 2-3
Using a High Energy Ribbon ................................................................................................. 2-3
Setting the Speed ................................................................................................................... 2-4
Print Speed Considerations with RFID ................................................................................... 2-4
Recommended Maximum Print Speeds .................................................................................. 2-4
Setting the Feed Mode ............................................................................................................ 2-5
Setting the Cut Mode............................................................................................................... 2-5
Cut Modes with RFID ........................................................................................................ 2-6
Setting the Backfeed ............................................................................................................... 2-6
Adjusting the Position Settings................................................................................................. 2-6
Setting the Print Position ..................................................................................................... 2-7
Setting the Supply Position .................................................................................................. 2-7
Setting the Margin Position .................................................................................................. 2-8
Setting the Cut Position ....................................................................................................... 2-8
Setting the Dispense Position ............................................................................................... 2-8
Setting the Backfeed Distance .............................................................................................. 2-9
Using Batch Separators ........................................................................................................... 2-9
Using Skip Index ................................................................................................................... 2-10
Setting the Error Action ......................................................................................................... 2-10
Using Rotate Image............................................................................................................... 2-11
Setting the Maximum Calibration Length ................................................................................. 2-12
Setting the Print Contrast ...................................................................................................... 2-13
SETTING COMMUNICATIONS ....................................................................................................... 3-1
Setting the Baud Rate ............................................................................................................. 3-1
Setting the Word Length .......................................................................................................... 3-2
Setting the Stop Bits ............................................................................................................... 3-2
Setting the Parity .................................................................................................................... 3-2
Setting the Flow Control .......................................................................................................... 3-2
Resetting to Default Values ..................................................................................................... 3-3
Using USB Communications ..................................................................................................... 3-3
Setting the Mode ................................................................................................................. 3-3

ii System Administrator’s Guide Classification: Avery Dennison - Public
SETTING ETHERNET COMMUNICATIONS ..................................................................................... 4-1
Viewing the MAC Address ........................................................................................................ 4-1
Entering the IP Address ........................................................................................................... 4-2
Entering the Subnet Mask ........................................................................................................ 4-2
Entering the IP Gateway .......................................................................................................... 4-2
Setting the Boot Method .......................................................................................................... 4-3
Reset Default Password .......................................................................................................... 4-3
Default Network ...................................................................................................................... 4-3
Factory Defaults .................................................................................................................. 4-4
SETTING WIRELESS COMMUNICATIONS ..................................................................................... 5-1
Viewing the Signal Strength ..................................................................................................... 5-2
Entering the SSID ................................................................................................................... 5-2
Wireless Mode ........................................................................................................................ 5-3
Roam Threshold ..................................................................................................................... 5-3
Transmit Rate (Ad-Hoc Only) ................................................................................................... 5-4
Channel (Ad-Hoc Only) ............................................................................................................ 5-5
SETTING DEFAULTS ................................................................................................................... 6-1
Setting the Language .............................................................................................................. 6-2
Setting the Monetary Sign ....................................................................................................... 6-3
Setting the Secondary Sign...................................................................................................... 6-3
Setting the Number of Decimal Places ...................................................................................... 6-4
Setting the Slashed Zero Appearance ....................................................................................... 6-4
Setting the Power-up Mode ...................................................................................................... 6-5
Setting the Numeric Format ..................................................................................................... 6-5
Using Flash Storage ................................................................................................................ 6-5
Setting the Image Error Mode .................................................................................................. 6-6
Setting the Configuration Packet Mode (Ignore Config) .............................................................. 6-6
Setting the Batch Packet Mode (Ignore BchCtl) ......................................................................... 6-7
Setting the Error Retry Mode ................................................................................................... 6-7
Adjusting the Image Length ..................................................................................................... 6-8
Setting the Sleep Delay ........................................................................................................... 6-8
Setting the LCD Contrast ......................................................................................................... 6-9
Setting the Format Number Mode (Ignore Fmt #s)...................................................................... 6-9
Using a Temporary Graphics Buffer ........................................................................................ 6-10
Using Flash Memory .............................................................................................................. 6-10
Formatting Flash Memory ................................................................................................... 6-11
Viewing Available Flash Memory ......................................................................................... 6-11
Packing Flash Memory ....................................................................................................... 6-11
Using a USB Thumb Drive ..................................................................................................... 6-12
Updating the RFID Inlay Database ...................................................................................... 6-12

Classification: Avery Dennison – Public TOC-iii
Setting the Clock (Optional) ................................................................................................... 6-13
Setting the Hour ................................................................................................................ 6-14
Setting the Minute ............................................................................................................. 6-14
Setting the Day of the Month .............................................................................................. 6-14
Setting the Month .............................................................................................................. 6-14
Setting the Year ................................................................................................................ 6-15
Selecting the Interpreter ........................................................................................................ 6-15
USING SCRIPTS .......................................................................................................................... 7-1
Initial Script Startup Procedures............................................................................................... 7-1
Viewing Script Information ....................................................................................................... 7-1
Downloading a Script .............................................................................................................. 7-2
Enabling a Script .................................................................................................................... 7-2
Deleting a Script ..................................................................................................................... 7-2
Enabling Status Polling ........................................................................................................... 7-3
Using Immediate Commands .................................................................................................... 7-3
SETTING RFID OPTIONS .............................................................................................................. 8-1
About RFID Supplies ............................................................................................................... 8-1
What is Pitch? ..................................................................................................................... 8-2
Getting Started With RFID ....................................................................................................... 8-3
Using the Easy Setup Menu ..................................................................................................... 8-3
Selecting the Inlay ............................................................................................................... 8-4
Entering the Inlay Position ................................................................................................... 8-4
Using the Advanced Setup Menu .............................................................................................. 8-5
Setting Stop-To-Encode Mode .............................................................................................. 8-6
Performance Considerations with RFID ................................................................................. 8-6
Enabling Singulate Mode ...................................................................................................... 8-7
Setting the Write Power ....................................................................................................... 8-7
Setting the Read Power ....................................................................................................... 8-8
Setting the Encode Position.................................................................................................. 8-8
Enabling Tag Saver ............................................................................................................. 8-9
Setting the First TID Position ................................................................................................ 8-9
Setting the Start Encode Position ....................................................................................... 8-10
Setting the Encode Zone .................................................................................................... 8-11
Verifying the RFID Inlay Data ............................................................................................. 8-12
Setting the Verify Power ..................................................................................................... 8-13
Setting the Tag Verify Position ........................................................................................... 8-13
Enabling Retry Encode ....................................................................................................... 8-14
Clearing Data .................................................................................................................... 8-14
RFID Troubleshooting with Non-Stop Encoding ....................................................................... 8-14
PRINTING .................................................................................................................................... 9-1
Downloading Files ................................................................................................................... 9-1
Online Printing ........................................................................................................................ 9-2
Offline Printing ....................................................................................................................... 9-2

iv System Administrator’s Guide Classification: Avery Dennison - Public
USING DIAGNOSTICS ................................................................................................................ 10-1
Factory Set Password ........................................................................................................... 10-1
Checking the Versions ........................................................................................................... 10-2
Checking Supply Quality ........................................................................................................ 10-2
Using a Password ................................................................................................................. 10-3
TROUBLESHOOTING ................................................................................................................. 11-1
Configuring a Wireless Printer using a Wired Connection ......................................................... 11-1
Using the Network Console Packet ......................................................................................... 11-4
Adjusting the Printer to Remove Ribbon Wrinkle ...................................................................... 11-6
About the Ribbon’s Take-up Reel ........................................................................................ 11-7
Setting the Supply Guides ..................................................................................................... 11-8
Adjusting the Ribbon Tension ............................................................................................. 11-9
SPECIFICATIONS & ACCESSORIES ............................................................................................. A-1
Supplies (Media) ..................................................................................................................... A-2
String Tags ......................................................................................................................... A-2
Cable Pinouts ......................................................................................................................... A-2
Accessories ............................................................................................................................ A-3
Factory-Installed Options ......................................................................................................... A-3
Shipping the Printer ................................................................................................................ A-3
MENU STRUCTURE ..................................................................................................................... B-1
GLOSSARY ................................................................................................................................. G-1

Classification: Avery Dennison – Public Getting Started 1-1
GETTING STARTED
The Avery Dennison® Monarch® Tabletop Printer 1 prints on thermal transfer
(ribbon) and thermal direct labels or tags. The printer prints labels continuously (in one
strip) or on-demand (one label at a time). The printer prints on aperture, die cut, black
mark, or continuous (non-indexed) supplies.
Audience
This manual is for the System Administrator who configures and updates the printer.
♦ To load supplies, print labels, or how to care for the printer, refer to the Operator’s
Handbook.
♦ To create format and batch packets for printing or how to configure the printer online,
refer to the Packet Reference Manual.
Monarch® MPCL™ Toolbox Utilities are available on our Web site. However, they are not
label production software. Call Customer Service for information about label production
software.
Using the Control Panel
The control panel has a four-line LCD display and five buttons. The top three buttons are
function buttons, which vary depending on the task shown above the button. The two
bottom buttons are navigation buttons. Use these buttons to scroll through menus.
The LCD
♦ shows a red background when immediate attention is
required for a jam or error.
♦ shows a green background when the printer is active
(printing or receiving data).
♦ shows a white background when viewing menu prompts,
printer settings, button functions, etc.
Display Icons
The display icons indicate the following:
Icon Description Icon Description
RFID successful
encode
Wireless mode active
RFID successful
verification
Signal strength
Battery life
Wired Ethernet mode
active
USB drive installed
1
MPCL
READY
0.0.0.0
FEED TLABEL MENU

1-2 System Administrator’s Guide Classification: Avery Dennison - Public
Selecting a Function
Use or to see the menu options. Press SELECT when you see the menu option you
need. Press CHANGE to change a setting. Press SET to save a setting.
Exiting a Function
There are two ways to exit an option. Pressing BACK once returns to the previous menu
and saves any changes. Pressing CANCEL exits to the previous menu; however,
changes are not saved.
Printing a Test Label
From the Main Menu select TLABEL. Select from the test label options:
Printer Information
MPCL Label
Contains generic information, including
inch counts and printhead resolution.
Contains the printer’s MPCL packet
configuration.
Mnet2 Label
RFID Configuration
Contains the printer’s network/Ethernet
configuration.
Contains the module’s Firmware Version,
Module Type, Easy Setup Version (RFID
Inlay Database), Region, Frequency, etc.
Note: There are two RFID module types: One for FCC (IPJ-RS500GX) and one for
ETSI (IPJ-RS500EU) frequency ranges.

Classification: Avery Dennison – Public Getting Started 1-3
Removing the Cover
1. Open the cover.
2. Unlock the printhead by turning the retaining latch.
3. Lift the printhead assembly using the printhead tab
until the assembly locks into place.
4. Remove both cover thumbscrews.
5. Gently push down on the control panel release tab
located inside the front cover. The control panel tilts
forward.
6. Using both hands, slide the cover to the left and remove.
Control
Panel

1-4 System Administrator’s Guide Classification: Avery Dennison - Public

Classification: Avery Dennison – Public Setting Supply Options 2-1
SETTING SUPPLY OPTIONS
This chapter explains how to select the supply type, ribbon, speed, feed mode, cut
mode, backeed, print position, supply position, margin position, cut position, dispense
position, backfeed distance, separators, skip index mode, rotate image, maximum
calibration length, and print contrast.
You may limit access to this menu to prevent changes by the users. Users are prompted
to enter a password when password protection is enabled.
The supply options are listed in the table below.
Option
Choices
Default
Supply Type E Aperture/E Die Cut/E Black Mark/Continuous/ C
Aperture/C Die Cut/C Black Mark/C Tag Edge
E Die Cut
Ribbon No/Yes/High Energy Yes
Speed
2.5/4.0/6.0/8.0/10.0/12.0/Default
Default
Feed Mode Continuous/On-Demand/Liner Takeup Continuous
Cut Mode Disabled/Cut Each Tag/Cut Each Batch/
Mode 3/Mode 4/Mode 5/Mode 6
Disabled
Backfeed Off/On Off
Print Position -450 to 450 0
Supply Position -300 to 300 0
Margin Position -99 to 99 0
Cut Position -300 to 300 0
Dispense Position 50 to 200 65
Backfeed Distance
10 to 200
65
Separators No/Yes/Long No
Skip Index No/Yes No
Error Action Normal
Overstrike/Continue 1x – 5x
Normal
Rotate Image No/Yes No
Maximum
Calibration Length
0 to 6902 (203 dpi = 34 inches) 3552
Contrast -699 to 699 0
Press CANCEL to exit an option without changing the setting.
2

2-2 System Administrator’s Guide Classification: Avery Dennison - Public
Setting the Supply Type
The printer can print on aperture, black mark, die cut, or continuous supplies as shown.
Set the printer’s supply type to match the loaded supplies.
Supply/print position adjustments and the format determine where the printing begins on
the supply.
Select For
E Aperture
(Tag Edge Aperture)
Aperture holes (or openings) on the left edge of the
supply. The supply is sensed using the holes. You
may need to make supply or print position
adjustments on your format.
See description for Center Tag Edge.
E Die Cut (Edge Die Cut) or
C Die Cut (Center Die Cut)
Die cut supplies have a rounded edge. The supply
is sensed using the gap between the labels. If
using semi die cut supplies (tags with rounded
corners on the edges), select Edge Die Cut.
E Black Mark (Edge Black Mark)
or
C Black Mark (Center Black Mark)
Black marks on the back of the supply for sensing.
The supply is sensed using the black mark.
Select E Black Mark for black marks on the left
edge.
Select C Black Mark for black marks in the center.
Select C Black Mark for black marks across the
entire width of supply.
Continuous Continuous supply does not have any index marks
for sensing or perforations. This is also known as
non-indexed supply.
C Aperture (Center Aperture) Aperture holes (or openings) in the center of the
supply. They do not contain a black mark. The
supply is sensed using the holes.

Classification: Avery Dennison – Public Setting Supply Options 2-3
Center Tag Edge Center tag edge supply has aperture holes (or
openings) centered on the left edge of the supply.
The supply is sensed using the holes.
Using this setting, the printer automatically
calibrates to print at the leading edge. No
additional supply/print position adjustments are
necessary.
Setting the Ribbon
There are different ribbon requirements for the types of supplies:
Select To
No (for thermal direct supply) Not use a ribbon for printing.
Yes (for thermal transfer supply) Require a ribbon for printing.
Hi Energy
(High Energy Supply -
TUFF-MARK®)
Require an elevated heat setting for resin ribbon
applications.
Using a High Energy Ribbon
When you select high energy ribbon for the printer setting, you are setting the printer to a
higher printing temperature. Select this setting only after you have loaded a high energy
ribbon and supplies or it may damage the printhead.
High Energy Ribbon Limitations:
♦ Use a print speed of 2.5 ips. ♦ Printhead warranty is reduced to 100,000 inches.
♦ Serial bar codes cannot be printed. ♦ Do not use peel mode
♦ Reverse fonts cannot be used. ♦ Not for use on full tinted supplies.
♦ Do not print horizontal lines or bars. ♦ Graphics are limited.
♦ Requires a non-printing area at least 0.1 inch (2.54 mm) on left and right edge of ribbon.
♦ No more than 20% of the supply should have print (black coverage).
CAUTION: The high energy ribbon may break or stick to the supply when more than 20% of
the supply contains print.

2-4 System Administrator’s Guide Classification: Avery Dennison - Public
Setting the Speed
Select the print speed in IPS (inches per second). If print quality is important, reduce the
print speed - a lower print speed increases the print quality of labels. Use premium
supplies when printing at high speeds.
Select To Select To
2.5 IPS Print at 2.5 IPS. 10.0 IPS Print at 10.0 IPS.
4.0 IPS Print at 4.0 IPS. 12.0 IPS Print at 12.0 IPS.
6.0 IPS
8.0 IPS
Print at 6.0 IPS.
Print at 8.0 IPS.
Default
Print formats with serial bar codes at 2.5 IPS
and formats with parallel bar codes at 6.0 IPS.
Print Speed Considerations with RFID
The RFID settings in Easy Setup (and the RFID Printer Setup Utility) are based on
encoding 96-bits of EPC data with a lock code. If your RFID data is more complex than
96-bits of EPC data with a lock code, you may need to decrease the printer’s speed in
non-stop encode mode. The following examples may require a decreased print speed:
♦ encoding 96-bits of EPC data and programming user memory
♦ encoding more than 96-bits of EPC data with a lock code
♦ encoding more than 96-bits of EPC data and programming user memory
When using Easy Setup to configure the printer for RFID supplies, the print speed may be
decreased. For example, some inlays encode better at slower speeds, so if the printer is
set for 8.0 ips, Easy Setup may change the print speed to use 4.0 ips instead.
The amount of programmable EPC data, user memory, access password, and lock code
data varies by print speed and RFID chip. If the printer cannot program all the RFID data
within the allotted time, an error occurs.
Recommended Maximum Print Speeds
If you change the speed, you must resend your formats or turn off the printer and back on
before the change takes effect. If you change the speed in offline mode, turn off the
printer then turn it back on before the change takes effect.
Options:
Print Speed, inches per second
2.5/4.0/6.0 8.0 10.0 12.0
300 dpi
printhead
supported supported not supported not supported
Tags
supported supported not recommended not recommended
TuffMark®
Supply
2.5 ips max.
recommended
not
recommended
not recommended not recommended
Serial bar codes
2.5 ips max.
recommended
not
recommended
not recommended not recommended
Liner Take-up
supported supported not supported not supported
Cutter & Stacker
supported supported not supported not supported
Peel Mode
supported supported not supported not supported
Bar Code
Verifier
supported not
recommended
not recommended not recommended

Classification: Avery Dennison – Public Setting Supply Options 2-5
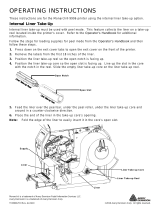
Setting the Feed Mode
Set the feed mode based on your application and supply type. To load supplies for liner
take-up, refer to the Operator’s Handbook.
Select To
Continuous Print tags or labels in one strip.
On-Demand Print one label, once that label is removed, the next label prints.
Liner Take-up Print labels while the liner is collected on a take-up reel inside the
printer. This is optional.
Setting the Cut Mode
Set how the printer cuts tags. Purchase the optional 933 Cutter. The supply may shift as
the cutter cuts and you may see a small disruption on the printed supply. This shift does
not affect bar code quality. There is no cut button on the printer – select the appropriate
cut mode for your application.
Since the cutter is 3.4 inches away from the printhead, printed tags may be left between
the printhead and cutter. The cutter operates when the printer is running. If the printer is
paused, the cutter stops cutting. The cutter also stops cutting whenever the cutter’s
cover is opened.
When cutting RFID supplies, enable tag saver.
Description of cut modes:
Cut Mode
Cut Before
first tag in Batch?
Cut Between
Tags?
Cut After
Batch?
Printed tags left between
printhead and cutter?
Disabled
No Cut
No No No No
Cut Each Tag Yes Yes Yes Yes*
Cut Each Batch Yes No
(Feeds strips)
Yes Yes*
Cut Mode 3
Cut After Last
Tag
Yes Yes Yes No*
Cut Mode 4
No Cut Before
No Yes Yes Yes*
Cut Mode 5
Cut Last Strip
Yes No
(Feeds strips)
Yes No*
Cut Mode 6
Cut After Batch
No No Yes No
No* Cut Modes 3 and 5 minimize the number of tags left between the printhead and
the cutter. Depending on the length of supply being cut, there may be one tag
left between the printhead and the cutter.
Yes* The last tag in the batch is queued to be cut once it reaches the cutter; however,
there may be printed tags left between the printhead and the cutter. The user
must send another batch to feed the last tag out far enough to be cut.

2-6 System Administrator’s Guide Classification: Avery Dennison - Public
Cut Modes with RFID
Using RFID supplies, we recommend cut modes 1, 2, and 4 because
♦ cut modes 3, 5 and 6 may cause ribbon tearing.
♦ RFID supplies are more prone to curl and may cause a jam.
Contact Technical Support to order replacement 300 dpi printheads (KST) for use with the
cutter and RFID supplies.
Setting the Backfeed
Backfeed advances each printed label to the desired dispense position. Once that label is
removed, the next label to be printed is backed up underneath the printhead.
Select To
Off Disable backfeed.
On Enable backfeed. The printer moves the supply backwards before
printing. Use the Positioning menu to set the dispense position and the
backfeed distance.
Adjusting the Position Settings
This menu includes selections to change the print, supply, margin, cut, dispense, and
backfeed distance positions.
See the following graphic for a representation of the following adjustments: dispense
position, backfeed distance, supply position, print position, and margin position.

Classification: Avery Dennison – Public Setting Supply Options 2-7
Setting the Print Position
This function adjusts the image’s position on the supply in the feed direction. Adjust the
print position if the print is too close to the top or bottom of the supply, or overtypes the
pre-printed area. The adjustments are in dots where one dot equals 0.0049 inch.
Changing this setting only affects new formats sent to the printer. Any formats previously
saved into flash memory are not affected.
Select To
Decrease the setting. Moves the print down.
Increase the setting. Moves the print up.
Press 1 to toggle the amount (1, 10, or 100).
Setting the Supply Position
This function adjusts the position of the supply relative to the index marks in the feed
direction. Adjust the supply position to compensate for supply variation. The
adjustments are in dots where one dot equals 0.0049 inch.
Adjust the supply position only on initial printer setup. For format adjustments, change
the print position. This option takes effect when you print the next label or tag. Changing
supply position may also affect print position.
Select To
Decrease the setting. Moves the print down.
Increase the setting. Moves the print up.
Press 1 to toggle the amount (1, 10, or 100).

2-8 System Administrator’s Guide Classification: Avery Dennison - Public
Setting the Margin Position
This function adjusts where the format prints side to side on the supply. The adjustments
are in dots where one dot equals 0.0049 inch.
The width of the print area depends on the supply size. The maximum width is four
inches. When you move the image to the right or left on the supply, avoid moving the
image too close to either edge, because it may not print.
Changing this setting only affects new formats sent to the printer. Any formats previously
saved into flash memory are not affected.
Select To
Decrease the setting. Moves print to the left.
Increase the setting. Moves print to the right.
Press 1 to toggle the amount (1, 10, or 100).
Setting the Cut Position
This function adjusts where the tag is cut. The printer adjusts the cut position according
to the index marks on the supply. Aperture supplies may need adjustments. Increase to
move the cut up; decrease to move the cut down.
Select To
Decrease the setting. Moves the cut down.
Increase the setting. Moves the cut up.
Press 1 to toggle the amount (1, 10, or 100).
Setting the Dispense Position
This function adjusts the amount to advance each label to allow for easy removal from the
printer.
Select To
Decrease the setting. Moves the print down.
Increase the setting. Moves the print up.
Press 1 to toggle the amount (1, 10, or 100).
Print too far to the left
Print too far to the right

Classification: Avery Dennison – Public Setting Supply Options 2-9
Setting the Backfeed Distance
The function adjusts the amount to move the label backwards at the start of each batch
(or label in on-demand mode). The backfeed distance should be equal to or less than the
dispense position. If the backfeed distance is greater than the dispense position, the
dispense position automatically changes to match the backfeed distance.
Select To
Decrease the setting. Moves the print down.
Increase the setting. Moves the print up.
Press 1 to toggle the amount (1, 10, or 100).
Note: When tearing butt cut supplies, the backfeed distance must be 30 dots (0.15
inches) less than the dispense position. This causes a 30-dot non-print zone on
the supply, but prevents exposed adhesive under the printhead.
Using Batch Separators
A batch separator is an extra tag printed in
between batches with a pinstripe pattern. For
continuous supply, the batch separator is always
six inches long. The batch’s name prints on the
batch separator.
Changing this setting only affects new formats
sent to the printer. Any formats previously
saved into flash memory are not affected.
Select To
No Disable batch separators.
Do not use batch separators with continuous (non-indexed) supply.
Yes Enable batch separators.
Long Enable double-length (two tags) batch separators.
Batch Separator

2-10 System Administrator’s Guide Classification: Avery Dennison - Public
Using Skip Index
Skip index mode skips (or ignores) a sense mark and prints an image over multiple
labels, if necessary. For example, if you have 4.0" long supplies loaded, but the image is
8.0" long, enable skip index mode to print the 8.0" long image on two labels. Use the skip
index feature when you have a single format that contains two labels, such as a shelf
label and a carton label.
The image length is determined by the format header. Refer to the Packet Reference
Manual for more information.
When designing the format, make sure text or graphics do not print in the gap of label
rolls. Do not use skip index with RFID supplies.
Select To
No Disable skip index.
Yes Enable skip index and print a format on two (multiple) labels.
Setting the Error Action
Sets how the printer recovers/responds to a bad RFID inlay or a bad barcode verifier
scan. Selecting overstrike and continue 1x-5x sets the number of times the printer prints
an overstrike pattern on consecutively bad labels/scans before generating an error. The
user must clear the error before operation can continue. The overstrike pattern prevents
someone from using a bad RFID label or label with a non-scannable bar code.
Note: Do not use the overstrike action with peel mode or string tags.
Select To
Normal Display the error. The error must be cleared before operation
can continue. Press CANCEL to clear the error and continue
printing. No overstrike pattern is printed.
Overstrike/Continue 1x
Overstrike/Continue 2x
Overstrike/Continue 3x
Overstrike/Continue 4x
Overstrike/Continue 5x
Attempt to reprint the label for one, two, three, four, or five
consecutive tries. An overstrike pattern is printed each time the
reprint fails. Printing is stopped after the selected number of
overstrike patterns have printed. Press CANCEL to clear the
error and continue printing. Do not use the overstrike label.
/