Page is loading ...

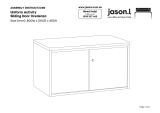
ASSEMBLY INSTRUCTIONS
Spine
Page 1 of 16
Need help!
Call us on
1300 527 665
www.jasonl.com.au
Tools Required:
Power screwdriver; Allen key set (provided)
2 persons required for installation

ASSEMBLY INSTRUCTIONS
Spine
Table top x1
Legs Quadro A x2
Beam x1
Plastic bracket x4
A
B
C
D
Allen key x2I
M8x20MM CSK x2
M8x20MM Socket head x2
M6x20MM Socket head x4
M6x30MM Socket head x4
E
F
G
H
COMPONENTS
SCREWS
Page 2 of 16
Need help!
Call us on
1300 527 665
www.jasonl.com.au
C
D
E F G H
A
B
The first step is to assemble the four
desks. The necessary components
for each of them are as follow:
x4

F
G
ASSEMBLY INSTRUCTIONS
Spine
STEP 01
Using Allen Key provided, attach 2 plastic brackets per leg (D)
(as per picture above) using M6x20MM (G) Socket head screw
Using Allen Key provided, attach M8x20MM Socket head (F)-
screw socket half way into leg for both legs (B)
STEP 02
Page 3 of 16
Need help!
Call us on
1300 527 665
www.jasonl.com.au

ASSEMBLY INSTRUCTIONS
Spine
STEP 03
Adjust extendable beam (C) to desired
length using markers and secure beam
at that length using screws provided
Page 4 of 16
Need help!
Call us on
1300 527 665
www.jasonl.com.au
50
1200
1300
1400
1500
1600
1700
1800
1900
2000
50

ASSEMBLY INSTRUCTIONS
Spine
STEP 04
TOP VIEW
Attach beam (C) to legs (B) using nut insert in legs.
See point attached
Frame looks like this. Using Allen Key, attach beam (C) with Socket (E)
STEP 05
Page 5 of 16
Need help!
Call us on
1300 527 665
www.jasonl.com.au
E
E

ASSEMBLY INSTRUCTIONS
Spine
STEP 06
Page 6 of 16
Need help!
Call us on
1300 527 665
www.jasonl.com.au
Place desktop ontop of frame - with cutout at the back of the desk.
Nut inserts in top will align with plastic joiner brackets using M6x30MM
(H) sockets attached top to frame.
H
TABLE TOP
BOTTOM VIEW
nut insertnut insert

Once the desks are fully assembled,
proceed now with storages assembly
process, using the detailed components
for each of them:
Hardware:
Minifix Cam
14 pcs
Minifix Steel Bolt
14 pcs
Rubber Wood Dowel
19 pcs
Push Lock
1 sets
Door Panel Rail Guide
4 sets (already installed) Stripe Handle
2 sets
Leveller N2880
Plastic Cap
5 pcs
Adjustable
Leveller N2880
5 pcs
Adjustable
Leveller N2881
5 pcs
Chipboard
Screw 4 x 16mm
20 pcs
Components:
- Back Panel -
Qty : 1 pc
- Base Panel -
Qty : 1 pc
- Top Rail -
Qty : 1 pc
-Shelf-
Qty : 1 pc
- Side Panel -
Qty : 2 pcs
- Door Panel -
Qty : 2 pcs
- Door Rail-
Qty : 1 pc
ASSEMBLY INSTRUCTIONS
Spine
Page 7 of 16
Need help!
Call us on
1300 527 665
www.jasonl.com.au
x4

7
64
1
5
2
3
Exploded
view
ASSEMBLY INSTRUCTIONS
Spine
Page 8 of 16
Need help!
Call us on
1300 527 665
www.jasonl.com.au

Minifix Steel Bolt
Back panel Side panels
Rubber Wood Dowel
ASSEMBLY INSTRUCTIONS
Spine
Page 9 of 16
Need help!
Call us on
1300 527 665
www.jasonl.com.au

Minifix Steel Bolt
Door Rail Base Panel
Top Rail
Rubber Wood Dowel
ASSEMBLY INSTRUCTIONS
Spine
Page 10 of 16
Need help!
Call us on
1300 527 665
www.jasonl.com.au

Add side panel (6) & Shelf (7) at the same time.
Attach levellers with Chipboard Screw 4x16 at
bottom of carcass
Lay back panel (1) on ground.
Add one side panel (2) and
base panel (3)
STEP 01
Add top rail (4) & centre panel (5)
STEP 02
STEP 03
Chipboard
Screw 4 x 32mm
Adjustable Leveller
N2880
Leveller N2880 Cap
DECO-CAP-18X15
5-pcs
ASSEMBLY INSTRUCTIONS
Spine
Page 11 of 16
Need help!
Call us on
1300 527 665
www.jasonl.com.au

8
8
10
For the two end storages, assemble
Top Panel (800mm) at top of carcass.
Now two of them are already complete.
Assembly MFC sliding doors
STEP 04 STEP 05
PUSH
ASSEMBLY INSTRUCTIONS
Spine
Page 12 of 16
Need help!
Call us on
1300 527 665
www.jasonl.com.au

ASSEMBLY INSTRUCTIONS
Spine
Page 13 of 16
Need help!
Call us on
1300 527 665
www.jasonl.com.au
For the remaining two storages, position them
side by side, facing the same side. And proceed
to assemble single top (1600mm) over two
modules:
STEP 06
module 1
800 mm
1600mm
module 2
800 mm
Tighten Minifix
Connecting into
Boring Holes
Top view

Components:
Hardware:
Base panel
Qty: 1 pc
1Back panel
Qty: 1 pc
Side panel L
Qty: 1 pc
Back panel R
Qty: 1 pc
Front panel
Qty: 1 pc
Top panel
Qty: 1 pc
Collar Stud
262.24.710
10 pcs
Minifix Steel
Bolt 10259
16 pcs
Note For Minifix Cam
Important: Function of Klix cam
1/4 RIGHT TURN FOR
LOCKING Make Sure The Arrow Is Pointing
Upwards Before Inserting Into The Panel's Hole
DECO-CAP
16x5
16 pcs
2
3 4
5 6
Once the four storages are fully
assembled, proceed now with planter
box assembly process, using the
detailed components for each of them:
ASSEMBLY INSTRUCTIONS
Spine
Page 14 of 16
Need help!
Call us on
1300 527 665
www.jasonl.com.au
x2

ASSEMBLY INSTRUCTIONS
Spine
Page 15 of 16
Need help!
Call us on
1300 527 665
www.jasonl.com.au
Step 1.
Assemble component follow
sequence number
Step 2.
Insert collar stud
into boring hole
Complete
assembly
1
2
3
4
5
6

ASSEMBLY INSTRUCTIONS
Spine
Page 16 of 16
Need help!
Call us on
1300 527 665
www.jasonl.com.au
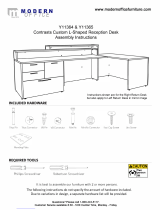
Bring the parts closer together, and
facing in the right direction. When
finished, the workstation should look
like this, and the assembly process
is complete.
/