
Page 1 of 10
ASSEMBLY INSTRUCTIONS
Need help!
Call us on
1300 527 665
www.jasonl.com.au
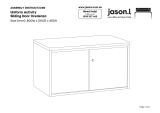
Uniform Activity Module Sliding
Door Credenza with Backboard
Seat and Back Cushion
Size (mm): 800L x 500D

Page 2 of 10
ASSEMBLY INSTRUCTIONS
Need help!
Call us on
1300 527 665
www.jasonl.com.au
Uniform Activity Module Sliding Door
Credenza with Backboard
Seat and Back Cushion
Size (mm): 800L x 500D
A
B
C
D
E
F
G
1
2
3
4
5
6
7
8
D D
D D
D
D
D D
D D
D
A CC
CC A
C C
B
B B
C C
ACA
ACA
A A
COMPONENTS PANELS
Minifix Housing x14
Collar Stud x5
Rubber Wood Dowel M8 x40mm x14
Minifix Connecting Bolt x14
Adjustable Leveller N2880 x5
Leveller N2880 Cap x5
Deco Cap x5
Back Panel x1
Side Panel R x1
Top Rail
Side Panel L x1
Base Panel x1
Top Panel x1
Central table x1
Door x2
Top panel or cushion
Rail
C C
A A
Top rail
Back panel
Side panel
D
B B
ACA
ACA
Side panel
Door Door
Base panel
1
6
5
3
788
24
A B C
E F
D
G
Hardware:

ASSEMBLY INSTRUCTIONS
Need help!
Call us on
1300 527 665
www.jasonl.com.au
Uniform Activity Module Sliding Door
Credenza with Backboard
Seat and Back Cushion
Size (mm): 800L x 500D
Assemble all panels in the following order.
Function of Klix Cam
Turn for locking
75° Min - 195° Max
Make sure the arrow is
pointing upwards before
inserting into the panel’s hole.
Page 3 of 10
Tighten Minifix
Connecting into
Boring Hole.
Insert Minifix Housing
into Boring Hole.
Insert collar stud into boring
holes, at the height you want
shelves.
Back Panel
4
2
6
1
5
3
Side
Panel L
Base Panel
Rail
Top Panel
Top Rail
Side Panel R
7

ASSEMBLY INSTRUCTIONS
Need help!
Call us on
1300 527 665
www.jasonl.com.au
Uniform Activity Module Sliding Door
Credenza with Backboard
Seat and Back Cushion
Size (mm): 800L x 500D
Page 4 of 10
Minifix Steel Bolt
Back panel Side panels
Rubber Wood Dowel

ASSEMBLY INSTRUCTIONS
Need help!
Call us on
1300 527 665
www.jasonl.com.au
Uniform Activity Module Sliding Door
Credenza with Backboard
Seat and Back Cushion
Size (mm): 800L x 500D
Page 5 of 10
Minifix Steel Bolt
Door Rail Base Panel
Top Rail
Rubber Wood Dowel

ASSEMBLY INSTRUCTIONS
Need help!
Call us on
1300 527 665
www.jasonl.com.au
Uniform Activity Module Sliding Door
Credenza with Backboard
Seat and Back Cushion
Size (mm): 800L x 500D
Page 6 of 10
Add side panel (4) & Shelf (7) at the same time.
Attach levellers with Chipboard Screw 4x16 at
bottom of carcass
Lay back panel (1) on ground.
Add one side panel (4) and
base panel (5)
STEP 01
Add top rail (3) &
centre panel (7)
STEP 02
STEP 03
Chipboard
Screw 4 x 32mm
Adjustable Leveller
N2880
Leveller N2880 Cap
DECO-CAP-18X15
5-pcs
Tighten leveller into boring hole and screw the cap.
Use DECO-CAP-18X15 to seal holes on base panel.

ASSEMBLY INSTRUCTIONS
Need help!
Call us on
1300 527 665
www.jasonl.com.au
Uniform Activity Module Sliding Door
Credenza with Backboard
Seat and Back Cushion
Size (mm): 800L x 500D
Page 7 of 10
8
6
Assemble Top Panel at top of carcass
and complete assembly
Assembly MFC sliding doors
STEP 04 STEP 05
PUSH

ASSEMBLY INSTRUCTIONS
Need help!
Call us on
1300 527 665
www.jasonl.com.au
Uniform Activity Module Sliding Door
Credenza with Backboard
Seat and Back Cushion
Size (mm): 800L x 500D
Add single top
over all modules
note:
single wooden tops
can be replaced
with cushions
module 1
800 mm
1600mm
800mm
2400mm
module 2
800 mm module 3
800 mm
Tighten Minifix
Connecting into
Boring Holes
Assembling multiple modules
Page 8 of 10
Top view
cushion

ASSEMBLY INSTRUCTIONS
Need help!
Call us on
1300 527 665
www.jasonl.com.au
Uniform Activity Module Sliding Door
Credenza with Backboard
Seat and Back Cushion
Size (mm): 800L x 500D
Backboard KSBB90
800L x 900H x 50D
KSBB12 with BSBS75
- Panel 1
KSBB12 with BSBS75
- Panel 2
Backboard KSBB90
800L x 900H x 50D
Cushion Pad KSBS75
800L x 740W x 40D
Installation method: Cushion pad fix
with backboard using JCBC screw
Cushion Pad KSBS45
800L x 450W x 40D
Backboard
KSBB12
Cushion Pad
KSBS75
PH 1240 Premanent Housing
(Pre-Installed)
RC 1240
Releasable Connector
(Install by customer)
RC 1240
Releasable Housing
(Pre-installed)
Installation method:
Clipping mechanism
Clip RC1240 Connector with
RH1240 Housing
To assemble: Attach the boards
toward another directly
Boards are joined
To disassemble: Push to release
Lift and separate
1
1
2
3
4
5
2 3 4 5
Assembling
Backboard
Page 9 of 10
Side view
JCBC
Screw
JCBC
Screw
note:
Push screw through
laminate - Breaking
perforation in laminate

Screw using 4x32mm chipboard screws through the back of the small
sliding door credenza and attach to the back of the other module.
ASSEMBLY INSTRUCTIONS
Need help!
Call us on
1300 527 665
www.jasonl.com.au
Uniform Activity Module Sliding Door
Credenza with Backboard
Seat and Back Cushion
Size (mm): 800L x 500D
Assembling Backboard
Possible
configurations
Page 10 of 10
Backboard
with cushion
-
 1
1
-
 2
2
-
 3
3
-
 4
4
-
 5
5
-
 6
6
-
 7
7
-
 8
8
-
 9
9
-
 10
10


Ask a question and I''ll find the answer in the document
Finding information in a document is now easier with AI
Related papers
-
 JasonL UNVB0700PT Operating instructions
-
 JasonL Uniform Small Drawer Lateral Filing Cabinet Wenge Operating instructions
-
 JasonL PVM1001PU Operating instructions
-
 JasonL MY-OE-PB Operating instructions
-
 JasonL WCWHLBPW Operating instructions
-
 JasonL WCWHLBUB Operating instructions
-
 JasonL KSCR04MECB Operating instructions
-
 JasonL JR4167PT Operating instructions
-
 JasonL JR4148PT Operating instructions
-
 JasonL JR3121207WT Operating instructions


Other documents
-
 ferm LIVING Slope Shelf Assembly Manual
-
 Modern Office Y11364 Assembly Instructions Manual
-
 OSP Furniture DEN4822WD-NT Operating instructions
-
Knight Ergoplan Credenza Assembly Instructions Manual
-
 Nucraft Tavola™ Installation guide
-
Bertolini 4191 Operating instructions
-
Sunnydaze Decor LAM-669 Operating instructions
-
 OSP Furniture JEF4622WD-ES Operating instructions
-
 Sunnydaze LAM-639 User manual
-


