Wincor Nixdorf TH180 Reference guide
- Category
- Label printers
- Type
- Reference guide

TH180
Quick Reference
Warranty Information
Wincor Nixdorf guarantees a limited warranty engagement for 12
months beginning with the date of delivery. This warranty
engagement covers all those damages which occur despite a normal
use of the product.
Damages because of
- improper or insufficient maintenance,
- improper use of the product or unauthorized
modifications of the product,
- inadequate location or surroundings
will not be covered by the warranty.
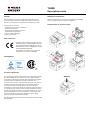
Manufacturers Certification
The device complies with the requirements of
the EC directives 2004/108/EC with regard to
“Electromagnetic compatibility” and, if
applicable, 2006/95/EC “Low Voltage Directive”
and RoHS directive 2011/65/EU.
Therefore, you will find the CE mark on the
device or packaging.
Approvals
FCC-Class A Declaration
This equipment has been tested and found to comply with the limits
for a Class A digital device, pursuant to part 15 of the FCC Rules.
These limits are designed to provide reasonable protection against
harmful interference when the equipment is operated in a
commercial environment. This equipment generates, uses, and can
radiate radio frequency energy
and, if not installed and used in
accordance with the instruction manual, may cause harmful
interference to radio communications. Operation of this equipment
in a residential area is likely to cause harmful interference in which
case the user will be required to correct the interference at his own
expense. Modifications not authorized by the
manufacturer may
void users authority to operate this device. This class A digital
apparatus complies with Canadian ICES-003.
Cet appareil numerique de la classe A est conforme à la norme NMB-
003 du Canada.
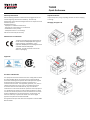
Unpack the Printer
Unpack the printer, saving all packing materials for future shipping
or storage.
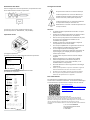
Changing the paper roll
Push

Connecting the cables
Depending on your printer configuration, the connector panel may
vary from the illustration.
1 2 3 4
1) DC power 2) cash drawer 3) USB 4) serial interface
5) AC power (Rating: 100-240V AC, 1.1A, 50-60 Hz)
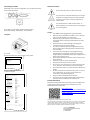
Test print
1) Turn off the power switch on the printer.
2) Push the FEED button while turning on the printer.
Special Mode
1.Test Print
2.Setup Menu
3.Hex Dump
4.Command Trace
5.Sample Print
6.End
<Set>
Press FEED button for the number of times
as the same as your selecting item, and
wait more than 1 second.
用紙送り方向
3) Press the FEED button once
to start a test print.
Firmware Number KA02041-Jxxx
Firmware Version 01A (0xxxxx)
123456
Memory Switch 1
Power On Status Enable
Receive Buffer 4KByte
Busy Condition
Bufferfull
Receive Error ?Print
Auto LF Disable
DSR(#6)Reset Disable
INIT(#25)Reset Disable
USB Soft Reset Enable
Memory Switch 2
Cover Open Error Auto Recovery
Error Auto Recovery
Batch (COM IF) Enable
Batch (Other IF) Disable
Serial Number Disable
ASB Enable
Font-B Mode1
Print
Paper Width
80mm/48columns
Max Speed 180mm/s
Print Density 100%
Hardware
Error Alert None
Buzzer Interval Pattern 2
Buzzer Repetition Three
Graph/User NV-MEM 384KB/192KB
Cut at CoverClose Disable
PNE Detect
Enable
Interface
Baudrate 115200BPS
Format 8NONE1
Protocol DSR/DTR
USB Printer
∬
∬
用紙送り方向
! " # $ % & ' ( ) * + , - . / 0 1 2 3 4
5 6 7 8 9 : ; < = > ? @ A B C D E F G H I
J K L M N O P Q R S T U V W X Y Z [ \ ] ^
_ ~ a b c d e f g h I j k l m n o p q r s
Safety instructions
Do not touch the printer’s cutter and tear bar.
The print head is a thermal element and it is at high
temperature during printing or just after operation.
Therefore, do not touch it and its peripherals for
safety reasons.
The thermal head is an ESD-sensitive device. To
prevent damage, do not touch either its printing part
or connecting parts.
Caution:
• The TH180 must be plugged into a grounded socket.
• Always lay the supply leads and cables in such a way that
they cannot be stepped on or tripped over.
• When setting up the appliance, ensure that the all
connecting devices and the grounded sockets are easily
accessible.
• Check that the set nominal voltage of the appliance
corresponds to the local mains voltage.
• In order to completely separate the appliance from the
mains voltage, switch off the appliance and disconnect it
from the mains.
• In the event of an emergency (e.g. damaged housing,
damaged power supply cable, penetration of liquids or
foreign objects), immediately switch off the appliance and
disconnect it from the mains.
• Switch off the appliance and disconnect it from the mains
before cleaning.
• Install the printer on a flat and stable place.
• Keep the printer away from water source.
• Do not use or store the printer in a place exposed to heat
or fire, moisture, serious pollution and direct sunlight.
• Do not place the printer on a place exposed to vibration or
impact.
• No dew condensation is allowed to the printer. In case of
such condensation, do not turn on the power until
condensation completely disappeared.
• Only use cables released by Wincor Nixdorf.
• The printer should only be disassembled or repaired by a
technician who is certified by the manufacturer.
Further Information
Please find detailed information about the printer in the Operator’s
Guide. That document as PDF file and needed drivers can be
downloaded from this web site:
Copyright© Wincor Nixdorf International GmbH, 2014
The reproduction, transmission or use of this document or its contents is not permitted
without express authority. Offenders will be liable for damages. All rights, including
rights created by patent grant or registration of a utility model or design, are reserved.
Delivery subject to availability; technical modifications possible.
Order No. 01750235803A
Wincor Nixdorf International GmbH
Wohlrabedamm 31
D-13629 Berlin
http://www.wincor-
nixdorf.com/internet/site_EN/EN/Support/
Downloads/POSLotterySystems/poslottery
systems_node.html
5
Page is loading ...
Page is loading ...

TH180
Description courte
Garantie
Wincor Nixdorf vous accorde une garantie limitée de 12 mois à
partir de la date de livraison. Cette garantie concerne toutes les
pannes qui se produisent en employant normalement le produit.
Les pannes pour raison de
- maintenance incorrecte ou insuffisante
- utilisation incorrecte ou
- modifications injustifiées du produit
- emplacement inapproprié ou
environnement inapproprié
ne sont pas couvertes.
Note du fabricant
Cet appareil est conforme aux exigences de la
directive européenne 2004/108/CE concernant
la « Compatibilité électromagnétique », et la «
Directive basse tension » 2006/95/CE, ainsi que
la directive RoHS 2011/65/UE.
Le marquage CE est apposé sur le revers de
l'appareil ou se trouve sur l'emballage.
Homologations
FCC-Class A Declaration
This equipment has been tested and found to comply with the limits
for a Class A digital device, pursuant to part 15 of the FCC Rules.
These limits are designed to provide reasonable protection against
harmful interference when the equipment is operated in a
commercial environment. This equipment generates, uses, and can
radiate radio frequency energy
and, if not installed and used in
accordance with the instruction manual, may cause harmful
interference to radio communications. Operation of this equipment
in a residential area is likely to cause harmful interference in which
case the user will be required to correct the interference at his own
expense. Modifications not authorized by the
manufacturer may
void users authority to operate this device. This class A digital
apparatus complies with Canadian ICES-003.
Cet appareil numérique de la classe A est conforme à la norme NMB-
003 du Canada.
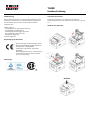
Déballage de l'imprimante
Déballez l'imprimante et conservez tout le matériel d'emballage
pour un transport ultérieur ou pour le rangement.
Remplacement du rouleau de papier
Appuyer

Branchement des câbles
Selon la configuration de votre imprimante, la représentation de la
barre de branchement ci-dessous peut varier.
1 2 3 4
1) Prise DC 2) Tiroir-caisse 3) USB 4) Interface série
5) Prise AC (Puissance: 100-240V AC, 1.1A, 50-60 Hz)
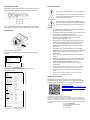
Impression d'essai
1) Éteignez l'imprimante.
2) Maintenez le bouton FEED appuyé en allumant l'imprimante.
Special Mode
1.Test Print
2.Setup Menu
3.Hex Dump
4.Command Trace
5.Sample Print
6.End
<Set>
Press FEED button for the number of times
as the same as your selecting item, and
wait more than 1 second.
用紙送り方向
3) Appuyez une fois brièvement sur le bouton FEED
pour démarrer l'impression.
Firmware Number KA02041-Jxxx
Firmware Version 01A (0xxxxx)
123456
Memory Switch 1
Power On Status Enable
Receive Buffer 4KByte
Busy Condition
Bufferfull
Receive Error ?Print
Auto LF Disable
DSR(#6)Reset Disable
INIT(#25)Reset Disable
USB Soft Reset Enable
Memory Switch 2
Cover Open Error Auto Recovery
Error Auto Recovery
Batch (COM IF) Enable
Batch (Other IF) Disable
Serial Number Disable
ASB Enable
Font-B Mode1
Print
Paper Width
80mm/48columns
Max Speed 180mm/s
Print Density 100%
Hardware
Error Alert None
Buzzer Interval Pattern 2
Buzzer Repetition Three
Graph/User NV-MEM 384KB/192KB
Cut at CoverClose Disable
PNE Detect
Enable
Interface
Baudrate 115200BPS
Format 8NONE1
Protocol DSR/DTR
USB Printer
∬
∬
用紙送り方向
! " # $ % & ' ( ) * + , - . / 0 1 2 3 4
5 6 7 8 9 : ; < = > ? @ A B C D E F G H I
J K L M N O P Q R S T U V W X Y Z [ \ ] ^
_ ~ a b c d e f g h I j k l m n o p q r s
Consignes de sécurité
Ne pas toucher la lame ni la tranche de découpe.
La tête d'impression est un thermo-élément qui
chauffe fortement pendant l'impression. Ne pas
toucher cette zone, même après l'impression.
La tête d'impression est un composant présentant
un risque électrostatique. Pour éviter les
détériorations ne toucher ni la tête d'impression ni la
zone qui l'entoure.
Attention :
• Le TH180 doit être impérativement branché à une prise
reliée à la terre.
• Positionnez les câbles d’alimentation de manière à éviter
que personne ne marche dessus ou ne trébuche.
• Assurez-vous que les prises de raccordement et les prises
de courant soient facilement accessibles lors de
l’installation des appareils
• Vérifiez que la tension nominale réglée sur l'appareil
corresponde à la tension réseau locale.
• Pour couper complètement un appareil de la tension du
réseau, éteignez-le et débranchez la prise secteur.
• En cas d’urgence (boîtier endommagé, câble
d’alimentation endommagé, infiltration de liquide ou de
corps étrangers, par exemple), éteindre l'appareil et
retirer la prise secteur.
• Toujours retirer la prise de secteur avant de nettoyer
l'appareil
• Placer l'imprimante sur un support plan et stable.
• Éviter les emplacements directement exposés au
rayonnement solaire, à une chaleur extrême, à une
humidité élevée ou à la poussière.
• De fortes vibrations ou des coups peuvent endommager
l'imprimante.
• Éviter que l'imprimante ne prenne l'humidité. L'appareil
doit être absolument sec lors de sa mise en service.
• N'utiliser que des câbles autorisés par Wincor Nixdorf.
• Seul un personnel spécialisé et habilité est autorisé à
effectuer des réparations sur l'appareil.
Plus d'informations
Des informations supplémentaires concernant l'imprimante se
trouvent dans le manuel de l'utilisateur. Ce manuel est à télécharger
en format PDF ainsi que des drivers à l'adresse Internet suivante:
Copyright ©Wincor Nixdorf International GmbH, 2014
Tous droits réservés, en particulier (même au niveau d'extraits) tous droits de
traduction, de réimpression, de reproduction par copie ou tout autre procédé
équivalent. Toute transgression entraîne des dédommagements. Tous nos droits sont
réservés, notamment pour le cas de la délivrance d'un brevet ou celui de
l'enregistrement d'un modèle d'utilité. Sous réserve de disponibilité et de modifications
techniques.
N° de commande 01750235803A
Wincor Nixdorf International GmbH
Wohlrabedamm 31
D-13629 Berlin
http://www.wincor-
nixdorf.com/internet/site_EN/EN/Support/
Downloads/POSLotterySystems/poslottery
systems_node.html
5
-
 1
1
-
 2
2
-
 3
3
-
 4
4
-
 5
5
-
 6
6


Wincor Nixdorf TH180 Reference guide
- Category
- Label printers
- Type
- Reference guide
Ask a question and I''ll find the answer in the document
Finding information in a document is now easier with AI
in other languages
- français: Wincor Nixdorf TH180 Guide de référence
- Deutsch: Wincor Nixdorf TH180 Referenzhandbuch
Related papers
-
Wincor Nixdorf TH230 / TH230+ Reference guide
-
Wincor Nixdorf TH210 VI Reference guide
-
-
-
-
Wincor Nixdorf TH320 Reference guide
-
-
-
-
Wincor Nixdorf BEETLE /iPRINT User manual
Other documents
-
Diebold Nixdorf TH180 Reference guide
-
 Handy THTPDC User manual
-
Monitor Audio O7VMA119210 User manual
-
OKI PT341 Dual User guide
-
OKI LD670 User manual
-
Motorola Symbol DS9808-R Specification
-
-
-
Fujitsu FP-410 User manual
-
