Your TV comes with:
• Remote control and batteries
• Several documents, including the Resource
Guide, and Standard Liminted Warranty.
• Pedestal stand and hardware
• All other cables and adapters are sold
separately.
• If any items are missing or damaged, notify
your dealer immediately.
• For the United States, the Standard Limited
Warranty is located at
support.toshiba.com/warranty.
• For Canada, the terms and conditions of
the Limited One (1) Year Warranty on Parts and
Labour can be found at
www.toshiba.ca/support Click on Televisions,
Select Warranty, then Select Standard Warranty
& Service Plans and Select Flat Panel
Television (bilingual)
40/50L1400U/UC/UM
B
40” 50”
RIGHT x 1 (40/50L1400U/UC/UM)
40/50L1400U/UC/UM
x 1 (40/50L1400U/UC/UM)LEFT
40” 50”
40’ E
50’ F
D
40’
The Resource Guide contains important safety precautions not included in this
document. Please review completely prior to using this product. Complete
instructions are contained in the User's Guide located on Toshiba's web site at :
For United States: support.toshiba.com
For Canada: www.toshiba.ca/support/ceg
For Mexico:
http://www.toshiba.com.mx/tdmConsumo/Informacion/Contacto.aspx?ID=SPT"
Register Your Toshiba Television
Enhance your ownership experience by taking a few minutes to register your Toshiba product at register.toshiba.com (for L1400U
and L1400UM series) or support.toshiba.ca/warranty/ (for L1400UC series). Completing product registration allows Toshiba to
provide you with product information updates, special offers and promotions. Failure to complete product registration will not
diminish your rights under the Standard Limited Warranty.
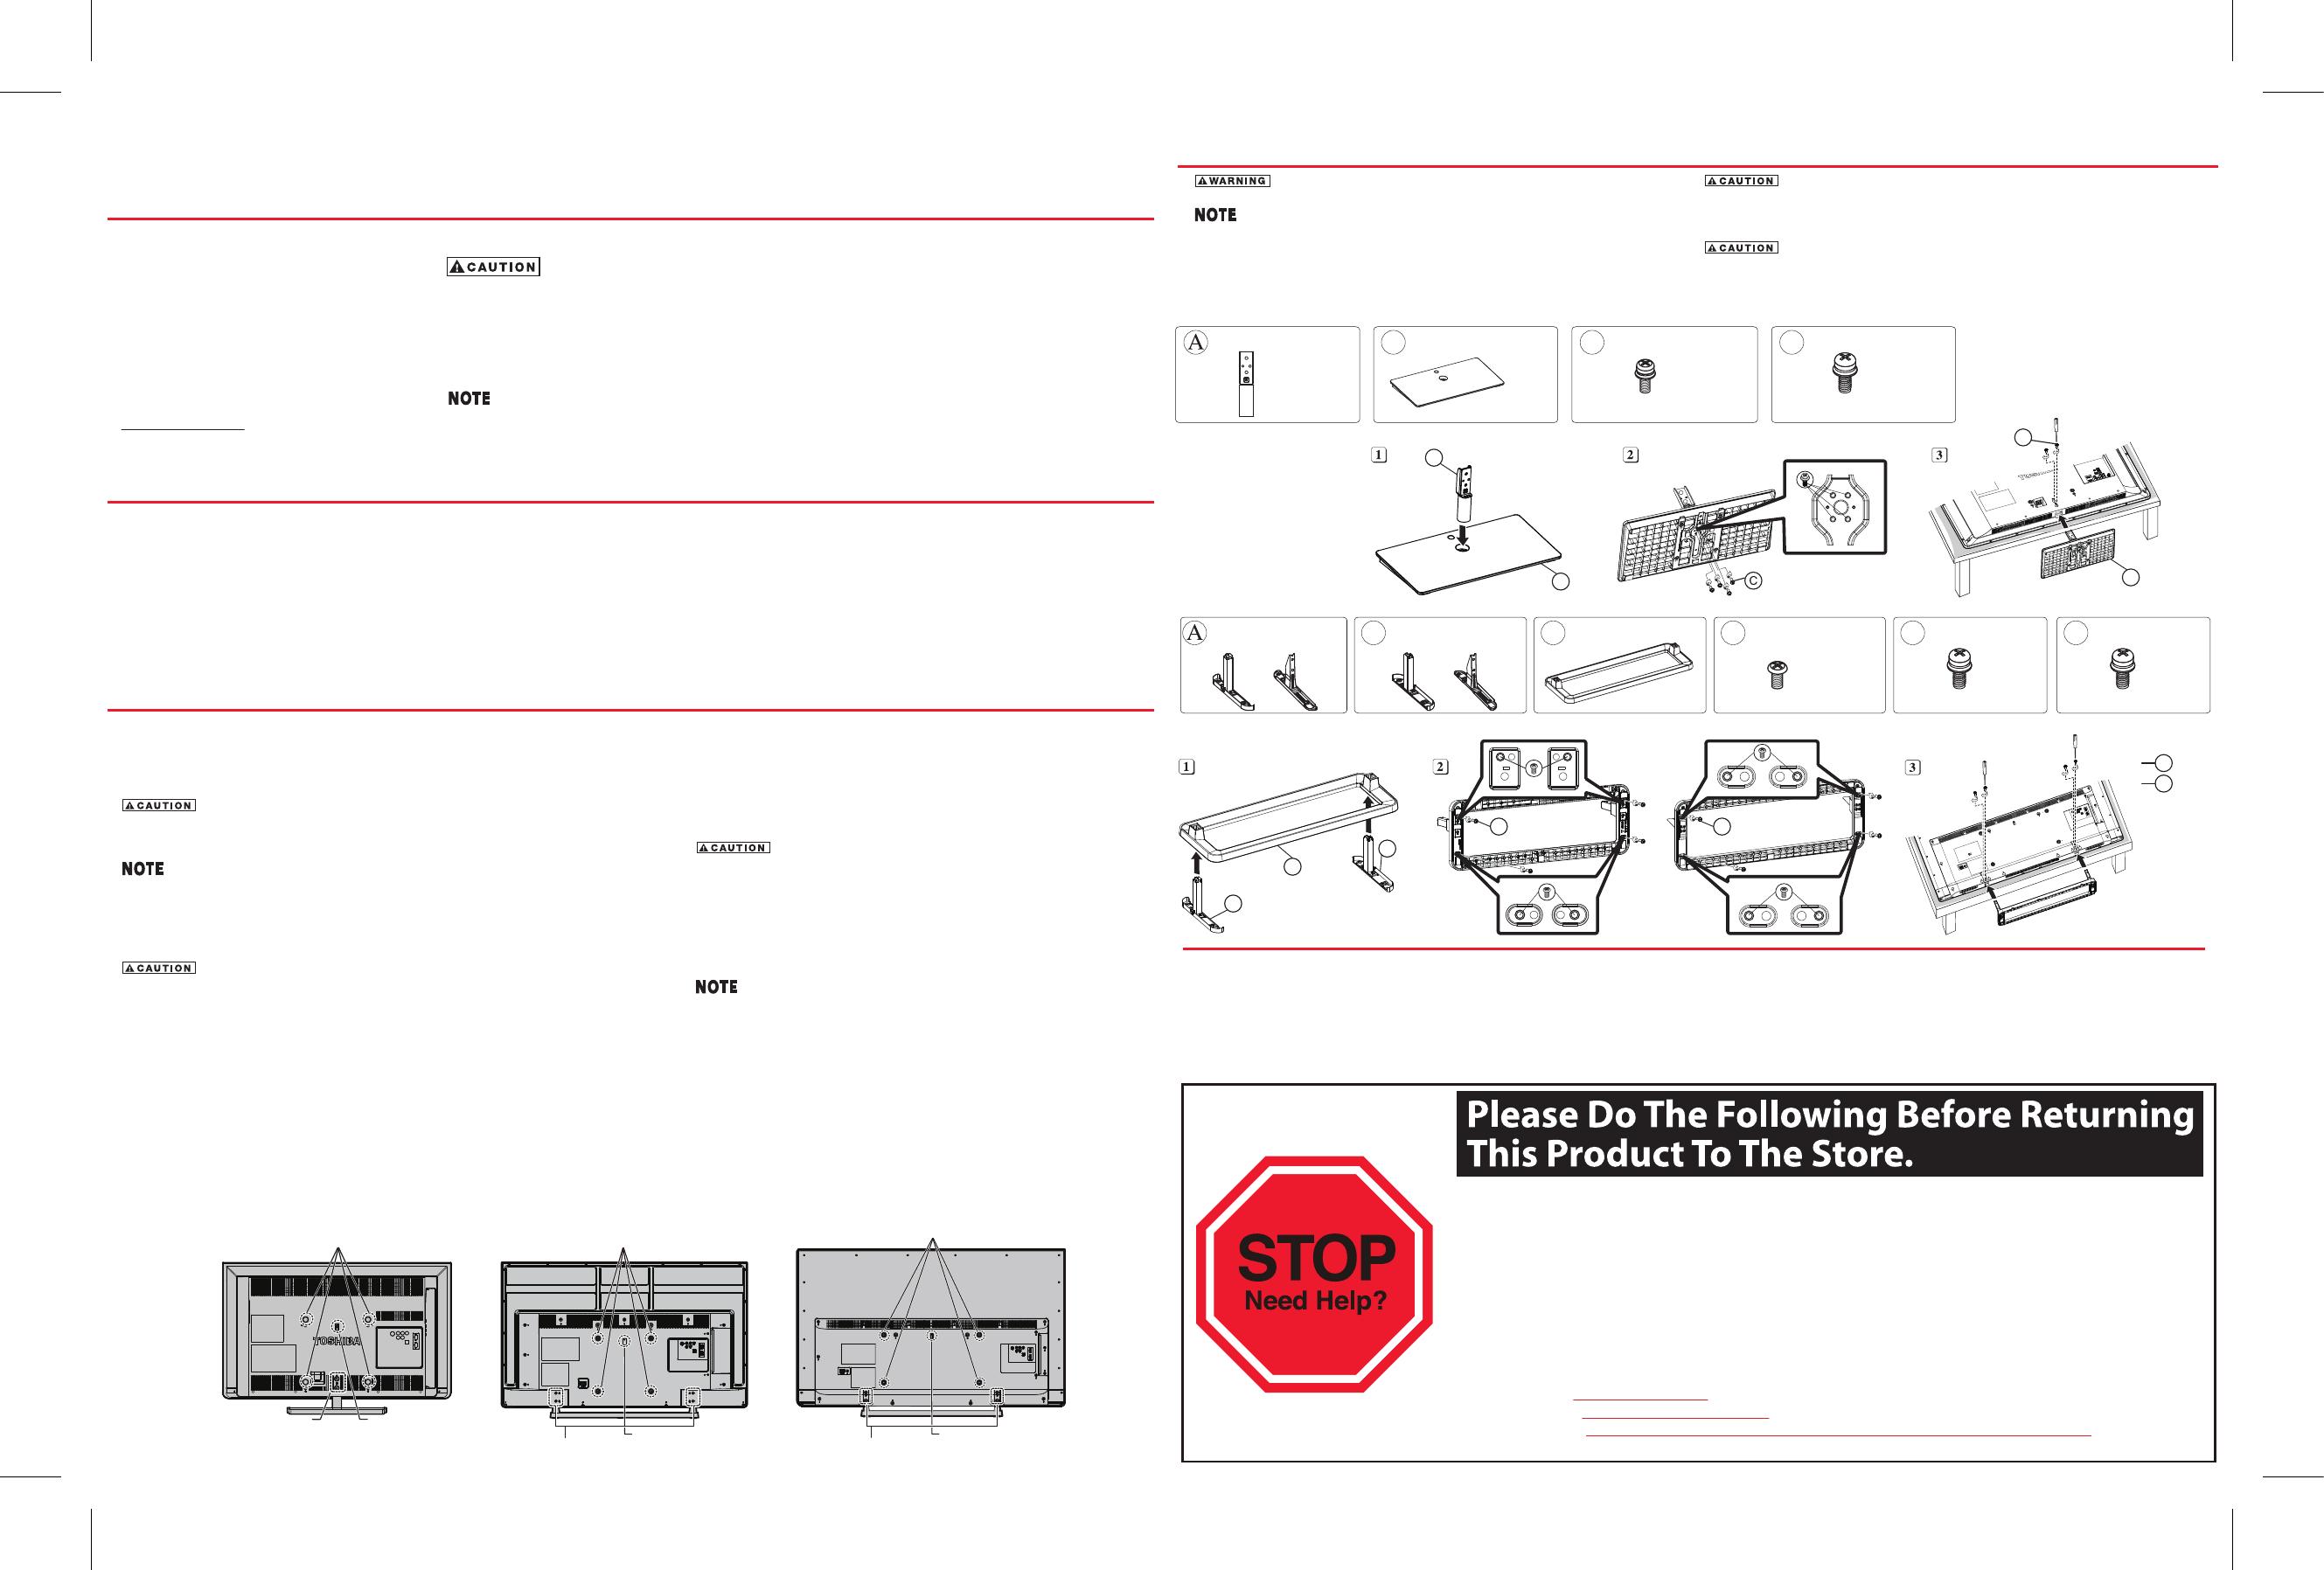
Pedestal Assembly Instructions
To prevent possible electric shock, protect the power cord
from being pinched when attaching the pedestal stand.
Before beginning pedestal assembly, carefully lay the front of
the LCD Panel face down on a flat, cushioned surface such as a
quilt or blanket. Leave the bottom of the unit protruding over the
edge of the surface and assemble pedestal as indicated below.
Two people are required for installation to avoid injury or
damage to the TV.
Extreme care should always be used when attaching the
pedestal stand to avoid damage to the LCD panel.
For safety information, please review the User’s Guide online:
For United States: support.toshiba.com
For Canada: www.toshiba.ca/support/ceg
For Mexico:
http://www.toshiba.com.mx/tdmConsumo/Informacion/Contacto.aspx?ID=SPT"
QUICK START
Check the components
Unpack the box
1. Remove the components and TV from
the box. Save the packing materials in
case you need them later.
2. Remove the documentation for
important information.
A High-Definition signal is needed to receive a High-Definition picture.
Once you have a High-Definition signal you need to connect it to a
High-Definition input on your TV. Not all channels are currently
broadcasting in HD. Standard analog TV channels and HD channels, even
on the same network, broadcast on different channels. (Example: ABC
analog may be on channel 4, while ABC-HD may be on channel 104.)
To display your TV using a Wall Bracket:
Be sure to remove the pedestal stand before mounting your TV with a
wall bracket. Always use a wall bracket Listed by an independent
laboratory (such as UL, CSA, ETL) that is appropriate for the size and
weight of the TV:
Two people are required for installation to avoid injury or
damage to the TV.
1. Unplug and remove any cables and/or other component connectors
from the rear of the TV.
2. Follow the instructions provided with your wall bracket. Before
proceeding, make sure the appropriate bracket(s) are attached to the
wall and the back of the TV as described in the instructions provided
with the wall bracket.
Always use the screws supplied or recommended by
the wall mount manufacturer.
VESA Mounting Pattern
TV Size Hole Pattern (H x V) Screw Size
32" 200mm x 200mm M6
40" 200mm x 200mm M6
50" 400mm x 200mm M8
L1400U/UC/UM Series
To display your TV on the included Pedestal Stand:
Observe the following safety precautions:
1. Read and follow the pedestal assembly instructions section in this document
Before beginning pedestal assembly, carefully lay the TV facedown on a
flat, cushioned surface such as a quilt or blanket. Leave the bottom of the
unit protruding over the edge of the surface and assemble the pedestal as
indicated below.
Extreme care should always be used when attaching or removing the pedestal
stand to avoid damage to the display panel.
2. Assemble the pedestal stand with the hardware provided.
3. After assembling the pedestal, place the TV on a sturdy, level surface that can
support the weight of the TV.
4. Be sure to secure the TV to a wall stud, pillar, surface, or other immovable structure.
Choosing a location for your LED TV
D
32L1400U/UC/UM
x 2 (32L1400U/UC/UM)
M5 ; L14mm
x 4 (32L1400U/UC/UM)
C
32L1400U/UC/UM
M4 ; L12mm
x 1 (32L1400U/UC/UM)
B
32L1400U/UC/UM32L1400U/UC/UM
x 1 (32L1400U/UC/UM)
E
40L1400U/UC/UM
x 4 (40L1400U/UC/UM)
M4 ; L12mm
F
50L1400U/UC/UM
x 4 (50L1400U/UC/UM)
M5 ; L10mm
x 4 (40/50L1400U/UC/UM)
D
40/50L1400U/UC/UM
M4 ; L8mm
32L1400U/UC/UM model
40/50L1400U/UC/UM model
B
A
B
D
32/40/50L1400U (United States model)
32/40/50L1400UC (Canada model) 32/40/50L1400UM (Mexico model)
Many questions regarding parts, service, and warranties can be answered by visiting the Customer Support Section
of our website:
THANK YOU
If you are experiencing a technical problem or have questions regarding operation, authorized service centers,
warranty or parts, please contact our Customer Support Center at:
Always place the TV on a sturdy, level, stable surface that can support
the weight of the unit. Secure the TV using one of the following
methods:
(1) Secure the TV with a mounting screw (Recommended).
• Place the TV on a sturdy surface that has a sufficient
thickness and screw the unit on the surface securely by using
the mounting screw and the fall-prevention screw hole.
• If secured to furniture or other movable objects, the furniture must
be secured to an immovable structure using the method shown in
item 2 below.
(2) Secure the TV with a sturdy strap to a wall stud, pillar, or
other immovable structure. When connecting the strap:
- attach the strap to the TV using the hooks on the back of
the TV, the clips on the pedestal, or the hole in the base of
the pedestal as available.
- make sure the strap is tight, secure, and parallel to the floor.
For L1400U series (United States model):
(800) 631-3811 From Inside the United States
(949) 583-3050 From Outside the United States
For L1400UC series (Canada model):
1-800-268-3404 From within Canada
For L1400UM series (Mexico model):
9126-5165 and 9126-5166 for Mexico
01-800-712-67-64 lada 800 for Mexico
L1400U series: support.toshiba.com
L1400UC series: www.toshiba.ca/support/ceg
L1400UM series: http://www.toshiba.com.mx/tdmConsumo/Informacion/Contacto.aspx?ID=SPT"
x 1 (40/50L1400U/UC/UM)
C
40/50L1400U/UC/UM
B
A
C
D
50’
32” TV
VESA Mounting Pattern
(Sample illustration)
Two stand screws
Hook Sturdy strap
(as short as possible)
40” TV
VESA Mounting Pattern
Hook Sturdy strap
(as short as possible)
Two stand screws
(Sample illustration)
VESA Mounting Pattern
Hook Sturdy strap
(as short as possible)
Two stand screws
(Sample illustration)
50” TV
Get detailed product information:
L1400U series: A comprehensive User's Guide for your model
is available at support.toshiba.com, as well as up-to-date
product information.
L1400UC series: For up-to-date product information,
visit www.toshiba.ca/support/ceg
For detailed product specifications, Select Product, then
select Model and select Model Number.
L1400UM series:
A comprehensive User's Guide for your model is available at
http://www.toshiba.com.mx/tdmConsumo/Informacion/Co
ntacto.aspx?ID=SPT"
• Subject to Change.
Product specifications, configurations, prices,
system/component/options availability are all
subject to change without notice.
Notice


