HP Latex 3500 Printer User guide

Category
Label printers
Type
User guide

This manual is also suitable for

HP Latex 1500 Printer
HP Latex 3000 Printer Series
Double-sided Day Night Kit User Guide
© Copyright 2016 HP Development Company,
L.P.
Edition 1
Legal notices
The information contained herein is subject to
change without notice.
The only warranties for HP Products and
services are set forth in the express warranty
statement accompanying such products and
services. Nothing herein should be construed as
constituting an additional warranty. HP shall not
be liable for technical or editorial errors or
omissions contained herein.
Safety notice
Read and follow the operating and safety
instructions before starting the printer.
Table of contents
1 HP Latex Double-sided Day Night Kit .................................................................................................................................................... 1
Kit components ......................................................................................................................................................................... 1
Introduction ............................................................................................................................................................................... 2
Double-sided backlit print instructions ................................................................................................................................. 3
Preparing the image content for double-sided backlit printing ........................................................................................ 4
LED proong lights ................................................................................................................................................................ 14
2 Hardware maintenance ......................................................................................................................................................................... 15
Replace the Double-sided Day Night Kit platen substrate protector ............................................................................ 15
Replace a Double-sided Day Night Kit substrate edge holder ........................................................................................ 16
Clean Double-sided Day Night Kit lights ............................................................................................................................. 17
3 Print Care diagnostics ............................................................................................................................................................................ 19
Diagnostics for operator ....................................................................................................................................................... 19
4 System errors and alerts ....................................................................................................................................................................... 20
ENWW iii
iv ENWW
1 HP Latex Double-sided Day Night Kit
The HP Latex Double-sided Day and Night Kit allows to easily print on translucent substrate double-sided prints
for outdoor advertising with better color appearance in any light—frontlit during the day or backlit at night.
NOTE: This video applies to HP Latex 1500 and HP Latex 3000 printer series.
Kit components
1. Platen substrate protector, 2 units
2. Tensioners, 6 units
3. Double-sided Day Night Kit substrate edge holders, 2 units and 10 extra strips
4. 3000 series only: Regular substrate edge holders, 4 units and 20 extra strips
IMPORTANT: Once the Double-sided Day Night Kit is installed in your 3000 series printer, you should
remove the original edge holders, and use instead the edge holders provided with the kit. New regular
edge holders and Double-sided Day Night Kit edge holders are provided.
ENWW Kit components 1
When printing a double-sided backlit job, information can be found in the Internal Print Server about how to
load/unload the substrate.
Introduction
Roll-to-roll conguration is the only one supported for double-sided printing. Double-sided printing cannot be
performed if the dual-roll spindle is in use.
Double-sided jobs must be dened as a pair of ripped images:
Side A is the rst image to be printed.
Side B is the second image to be printed, and is done so on the reverse of side A. Side B is always
automatically mirrored. By default, side B assumes the image is the same as side A. There is the option to
specify a dierent image for side B.
IMPORTANT: For double-sided backlit the maximum render resolution supported for side B is 300 ppi.
2 Chapter 1 HP Latex Double-sided Day Night Kit ENWW
Double-sided backlit print instructions
Double-sided backlit printing basic steps:
Front (side A): Select and load the substrate roll for printing
1. Select a roll of a material suitable for double-sided backlit printing. The material should be translucent (it
should let some light pass through when backlit). For double-sided printing of blockout (opaque substrate),
see the printer’s user guide at http://www.hp.com/.
IMPORTANT: Make sure the platen substrate protector is not installed, if it is; uninstall it. If not, the
substrate advance sensor cannot see the substrate, which will aect advance and overall print quality.
2. In the Internal Print Server, click Load Substrate and select Roll to Roll conguration, Single Roll (uncheck
the Dual Roll option) and check the Load Side A option. Pass the substrate through the substrate path
taking care to center it as much as possible, then attach it to the output spindle core.
3. To select the substrate you’re using, you have two options:
Option 1: Select a generic substrate type. Click the Substrate Type drop-down list and select the
loaded substrate. Suitable generic substrates for side A backlit are Generic Side A Translucent PVC
Banner (for PVC backlit banners) or Generic Side A Translucent Paper (for backlit papers).
Option 2: Download customized settings for your specic substrate. Click the Search online button
and look for your specic substrate brand and name.
ENWW Double-sided backlit print instructions 3
Substrates for Double-sided Day Night application are named using the following convention:
<substrate name> – For dual side/Day&night mode – Side A
<substrate name> – For dual side/Day&night mode – Side B
If you nd your substrate in this window, you should then download and install both substrates, for
printing sides A and B.
4. Click Finish to start the automatic substrate load checks. Wait until the load process ends before continuing.
Preparing the image content for double-sided backlit printing
NOTE: You can rasterize the images in the RIP at a maximum of 300 ppi (600 ppi images are not supported for
side B).
Create a double-sided backlit job
1. In the printer’s Internal Print Server, click Add Job, and select the job from the corresponding folder.
4 Chapter 1 HP Latex Double-sided Day Night Kit ENWW
You can start the double-sided print from here, or by following the process described next.
2. Select Double-Sided Backlit (Translucent Substrate).
3. Select the loaded substrate, and Side A print mode.
IMPORTANT: Before printing side A, select the substrate type and print mode for printing side B. You can
select a suitable substrate type by:
Option 1: Selecting a generic substrate type: Generic Side B Translucent PVC Banner (for PVC backlit
banners) or Generic Side B Translucent Paper (for backlit papers).
Option 2: Using a custom substrate type previously downloaded using the Search online option:
<substrate name> – For dual side/Day&night mode – Side B
ENWW Preparing the image content for double-sided backlit printing 5
4. The same image is printed on the front and back by default. If you want to specify a dierent image for the
back, select the image name at the top left part of the dialog window or at the corresponding option at the
bottom right of the image.
5. Make sure that the bottom right part of the job menu indicates: Side to be printed now: Side A. If not, select
A in the Print: drop-down list.
6. Click Save to close the dialog window.
Print on the front (side A)
1. Select the job just created in the Internal Print Server job queue.
6 Chapter 1 HP Latex Double-sided Day Night Kit ENWW
IMPORTANT: Before printing side A, select the substrate type and print mode for printing side B. You can
select a suitable substrate type by:
Option 1: Selecting a generic substrate type: Generic Side B Translucent PVC Banner (for PVC backlit
banners) or Generic Side B Translucent Paper (for backlit papers).
Option 2: Using a custom substrate type previously downloaded using the Search online option:
<substrate name> – For dual side/Day&night mode – Side B
2. Click Print. The carriage positions itself over the substrate and the platen backlight illumination level
automatically adjusts according to substrate translucency so that the registration marks can be correctly
detected while printing side B. If the substrate is not translucent, an error appears and printing will not start
(remember that for double-sided printing of blockout substrates a
dierent workow should be followed,
see the printer’s user guide at http://www.hp.com/). Registration marks are printed on side A all along the
sides of the substrate and also across the substrate at the beginning of each copy—only if copies have
been selected in the Internal Print Server. If copies are selected in the RIP, only lateral registration marks
will be printed. For best results, select copies in the Internal Print Server.
3. Wait for side A to nish printing.
Rewind the roll before printing on the back (side B)
1. Click the Load Substrate button to open the dialog window. The printer alerts that the substrate will be
unloaded. Click Yes to proceed..
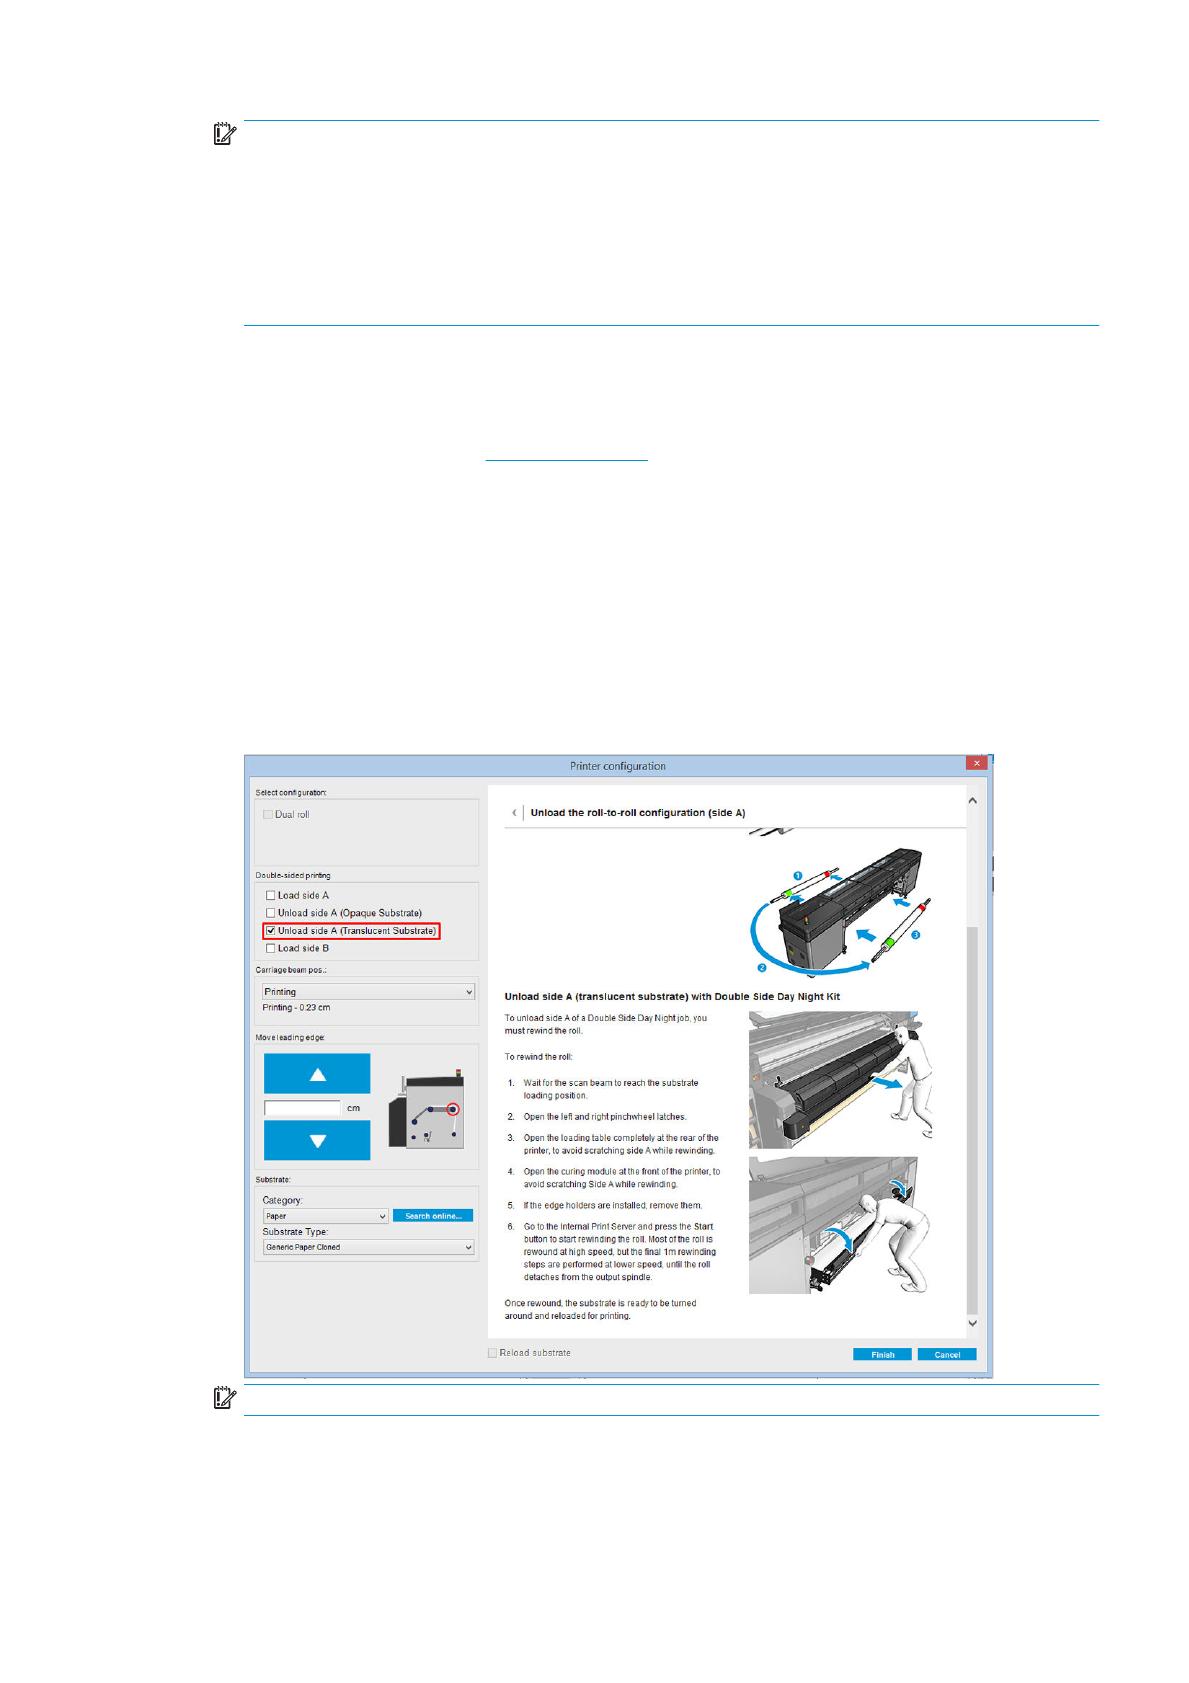
2. Check the Unload Side A (Translucent Substrate) option in the substrate load dialog window.
IMPORTANT: Carefully follow the instructions shown in the Substrate Dialog window.
3. Click Finish to start the roll rewind process. The substrate rewinds into the input spindle.
ENWW Preparing the image content for double-sided backlit printing 7
Load the substrate roll for printing on the back (side B)
1. Install the platen substrate protector. See Double-sided Day Night Kit platen substrate protector installation
on page 9.
2. Disinate the input spindle to loosen the roll. Open the spindle latches at both ends.
3. Remove the roll from the spindle, turn it around 180 degrees and replace it onto the spindle from the
opposite end. Side B is now the substrate side facing up and exposed to be printed.
NOTE: If your printer is an HP Latex 3000 printer series, what you see may be slightly dierent.
4. Reinate the input spindle.
5. Feed the substrate through the substrate path and reattach it to the output spindle, aligning it correctly so
as to be straight from input to output.
8 Chapter 1 HP Latex Double-sided Day Night Kit ENWW
6. Check Load side B in the Load Substrate window, and click Finish.
NOTE: The carriage beam position is automatically raised in case its current height is not safe for
scanning edges with the platen substrate protector installed. It is then automatically lowered or raised to
the previous position at the end of the substrate load process.
When using the Double-sided Day and Night Kit some elements need to be installed to print side B of a job:
Double-sided Day Night Kit platen substrate protector installation
1. Place the protector on the platen and drop the far side of the protector on the far side of the platen, in the
space between the platen and the roller; it is magnetic and will attach itself. Nevertheless make sure it is
attached to the base and not to the LED guide.
2. Unroll the platen substrate protector fabric covering all the platen. Try to cover all the platen with the
protector, or use two protectors. It is important to try to cover at least all the printed content.
IMPORTANT: Place the platen protector with the label face down, in contact with the platen.
ENWW Preparing the image content for double-sided backlit printing 9
3. To provide the correct tension to the platen protector, place the tensioner element between the platen and
the diverter wheels. Make sure the fabric is at, with no wrinkles.
See also the installation video:
4. Use the regular edge holders to secure the protector; if necessary also use the Double-sided Day Night Kit
edge holders to secure the substrate edges.
Double-sided Day Night Kit edge-holder installation
1. Standing in front of the printer, place the edge holder onto the far side of the platen at the furthest edge of
the platen substrate protector.
10 Chapter 1 HP Latex Double-sided Day Night Kit ENWW
2. Clip the edge holder onto rear side of the platen substrate protector situated between the printer platen
and Double-sided Day Night platen light.
3. Attach the other side of the edge holder to the protector tensioner, covering the edge of the substrate.
4. Provide the correct tension to the edge holder using a at screwdriver.
NOTE: If the edges of the protector extend beyond the substrate, use the regular edge holders to hold
the protector. If required, use the Double-sided Day Night Kit specic edge holders to hold the substrate. If
the protector is hidden below the substrate, use the regular edge holders to hold the substrate.
Substrate positioning to enable proper registration marks scan
1. Turn on the platen backlight button in the Internal Print Server or on the printer. The substrate is now
backlit and the content printed on Side A can be seen in the illuminated area.
NOTE: If your printer is an HP Latex 3000 printer series, the platen backlight can be switched on only at
the Internal Print Server.
ENWW Preparing the image content for double-sided backlit printing 11
2. Using the arrows in the Internal Print Server, move the substrate so that all of the top row registration
marks at the beginning of the copy are completely visible in the illuminated area.
Print on the back (side B)
1. Click your double-sided job in the job queue and select Edit.
2. Select B in the Print drop-down list. The bottom right part of the job menu states: Side to be printed now:
Side B.
3. Click Save.
12 Chapter 1 HP Latex Double-sided Day Night Kit ENWW
4. Click the double-sided job in the queue, and then click Print.
5. The carriage moves to the rightmost registration mark, and the substrate advances until the rst
registration mark is detected. The carriage now scans the complete width of the substrate to detect the
top-row registration marks. If correct, printing of side B commences, and the print preview shows the
progress; if not, a warning message appears to indicate that the marks could not be detected, and printing
will not start.
6. The system automatically maintains side B with side A registration. Registration quality can be checked
after the curing zone.
ENWW Preparing the image content for double-sided backlit printing 13
LED proong lights
Risk of burns
For more safety information, see the printer’s user guide
The set of lights allows the visual inspection of the image printed on-press. It is comprised of two lights:
Front light: Mounted underneath the New Universal Mounting Beam (UMB), illuminating the print output for
frontal visual assessment.
Back light: Two strips of LED illuminating from the rear of the substrate output, providing an on-printer
light source for visually assessing backlit prints; no need to stop the printer to view in a light box.
The LED proong lights can easily be managed and switched on and o from the Internal Print Server and also
by pressing the corresponding buttons at the right of the printer.
NOTE: If your printer is an HP Latex 3000 printer series, the lights can be switched on only from the Internal
Print Server.
IMPORTANT: LED proong lights will switch o after a time out.
CAUTION: LED proong lights can reach high temperatures, use caution when approaching and working close
to LED strips.
CAUTION: You are recommended not to look directly at the LEDs while they are on.
14 Chapter 1 HP Latex Double-sided Day Night Kit ENWW
2 Hardware maintenance
Replace the Double-sided Day Night Kit platen substrate protector
You may need to replace the fabric of the platen substrate protector if it becomes damaged or dirty.
NOTE: HP recommends that you wear gloves when handling ink and condensates system components.
1. To remove the fabric from the guide, remove one blue cover at either of the two ends with a screwdriver.
2. Remove the old fabric from the guide and dispose of it.
IMPORTANT: Consult your local authorities to determine the correct manner in which to dispose of waste.
NOTE: You can nd the Material Safety Data Sheets (MSDS) of the ink in http://www.hp.com/go/msds.
ENWW Replace the Double-sided Day Night Kit platen substrate protector 15
3. Take the new fabric and insert it in the guide.
IMPORTANT: Make sure that you place it in the correct position.
Replace a Double-sided Day Night Kit substrate edge holder
You may need to replace an edge-holder strip if it is broken or deteriorated.
Replacement (1500 printer)
1. If the edge holder is installed in the printer, remove it from the platen.
2. Remove the damaged strip from the ends of the edge holders.
3. Take one of the strips provided with the kit and attach the plastic end pieces to it. The soft surface should
be face up and the roughened surface face down, to be in contact with the paper once the edge holder is
installed in the printer.
4. Replace the edge holder on the platen, if you intend to use it.
16 Chapter 2 Hardware maintenance ENWW
  • Page 1 1
  • Page 2 2
  • Page 3 3
  • Page 4 4
  • Page 5 5
  • Page 6 6
  • Page 7 7
  • Page 8 8
  • Page 9 9
  • Page 10 10
  • Page 11 11
  • Page 12 12
  • Page 13 13
  • Page 14 14
  • Page 15 15
  • Page 16 16
  • Page 17 17
  • Page 18 18
  • Page 19 19
  • Page 20 20
  • Page 21 21
  • Page 22 22
  • Page 23 23
  • Page 24 24
  • Page 25 25

HP Latex 3500 Printer User guide

Category
Label printers
Type
User guide
This manual is also suitable for

Ask a question and I''ll find the answer in the document

Finding information in a document is now easier with AI