AA
B
B
D
D
C
C
JJ
L
L
E
E
F
F
G
G
H
H
K
K
I
I
MM
N
N
O
O
C
C
JJ
E
E
P
P
Q
Q
R
R
I
I
LL
S
S
Model Numbers
Duro
®
Single Handle Lavatory Faucet
Operation & Maintenance Manual
SLS-3612-1.5, SLS-3622-1.5
Single handle lavatory faucet featuring a single hole
mounting conguration. Includes ceramic cartridge,
stainless steel braided hoses with 3/8" compression
ttings, metal drain assembly and standard 1.5 gpm
(5.7 L/min) aerator. Components made from brass and
nonmetallic materials plated in standard
polished chrome nish.
Specification
Warranty
Limited Lifetime - to the original end purchaser in
consumer/residential installations.
5 Years - for industrial/commercial installations.
Refer to www.symmons.com/warranty for complete
warranty information.
Compliance
Modifications
Note: Append appropriate -sufx to model number.
☐
SLS-3612-1.5
Duro Single Handle Lavatory Faucet (6-7/8" height)
☐
SLS-3622-1.5
Duro Single Handle Lavatory Faucet (4-1/2" height)
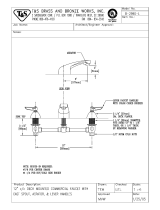
Dimensions
Note: Dimensions subject to change without notice.
c
Certied by
IAPMO R&T
Measurements
A 1-11/16", 43 mm
B 6-5/8", 168 mm
C
Hole Size:
Min. Ø 1-1/4", 32 mm
Max. Ø 1-1/2", 38 mm
D 3/16", 5 mm
E 4-7/16", 113 mm
F 8-9/16", 217 mm
G 6-7/8", 175 mm
H 5-5/16", 135 mm
I 12°
J
Deck Thickness Ref.
Min. 7/8", 22 mm
Max. 2-3/8", 60 mm
K 24", 610 mm
L 3/8" compression tting
M 1-11/16", 43 mm
N 4-5/16", 110 mm
O 3/16", 5 mm
P 6-1/8", 156 mm
Q 4-1/2", 114 mm
R 2-15/16", 75 mm
S 25", 635 mm
-ASME A112.18.1/CSA B125.1
-NSF/ANSI 61.9, NSF/ANSI 372
-WaterSense 1.5 gpm (5.7 L/min)
☐
-0.5
0.5 gpm (1.9 L/min) aerator
☐
-1.0
1.0 gpm (3.8 L/min) aerator
☐
-2.2
2.2 gpm (8.3 L/min) aerator
CG
CG

Parts Breakdown
2
Replacement Parts
Item Description Part Number
A
B
C
Handle
Set Screw
Plug Button
LN-01416
D Cartridge
LN-01417
(SLS-3612-1.5)
RL-236
(SLS-3622-1.5)
F
Aerator 2.2
Aerator 1.5
Aerator 1.0
Aerator 0.5
LN-15
FLR-110-1.5
FLR-110-1.0
RL-019
J
K
T
Lift Rod
Stopper
Ball Rod
RL-014
J Lift Rod RL-015
K Stopper RL-016
G, H
I
Y
Mounting Gaskets (2x)
Fasteners
Supply Hose
RL-011
Z Deck Plate RL-104
Required for Installation
Adjustable wrench
Allen wrench:
3/16"
Plumber tape
Plumber putty
A
D
E
G
H
I
K
L
O
F
Y
B
C
J
M
N
P
Q
W
U
V
T
S
R
X
Z
OPTIONAL

Installation
3
1a) SLS-3612: Insert faucet body (E)
through deck surface.
1b) SLS-3622: Insert faucet
body (E) through deck plate (Z)
and deck surface.
2) Slide mounting gasket (G) and
metal washer (H) on to fasteners (X).
Secure with mounting nuts (I).
Note: Hoses removed for clarity.
3) Install teon tape to inlets of
shut-off valves. Attach supply lines
to shut-off valves and hand tighten.
Using a wrench, nish with one-
half turn. DO NOT overtighten.
4) Apply plumber putty to underside
of ange (L).
5) Insert ange (L) into drain opening.
From below, attach drain body (Q)
with gasket (M) and washer (N) to
ange (2-3 turns until hand tight).
Note: Make sure drain cavity (on
drain body) faces rear of sink.
6) From below, tighten ange nut (O)
to secure drain body (Q).
DO NOT overtighten.
Note: Make sure ange is centered
in drain opening.
7) Insert stopper (K) into ange (L)
and rotate to proper position.
Note: Stopper can be installed
removable or non-removable
determined by eye hole position.
8) Insert pivot rod (T) into drain
body (Q) against gasket (P) and inner
seat (R). Install outer seat (S) against
pivot ball and secure assembly by
tightening retaining nut (U).
Note: Pivot rod passes under
stopper.
1
2
G
X
H
I
1
1
2
E
E
Z
L
3
1
2
L
Q
M
N
OPTIONAL
O
Q
Removable
K
Removable
K
Non Removable
K
L
1
T
S
U
Q
R
P
2

Installation
Symmons Industries, Inc. ■ 31 Brooks Drive ■ Braintree, MA 02184 ■ Phone: (800) 796-6667 ■ Fax: (800) 961-9621
Copyright © 2017 Symmons Industries, Inc. ■ symmons.com ■ [email protected] ■ ZV-3152 REV C ■ 041217
9) Insert lift rod (J) into back of
faucet body (E). From below,
attach clevis strap (W) to lift
rod (J). Tighten thumb screw to
secure.
10) With stopper in closed location,
insert pivot rod (T) into clevis
strap (W). Secure with spring
clip (V).
11) To adjust stopper, select
another hole in clevis strap or
loosen thumb screw to slightly
raise or lower lift rod.
12) Attach drain body to drain trap.
13) The handle limit stop can
be set to limit handle turn to
the hot position. To measure
temperature, turn handle to
full hot position and lift handle
half way open. If water is too
hot or cold, loosen set screw
and remove handle. Remove
limit stop ring and rotate
counter clockwise to lower
temperature or clockwise to
raise temperature.
2
1
3
J
E
J
W
T
W
V
V
Hotter (+)
Colder (–)
1
3
2
2
Care and Cleaning
1) Clean nished trim area with a soft cloth using mild soap and water or a non-abrasive cleaner and then quickly rinse
with water.
Troubleshooting Chart
Problem Cause Solution
Finish is spotting.
Elements in water supply may cause
water staining on nish.
Clean nished trim area with a soft
cloth using mild soap and water or a
non-abrasive cleaner and then
quickly rinse with water.
Faucet is leaking from handle
or faucet body.
Cartridge o-rings are worn or foreign
matter (dirt, chips) is lodged between
cartridge and o-rings.
Remove cartridge and inspect for
foreign matter. Replace cartridge
if necessary.
Faucet no longer maintains desired
temperature.
Hard water deposits inside of
cartridge is preventing accurate mix
of hot and cold water.
Soak cartridge in white vinegar for
1 hour to breakdown hard water
deposits, then rinse with water.
Replace cartridge if necessary.
For California Residents
WARNING: This product contains chemicals known to the State of California to cause cancer, birth defects, or other reproductive harm.
/