Sun Microsystems Netra T2000 User guide
- Category
- Servers
- Type
- User guide


Please
Recycle
Copyright 2006 Sun Microsystems, Inc., 4150 Network Circle, Santa Clara, California 95054, U.S.A. All rights reserved.
Sun Microsystems, Inc. has intellectual property rights relating to technology that is described in this document. In particular, and without
limitation, these intellectual property rights may include one or more of the U.S. patents listed at http://www.sun.com/patents and one or
more additional patents or pending patent applications in the U.S. and in other countries.
This document and the product to which it pertains are distributed under licenses restricting their use, copying, distribution, and
decompilation. No part of the product or of this document may be reproduced in any form by any means without prior written authorization of
Sun and its licensors, if any.
Third-party software, including font technology, is copyrighted and licensed from Sun suppliers.
Parts of the product may be derived from Berkeley BSD systems, licensed from the University of California. UNIX is a registered trademark in
the U.S. and in other countries, exclusively licensed through X/Open Company, Ltd.
Sun, Sun Microsystems, the Sun logo, Java, AnswerBook2, docs.sun.com, Netra, OpenBoot, SunFire, and Solaris are trademarks or registered
trademarks of Sun Microsystems, Inc. in the U.S. and in other countries.
All SPARC trademarks are used under license and are trademarks or registered trademarks of SPARC International, Inc. in the U.S. and in other
countries. Products bearing SPARC trademarks are based upon an architecture developed by Sun Microsystems, Inc.
The OPEN LOOK and Sun™ Graphical User Interface was developed by Sun Microsystems, Inc. for its users and licensees. Sun acknowledges
the pioneering efforts of Xerox in researching and developing the concept of visual or graphical user interfaces for the computer industry. Sun
holds a non-exclusive license from Xerox to the Xerox Graphical User Interface, which license also covers Sun’s licensees who implement OPEN
LOOK GUIs and otherwise comply with Sun’s written license agreements.
U.S. Government Rights—Commercial use. Government users are subject to the Sun Microsystems, Inc. standard license agreement and
applicable provisions of the FAR and its supplements.
DOCUMENTATION IS PROVIDED "AS IS" AND ALL EXPRESS OR IMPLIED CONDITIONS, REPRESENTATIONS AND WARRANTIES,
INCLUDING ANY IMPLIED WARRANTY OF MERCHANTABILITY, FITNESS FOR A PARTICULAR PURPOSE OR NON-INFRINGEMENT,
ARE DISCLAIMED, EXCEPT TO THE EXTENT THAT SUCH DISCLAIMERS ARE HELD TO BE LEGALLY INVALID.
Copyright 2006 Sun Microsystems, Inc., 4150 Network Circle, Santa Clara, Californie 95054, États-Unis. Tous droits réservés.
Sun Microsystems, Inc. possède les droits de propriété intellectuels relatifs à la technologie décrite dans ce document. En particulier, et sans
limitation, ces droits de propriété intellectuels peuvent inclure un ou plusieurs des brevets américains listés sur le site
http://www.sun.com/patents, un ou les plusieurs brevets supplémentaires ainsi que les demandes de brevet en attente aux les États-Unis et
dans d’autres pays.
Ce document et le produit auquel il se rapporte sont protégés par un copyright et distribués sous licences, celles-ci en restreignent l’utilisation,
la copie, la distribution, et la décompilation. Aucune partie de ce produit ou document ne peut être reproduite sous aucune forme, par quelque
moyen que ce soit, sans l’autorisation préalable et écrite de Sun et de ses bailleurs de licence, s’il y en a.
Tout logiciel tiers, sa technologie relative aux polices de caractères, comprise, est protégé par un copyright et licencié par des fournisseurs de
Sun.
Des parties de ce produit peuvent dériver des systèmes Berkeley BSD licenciés par l’Université de Californie. UNIX est une marque déposée
aux États-Unis et dans d’autres pays, licenciée exclusivement par X/Open Company, Ltd.
Sun, Sun Microsystems, le logo Sun, Java, AnswerBook2, docs.sun.com, Netra, OpenBoot, Sun Fire, et Solaris sont des marques de fabrique ou
des marques déposées de Sun Microsystems, Inc. aux États-Unis et dans d’autres pays.
Toutes les marques SPARC sont utilisées sous licence et sont des marques de fabrique ou des marques déposées de SPARC International, Inc.
aux États-Unis et dans d’autres pays. Les produits portant les marques SPARC sont basés sur une architecture développée par Sun
Microsystems, Inc.
L’interface utilisateur graphique OPEN LOOK et Sun™ a été développée par Sun Microsystems, Inc. pour ses utilisateurs et licenciés. Sun
reconnaît les efforts de pionniers de Xerox dans la recherche et le développement du concept des interfaces utilisateur visuelles ou graphiques
pour l’industrie informatique. Sun détient une license non exclusive de Xerox sur l’interface utilisateur graphique Xerox, cette licence couvrant
également les licenciés de Sun implémentant les interfaces utilisateur graphiques OPEN LOOK et se conforment en outre aux licences écrites de
Sun.
LA DOCUMENTATION EST FOURNIE "EN L’ÉTAT" ET TOUTES AUTRES CONDITIONS, DÉCLARATIONS ET GARANTIES EXPRESSES
OU TACITES SONT FORMELLEMENT EXCLUES DANS LA LIMITE DE LA LOI APPLICABLE, Y COMPRIS NOTAMMENT TOUTE
GARANTIE IMPLICITE RELATIVE À LA QUALITÉ MARCHANDE, À L’APTITUDE À UNE UTILISATION PARTICULIÈRE OU À
L’ABSENCE DE CONTREFAÇON.

iii
Contents
Preface xiii
1. System Console 1
Communicating With the System Console 1
Serial Management Port 1
Establishing Communication With the Serial Management Port 2
Network Management Port 5
Switching Between the Consoles 6
ALOM sc> Prompt 7
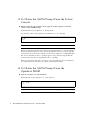
▼To Obtain the ALOM Prompt From the Solaris Console 8
▼To Obtain the ALOM Prompt From the OpenBoot PROM 8
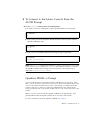
▼To Connect to the Solaris Console From the ALOM Prompt 9
OpenBoot PROM ok Prompt 9
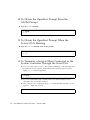
▼To Obtain the OpenBoot Prompt From the ALOM Prompt 10
▼To Obtain the OpenBoot Prompt When the Solaris OS Is Running 10
▼To Terminate a Session When Connected to the System Controller
Through the Serial Port 10
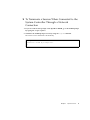
▼To Terminate a Session When Connected to the System Controller
Through a Network Connection 11
2. Advanced Lights Out Manager 13

iv Netra T2000 Server Administration Guide • September 2006
ALOM Overview 13
ALOM Features 13
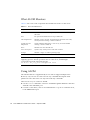
What ALOM Monitors 14
Using ALOM 14
▼To Set the Initial Password 15
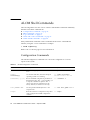
ALOM Shell Commands 16
Configuration Commands 16
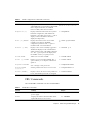
FRU Commands 17
Log Commands 18
Status and Control Commands 18
Other ALOM Commands 20
Basic ALOM Tasks 20
▼To Reset ALOM 20
▼To Switch Between the System Console and ALOM 21
▼To Control the Locator LED 21
▼To Reset the Host Server 21
▼To View Environmental Information About the Server 21
▼To Reconfigure ALOM to Use the Ethernet (NET MGT) Port 22
▼To Add ALOM User Accounts 23
▼To Remove an ALOM User Account 23
▼To Log In to ALOM 24
▼To Change an ALOM Password 24
▼To Set Up Email Alerts 24
▼To Back Up Your ALOM Configuration 25
▼To Display Your ALOM Version 25
3. OpenBoot PROM 27
OpenBoot PROM Overview 27
Before You Obtain the ok Prompt 28

Contents v
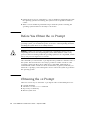
Obtaining the ok Prompt 28
Graceful Shutdown 29
ALOM break or console Command 29
Stop-A Keys or Break Key 29
Manual System Reset 30
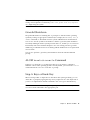
▼To Obtain the ok Prompt 30
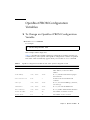
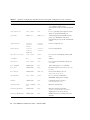
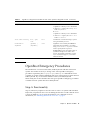
OpenBoot PROM Configuration Variables 31
▼To Change an OpenBoot PROM Configuration Variable 31
OpenBoot Emergency Procedures 33
Stop-A Functionality 33
Stop-N Functionality 34
▼To Restore OpenBoot Configuration Defaults 34
Stop-F Functionality 35
Stop-D Functionality 35
4. Basic Administrative Tasks 37
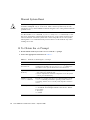
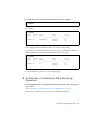
Status Indicators 37
Interpreting Status LEDs 38
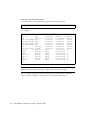
Bezel Server Status Indicators 39
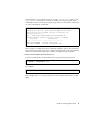
Alarm Status Indicators 41
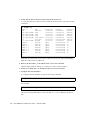
Selecting a Boot Device 43
▼To Select a Boot Device 44
Unconfiguring and Reconfiguring Devices 45
▼To Unconfigure a Device Manually 45
▼To Reconfigure a Device Manually 46
Displaying System Fault Information 46
▼To Display System Fault Information 46
Multipathing Software 47
Storing FRU Information 48

vi Netra T2000 Server Administration Guide • September 2006
▼To Store Information in Available FRU PROMs 48
Automatic System Recovery 48
Autoboot Options 49
▼To Enable Automatic Degraded Boot 49
Error Handling Summary 49
▼To Enable ASR 50
▼To Disable ASR 51
Updating the Firmware 51
▼To Update the Server Firmware 52
5. Securing the Server 55
Security Guidelines 55
Defining the Console Password 56
Using the SNMP Protocol Default Configuration 56
Rebooting the System Controller to Implement Settings 56
Selecting a Remote Connection Type 57
Enabling SSH 57
Features Not Supported by SSH 59
Changing SSH Host Keys 60
Additional Security Considerations 60
Special Key Sequences for RTOS Shell Access 60
Domain Minimization 61
Solaris Operating System Security 61
6. Managing Disk Volumes 63
RAID Requirements 63
Disk Volumes 64
RAID Technology 64
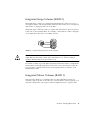
Integrated Stripe Volumes (RAID 0) 65

Contents vii
Integrated Mirror Volumes (RAID 1) 65
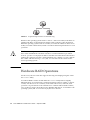
Hardware RAID Operations 66
Slot Numbers and Device Names for Non-RAID Disks 67
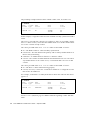
▼To Create a Mirrored Volume 67
▼To Create a Mirrored Volume of the Default Boot Device 70
▼To Create a Striped Volume 71
▼To Configure and Label a RAID Volume 73
▼To Delete a RAID Volume 76
▼To Perform a Mirrored Disk Hot-Swap Operation 78
▼To Perform a Nonmirrored Disk Hot-Swap Operation 79
A. Watchdog Timer Application Mode 85
Understanding the Watchdog Timer Application Mode 85
Watchdog Timer Limitations 86
Using the ntwdt Driver 88
Understanding the User API 88
Using the Watchdog Timer 89
Setting the Timeout Period 89
Enabling or Disabling the Watchdog 89
Rearming the Watchdog 90
Getting the State of the Watchdog Timer 90
Finding and Defining Data Structures 90
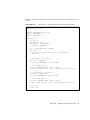
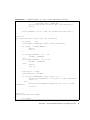
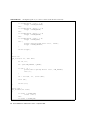
Example Watchdog Program 91
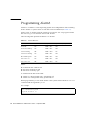
Programming Alarm3 92
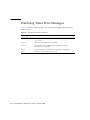
Watchdog Timer Error Messages 94
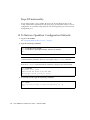
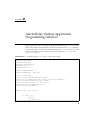
B. Alarm Relay Output Application Programming Interface 95

viii Netra T2000 Server Administration Guide • September 2006


xNetra T2000 Server Administration Guide • September 2006

xi
Tables
TABLE 1-1 Pin Crossovers for Connecting to a Typical Terminal Server 3
TABLE 1-2 Entries for hardwire In the /etc/remote File 4
TABLE 2-1 What ALOM Monitors 14
TABLE 2-2 ALOM Configuration Commands 16
TABLE 2-3 ALOM FRU Commands 17
TABLE 2-4 ALOM Log Commands 18
TABLE 2-5 ALOM Status and Control Commands 18
TABLE 2-6 Other ALOM Commands 20
TABLE 3-1 Methods of Obtaining the ok Prompt 30
TABLE 3-2 OpenBoot Configuration Variables Stored on the System Configuration Card 31
TABLE 4-1 LED Behavior and Meaning 38
TABLE 4-2 LED Behaviors With Assigned Meanings 38
TABLE 4-3 Bezel Server Status Indicators 40
TABLE 4-4 Locator LED Commands 41
TABLE 4-5 Alarm Indicators and Dry Contact Alarm States 42
TABLE 4-6 Device Identifiers and Devices 45
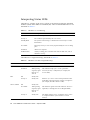
TABLE 5-1 SSH Server Attributes 57
TABLE 6-1 Disk Slot Numbers, Logical Device Names, and Physical Device Names 67
TABLE A-1 Alarm3 Behavior 92
TABLE A-2 Watchdog Timer Error Messages 94

xii Netra T2000 Server Administration Guide • September 2006

xiii
Preface
The Netra T2000 Server Administration Guide provides information and detailed
procedures that enable administration and management of the Netra™ T2000 server.
This document is written for technicians, system administrators, authorized service
providers (ASPs), and users who have advanced experience administrating server
systems.
How This Document Is Organized
Chapter 1 explains how to access the system console to enable remote management
and administration.
Chapter 2 describes using Advanced Lights Out Manager (ALOM) for remote
administration of your server.
Chapter 3 describes the function, methods of obtaining, and configuration of the
OpenBoot™ PROM.
Chapter 4 describes status indicators and basic tasks that might be done as the
course of system administration.
Chapter 5 provides important information about securing the system.
Chapter 6 describes redundant array of independent disks (RAID) concepts.
Appendix A gives information on the watchdog timer application mode on the
server.
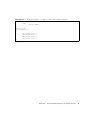
Appendix B provides a sample program that illustrates how to get or set the status
of the alarms.

xiv Netra T2000 Server Administration Guide • September 2006
Using UNIX Commands
This document might not contain information about basic UNIX®commands and
procedures such as shutting down the system, booting the system, and configuring
devices. Refer to the following for this information:
■Software documentation that you received with your system
■Solaris™ Operating System documentation, which is at:
http://docs.sun.com
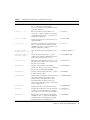
Shell Prompts
Typographic Conventions
Shell Prompt
C shell machine-name%
C shell superuser machine-name#
Bourne shell and Korn shell $
Bourne shell and Korn shell superuser #
Typeface*Meaning Examples
AaBbCc123 The names of commands, files,
and directories; on-screen
computer output
Edit your.login file.
Use ls -a to list all files.
% You have mail.
AaBbCc123 What you type, when contrasted
with on-screen computer output
%su
Password:
AaBbCc123 Book titles, new words or terms,
words to be emphasized.
Replace command-line variables
with real names or values.
Read Chapter 6 in the User’s Guide.
These are called class options.
You must be superuser to do this.
To delete a file, type rm filename.

Preface xv
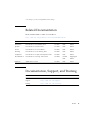
Related Documentation
The documents listed as online are available at:
http://www.sun.com/products-n-solutions/hardware/docs/
Documentation, Support, and Training
* The settings on your browser might differ from these settings.
Application Title Part Number Format Location
Installation Netra T2000 Server Installation Guide 819-5838 PDF Online
Updates Netra T2000 Server Product Notes 819-5840 PDF Online
Service Netra T2000 Server Service Manual 819-5841 PDF Online
Planning Netra T2000 Server Site Planning Notes 819-5842 PDF Online
Compliance Netra T2000 Server Safety and Compliance Guide 819-5843 PDF Online
Documentation Netra T2000 Server Getting Started Guide 819-5844 Printed
PDF
Shipping kit
Online
Reference ALOM CMT 1.2 Guide 819-3250 PDF Online
Sun Function URL
Documentation http://www.sun.com/documentation/
Support http://www.sun.com/support/
Training http://www.sun.com/training/

xvi Netra T2000 Server Administration Guide • September 2006
Third-Party Web Sites
Sun is not responsible for the availability of third-party web sites mentioned in this
document. Sun does not endorse and is not responsible or liable for any content,
advertising, products, or other materials that are available on or through such sites
or resources. Sun will not be responsible or liable for any actual or alleged damage
or loss caused by or in connection with the use of or reliance on any such content,
goods, or services that are available on or through such sites or resources.
Sun Welcomes Your Comments
Sun is interested in improving its documentation and welcomes your comments and
suggestions. You can submit your comments by going to:
http://www.sun.com/hwdocs/feedback
Please include the title and part number of your document with your feedback:
Netra T2000 Server Administration Guide, part number 819-5837-10

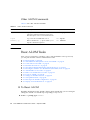
1
CHAPTER 1
System Console
This chapter explains how to access the system console to enable remote
management and administration. This chapter includes the following topics:
■“Communicating With the System Console” on page 1
■“Switching Between the Consoles” on page 6
Communicating With the System
Console
The administrator needs a way to interact with the server at a low level, to configure
the very basic I/O and server boot behavior. The system console enables the
administrator to accomplish these tasks, using special commands. Additionally, the
system console displays information, status, and error messages generated by
firmware during server startup and operation. Once the operating system is booted,
the system console displays Solaris system messages and accepts Solaris commands.
The server has two I/O ports dedicated to the system console:
■SC SERIAL MGT
■SC NET MGT
Serial Management Port
The serial management port (SC SERIAL MGT) is the default connection to the
system console. Though a serial connection, this port uses an RJ-45 connector.
Communicating with the system controller through this port requires the following
serial parameters:
■9600 baud

2Netra T2000 Server Administration Guide • September 2006
■8 bits
■No parity
■1 stop bit
■No handshaking
Serial devices that can communicate with the serial management port are:
■Terminal server
■TIP line connected to another Sun™ computer
■Alphanumeric terminal or similar device
Because it is a serial connection, there is communication between only two devices.
This constraint limits access and provides for a more secure link between the
administrator and the server.
The serial management port is not a general-purpose serial port. It is dedicated to
the system controller. If you want to use a serial peripheral, connect it to the
standard 9-pin serial port on the back panel of the server. The Solaris OS sees this
port as TTYA and it is labeled as such.
Establishing Communication With the Serial
Management Port
▼To Access The System Console Through a Terminal Server
1. Complete the physical connection from the serial management port to your
terminal server.
The serial management port on the server is a data terminal equipment (DTE) port.
Verify that the serial port pinouts of the server match those of the terminal server
you plan to use.
■If the pinout of the server serial management port corresponds with the pinout of
the RJ-45 port on the terminal server, you have two connection options:
■Connect a serial interface breakout cable directly to the server.
■Connect a serial interface breakout cable to a patch panel and use the straight-
through patch cable (supplied by Sun) to connect the patch panel to the server.
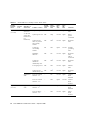
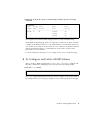
■If the pinout of the server serial management port do not correspond with the
pinout of the RJ-45 port on the terminal server, you need to make a crossover
cable. TABLE 1-1 shows the pinout of the crossover cable.

Chapter 1 System Console 3
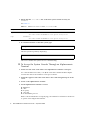
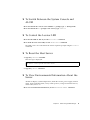
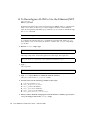
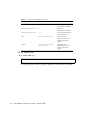
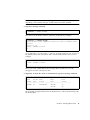
2. Open a terminal session on the connecting device, and type:
For example, for a server connected to port 10000 on a terminal server whose IP
address is 192.20.30.10, you would type:
▼To Access the System Console Through the TIP Connection
1. Connect the RJ-45 serial cable and, if required, the DB-9 or DB-25 adapter
provided.
The cable and adapter connect between another Sun system’s serial port (typically
TTYB) and the serial management port on the back panel of the server.
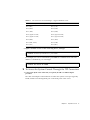
TABLE 1-1 Pin Crossovers for Connecting to a Typical Terminal Server
Server Serial Port (RJ-45 Connector) Pin Terminal Server Serial Port Pin
Pin 1 (RTS) Pin 1 (CTS)
Pin 2 (DTR) Pin 2 (DSR)
Pin 3 (TXD) Pin 3 (RXD)
Pin 4 (Signal Ground) Pin 4 (Signal Ground)
Pin 5 (Signal Ground) Pin 5 (Signal Ground)
Pin 6 (RXD) Pin 6 (TXD)
Pin 7 (DSR /DCD) Pin 7 (DTR)
Pin 8 (CTS) Pin 8 (RTS)
%telnet IP-address-of-terminal-server port-number
%telnet 192.20.30.10 10000

4Netra T2000 Server Administration Guide • September 2006
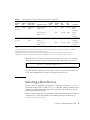
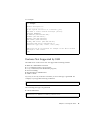
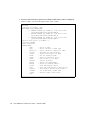
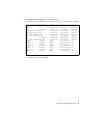
2. Ensure that the /etc/remote file on the Sun system contains an entry for
hardwire.
See TABLE 1-2.
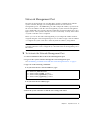
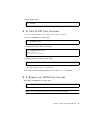
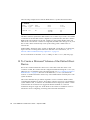
3. In a terminal window on the Sun system, type:
The Sun system responds by displaying:
The server and the Sun system are now communicating.
▼To Access the System Console Through an Alphanumeric
Terminal
1. Attach one end of the serial cable to the alphanumeric terminal’s serial port.
Use a null modem serial cable, or an RJ-45 serial cable and null modem adapter.
Connect this cable to the terminal’s serial port connector.
2. Attach the opposite end of the serial cable to the serial management port on the
server.
3. Power on the alphanumeric terminal.
4. Set the alphanumeric terminal to receive:
■9600 baud
■8 bits
■No parity
■1 stop bit
■No handshake protocol
Refer to the documentation accompanying your terminal for information about how
to operate and configure the terminal.
TABLE 1-2 Entries for hardwire In the /etc/remote File
Serial port Entry for hardwire
ttya hardwire:\
:dv=/dev/term/a:br#9600:el=^C^S^Q^U^D:ie=%$:oe=^D:
ttyb hardwire:\
:dv=/dev/term/b:br#9600:el=^C^S^Q^U^D:ie=%$:oe=^D:
% tip hardwire
connected
Page is loading ...
Page is loading ...
Page is loading ...
Page is loading ...
Page is loading ...
Page is loading ...
Page is loading ...
Page is loading ...
Page is loading ...
Page is loading ...
Page is loading ...
Page is loading ...
Page is loading ...
Page is loading ...
Page is loading ...
Page is loading ...
Page is loading ...
Page is loading ...
Page is loading ...
Page is loading ...
Page is loading ...
Page is loading ...
Page is loading ...
Page is loading ...
Page is loading ...
Page is loading ...
Page is loading ...
Page is loading ...
Page is loading ...
Page is loading ...
Page is loading ...
Page is loading ...
Page is loading ...
Page is loading ...
Page is loading ...
Page is loading ...
Page is loading ...
Page is loading ...
Page is loading ...
Page is loading ...
Page is loading ...
Page is loading ...
Page is loading ...
Page is loading ...
Page is loading ...
Page is loading ...
Page is loading ...
Page is loading ...
Page is loading ...
Page is loading ...
Page is loading ...
Page is loading ...
Page is loading ...
Page is loading ...
Page is loading ...
Page is loading ...
Page is loading ...
Page is loading ...
Page is loading ...
Page is loading ...
Page is loading ...
Page is loading ...
Page is loading ...
Page is loading ...
Page is loading ...
Page is loading ...
Page is loading ...
Page is loading ...
Page is loading ...
Page is loading ...
Page is loading ...
Page is loading ...
Page is loading ...
Page is loading ...
Page is loading ...
Page is loading ...
Page is loading ...
Page is loading ...
Page is loading ...
Page is loading ...
Page is loading ...
Page is loading ...
Page is loading ...
Page is loading ...
Page is loading ...
Page is loading ...
Page is loading ...
Page is loading ...
Page is loading ...
Page is loading ...
Page is loading ...
Page is loading ...
Page is loading ...
Page is loading ...
Page is loading ...
Page is loading ...
Page is loading ...
Page is loading ...
Page is loading ...
Page is loading ...
Page is loading ...
Page is loading ...
-
 1
1
-
 2
2
-
 3
3
-
 4
4
-
 5
5
-
 6
6
-
 7
7
-
 8
8
-
 9
9
-
 10
10
-
 11
11
-
 12
12
-
 13
13
-
 14
14
-
 15
15
-
 16
16
-
 17
17
-
 18
18
-
 19
19
-
 20
20
-
 21
21
-
 22
22
-
 23
23
-
 24
24
-
 25
25
-
 26
26
-
 27
27
-
 28
28
-
 29
29
-
 30
30
-
 31
31
-
 32
32
-
 33
33
-
 34
34
-
 35
35
-
 36
36
-
 37
37
-
 38
38
-
 39
39
-
 40
40
-
 41
41
-
 42
42
-
 43
43
-
 44
44
-
 45
45
-
 46
46
-
 47
47
-
 48
48
-
 49
49
-
 50
50
-
 51
51
-
 52
52
-
 53
53
-
 54
54
-
 55
55
-
 56
56
-
 57
57
-
 58
58
-
 59
59
-
 60
60
-
 61
61
-
 62
62
-
 63
63
-
 64
64
-
 65
65
-
 66
66
-
 67
67
-
 68
68
-
 69
69
-
 70
70
-
 71
71
-
 72
72
-
 73
73
-
 74
74
-
 75
75
-
 76
76
-
 77
77
-
 78
78
-
 79
79
-
 80
80
-
 81
81
-
 82
82
-
 83
83
-
 84
84
-
 85
85
-
 86
86
-
 87
87
-
 88
88
-
 89
89
-
 90
90
-
 91
91
-
 92
92
-
 93
93
-
 94
94
-
 95
95
-
 96
96
-
 97
97
-
 98
98
-
 99
99
-
 100
100
-
 101
101
-
 102
102
-
 103
103
-
 104
104
-
 105
105
-
 106
106
-
 107
107
-
 108
108
-
 109
109
-
 110
110
-
 111
111
-
 112
112
-
 113
113
-
 114
114
-
 115
115
-
 116
116
-
 117
117
-
 118
118
-
 119
119
-
 120
120
-
 121
121
-
 122
122


Sun Microsystems Netra T2000 User guide
- Category
- Servers
- Type
- User guide
Ask a question and I''ll find the answer in the document
Finding information in a document is now easier with AI
Related papers
-
Sun Microsystems SPARC T5220 User manual
-
-
-
-
-
-
-
-
-
Other documents
-
Siemens Security Camera T1000 User manual
-
Fujitsu T2000 User manual
-
Oracle Sun Netra T5440 User manual
-
-
-
Fujitsu SPARC T2000 User manual
-
-
-
-