Sony STR-DN1060/STR-DN860 User manual
- Category
- AV receivers
- Type
- User manual

MULTI CHANNEL AV RECEIVER STR-DN1060/STR-DN860
Parts and Controls
Receiver (STR-DN1060)
Front panel (STR-DN1060) (upper section) [1]
Front panel (STR-DN1060) (lower section) [2]
On/standby indicator (STR-DN1060) [3]
Indicators on the display panel [4]
Rear panel (STR-DN1060) [5]
Receiver (STR-DN860)
Front panel (STR-DN860) (upper section) [6]
Front panel (STR-DN860) (lower section) [7]
On/standby indicator (STR-DN860) [8]
Indicators on the display panel [9]
Rear panel (STR-DN860) [10]
Remote control
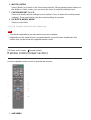
Remote control (upper section) [11]
Remote control (lower section) [12]
Preparation
1. Installing speakers
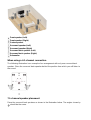
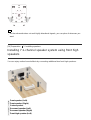
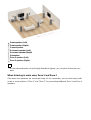
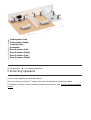
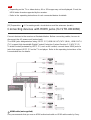
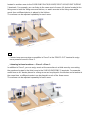
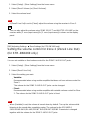
Installing 7.1-channel speaker system using surround back speakers [13]
Installing 7.1-channel speaker system using front high speakers [14]
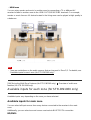
Installing 5.1-channel speaker system [15]
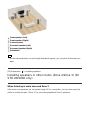
Installing speakers in other rooms (Zone 2/Zone 3) (for STR-DN1060 only) [16]

2. Connecting speakers
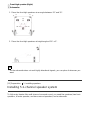
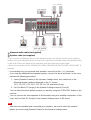
Connecting speakers [17]
Connecting the speakers in Zone 2 and/or Zone 3 (for STR-DN1060 only) [18]
Bi-amplifier connections [19]
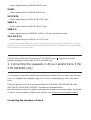
3. Connecting a TV
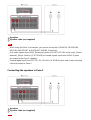
Connecting a TV (for STR-DN1060) [20]
Connecting a TV (for STR-DN860) [21]
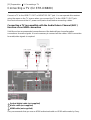
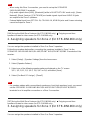
Connecting a 4K TV [22]
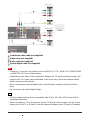
Notes on connecting cables [23]
About HDMI connections [24]
4. Connecting audio-visual devices and the antennas (aerials)
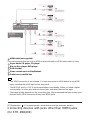
Connecting devices with HDMI jacks (for STR-DN1060) [25]
Connecting devices with HDMI jacks (for STR-DN860) [26]
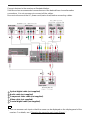
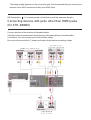
Connecting devices with jacks other than HDMI jacks (for STR-DN1060) [27]
Connecting devices with jacks other than HDMI jacks (for STR-DN860) [28]
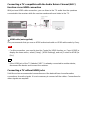
Connecting an iPhone, iPod, or USB device [29]
Connecting an MHL-compatible mobile device [30]
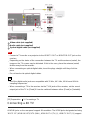
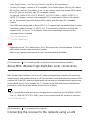
Connecting the antenna (aerial) [31]
Connecting another amplifier in Zone 2 (for STR-DN1060 only) [32]
Connecting another amplifier or TV in the HDMI zone (for STR-DN1060 only) [33]
Digital audio formats supported by the receiver [34]
Notes on connecting cables [35]
About HDMI connections [36]
About MHL (Mobile High-Definition Link) connections [37]
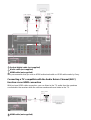
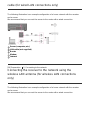
5. Connecting to the network
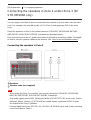
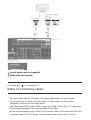
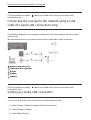
Connecting the receiver to the network using a LAN cable (for wired LAN connections
only) [38]
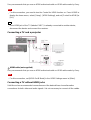
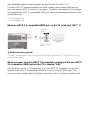
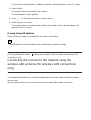
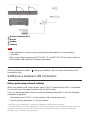
Connecting the receiver to the network using the wireless LAN antenna (for wireless LAN

connections only) [39]
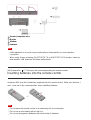
6. Turning on the receiver/preparing the remote control
Inserting batteries into the remote control [40]
Turning on the receiver [41]
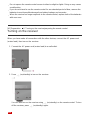
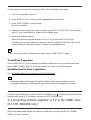
7. Setting up the receiver using Easy Setup
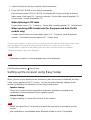
Setting up the receiver using Easy Setup [42]
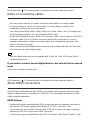
Tips for automatic calibration (Auto Calibration)
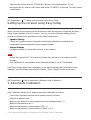
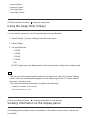
1. About Auto Calibration [43]
2. Before you perform Auto Calibration [44]
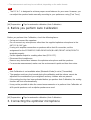
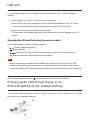
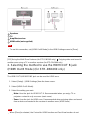
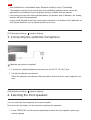
3. Connecting the optimizer microphone [45]
4. Selecting the front speakers [46]
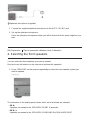
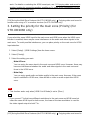
5. Performing Auto Calibration [47]
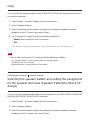
6. Checking Auto Calibration results [48]
Enjoying Video and Sound
Playing AV devices
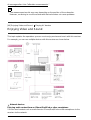
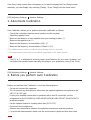
Enjoying Video and Sound [49]
Using the menu on the TV screen [50]
Enjoying video/sound from the connected device [51]
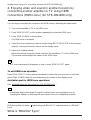
Enjoying sound of an ARC (Audio Return Channel) compatible TV [52]
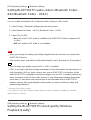
Watching HDCP 2.2 Copyright-protected Content [53]
Playing content from an iPhone/iPad/iPod
Enjoying audio content stored on an iPhone/iPod via the USB port [54]
Enjoying audio content from iTunes or an iPhone/iPad/iPod via the network (AirPlay) [55]
Enjoying audio content using the BLUETOOTH function (Pairing operation) [56]
Compatible iPhone/iPad/iPod models [57]
Notes on iPhone/iPad/iPod [58]

Playing content from a USB device
Enjoying content stored on a USB device [59]
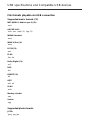
USB specifications and Compatible USB devices [60]
Notes on USB devices [61]
Listening to the radio
Listening to FM radio [62]
Presetting FM radio stations (Preset Memory) [63]
Naming preset stations (Name Input) [64]
Tuning to a station directly (Direct Tuning) [65]
Receiving RDS broadcasts (for European and Asia-Pacific models only) [66]
Enjoying sound effects
Selecting a sound field (Sound Field) [67]
Resetting sound fields to the default settings [68]
Adjusting the equalizer (Equalizer) [69]
Enjoying clear and dynamic sound at a low volume (Sound Optimizer) [70]
Enjoying more natural sound with speakers installed in the ceiling (In-Ceiling Speaker
Mode) [71]
Enjoying high-fidelity sound (Pure Direct) [72]
Displaying the mobile device display on the TV screen (Screen
mirroring)
Displaying the mobile device display on the TV screen (Screen mirroring) [73]
Using Network Features
About network features
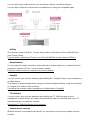
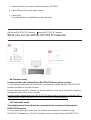
What you can do with network features [74]
Setting up a wired LAN connection (for wired LAN connections only)

Connecting the receiver to the network using a LAN cable (for wired LAN connections
only) [75]
Setting up a wired LAN connection [76]
Setting up a wireless LAN connection (for wireless LAN connections
only)
Connecting the receiver to the network using the wireless LAN antenna (for wireless LAN
connections only) [77]
Setting up a wireless LAN connection [78]
Enjoying content stored on a server on the home network
Enjoying content stored on a server on the home network [79]
Deleting a server from the server list [80]
Setting whether to control this receiver from a controller device on the home network
(Renderer Access Control) [81]
Enjoying audio content from iTunes or an iPhone/iPad/iPod via the
network (AirPlay)
Compatible iPhone/iPad/iPod models [82]
Enjoying audio content from iTunes or an iPhone/iPad/iPod via the network (AirPlay) [83]
Enjoying internet music services
Enjoying music services offered on the Internet [84]
Using “SongPal” to control the receiver from a smartphone or tablet
device
Controlling the receiver using a smartphone or tablet device (SongPal) [85]
Listening to the same music on multiple devices/Listening to different music in a different
location (SongPal Link) [86]
Using TV SideView to control the receiver from a smartphone or tablet
device
Registering TV SideView device to the receiver [87]

Checking the registered TV SideView device (Registered Remote Devices) [88]
Deleting TV SideView device from device list [89]
Using Google Cast™ to enjoy audio content from a smartphone or tablet
device
Using Google Cast™ to enjoy audio content from a smartphone or tablet device [90]
Setting whether to control this receiver from a device on the home
network
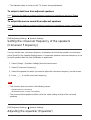
Setting whether to control this receiver from a controller device on the home network
(Renderer Access Control) [91]
Enabling automatic access from a newly detected controller device (Auto Renderer
Access Permission) [92]
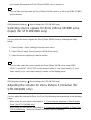
Deleting devices from the device list in Renderer Access Control [93]
Using BLUETOOTH Features
About BLUETOOTH Features
What you can do with BLUETOOTH features [94]
Enjoying audio content stored on a BLUETOOTH device
Enjoying audio content stored on a BLUETOOTH device with a one-touch connection
(NFC) [95]
Enjoying audio content using the BLUETOOTH function (Pairing operation) [96]
Controlling a BLUETOOTH device using the remote control [97]
Compatible BLUETOOTH version and profiles [98]
Listening with BLUETOOTH headphones
Listening with BLUETOOTH headphones (Pairing operation) [99]
Compatible BLUETOOTH version and profiles [100]
Using “SongPal” to control the receiver from a smartphone or tablet
device

Controlling the receiver using a smartphone or tablet device (SongPal) [101]
Listening to the same music on multiple devices/Listening to different music in a different
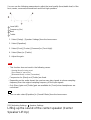
location (SongPal Link) [102]
Using the Multi-Zone Features (for STR-DN1060 only)
Overview of multi-zone features (for STR-DN1060 only)
What you can do with multi-zone features (for STR-DN1060 only) [103]
Available inputs for each zone (for STR-DN1060 only) [104]
Enjoying sound from speakers located in other rooms (for STR-DN1060
only)
1. Connecting the speakers in Zone 2 and/or Zone 3 (for STR-DN1060 only) [105]
2. Assigning speakers for Zone 2 (for STR-DN1060 only) [106]
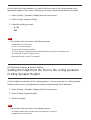
3. Assigning speakers for Zone 3 (for STR-DN1060 only) [107]
4. Enjoying sound in Zone 2 and/or Zone 3 (for STR-DN1060 only) [108]
Enjoying sound from speakers located in other rooms using another
amplifier (for STR-DN1060 only)
1. Connecting another amplifier in Zone 2 (for STR-DN1060 only) [109]
2. Setting the volume control for Zone 2 (Zone2 Line Out) (for STR-DN1060 only) [110]
3. Enjoying sound using another amplifier in Zone 2 (for STR-DN1060 only) [111]
Enjoying video and sound in another room using a TV or another
receiver (for STR-DN1060 only)
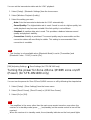
1. Connecting another amplifier or TV in the HDMI zone (for STR-DN1060 only) [112]
2. Selecting the method to use the HDMI OUT B jack (HDMI Out B Mode) (for STR-
DN1060 only) [113]
3. Setting the priority for the main zone (Priority) (for STR-DN1060 only) [114]
4. Enjoying video and sound in another location by connecting another amplifier or TV
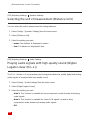
using HDMI connections (HDMI zone) (for STR-DN1060 only) [115]

Using Other Features
Interlocking with BRAVIA TV and other devices (“BRAVIA” Sync)
What is “BRAVIA” Sync? [116]
Preparing for “BRAVIA” Sync [117]
Enjoying an input source from a connected device immediately (One-Touch Play) [118]
Enjoying TV sound from the speakers connected to the receiver (System Audio Control)
[119]
Turning off the receiver and connected devices simultaneously with the TV (System
Power-Off) [120]
Selecting the optimum picture quality and sound field automatically (Scene Select) [121]
About Home Theatre Control [122]
Operating the receiver menu using the TV remote control (Remote Easy Control) [123]
About Controlling MHL devices [124]
Enjoying video and sound with your desired way of use
Switching the monitors that output the HDMI video signals (for STR-DN1060 only) [125]
Switching between digital and analog audio (Input Mode) [126]
Using other video/audio input jacks (Input Assign) [127]
Saving and recalling various settings for the receiver (Custom Preset)
About Custom Preset [128]
Saving the settings to a preset [129]
Recalling the settings saved to the scene [130]
Items for which you can save settings and the default values for each item [131]
Using the sleep timer
Using the sleep timer (Sleep) [132]
Checking information on the receiver
Viewing information on the display panel [133]

Adjusting Settings
Easy Setup
Setting up the receiver using Easy Setup [134]
Speaker Settings
1. About Auto Calibration [135]
2. Before you perform Auto Calibration [136]
3. Connecting the optimizer microphone [137]
4. Selecting the front speakers [138]
5. Performing Auto Calibration [139]
6. Checking Auto Calibration results [140]
Calibrating the phase characteristics of the speakers (A.P.M. (Automatic Phase
Matching)) [141]
Selecting the Auto Calibration type (Calibration Type) [142]
Setting how to assign the surround speaker terminals (Speaker Pattern/Surround SP
Assign) (for STR-DN1060 only) [143]
Selecting the speaker pattern and setting the assignment for the speaker terminals
(Speaker Pattern/Sur Back SP Assign) [144]
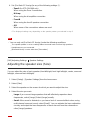
Adjusting the speaker size (Size) [145]
Adjusting the speaker distance (Distance) [146]
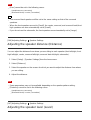
Adjusting the speaker level (Level) [147]
Outputting a test tone from each speaker (Test Tone) [148]
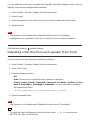
Setting the crossover frequency of the speakers (Crossover Frequency) [149]
Adjusting the equalizer (Equalizer) [150]
Lifting up the sound of the center speaker (Center Speaker Lift Up) [151]
Setting the height from the floor to the ceiling speakers (Ceiling Speaker Height) [152]
Selecting the unit of measurement (Distance Unit) [153]
Audio Settings
Playing audio signals with high-quality sound (Digital Legato Linear (D.L.L.)) [154]
Enjoying clear and dynamic sound at a low volume (Sound Optimizer) [155]
Selecting a sound field (Sound Field) [156]

Selecting the HD-D.C.S. effect type (HD-D.C.S. Type) [157]
Enjoying more natural sound with speakers installed in the ceiling (In-Ceiling Speaker
Mode) [158]
Enjoying high-fidelity sound (Pure Direct) [159]
Setting the low-pass filter for the subwoofer output (Subwoofer Low Pass Filter) [160]
Synchronizing audio with video output (A/V Sync) [161]
Time-aligning the LFE (low frequency effect) channel (LFE Time Alignment) [162]
Adjusting the volume automatically (Advanced Auto Volume) [163]
Selecting the language of digital broadcasts (Dual Mono) [164]
Compressing the dynamic range (Dynamic Range Compressor) [165]
Screen Settings
Setting the screen aspect ratio of the TV (TV Type) [166]
Outputting 24p video signals when watching content from other networks (Network
content 24p Output) [167]
Enjoying 4K content (4K Output) [168]
Setting the color space conversion for the video signal from HDMI jacks (YCbCr/RGB
(HDMI)) [169]
Outputting the Deep Color video signal from HDMI jacks (HDMI Deep Color Output) [170]
Smoothing the gradation of video signals (SBM (Super Bit Mapping)) [171]
HDMI Settings
Upscaling video signals to 4K (HDMI In 4K Scaling) [172]
Controlling HDMI devices (Control for HDMI) [173]
Passing HDMI signals through (Standby Through) [174]
Setting the HDMI audio signal output of connected devices (Audio Out) [175]
Setting the level of the subwoofer (Subwoofer Level) [176]
Selecting the method to use the HDMI OUT B jack (HDMI Out B Mode) (for STR-DN1060
only) [177]
Setting the priority for the main zone (Priority) (for STR-DN1060 only) [178]
Speeding up the display when switching the HDMI input (Fast View) [179]
Automatically switching the input when an MHL device is connected or being played
(MHL Auto Input) [180]

Input Settings
Changing the assignment and display for the input jacks [181]
Changing the name for each input (Name) [182]
Network Settings
Setting up a wired LAN connection [183]
Setting up a wireless LAN connection [184]
Checking the network connection status (Network Connection Status) [185]
Checking whether the network connection has been made properly (Network Connection
Diagnostics) [186]
Setting the priority radio frequency channel for Screen mirroring (Screen mirroring RF
Setting) [187]
Displaying the connected home network server (Connection Server Settings) [188]
Enabling automatic access from a newly detected controller device (Auto Renderer
Access Permission) [189]
Setting whether to control this receiver from a controller device on the home network
(Renderer Access Control) [190]
Checking the registered TV SideView device (Registered Remote Devices) [191]
Enabling the network function even when this receiver is in standby mode (Remote Start)
[192]
Turning on the control mode for maintenance (External Control) [193]
Bluetooth Settings
Selecting the BLUETOOTH mode (Bluetooth Mode) [194]
Checking the BLUETOOTH device list (Device List) [195]
Setting the Bluetooth Standby mode (Bluetooth Standby) [196]
Setting BLUETOOTH audio codecs (Bluetooth Codec - AAC/Bluetooth Codec - LDAC)
[197]
Setting the BLUETOOTH sound quality (Wireless Playback Quality) [198]
Zone Settings (for STR-DN1060 only)
Turning the power for Zone 2/Zone 3/HDMI zone on/off (Power) (for STR-DN1060 only)
[199]

Selecting source signals for Zone 2/Zone 3/HDMI zone (Input) (for STR-DN1060 only)
[200]
Adjusting the volume for Zone 2/Zone 3 (Volume) (for STR-DN1060 only) [201]
Setting the volume control for Zone 2 (Zone2 Line Out) (for STR-DN1060 only) [202]
System Settings
Selecting the language (Language) (for USA, Canadian, European and Australian models
only) [203]
Tuning on/off the display for the volume level or sound field (Auto Display) [204]
Reducing the startup time (Quick Start/Network Standby) (for USA, Canadian and Asia-
Pacific models only) [205]
Setting standby mode (Auto Standby) [206]
Switching the brightness of the display panel (Dimmer) [207]
Using the sleep timer (Sleep) [208]
Receiving information on newer software (Software Update Notification) [209]
Deleting personal data (Initialize Personal Information) [210]
Assigning a name to the receiver (Device Name) [211]
Checking the software version and MAC address of the receiver (System Information)
[212]
Checking software license information (Software License Information) [213]
Updating the software automatically (Auto Update Settings) [214]
Updating the software (Software Update) [215]
Using the menu on the display panel
Operating the receiver with the menu on the display panel [216]
Viewing information on the display panel [217]
Reverting to the factory default settings
Reverting to the factory default settings [218]
Troubleshooting
Error messages

PROTECTOR [219]
An over-current from the USB port was detected. [220]
List of messages after Auto Calibration measurements [221]
General
The receiver is turned off automatically. [222]
Cannot find an available input when connecting several digital devices. [223]
Image
No image appears on the TV. [224]
No 3D image appears on the TV. [225]
No 4K image appears on the TV. [226]
No image is output from the TV when the receiver is in standby mode. [227]
The home menu does not appear on the TV screen. [228]
The display panel is turned off. [229]
Sound
No sound or only a very low level of sound is heard, no matter which device is selected.
[230]
There is severe humming or noise. [231]
No sound or only a very low level of sound is heard from specific speakers. [232]
There is no sound from a specific device. [233]
There is no sound from the TV via the HDMI OUT (ARC) jack when using the Audio
Return Channel function. [234]
The left and right sound is unbalanced or reversed. [235]
Dolby Digital or DTS multi-channel sound is not reproduced. [236]
The surround effect cannot be obtained. [237]
A test tone is not output from the speakers. [238]
A test tone is output from a different speaker than the speaker displayed on the TV
screen. [239]
No sound is output from the TV when the receiver is in standby mode. [240]
Tuner

The FM reception is poor. [241]
The FM stereo reception is poor. [242]
You cannot tune to radio stations. [243]
RDS does not work (for European and Asia-Pacific models only). [244]
The RDS information that you want does not appear (for European and Asia-Pacific
models only). [245]
iPhone/iPad/iPod
The sound is distorted. [246]
There is no sound from an iPhone/iPod. [247]
An iPhone/iPad/iPod cannot be charged. [248]
An iPhone/iPad/iPod cannot be operated. [249]
The ringtone volume of an iPhone does not change. [250]
USB devices
Are you using a compatible USB device? [251]
There is noise, skipping, or distorted sound. [252]
A USB device is not recognized. [253]
Playback does not start. [254]
A USB device cannot be connected to the USB port. [255]
Erroneous display. [256]
An audio file cannot be played. [257]
Network connection
Cannot connect to the network using WPS via a wireless LAN connection. [258]
Cannot connect to the network. [259]
Cannot control the receiver using a “SongPal” device. [260]
Cannot control the receiver using a TV SideView device. [261]
Cannot select the Network Settings menu. [262]
Home Network
Cannot connect to the network. [263]

A server does not appear in the server list. ([Cannot find the server.] appears on the TV
screen.) [264]
Playback does not start, or the player does not automatically proceed to the next track or
file. [265]
The sound skips during playback. [266]
[No playable file in this category.] appears. [267]
Cannot play copyrighted files. [268]
Cannot select a previously selected track. [269]
Controller devices or applications on the home network cannot connect to the receiver.
[270]
The receiver cannot be turned on by devices on a network. [271]
AirPlay
The receiver cannot be found from an iPhone/iPad/iPod or iTunes. [272]
The sound skips. [273]
The receiver cannot be operated. [274]
Music Services
Cannot connect the receiver to a service. [275]
The sound skips. [276]
BLUETOOTH device
Pairing cannot be done. [277]
Cannot make a BLUETOOTH connection. [278]
The sound skips or fluctuates, or the connection is lost. [279]
The sound of your BLUETOOTH device cannot be heard on the receiver. [280]
Severe humming or noise. [281]
Cannot control the receiver using a “SongPal” device. [282]
“BRAVIA” Sync (Control for HDMI)
The Control for HDMI function does not work. [283]
TV sound cannot be heard from the speakers connected to the receiver. [284]
An MHL-compatible source device cannot be charged. [285]

No image from an MHL-compatible source device. [286]
Remote control
The remote control does not function. [287]
If the problem is not solved
Reverting to the factory default settings [288]
Resetting sound fields to the default settings [289]
Customer support websites [290]
Other Information
Trademarks
Trademarks [291]
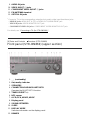
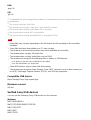
[1] Parts and Controls Receiver (STR-DN1060)
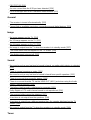
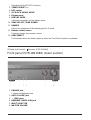
Front panel (STR-DN1060) (upper section)
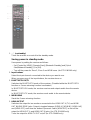
1. (on/standby)
2. On/standby indicator
3. SPEAKERS
4. CONNECTION PAIRING BLUETOOTH

Operates the BLUETOOTH function.
5. TUNER PRESET +/–
6. NFC sensor
7. A.F.D./2CH, MOVIE, MUSIC
8. Display panel
9. DISPLAY MODE
Switches information on the display panel.
10. ZONE SELECT, ZONE POWER
11. DIMMER
Adjusts the brightness of the display panel in 3 levels.
12. Remote control sensor
Receives signals from remote control.
13. PURE DIRECT
The indicator above the button lights up when the Pure Direct function is activated.
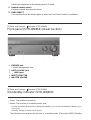
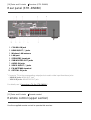
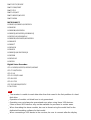
[2] Parts and Controls Receiver (STR-DN1060)
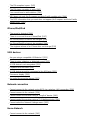
Front panel (STR-DN1060) (lower section)
1. PHONES jack
Connect headphones here.
2. AUTO CAL MIC jack
3. (USB) port
4. HDMI/MHL (VIDEO 2 IN) jack
5. INPUT SELECTOR
6. MASTER VOLUME

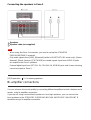
[3] Parts and Controls Receiver (STR-DN1060)
On/standby indicator (STR-DN1060)
Green: The receiver is turned on.
Amber: The receiver is in standby mode, and:
[Control for HDMI], [Remote Start], [Bluetooth Standby] (*) or [Quick Start/Network Standby] (**) is
set to [On].
[Standby Through] is set to [On] or [Auto].
Power for Zone 2/3 or HDMI zone is set to [On].
The indicator turns off when the receiver is in standby mode, [Control for HDMI], [Standby
Through], [Remote Start], [Bluetooth Standby] (*) and [Quick Start/Network Standby] (**)
are set to [Off], and the power for all zones is set to [Off].
* When [Bluetooth Standby] is activated, the indicator only lights in amber when a device has
been paired with the receiver. If there are no devices paired with the receiver, the indicator turns
off when the receiver is in standby mode.
** For USA, Canadian and Asia-Pacific models only.
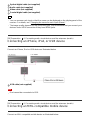
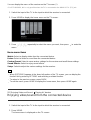
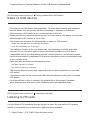
[4] Parts and Controls Receiver (STR-DN1060)
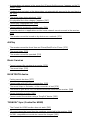
Indicators on the display panel
1. Input indicator
Lights up to indicate the current input.
HDMI
The receiver recognizes devices connected via an HDMI IN jack.
ARC
TV input is selected and Audio Return Channel (ARC) signals are detected.
COAX
Digital signals are input through the COAXIAL jack.
OPT
Digital signals are input through the OPTICAL jack.

2. S.OPTIMIZER
Lights up when the Sound Optimizer function is activated.
3. D.C.A.C.
Lights up when the measurement results of the Auto Calibration function are applied.
4. Dolby Digital Surround indicator
The applicable indicator lights up when the receiver is decoding the corresponding
Dolby Digital format signals.
: Dolby Digital
TrueHD: Dolby TrueHD
5. DTS(-HD) indicator
The applicable indicator lights up when the receiver is decoding the corresponding DTS
format signals.
DTS: DTS
DTS-HD: DTS-HD
6. Speaker system indicator
7. Tuning indicator
ST
Lights up when the receiver tunes to a stereo broadcast.
8. HDMI OUT A + B (for STR-DN1060 only)
9. SLEEP
Lights up when the sleep timer is activated.
10. EQ
Lights up when the equalizer is activated.
11. D.L.L.
Lights up when the Digital Legato Linear (D.L.L.) function is activated.
12. D.R.C.
Lights up when dynamic range compression is activated.
13. NEO:6
Lights up when DTS Neo:6 Cinema/Music decoding is activated.
14. Dolby Pro Logic indicator
The applicable indicator lights up when the receiver performs Dolby Pro Logic
processing. This matrix surround decoding technology can enhance input signals.
PL: Dolby Pro Logic
PLII: Dolby Pro Logic II
PLIIx: Dolby Pro Logic IIx
15. ZONE, ZONE2, ZONE3 (for STR-DN1060 only)
ZONE2, ZONE3 or both light up while the power to the corresponding zone is on.
ZONE and HDMI OUT light up when the power for HDMI zone is on.
16. A.P.M.
Lights up when the A.P.M. (Automatic Phase Matching) function is activated. You can
only set the A.P.M. function in the D.C.A.C. (Digital Cinema Auto Calibration) function.
17. UPDATE
Lights up when new software is available.

18. Wireless LAN signal strength indicator
Lights up to show the strength of the wireless LAN signal.
: No signal.
: Weak signal.
: Moderate signal.
: Strong signal.
19. BT
Lights up when a BLUETOOTH device is connected. Flashes while connecting.
20. Wired LAN indicator
Lights up when a LAN cable is connected.
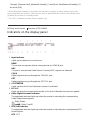
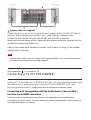
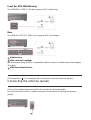
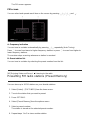
[5] Parts and Controls Receiver (STR-DN1060)
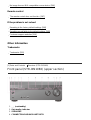
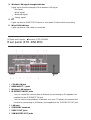
Rear panel (STR-DN1060)
1. COAXIAL IN jack
2. HDMI IN/OUT (*) jacks
3. Wireless LAN antenna
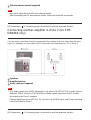
4. IR REMOTE IN/OUT jacks
You can control the receiver from a distance by connecting an IR repeater (not
supplied) to the IR REMOTE IN jack.
You can start or stop playback of devices such as a CD player connected to the
receiver by connecting an IR Blaster (not supplied) to the IR REMOTE OUT jack.
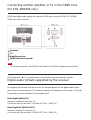
5. LAN port
6. SPEAKERS terminals
7. ZONE 2 OUT jacks
8. SUBWOOFER OUT jacks
Page is loading ...
Page is loading ...
Page is loading ...
Page is loading ...
Page is loading ...
Page is loading ...
Page is loading ...
Page is loading ...
Page is loading ...
Page is loading ...
Page is loading ...
Page is loading ...
Page is loading ...
Page is loading ...
Page is loading ...
Page is loading ...
Page is loading ...
Page is loading ...
Page is loading ...
Page is loading ...
Page is loading ...
Page is loading ...
Page is loading ...
Page is loading ...
Page is loading ...
Page is loading ...
Page is loading ...
Page is loading ...
Page is loading ...
Page is loading ...
Page is loading ...
Page is loading ...
Page is loading ...
Page is loading ...
Page is loading ...
Page is loading ...
Page is loading ...
Page is loading ...
Page is loading ...
Page is loading ...
Page is loading ...
Page is loading ...
Page is loading ...
Page is loading ...
Page is loading ...
Page is loading ...
Page is loading ...
Page is loading ...
Page is loading ...
Page is loading ...
Page is loading ...
Page is loading ...
Page is loading ...
Page is loading ...
Page is loading ...
Page is loading ...
Page is loading ...
Page is loading ...
Page is loading ...
Page is loading ...
Page is loading ...
Page is loading ...
Page is loading ...
Page is loading ...
Page is loading ...
Page is loading ...
Page is loading ...
Page is loading ...
Page is loading ...
Page is loading ...
Page is loading ...
Page is loading ...
Page is loading ...
Page is loading ...
Page is loading ...
Page is loading ...
Page is loading ...
Page is loading ...
Page is loading ...
Page is loading ...
Page is loading ...
Page is loading ...
Page is loading ...
Page is loading ...
Page is loading ...
Page is loading ...
Page is loading ...
Page is loading ...
Page is loading ...
Page is loading ...
Page is loading ...
Page is loading ...
Page is loading ...
Page is loading ...
Page is loading ...
Page is loading ...
Page is loading ...
Page is loading ...
Page is loading ...
Page is loading ...
Page is loading ...
Page is loading ...
Page is loading ...
Page is loading ...
Page is loading ...
Page is loading ...
Page is loading ...
Page is loading ...
Page is loading ...
Page is loading ...
Page is loading ...
Page is loading ...
Page is loading ...
Page is loading ...
Page is loading ...
Page is loading ...
Page is loading ...
Page is loading ...
Page is loading ...
Page is loading ...
Page is loading ...
Page is loading ...
Page is loading ...
Page is loading ...
Page is loading ...
Page is loading ...
Page is loading ...
Page is loading ...
Page is loading ...
Page is loading ...
Page is loading ...
Page is loading ...
Page is loading ...
Page is loading ...
Page is loading ...
Page is loading ...
Page is loading ...
Page is loading ...
Page is loading ...
Page is loading ...
Page is loading ...
Page is loading ...
Page is loading ...
Page is loading ...
Page is loading ...
Page is loading ...
Page is loading ...
Page is loading ...
Page is loading ...
Page is loading ...
Page is loading ...
Page is loading ...
Page is loading ...
Page is loading ...
Page is loading ...
Page is loading ...
Page is loading ...
Page is loading ...
Page is loading ...
Page is loading ...
Page is loading ...
Page is loading ...
Page is loading ...
Page is loading ...
Page is loading ...
Page is loading ...
Page is loading ...
Page is loading ...
Page is loading ...
Page is loading ...
Page is loading ...
Page is loading ...
Page is loading ...
Page is loading ...
Page is loading ...
Page is loading ...
Page is loading ...
Page is loading ...
Page is loading ...
Page is loading ...
Page is loading ...
Page is loading ...
Page is loading ...
Page is loading ...
Page is loading ...
Page is loading ...
Page is loading ...
Page is loading ...
Page is loading ...
Page is loading ...
Page is loading ...
Page is loading ...
Page is loading ...
Page is loading ...
Page is loading ...
Page is loading ...
Page is loading ...
Page is loading ...
Page is loading ...
Page is loading ...
Page is loading ...
Page is loading ...
Page is loading ...
Page is loading ...
Page is loading ...
Page is loading ...
Page is loading ...
Page is loading ...
Page is loading ...
Page is loading ...
Page is loading ...
Page is loading ...
-
 1
1
-
 2
2
-
 3
3
-
 4
4
-
 5
5
-
 6
6
-
 7
7
-
 8
8
-
 9
9
-
 10
10
-
 11
11
-
 12
12
-
 13
13
-
 14
14
-
 15
15
-
 16
16
-
 17
17
-
 18
18
-
 19
19
-
 20
20
-
 21
21
-
 22
22
-
 23
23
-
 24
24
-
 25
25
-
 26
26
-
 27
27
-
 28
28
-
 29
29
-
 30
30
-
 31
31
-
 32
32
-
 33
33
-
 34
34
-
 35
35
-
 36
36
-
 37
37
-
 38
38
-
 39
39
-
 40
40
-
 41
41
-
 42
42
-
 43
43
-
 44
44
-
 45
45
-
 46
46
-
 47
47
-
 48
48
-
 49
49
-
 50
50
-
 51
51
-
 52
52
-
 53
53
-
 54
54
-
 55
55
-
 56
56
-
 57
57
-
 58
58
-
 59
59
-
 60
60
-
 61
61
-
 62
62
-
 63
63
-
 64
64
-
 65
65
-
 66
66
-
 67
67
-
 68
68
-
 69
69
-
 70
70
-
 71
71
-
 72
72
-
 73
73
-
 74
74
-
 75
75
-
 76
76
-
 77
77
-
 78
78
-
 79
79
-
 80
80
-
 81
81
-
 82
82
-
 83
83
-
 84
84
-
 85
85
-
 86
86
-
 87
87
-
 88
88
-
 89
89
-
 90
90
-
 91
91
-
 92
92
-
 93
93
-
 94
94
-
 95
95
-
 96
96
-
 97
97
-
 98
98
-
 99
99
-
 100
100
-
 101
101
-
 102
102
-
 103
103
-
 104
104
-
 105
105
-
 106
106
-
 107
107
-
 108
108
-
 109
109
-
 110
110
-
 111
111
-
 112
112
-
 113
113
-
 114
114
-
 115
115
-
 116
116
-
 117
117
-
 118
118
-
 119
119
-
 120
120
-
 121
121
-
 122
122
-
 123
123
-
 124
124
-
 125
125
-
 126
126
-
 127
127
-
 128
128
-
 129
129
-
 130
130
-
 131
131
-
 132
132
-
 133
133
-
 134
134
-
 135
135
-
 136
136
-
 137
137
-
 138
138
-
 139
139
-
 140
140
-
 141
141
-
 142
142
-
 143
143
-
 144
144
-
 145
145
-
 146
146
-
 147
147
-
 148
148
-
 149
149
-
 150
150
-
 151
151
-
 152
152
-
 153
153
-
 154
154
-
 155
155
-
 156
156
-
 157
157
-
 158
158
-
 159
159
-
 160
160
-
 161
161
-
 162
162
-
 163
163
-
 164
164
-
 165
165
-
 166
166
-
 167
167
-
 168
168
-
 169
169
-
 170
170
-
 171
171
-
 172
172
-
 173
173
-
 174
174
-
 175
175
-
 176
176
-
 177
177
-
 178
178
-
 179
179
-
 180
180
-
 181
181
-
 182
182
-
 183
183
-
 184
184
-
 185
185
-
 186
186
-
 187
187
-
 188
188
-
 189
189
-
 190
190
-
 191
191
-
 192
192
-
 193
193
-
 194
194
-
 195
195
-
 196
196
-
 197
197
-
 198
198
-
 199
199
-
 200
200
-
 201
201
-
 202
202
-
 203
203
-
 204
204
-
 205
205
-
 206
206
-
 207
207
-
 208
208
-
 209
209
-
 210
210
-
 211
211
-
 212
212
-
 213
213
-
 214
214
-
 215
215
-
 216
216
-
 217
217
-
 218
218
-
 219
219
-
 220
220
-
 221
221
-
 222
222
-
 223
223
-
 224
224
-
 225
225
-
 226
226
-
 227
227
-
 228
228
-
 229
229
-
 230
230
-
 231
231
-
 232
232


Sony STR-DN1060/STR-DN860 User manual
- Category
- AV receivers
- Type
- User manual
Ask a question and I''ll find the answer in the document
Finding information in a document is now easier with AI
Related papers
-
Sony STR-DN1080 User manual
-
-
Sony STR-DN860 Reference guide
-
Sony STR-DN1070 Operating instructions
-
-
-
Sony STRDN1080 User manual
-
-
Sony STR-DN1040 User manual
-