Page is loading ...

•
C
A
L
I
D
A
D
D
E
S
D
E
1
9
6
7
•
Q
U
A
L
I
T
Y
S
I
N
C
E
1
9
6
7
•
Q
U
A
L
I
T
E
D
E
P
U
I
S
1
9
6
7
•
L
I
M
I
T
E
D
W
A
R
R
A
N
T
Y
•
G
A
R
A
N
T
I
E
L
I
M
I
T
É
E
•
G
A
R
A
N
T
Í
A
L
I
M
I
T
A
D
A
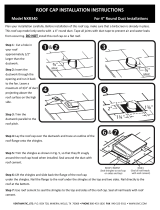
Extend duct to its full length, and position, cut and discard any excess.
Note:
Keep duct as straight as possible for maximum air flow and least
restrictions, while providing for easy maintenance.
Estire el conducto a su longitud total y colóquelo en posición corte y
deseche cualquier sobrante.
Nota:
Mantenga el conducto lo más recto posible para un máximo flujo
de aire y un mínimo de restricciones a la vez que facilita el
mantenimiento.
Attach one end of flexible duct to exhaust outlet pipe using clamp (Not
Included) and tighten.
Acople un extremo del tuberias flexibles a la salida de escape usando la
abrazadera que se incluye (no se incluyen) y apriétela.
Attach the other end of flexible duct to vent collar using supplied clamp
and tighten.
Acople el otro extremo del tuberias flexibles a la tubería de la ventila
usando la abrazadera y apriétela.
1
2
Installation Instructions:
Check and comply with local building codes.
Instrucciones de instalación:
Revise y cumpla los codigos locales de construccion.
3

d. Firmly press the roof cap flange downward within the markings made in step 6, being careful to
assure a complete seal of the applied adhesive sealant.
CAUTION
DURING PERFORMANCE OF THE FOLLOWING STEP, MAKE CERTAIN THAT
ZINC COATED/GALVANIZED STEEL ROOFING NAILS OF THE PROPER
LENGTH ARE USED TO SECURE THE ROOF CAP. KEEP ALL OTHER NAILS
AT LEAST 2 INCHES AWAY FROM THE PERIMETER OF THE ROOF CAP TO
AVOID DAMAGING THE ROOF CAP OR SHINGLES.
e. Drive the large-head roofing nails into the center of the mounting holes in the roof cap
flange until the nails just touch the flange. Driving the nails by that amount will leave the
roof in a “just- snug” fit under the nail heads. Securing the roof cap with a just snug fit
will allow for expansion and contraction movement of the roof cap hood.
10. Cut or size the shingles that will cover the sides of the roof cap flange, making certain that the
leading edge of the shingles will overhang the flange’s front mounting nail holes or slots by at
least ½-inch when the shingle courses are laid. (See Figure 2.) Make certain that, when
installed, the shingles will fully cover the mounting nails in order to avoid future rust bleeding
onto shingles. If any nail head or portion of a nail head cannot be covered, coat it with asphalt
cement.
11. Apply a continuous 1/4- to 3/8-inch diameter bead of adhesive sealant to the textured surfaces
that are located at the sides and rear of the hood on the upper side of the roof cap flange. Be
careful to maintain the bead of adhesive sealant within the textured surfaces in order to avoid
damaging the rain gutters. (See Figure 1.) Make certain that sufficient adhesive sealant bead
is applied between the upper textured surfaces of the roof cap flange and the shingles to
prevent water seepage into unprotected portions of the roof below.
12. Keeping the gap between the shingle and the boss of the roof cap hood even on both sides,
press the shingles down on the roof cap flange at the sides of the boss firmly enough to ensure
a good seal.
13. Cut or size the shingle(s) that will cover the rear of the roof cap flange.
14. Press down the shingle(s) on the rear of the roof cap flange firmly enough
to ensure a good seal.
15.
Apply a continuous bead of adhesive sealant along the gap between the boss of the roof cap hood and the shingles to provide a
final seal. If necessary, seal shingles at the edges of the overlap. For maximum long-term protection against weather
elements, use an additional leak barrier material such as Peel and Seal®. Peel and Seal® is a registered trademark of MFM
Building Products Corporation. It is suggested as an example, only. Consult your building products distributor for product
information.
© Lambro Industries, Inc. 354-359 & 371 INST, REV G
LAMBRO INDUSTRIES, INC.
115 ALBANY AVENUE
AMITYVILLE, NY 11701
(631) 842-8088 FAX (631) 842-8083
US AND CANADA (800) 645-2860
4
PLASTIC ROOF CAP MODELS #354, #355,
#356, #357, #358, #359 & #371 INSTALLATION INSTRUCTIONS
© Lambro Industries, Inc.
354-359 & 371 INST , REV G
WARNING
USE EXTREME CAUTION WHEN WORKING ON OR INSTALLING THE
ROOF CAP. DO NOT WORK ON A WET OR SLIPPERY ROOF. MAKE
CERTAIN THAT SOMEONE IS WITH YOU IN ORDER TO RENDER AID OR
CALL FOR ASSISTANCE OR MEDICAL HELP, IF NEEDED.
CAUTION
INSTALL ROOF CAPS COVERED BY THESE INSTRUCTIONS ON
STANDARD ASPHALT SHINGLE TYPE ROOFING WITH 3" IN 12" RISE,
(1/8-PITCH) SLOPES, OR GREATER (MINIMUM) TO A MAXIMUM OF 75°
WHERE THE FLAPPER CLOSES BY GRAVITY IN ITS MOUNTED
POSITION (MANSARD TYPE ROOFS). MAKE CERTAIN THAT THE ROOF
CAP MODEL BEING INSTALLED IS THE SAME AS THE MODEL
ILLUSTRATED IN THESE INSTRUCTIONS AND THAT THE ROOF CAP
INSTALLATION COMPLIES WITH APPLICABLE BUILDING
SPECIFICATIONS AND CODES. IMPROPER INSTALLATION OF A NEW
OR REPLACEMENT ROOF CAP OR USING THESE INSTRUCTIONS FOR
ANY ROOF CAP MODEL NOT COVERED BY THESE INSTRUCTIONS
CAN CAUSE SUBSTANTIAL LOSS OF OR DAMAGE TO PROPERTY. IF
YOU ARE NOT CERTAIN OF THE PROCEDURES THAT ARE REQUIRED
TO INSTALL THE ROOF CAP SAFELY AND PROPERLY, CONSULT A
PROFESSIONAL ROOFING CONTRACTOR. IF THE ROOF CAP IS BEING
INSTALLED OR REPLACED ON AN EXISTING SHINGLE ROOF, MAKE
CERTAIN THAT SHINGLES AND ANY OTHER ROOFING MATERIALS
ARE NOT DAMAGED BEFORE OR DURING ROOF CAP INSTALLATION.
IF NEW SHINGLES ARE BEING APPLIED OVER OLDER SHINGLES,
TREAT THE OLDER SHINGLES AS THE DECKING SURFACE; THAT IS,
REPLACE OR REPAIR
OLDER SHINGLES, AS NECESSARY, TO
ENSURE PROPER PLACEMENT OF NEW SHINGLES .
MATERIALS REQUIRED FOR INSTALLATION
1. Large-head, Zinc Coated/Galvanized Steel Roofing Nails long enough to penetrate fully
and to hold the roof cap to the roof deck securely. Serrated nails are preferred.
2. Adhesive Asphalt Sealant. Asphalt plastic roofing cement in accordance with ASTM 4586, Type I
or II, or equivalent, is recommended. Consult the shingle manufacturer for compatibility of the
selected adhesive sealant with the roofing shingles and material used in this application.
3. Roof decking strong enough to support the roof cap and attaching nails securely.
1

INSTALLATION PROCEDURE
1. Establish the location for the roof cap with the following considerations in mind:
a. The roof cap tail piece, ducting / fittings, and any clamps / tape / hardware used
to secure the duct / fittings to the tail piece must clear all roofing joists and studs, etc..
BOSS
FLANGE
UPPER SIDE
TEXTURED
SURFACE
FLAPPER AND
FLAPPER TUBE
RAIN GUTTER
FLANGE
HOOD
MOUNTING HOLE
SNAP-IN TAIL PIECE COLLAR
(SOME UNITS SUPPLIED WITH INTEGRAL TAILPIECE COLLAR)
FLANGE
UNDER SIDE
TEXTURED
SURFACE
BOTTOM OF
BASE FLANGE
SNAP-IN TAIL PIECE COLLAR
(IF APPLICABLE)-ROUND OR RECTANGULAR
SNAP-IN TAIL
PIECE
MOUNTING
HOLE
Figure 1. Roof Cap, Installation Part Locations
b. The leading edge of the front of the roof cap flange must be extending from
beneath, the leading edge of an exposed course (row) of shingles, especially
when the roof cap is being installed with “architectural” type shingles.
WARNING
DO NOT ALLOW THE ROOF CAP, AND ALL ASSOCIATED ITEMS,
INCLUDING DUCTING, CLAMPS, (PARTS THEMSELVES), AND ALL
TOOLS USED FOR PERFORMING THE INSTALLATION TO CON-
TACT ELECTRICAL WIRING, LINES, CABLES, OR PLUMBING.
DEATH, SERIOUS INJURY, OR DAMAGE CAN RESULT IF THIS
WARNING IS IGNORED
.
c. Shingles should be positioned relative to the roof cap, as shown in Figure 2.
d. Mounting holes in the roof cap flange must lie under the course of shingles
installed above the flange.
2. If applicable, center and snap the tabs of the snap-in tail piece into the hole in the base (Fig 1)
and firmly press the snaps into position. If necessary, gently rotate the snap-in tail piece
back and forth to help seat it in the base. Make certain that the attachment is secure.
3. Cut a hole with a diameter or sizing that is a minimum of 1/2" inch larger than the diameter,
or 1/2" larger than the overall L x overall W sizing of the tail pipe collar, whichever is applicable.
Make any adjustments in the diameter or sizing in accordance with the following requirements:
a. The hole size must allow for 1/4-inch clearance all around the
assembled roof cap tail piece collar, duct / fitting and clamp.
2
SHINGLE ABOVE ROOF
CAP (LOCATED ON TOP
OF ROOF CAP FLANGE)
SHINGLE BELOW ROOF
CAP (UNDER ROOF CAP
FLANGE AND UNDER
SHINGLES ON SIDE OF
ROOF CAP)
SHINGLES ON ROOF
CAP SIDES (UNDER
SHINGLES ON TOP OF
ROOF CAP, OVER SIDE
OF ROOF CAP FLANGE,
AND OVER SHINGLES
BELOW ROOF CAP)
ROOF CAP
1/2 inch
or more
FRONT MOUNTING
HOLE
UPPER SIDE TEXTURED SURFACES
Figure 2. Shingle Placement
b. Warning: The hole size should not allow more than 1/2" all around clearance or exceed
the tail piece collar diameter or rectangular dimensions by more than 1" overall.
c. When a hole has already been cut for a previously installed roof cap, the
diameter of that hole must be correct for the roof cap model being installed as a
replacement.
4. If not already accomplished, lay the shingle(s) that will lie under the front of the roof cap
flange. (See Figure 2.)
5. Trim and carefully cut away and remove any shingle material that is covering the hole that was
cut in step 3.
6. Position the roof cap over the center of the hole as evenly as is possible, checking for proper
fit and clearance. Mark the position of the roof cap on any shingles that have already been
installed or on the roof decking, as applicable.
7. Shim and level the area under the roof cap as follows:
a. Cut shingle material to form shims that, when placed under the roof cap flange, provide a
flat surface for support of the roof cap. The shims must also provide a smooth plane with
the shingle course on which the roof cap is to be mounted.
b. Secure the shims in place as required.
8. As determined by the installation, to ease or effectively install, attach the duct or duct fitting to the tail
piece collar and secure the duct or a fitting with a duct clamp, duct tape or addt'l necessary hardware.
9 After completing or having planned for attaching the duct or fitting, secure the roof cap as follows:
a. Make certain that the surfaces on which the roof cap is to be mounted are clean and dry.
b. Apply a continuous 1/4- to 3/8-inch bead of asphalt adhesive sealant to the textured
surface that runs through the center lines of the mounting holes on the underside of the
roof cap flange. (See Figure 1.) Use just enough sealant adhesive to seal against water
leakage; application of too much sealant can cause damage or distortion to roofing
materials. When the roof cap is being installed on “architectural” shingles, determine the
size of the adhesive sealant that will provide an acceptable seal.
c. Lower the tail piece collar (and ducting / fitting as applicable ) through the hole that has
been cut in the roof deck and position the roof cap within the markings made in step 6.
3
/