Page is loading ...


Z40
http://www.zennio.com Tecnical Support: http://support.zennio.com
2
CONTENTS
Contents ........................................................................................................................................ 2
1 Introduction ........................................................................................................................... 4
1.1 Z40 ................................................................................................................................. 4
1.2 Functionality .................................................................................................................. 6
1.3 Installation ..................................................................................................................... 8
1.4 Start-Up and Power Loss................................................................................................ 9
2 Update Objects after Reset ................................................................................................. 10
3 Configuration ....................................................................................................................... 11
3.1 Main Configuration ...................................................................................................... 11
3.1.1 GENERAL .................................................................................................................. 11
3.1.2 Translations .............................................................................................................. 16
3.1.3 Backlight ................................................................................................................... 18
3.1.4 Security .................................................................................................................... 18
3.1.5 Internal Temperature Sensor ................................................................................... 21
3.1.6 Screensaver .............................................................................................................. 21
3.1.7 Ambient Luminosity Sensor ..................................................................................... 24
3.1.8 Touch Locking .......................................................................................................... 24
3.1.9 Sounds ...................................................................................................................... 26
3.1.10 ADVANCED ............................................................................................................. 28
3.2 MENU ........................................................................................................................... 35
3.2.1 Configuration ........................................................................................................... 39
3.3 Page n .......................................................................................................................... 40
3.3.1 Configuration ........................................................................................................... 40
3.3.2 Box i .......................................................................................................................... 44
3.3.3 Setpoint .................................................................................................................... 81
3.3.4 Fan ............................................................................................................................ 81
3.4 Configuration Page ...................................................................................................... 83
3.5 Inputs ........................................................................................................................... 86
3.5.1 Binary Input .............................................................................................................. 86
3.5.2 Temperature Probe .................................................................................................. 86
3.5.3 Motion Detector ...................................................................................................... 86
3.6 Thermostat .................................................................................................................. 87


Z40
http://www.zennio.com Tecnical Support: http://support.zennio.com
4
1 INTRODUCTION
1.1 Z40
Z40 is an easily and intuitively controllable high-performance touch screens from
Zennio. The built-in features and functions make them the ideal solution for integral room
control in hotels, offices or any other environments where controlling climate systems,
lighting systems, shutters, scenes, etc. is required
The most outstanding features of Z40 are:
4.1 inch (4.1’’) backlit capacitive touch panel with backlit ‘Home’ button
incorporated, with screen resolution of 320 x 240 pixel.
Multiple direct-action functions, fully customisable.
Control distribution across up to 7 customisable pages + 1 configuration page.
Full climate management.
Programmable timers.
Scene control.
Alarm control.
Screensaver with customizable image.
Multi-Language.
2 independent thermostats.
Built-in temperature sensor.
Ambient luminosity sensor for brightness automatic adjustment.
Proximity sensor for quick start.
Buzzer for an audible acknowledgement of user actions (with the possibility of
disabling it either by parameter or by object).

Z40
http://www.zennio.com Tecnical Support: http://support.zennio.com
5
Possibility of locking / unlocking the touch panel through binary orders or
scenes, and of setting a timed/automatic locking of the device (cleaning
function).
Pop-ups and Welcome Back object (binary or scene).
Celsius and Fahrenheit temperature scales for the on-screen indicators, being
possible to select them in parameters or through communication object.
4 customisable analogue-digital inputs.
Heartbeat or periodic “still-alive” notification.
Elegant design, available in various colours.

Z40
http://www.zennio.com Tecnical Support: http://support.zennio.com
6
1.2 FUNCTIONALITY
Application program feature the following functions:
7 Pages, with up to 6 Fully-Customisable Boxes each, all of them fully
combinable and configurable by the integrator. These pages can be configured
as normal or thermostat type pages.
Box
Funcionality
Page
Normal
Thermostat
Indicators
Binary (icon, text)
Enumerated (icon, text)
Unsigned integer (1 / 2bytes)
Signed integer (1 / 2 / 4bytes)
Scaling (percentage)
Temperature
Float (2 / 4bytes)
Text (14bytes)
1-button
Control
Switch (pre-set value, switch)
Two objects (short press / long press)
Hold & Release
Scene (run / save)
Constant (counter, scaling, float)
Enumeration
Room State
2-button
Control
Switch (icon, text).
Switch + Indicator (counter, scaling, temperature)
Two objects (short press / long press)
Constant (counter, scaling, float)
Enumeration
Shutters
Light dimming
Multimedia
Room State
Climate
Specific
Control
Temperature Setpoint
Mode (cool/heat, extended)

Z40
http://www.zennio.com Tecnical Support: http://support.zennio.com
7
Special modes
Fan
Other
Controls
RGB
RGBW
Daily / Weekly Timer
Alarm
Page direct link
Boxes on
thermostat
pages
Setpoint control
Fan control
Table 1. Controls available in each type of page.
1 Configuration Page (optional), which contains the brightness and sounds
settings, the calibration of the built-in temperature probe, the programming
button, Hour/Date settings and Reset configuration.

Z40
http://www.zennio.com Tecnical Support: http://support.zennio.com
8
1.3 INSTALLATION
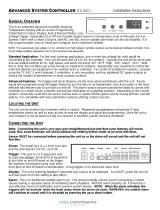
Figure 1 shows the connection outline of the device:
Figure 1. Schematic diagram.
Z40 is connected to the KNX bus through the built-in terminal (7). An external DC power
supply is not needed.
A short press on the Prog./Test button (5) will make the device enter the programming
mode. The Prog./Test LED (6) will then light in red. On the contrary, if this button is held
while the device gets connected to the bus, Z40 will enter the safe mode. In such case,
the programming LED will blink in red colour.
For detailed information about the technical features of Z40, as well as on security and
installation procedures, please refer to the device Datasheet, bundled within the device
packaging and also available at www.zennio.com.
1. Touch panel.
2. Backlit ‘Home’ button.
3. Luminosity and ProximitySensors.
4. Input connectors.
5. Programation Button.
6. Programation LED.
7. KNX connector.
8. Temperatura Probe.
9. Fixing clip.
3
6
4
1
2
7
8
5

Z40
http://www.zennio.com Tecnical Support: http://support.zennio.com
9
1.4 START-UP AND POWER LOSS
After download or device reset it is necessary to wait for about 2 minutes without
performing any action in order to make it possible a proper calibration of the proximity
sensor and luminosity sensor.
It is recommended not to approach less than 50 cm from the device during this time and
to avoid that the light strikes directly.
After download or power failure, the date and time flash to indicate that they may not be
correct. The flashing stops when a value is received through the bus or it is set from the
configuration page control.

Z40
http://www.zennio.com Tecnical Support: http://support.zennio.com
10
2 UPDATE OBJECTS AFTER RESET
The aim of this functionality is allowing the integrator to make a read request to the
statuses of the device objects after a reset. There are two situations in which this
functionality may be useful:
In case of a Z40 reset, if there have been changes in the bus while the Z40 was
off, after the reset, the objects in Z40 keep the same value as before the reset,
but not their actual value in the installation.
In addition, after programming from ETS, all objects are initialized to their default
values, but not to their actual values in the installation.
When a bus failure or ETS programming occurs, read requests of all the following objects
will be sent gradually (to prevent bus overload):
General objects: date and time, disabling pushbuttons, external temperature,
and temperature scale.
Indicator objects.
Timer enabling objects.
Alarm confirmation object.
Ventilation control: Auto mode dedicated object.RGB and RGBW objects.
Objects that will NOT be updated are:
Control objects.
Alarm trigger.
4-Bit Light Dimming.Shutter: Stop/Step.
All other objects
The time and date objects of Z40 will be read from the bus always after a reset,
regardless of whether this functionality is active or not.

Z40
http://www.zennio.com Tecnical Support: http://support.zennio.com
11
3 CONFIGURATION
After importing the corresponding database in ETS and adding the device into the
topology of the desired project, the configuration process begins by entering the
Parameters tab of the device.
3.1 MAIN CONFIGURATION
This tab is divided into multiple screens, all of which contain a set of global parameters
regarding the general functionality of the device, and therefore not specifically related to
a particular page of the user interface.
3.1.1 GENERAL
The "General" tab contains general settings. Most are checkboxes for enabling/disabling
other functionalities.
ETS PARAMETERISATION
Figure 2. Main Configuration - General.

Z40
http://www.zennio.com Tecnical Support: http://support.zennio.com
12
The following parameters are shown:
Inputs [disabled/enabled]
1
: enables or disables the “Inputs” tab in the tree on the
left, depending on whether the device will or will not be connected any external
accessories. For more information, see section 3.5.
Thermostats [disabled/enabled]: enables or disables the “Thermostat” tab in the
tree on the left. For more information, see section 3.6.
Heartbeat (Periodic Alive Notification) [disabled/enabled]: incorporates a one-
bit object to the project (“[Heartbeat] Object to Send ‘1’”) that will be sent
periodically with value “1” to notify that the device is still working (still alive).
Figure 3. Heartbeat.
Note: the first sending after download or bus failure takes place with a delay of
up to 255 seconds, to prevent bus overload. The following sendings march the
period set.
Home Button Enabled [disabled/enabled]: enables or disables the home button
to access to the menu page. If enabled, the following parameter appears:
➢ Page Linked to the Home Button: [Menu / Page 1 / … / Page 7 /
Configuration Page]: sets a shortcut to the indicated page when pressing on
the Home Button.
Show Time [disabled/enabled]: permits setting whether the current time
(according to the internal clock) is displayed in the upper-left corner of any page
or not.
Show Temperature [No / Internal Temperature Probe / External Value]: sets
whether the current temperature should show or not in the upper right corner of
every page, being necessary in such case to choose the source of the
1
The default values of each parameter will be highlighted in blue in this document, as follows:
[default/rest of options].

Z40
http://www.zennio.com Tecnical Support: http://support.zennio.com
13
temperature value: “Internal temperature probe” or “External value”. If the latter
is chosen, an object named “[General] External temperature” will be enabled,
so that it can be grouped with any other object that sends temperature values.
Button Box Style [No frame / Colored frame / Black frame]: permits selecting a
frame for the buttons of controls and pages, in order to distinguish them from the
indicators.
Figure 4. Button box (black, white color, no box).
Global Color Mask [White / Color select by dropdown]: permits selecting the
color that will be applied to all the elements of the screen in a general way.
Note: It is possible to set a different color in the desired boxes and buttons by
using a specific parameter in their configuration tab (see section 3.3.2).
First Weekday [Monday / Sunday]: sets the first day of week on calendar.
Weekdays initials [MTWTFSS]: permits customising the label that will represent
each of the weekdays on the screen. A seven-character string (including letters
or numbers), ordered according to the above First Weekday parameter, must be
entered – each of the characters will represent one weekday.
Hour Update Request Delay [disabled/enabled]: sets a sending delay
[1…65535] [s/min/h] for the date/time request when the device starts up.
Update Objects [Disabled / After Programming / After Reset / After Programming
and Reset]: enables the sending of read requests to update status objects and
indicators (see section 2 for further details). There are four options available,
some of them with a configurable delay:
➢ [Disabled]: no read request, therefore objects are not updated.
➢ [After Programming]: read requests are sent after a complete or partial
download (or when pressing the reset button in the configuration page, if set
as “Parameters Reset”, see section 3.4), after the parameterised delay
([0…10…65535] [s/min/h]).

Z40
http://www.zennio.com Tecnical Support: http://support.zennio.com
14
➢ [After Reset]: read request are sent when a reset occurs (bus failure, the
Reset Device ETS option or when pressing the reset button in the
configuration page, if set as “Z40 Reboot”, see section 3.4), after the
parameterised delay ([0…10…65535] [s/min/h]).
➢ [After Programming and Reset]: combination of the two above options.
Screensaver [disabled/enabled]: enables or disables the “Screensaver” tab in
the tree on the left. See section 3.1.6 for details.
Time to Consider Inactivity [1…65535] [s/min/h]: time that must elapse since
the last press and/or proximity detection to consider inactivity state. Then the
display backlight will dim. See section 3.1.3.
Proximity Sensor [disabled/enabled]: enables the proximity sensor. This
functionality permits “waking up” the device display when detecting presence
through the proximity sensor
Please refer to the user manual “Proximity and Luminosity Sensor” (available
in the Z40 product section at the Zennio homepage, www.zennio.com) for
detailed information about the functionality and the configuration of the related
parameters.
Ambient Luminosity Sensor [disabled/enabled]: enables or disables the
ambient luminosity sensor. When enabled, a new tab is added in the tree on the
left (see section 3.1.7).
Touch Locking [disabled/enabled]: enables or disables the possibility of locking
the touch by object. When enabled, a new tab is added in the tree on the left (see
section 3.1.8).
Sounds [Default/Custom]: sets whether the sound functions (button beeps,
alarm and doorbell) should work according to the pre-defined configuration
(“Default”) or to a user-defined configuration (“Custom”) (see section 3.1.9).
Advanced Configuration [enabled/disabled]: enables or disables the
“Advanced” tab in the tree on the left (see section 3.1.10).

Z40
http://www.zennio.com Tecnical Support: http://support.zennio.com
15
The project topology shows the following objects by default:
“[General] Time of Day”: 3-byte object for setting the internal time of the device,
for example, by linking it to a KNX clock. This object also allows read requests,
so the current time of the device can be checked. It is also automatically sent
after time changes made by the user from the screen itself.
Note: although the DPT of this object considers a field for setting the day of the
week, Z40 calculates it from the date and therefore ignores that field.
Important: Z40 does not have an RTC clock or battery to keep track of the
time in the absence of power. Therefore, it is important to receive the time
periodically from a device that obtains it through NTP and/or has a battery to
prevent delays during bus failures.
“[General] Date”: 3-byte object for setting the internal date of the device, for
example, by linking it to a KNX clock. This object also allows read requests, so
the current date of the device can be checked. It is also automatically sent after
date changes made by the user from the screen itself.
“[General] Scene: Receive” and “[General] Scene: Send”: objects for
respectively receiving and sending scene values from/to the KNX bus whenever
it is necessary (e.g., when the user touches a button that has been configured to
send scene commands; see section 3.3.2.2.4).
“[General] Activity”: 1-bit object to force activity/inactivity state on the device.
For further information, please refer to the user manual “Proximity and
Luminosity Sensor” and “Brightness” (available in the Z40 product section at
the Zennio homepage, www.zennio.com).
“[General] Display – Brightness”: 1-byte percentage object for changing the
display brightness level.
“[General] Proximity Sensor”, “[General] External Proximity Detection” and
“[General] Proximity Detection”: 1-bit object whose functionality is tied to the
proximity sensor. For further information, please refer to the user manual
“Proximity and Luminosity Sensor” (available in the Flat Display product
section at the Zennio homepage, www.zennio.com).

Z40
http://www.zennio.com Tecnical Support: http://support.zennio.com
16
“[General] Translations - Select Language”: 1 and 2-byte objects for changing
the language showed in the screen when receiving a value through the bus (see
section 3.1.2).
“[General] Translations - Main Language”: 1-bit object that, after the reception
of the value “1” from the bus, will load the main language (see section 3.1.2).
“[General] Temperature Scale”: 1-bit object which permits changing in runtime
the scale of the temperatures that may show on the screen (see section 3.1.10).
“[Internal Temp. Probe] Current Temperature”: 2-byte object through which the
value of the current measurement of the built-in sensor will be sent to the bus,
according to the parameterisation (see section 3.1.5).
3.1.2 TRANSLATIONS
Texts shown on the screen can be translated into up to five different languages.
Texts of page titles, box titles, indicators, etc. are entered by parameter in the
corresponding configuration tab. For each language enabled, an additional textbox is
displayed to enter the translation.
Note: depending on the space occupied by the charactere on the screen, the full text
entered may not be displayed.
Switching from language to another can be done through two types of communication
objects:
Up to five 1-bit objects, one for each language. If this is enabled, when a “1” is
received through any of this, the corresponding language is activated in the
device.
A 1-byte scene object. The expected values in this object are fixed, from 0 to 4,
to select the language. If the value received does not correspond to any
language, the texts will be displayed in the main language.
A 2-byte ASCII object. The expected values for this object are two characters of
the ASCII code, corresponding to ISO 639-1. If the received character pair does
not correspond to any enabled language but is in range, the texts will be
represented in the main language, if an out-of-range value is received, it does not
change the active language.

Z40
http://www.zennio.com Tecnical Support: http://support.zennio.com
17
Notes:
➢ Not case sensitive.
➢ Please refer to http://en.wikipedia.org/wiki/List_of_ISO_639-1_codes for a
table with the language codes.
On the other hand, Z40 allows the use of Latin, Greek and Cyrillic characters for the texts
displayed on the screen.
ETS PARAMETERISATION
Figure 5. Main Configuration - Translations.
Main language [enabled]: read-only parameter to make it evident that the main
language is always enabled.
➢ Select language: list of the available languages.
Language X [disabled/enabled]: enables the additional language X.
➢ Select language: list of available languages to select the language X.
Only the Main language is enabled by default.
While Translations stays enabled, the following objects are visible:
“[General] Translations – Select language” (one-byte).
“[General] Translations – Main language” (one-bit).
“[General] Translations – Select language” (two-byte).
Up to four specific objects for the additional languages will be also shown, if required:
“[General] Translations – Language X” (one bit).
These objects work accordingly to the behaviour mentioned above.

Z40
http://www.zennio.com Tecnical Support: http://support.zennio.com
18
3.1.3 BACKLIGHT
Z40 allows managing the brightness of the display according to two operating modes:
normal mode and night mode.
Note: Contrast is not a configurable feature in the device.
Please refer to the specific manual “Brightness” (available in the Z40 product section at
the Zennio website, www.zennio.com) for detailed information about the functionality and
the configuration of the related parameters.
3.1.4 SECURITY
Any box (general purpose) or page will be given the possibility of restricted access by
password. Setting one or two different passwords is possible, so the integrator can
afterwards configure whether the access to a page or box will be protected by one
password or another, or remain unprotected – every page can be independently
configured.
Buttons that lead to a protected page or box will show a little lock icon overlaid on their
lower left corner.
Figure 6 shows the “enter password” dialog shown to the user when trying to access a
protected page.
Figure 6. Security Pop up.
In case of setting up two levels, the first one is assumed to be enclosed by the second
one. This means that whenever the device asks the user to type password #1 (to enter
a certain page); password #2 will also be accepted. On the contrary, password #1 cannot
be used instead of password #2. This behaviour permits, therefore, making password #2

Z40
http://www.zennio.com Tecnical Support: http://support.zennio.com
19
available to users with further privileges while password #1 is assigned to users with
fewer privileges.
Moreover, when accessing to a protected page, all the boxes and pages with the same
or lower access level of the introduced password, are automatically unlocked. It can be
set if the elements are relocked after a time period or a page switch.
ETS PARAMETERISATION
This screen permits selecting how many security levels (one or two) will be available for
the configuration of the access to the control pages or the boxes.
Figure 7. Main Configuration - Security.
Security Levels [One Level / Two Levels]: selects whether one or two security
levels will be available.
Note: with independence of the option selected here, it will be necessary to
establish the security level desired for each specific page of controls.
Protect Again [After a Time Period / After a Page Switch / After a Time Period
or a Page Switch]: sets when is re-activated the security of pages or boxes

Z40
http://www.zennio.com Tecnical Support: http://support.zennio.com
20
unlocked. When selecting the first or the last option, a new parameter Time
[10…65535][s] [1…65535][min/h] appears to set the time period.
Password [Level 1: 1234; Level 2: 5678]: parameter made of four additional
textboxes, each of which should contain one of the four consecutive digits [0…9]
that will compose the password.
In case of enabling two security levels, the Password parameter will show twice,
being the first one referred to the password of Level 1, and the second one to the
password of Level 2.
Figure 8. Two security levels.
Important: the password insertion dialog features a specific option (lower left
button) that lets the user change, in runtime, the passwords originally set by
parameter. After accessing this option and prior to typing the new password, the
user will be required to type the corresponding old password (level 1 or level 2).
Note that although it will be possible to type password 2 even if the device asks
for password 1, the new password typed afterwards will be anyway stored as the
new password for level 1.
Security Pad Labels: parameter consisting in six additional textboxes, intended
for the customisation of the messages that the device shows (or may show) when
the user interacts with the password insertion dialog.
➢ Label for ‘Enter Password 1’ [Enter Password 1]: message shown when
the user is required to type in the password for level 1.
➢ Label for ‘Enter Password 2’ [Enter Password 2]: message shown when
the user is required to type in the password for level 2.
/