Page is loading ...

TILE FLOOR SAFETY
TILE FLOOR PADS
Installation and Use Instructions
BALDOSAS DE LOSETA
VINÍLICA
Instrucciones de instalación y uso
REVÊTEMENT DE SOL AVEC ÉLÉMENTS DE CARRELAGE
Instructions d’installation et d’utilisation
TABLE OF CONTENTS/ÍNDICES/TABLE DES MATIÈRES
TILE FLOOR SAFETY ....................................1
INSTALLATION REQUIREMENTS ...............2
INSTALLATION INSTRUCTIONS .................2
TILE FLOOR CARE........................................5
TROUBLESHOOTING....................................6
WARRANTY....................................................6
SEGURIDAD DEL PISO DE
LOSETA VINÍLICA..........................................7
REQUISITOS DE INSTALACIÓN ..................7
INSTRUCCIONES DE INSTALACIÓN ..........8
CUIDADO DEL PISO DE
LOSETA VINÍLICA........................................11
SOLUCIÓN DE PROBLEMAS .....................11
GARANTÍA ....................................................12
SÉCURITÉ DU REVÊTEMENT DE SOL..... 13
EXIGENCES D’INSTALLATION.................. 13
INSTRUCTIONS D’INSTALLATION ........... 13
ENTRETIEN DU REVÊTEMENT DE SOL... 18
DÉPANNAGE ............................................... 18
GARANTIE.................................................... 19
W10530349A
IT'S TIME TO RETHINK THE GARAGE.™
ES TIEMPO DE VOLVER A PENSAR EN EL GARAGE.™
LE GARAGE REPENSÉ.™
You can be killed or seriously injured if you don't immediately
You
can be killed or seriously injured if you don't
follow
All safety messages will tell you what the potential hazard is, tell you how to reduce the chance of injury, and tell you what can
happen if the instructions are not followed.
Your safety and the safety of others are very important.
We have provided many important safety messages in this manual and on your appliance. Always read and obey all safety
messages.
This is the safety alert symbol.
This symbol alerts you to potential hazards that can kill or hurt you and others.
All safety messages will follow the safety alert symbol and either the word “DANGER” or “WARNING.”
These words mean:
follow instructions.
instructions.
DANGER
WARNING

2
INSTALLATION REQUIREMENTS
Tools and Parts
Gather the required tools and parts before starting installation.
Tools Needed
Tile Floor Use Requirements
■ Intended for use in a garage.
■ The tile floor is designed to be used in either a wall-to-wall
application or as individual tile floor under vehicles.
■ The tile floor is designed to be placed over an existing garage
floor. Permanently adhering the tile floor to the surface of an
existing garage floor is not necessary nor recommended.
■ Sharp, heavy objects such as an automotive jack, jack stand, or
motorcycle kickstand may cut or damage the tile floor. Use a pad
such as a flat board, metal plate or cement slab of adequate
thickness between the sharp or heavy object and the tile floor to
help better distribute the load and to avoid damage to the tile
floor.
■ Do not operate a push mower or engage the blades of a riding
lawn mower while on the tile floor.
INSTALLATION INSTRUCTIONS
Prepare the Floor
The tile floor should be placed over a clean, dry, concrete garage
floor with a smooth surface.
1. Remove all items from the area to be covered with the tile floor.
2. Sweep, wash and dry the garage floor. Use a mild soap and
water.
NOTE: Allow the floor to dry completely.
3. Using a product recommended for your garage floor surface,
repair any surface cracks larger than ¹⁄₂" (1.25 cm) wide.
Install Tile Floor
IMPORTANT:
■ Measure the area of the garage floor to be covered and note any
obstructions to determine the number of tiles needed.
■ Leave a minimum of ¹⁄₂" (1.25 cm) space between the edge of the
tiles and the perimeter of the garage walls and around all
obstructions, such as stairs and posts. The spacing is necessary
to allow for expansion and contraction of tiles caused by
seasonal temperature fluctuations. The tiles may buckle if the
necessary spacing is not provided.
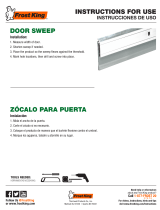
■ Place the tiles in a male to female connecting pattern. The female
loops should be located (as you stand inside the garage facing
the garage door) at the bottom and right side of each tile as
shown.
■ Connect the tiles by placing the male tabs on top of the female
loops. Using a rubber mallet, tap the male tabs into the female
loops as shown.
NOTE: Be sure to join all male tabs to the female loops for the
tiles to lock securely into place.
■ Many garage walls and floors are not square. Do not cut the tiles
before checking to see if the floor is square.
Under Vehicle Installation
1. Position the first tile in the front left corner of the desired
coverage area. Using the corner tile as a guide, connect the first
column of tiles.
2. Using a rubber mallet, connect the remaining tiles in the column
working toward the back. Proceed right until the desired
coverage area is complete.
■ Tape measure
■ Saw
■ Utility knife
■ Rubber mallet
■ Square (optional)
■ Pencil
■ Chalk line (optional)
■ Gladiator
®
DrainTiles
(optional)
■ Gladiator
®
Edge trim
(optional)
A. Male tabs
B. Female loops
A
B
1
2

3
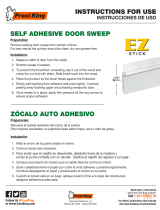
3. Attach the male edge trim by joining the male tabs to the female
connecting loops located on the tile. Attach the female edge trim
by joining the female connecting loops to the male tabs on the
tile. Connect the corner edge trim as shown.
Wall to Wall Installation
IMPORTANT: If installing edge trim around the perimeter walls in a
wall to wall application, determine the number of whole tiles to be
used. Be sure to leave a minimum of ¹⁄₂" (1.25 cm) space between the
edge trim and the perimeter of the garage walls.
1. Determine the starting point at the front of the garage. Using the
garage door track as a guide, draw a line (using a straightedge or
chalk line) between the center of the tracks on the garage floor as
shown.
2. Align the first female edge trim with the center line (near the left
edge of the garage door opening) as shown. The edge trim is the
guide for installing the tiles.
3. Using a rubber mallet connect the tiles in the first column
working from the female edge trim toward the back wall of the
garage. Continue installing the remaining tiles in the first row
working toward the right side of the garage as shown.
4. From the first column, continue installing the first row of tiles
working toward the left-side wall of the garage. Adjust the
installed tiles to balance the pattern.
IMPORTANT:
■ When installing tiles on the left-hand side of the column, it
may be necessary to adjust the position of the edge trim and
tiles.
■ To minimize cuts and/or balance the pattern, adjust the
installed edge trim and tiles to the left or right as needed.
When adjusting the tiles, be sure not to extend the edge trim
beyond the center line marked on the garage floor.
■ For a balanced pattern, tiles along both walls may need to be
cut. Before cutting the tiles or edge trim, measure the allotted
space. Mark and cut the tile to length for proper placement.
■ Using a saw, notch out the edge trim or tile around any
obstructions such as the garage door track.
■ In a wall-to-wall application, if no edge trim will be applied, it
may be necessary to cut the tile floor along one or more of
the perimeter walls.
A. Male tabs
B. Female edge trim
C. Corner edge trim
D. Male edge trim
E. Female loops
A. Garage door opening
B. Garage door track
C. Center line
A. Garage door opening
B. Garage door track
C. Center line
D. Female edge trim
E. Tile (with male tabs
facing front and left)
A
B
C
E
D
A
C
B
A
D
C
E
B
A. Adjust to the left or right.
1
2
AA

4
5. Continue installing the tiles on the left-hand side of the column
working toward the back of the garage until complete.
6. Connect the remaining tiles on the right of the column and work
toward the back of the garage as shown.
NOTE: If the orientation or placement of the tiles is incorrect due
to misassembly, separate the tiles at the leading edge of the
misassembly. Be sure that the female loops are at the bottom
and right side of each tile. Reconnect the tiles.
7. If necessary, cut the last row of tiles to fit between the existing
row of tiles and the back wall of the garage.
NOTE: Leave a minimum of ¹⁄₂" (1.25 cm) space between the
edge of the tiles and the perimeter of the garage walls and
around all obstructions, such as drains, stairs and posts. The
spacing is necessary to allow for expansion and contraction of
tiles caused by seasonal temperature fluctuations. The tiles may
buckle if the necessary spacing is not provided.
Obstructions
IMPORTANT:
■ If there are any obstructions in the path of the tile floor such as a
floor drain, support post, or stairs, use a saw to make the
necessary cutouts.
■ There are two ways to cover floor drains.
Style 1: Cutouts of tile floor for the existing drain.
Style 2: Insert one or more Gladiator
®
DrainTiles (optional) over
the existing drain.

5
Edge Trim Installation
Insert the edge trim by joining the male tabs to the connecting female
loops. Connect the corner edge trim as shown.
TILE FLOOR CARE
Your tile floor should last for years with proper care and maintenance.
IMPORTANT:
■ Sweep the tile floor as needed, to remove surface dirt, sand,
rocks and other abrasive material that may scratch or cut the
surface finish.
■ Periodically, wash the tile floor with a mild soap and water
solution. Use a soft scrub brush to remove ground-in dirt or
stains. Do not use a hard scrub brush. Excessive scrubbing will
cause damage to the surface finish.
■ If desired, the tile floor can be separated and moved to the
driveway to be cleaned and dried. It is normal for moisture to
appear between the tile floor and the garage floor. If desired,
remove the tile floor from the garage floor and allow the floor to
dry.
NOTE: Temperatures ranging from 0°F to 120°F (-18ºC to 49ºC)
will have no adverse effect on the tile floor.
■ Periodically, it may be necessary to separate the installed tile
floor in order to remove a damaged tile or to remove sections of
installed tiles for cleaning.
1. To separate tiles start at the left leading edge of the row.
2. Lift up in the center of the tiles pulling up on the right while
pushing down on the left. This will unsnap the connection.
Separate the row of tiles.
NOTE: Be sure to install the replacement tile male tabs/female
loops in the same orientation as the removed tile.
A. Male tabs
B. Female edge trim
C. Corner edge trim
D. Male edge trim
E. Female loops
A
B
C
E
D
A. Leading edge
B. Damaged tile
A
B

6
TROUBLESHOOTING
Stains on the tile floor
■ What kinds of stains can be removed? The tile floor will resist
many stains from common garage and automotive products.
However, certain products such as brake fluid, dyes, and carbon
black from tires may, over time, produce stains that are
permanent.
■ What products are needed to remove stains? Blot or wipe up
spills quickly to reduce the likelihood of permanent staining. If
washing with mild soap and water does not remove the stains,
use only a degreaser that is compatible with polypropylene
material.
IMPORTANT: Using a degreaser other than one that is
compatible with polypropylene material will damage the tile floor.
The tile floor becomes slightly buckled near the wall or
baseboard
■ Are the tiles buckling near the wall or baseboard? The tile
floor expands and contracts with seasonal temperature changes.
If you are installing the tile floor when the temperature is cool,
leave a ¹⁄₂" (1.25 cm) gap between the tile floor and each wall or
baseboard to allow expansion room when the temperature
warms.
■ What if buckling occurs and no gap exists? It may be
necessary to remove the tiles adjacent to the wall or obstruction
and trim the tiles to leave the necessary space or gap.
GLADIATOR
®
GARAGEWORKS BY WHIRLPOOL CORPORATION
TILE FLOOR WARRANTY
TEN-YEAR LIMITED WARRANTY
For ten years from the date of purchase, when this product is installed, operated and maintained according to the instructions attached to or
furnished with the product, Gladiator
®
GarageWorks will replace the defective product or parts if the part fails as a result of defective materials
or workmanship.
Gladiator
®
GarageWorks will not pay for:
1. Service calls to correct the installation of any Gladiator
®
GarageWorks products or to instruct you how to use or install them.
2. Damage resulting from improper handling or shipping of products, or products damaged by accident, misuse, abuse, fire, flood, improper
installation, acts of God, neglect, corrosion, modification or mishandling.
3. Shipping or freight fees to deliver replacement products or to return defective products.
4. Repairs or replacement when your product is used in other than normal, single-family household use, such as a commercial environment,
or handled in any way inconsistent with the installation instructions included with the product.
5. Cosmetic damage, including stains or discoloration, that does not affect the structural or functional capability of the product.
6. Replacement product for Gladiator
®
GarageWorks products operated outside the United States or Canada.
7. In Canada, travel or transportation expenses for customers who reside in remote areas.
8. Any labor costs during the limited warranty period.
9. Surfaces damaged due to chemical interaction.
10. Damage caused by permanently adhering the tile floor covering to the surface of the existing garage floor.
11. Damage resulting from failure to install the tile floor covering with the tread plate surface facing upward.
12. Damage from improper use including without limitation, burns, cuts, scratches, scuffs, punctures and indentations.
13. Damage caused by mold, mildew, fungus or bacteria.
14. Damage from extended direct exposure to sunlight.
15. Damage from excessive moisture, alkaline, and hydrostatic pressure damage from sub floor.
DISCLAIMER OF IMPLIED WARRANTIES; LIMITATION OF REMEDIES
IMPLIED WARRANTIES, INCLUDING TO THE EXTENT APPLICABLE WARRANTIES OF MERCHANTABILITY OR FITNESS FOR A PARTICULAR
PURPOSE, ARE EXCLUDED TO THE EXTENT LEGALLY PERMISSIBLE. ANY IMPLIED WARRANTIES THAT MAY BE IMPOSED BY LAW ARE
LIMITED TO ONE YEAR, OR THE SHORTEST PERIOD ALLOWED BY LAW. SOME STATES AND PROVINCES DO NOT ALLOW LIMITATIONS
OR EXCLUSIONS ON HOW LONG AN IMPLIED WARRANTY OF MERCHANTABILITY OR FITNESS LASTS, SO THE ABOVE LIMITATIONS OR
EXCLUSIONS MAY NOT APPLY TO YOU. THIS WARRANTY GIVES YOU SPECIFIC LEGAL RIGHTS, AND YOU MAY ALSO HAVE OTHER
RIGHTS WHICH VARY FROM STATE TO STATE OR PROVINCE TO PROVINCE.
Outside the 50 United States and Canada, this warranty does not apply. Contact your authorized Gladiator
®
GarageWorks dealer to determine
if another warranty applies.
If you need service, call the Gladiator
®
GarageWorks Customer eXperience Center, 1-866-342-4089 (toll-free), from anywhere in the U.S.A. In
Canada, contact your Whirlpool Canada LP designated service company or call 1-800-807-6777.
In the United States, Gladiator
®
GarageWorks means Whirlpool Corporation, Benton Harbor, Michigan 49022. In Canada, Gladiator
®
GarageWorks means Whirlpool Canada LP, Mississauga, ON L5N 3A7.
8/05
Keep your sales slip for future reference. You must provide proof
of purchase or installation date for in-warranty service.
Write down the date code found on the underside of the floor
covering to better help you obtain assistance or service if you ever
need it.
Dealer name____________________________________________________
Address ________________________________________________________
Phone number__________________________________________________
Date code ______________________________________________________
Purchase date __________________________________________________
/