Page is loading ...

1) TURN OFF POWER.
IMPORTANT: Before you start, NEVER attempt any work without
shutting off the electricity until the work is done.
a) Go to the main fuse, or circuit breaker, box in your home. Place
the main power switch in the “OFF” position.
b) Unscrew the fuse(s), or switch “OFF” the circuit breaker switch(s),
thatcontrolthepowertothextureorroomthatyouareworking
on.
c) Placethewallswitchinthe“OFF”position.Ifthexturetobe
replaced has a switch or pull chain, place those in the “OFF” position.
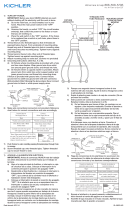
2) Thread hexnut onto threaded pipe so that 5 threads are exposed below
hexnut. From underside of mounting strap, thread long end of threaded
pipe into hole in mounting strap until hexnut touches mounting strap.
Tighten hexnut against mounting strap.
3) Thread second hexnut onto other end of threaded pipe. Tighten hexnut
up against mounting strap.
4) Attach mounting strap to outlet box. (Screws not provided)
5) Grounding instructions: (See Illus. A or B).
A) Onxtureswheremountingstrapisprovidedwithaholeand
two raised dimples. Wrap ground wire from outlet box around
green ground screw, and thread into hole.
B) Onxtureswhereacuppedwasherisprovided.Attachground
wire from outlet box under cupped washer and green ground
screw, and thread into mounting strap.
Ifxtureisprovidedwithgroundwire.Connectxturegroundwire
to outlet box ground wire with wire connector. (Not provided.) After
following the above steps. Never connect ground wire to black or white
power supply wires.
6) Make wire connections (connectors not provided.) Reference chart
below for correct connections and wire accordingly.
7) Pushxturetoceiling,carefullypassingthreadedpipethroughhole.
8) Securexturetoceilingusingnial.
GREEN GROUND
SCREW
CUPPED
WASHER
A
B
OUTLET BOX
GROUND
FIXTURE
GROUND
DIMPLES
WIRE CONNECTOR
(NOT PROVIDED)
OUTLET BOX
GROUND
GREEN GROUND
SCREW
FIXTURE
GROUND
Connect Black or
Red Supply Wire to:
Connect
White Supply Wire to:
Black White
*Parallel cord (round & smooth) *Parallel cord (square & ridged)
Clear, Brown, Gold or Black
without tracer
Clear, Brown, Gold or Black
with tracer
Insulated wire (other than green)
with copper conductor
Insulated wire (other than green)
with silver conductor
*Note: When parallel wires (SPT I & SPT II)
are used. The neutral wire is square shaped
or ridged and the other wire will be round in
shape or smooth (see illus.)
Neutral Wire
Date Issued: 6/1/12 IS-9886-US
MOUNTING STRAP
PLANCHAPARAMONTAR
FIXTURE
ARTEFACTO
FINIAL
CAPUCHÓN
THREADEDPIPE
TUBOROSCADO
HEXNUT
TUERCAHEXAGONAL
1) APAGUELAALIMENTACIÓNELÉCTRICA.
IMPORTANTE: Antesdecomenzar,NUNCAtratedetrabajarsinantes
desconectarlacorrientehastaqueeltrabajosetermine.
a) Vayaalacajaprincipaldefusibles,ointerruptorocajadecircuitos
desucasa.Coloqueelinterruptordelacorrienteprincipalen
posición de apagado “OFF”.
b) Desatornille el (los) fusible (s), o coloque el interruptor o
interruptores del breaker en posición de apagado “OFF”, que
controla (n) la corriente hacia el artefacto o habitación donde está
trabajando.
c) Coloqueelinterruptordeparedenposicióndeapagado“OFF”.Si
el artefacto que se va a reemplazar tiene un interruptor o cadena
quesejala,colóquelosenlaposicióndeapagado“OFF”.
2) Rosque la tuerca hexagonal en el tubo roscado de manera que las 5
roscasquedenexpuestaspordebajodelatuercahexagonal.Desdela
parteinferiordelaabrazaderademontaje,rosqueelextremolargodel
tuboroscadoeneloriciodelaabrazaderademontajehastaquela
tuercahexagonalentreencontactoconlaabrazaderademontaje.
Ajustelatuercahexagonalcontralaabrazaderademontaje.
3) Rosque una segunda tuerca hexagonal sobre el otro extremo del tubo
roscado.Ajustelatuercahexagonalcontralaabrazaderademontaje.
4) Sujetelaplanchaparamontaralacajadeconexión.(Noseproveen
los tornillos.)
5) Instrucciones de conexión a tierra solamente para los Estados Unidos.
(Vea la ilustracion A o B).
A) Enlaslámparasquetieneneleje,demontajeconunagujero
ydoshoyuelosrealzados.Enrollarelalambreatierradelacaja
tomacorriente alrededor del tornillo verde y pasarlo por el aquiero.
B) Enlaslámparasconunaarandelaacopada.Fijarelalambrea
tierradelacajatomacorrientedelajodelaarandelaacoaday
tornilloverde,ypaserporelejedemontaje.
Silalámparavieneconalambreatierra.Conecterelalambreatierra
delalámparaalalambreatierradelacajatomacorrientecon
un conector de alambres. (No incluido) Espués de seguir los pasos
anteriores. Nunca conectar el alambra a tierra a los alambres eléctros
negro o blanco.
6) Hagalesconexionesdelosalambres(noseproveenlosconnectores.)
Latabladereferenciadeabajoindicalasconexionescorrectasylos
alambres correspondientes.
7) Empujelaunidadcontralapared,pasandoconcuidadoeltuboroscado
atravésdelagujero.
8) Sujetelaunidadcontralaparedapretándolaconlacapuchón.
GREEN GROUND
SCREW
CUPPED
WASHER
A
B
OUTLET BOX
GROUND
FIXTURE
GROUND
DIMPLES
WIRE CONNECTOR
(NOT PROVIDED)
OUTLET BOX
GROUND
GREEN GROUND
SCREW
FIXTURE
GROUND
Connect Black or
Red Supply Wire to:
Connect
White Supply Wire to:
Black White
*Parallel cord (round & smooth) *Parallel cord (square & ridged)
Clear, Brown, Gold or Black
without tracer
Clear, Brown, Gold or Black
with tracer
Insulated wire (other than green)
with copper conductor
Insulated wire (other than green)
with silver conductor
*Note: When parallel wires (SPT I & SPT II)
are used. The neutral wire is square shaped
or ridged and the other wire will be round in
shape or smooth (see illus.)
Neutral Wire
/