Escea TC950 Installation guide

Category
Fireplaces
Type
Installation guide
Installation Instructions
and User Guide
TC950
IN-BUILT SOLID FUEL BURNER
630591_4
WARRANTY REPAIR AND ANNUAL SERVICING
Please contact Escea if you require warranty work. Warranty repair work must be carried
out by a recognised Escea woodfire installer. It is recommended that recognised Escea
Wood Fire Installers are also used to carry out annual servicing requirements (particularly
during the warranty period). For contact details of recognised Escea Wood Fire Technicians
in your area, or for replacement parts, please contact the retailer from whom the appliance
was purchased from, or visit our website.
All installation work must comply to AS/NZS 2918:2018 Domestic solid fuel burning
appliances- Installation AND these installation instructions. Any work undertaken that
does not comply to AS/NZS 2918:2018 AND these installation instructions will not
qualify for the Escea warranty. Escea will not be accountable for any unsafe installation
that does not comply to AS/NZS 2918:2018.
Manufactured by: Escea Ltd, PO Box 5277 Dunedin NZ, Ph: +64 3 478 8220
For contact details of your local Escea distributor or dealer, please visit www.escea.com,
call 0800 173 000, or email us at [email protected].
From Australia, please visit www.escea.com.au, call AU: 1800 460 832 or WA: 1800 730
140, or email us at [email protected]
CONTENTS
A Safety Information 4
B Product Details 6
C Installation Requirements 9
D Installation Procedure 21
E Flue System Installation 36
F Operation Guide 46
G Maintenance and Servicing 54
H Troubleshooting 68
I General Warranty Terms & Conditions 69
J Service History & Data Plate 72
4630591_4 TC950 InsTallaTIon Manual
AA SAFETY INFORMATION
NOTICE
DO NOT DISCARD THIS MANUAL
IMPORTANT OPERATING AND
MAINTENANCE INSTRUCTIONS
INCLUDED.
READ, UNDERSTAND AND FOLLOW
THESE INSTRUCTIONS FOR SAFE
INSTALLATION AND OPERATION.
LEAVE THIS MANUAL WITH PARTY
RESPONSIBLE FOR USE AND
OPERATION.
WARNING
IF THE INFORMATION IN THESE
INSTRUCTIONS IS NOT FOLLOWED
EXACTLY,
A FIRE OR EXPLOSION MAY RESULT
CAUSING PROPERTY DAMAGE,
PERSONAL INJURY OR DEATH.
IMPROPER INSTALLATION, ADJUSTMENT,
AERATION, SERVICE OR MAINTENANCE
CAN CAUSE INJURY OR PROPERTY
DAMAGE, BODILY INJURY OR EVEN
DEATH. PLEASE READ ENTIRE MANUAL
BEFORE YOU INSTALL AND USE YOUR
APPLIANCE.
THIS APPLIANCE IS NOT TO BE USED
BY PERSONS INCLUDING CHILDREN
WITH REDUCED PHYSICAL, SENSORY,
OR MENTAL CAPABILITIES, OR LACK OF
EXPERIENCE AND KNOWLEDGE, UNLESS
THEY HAVE BEEN GIVEN SUPERVISION OR
INSTRUCTION CONCERNING USE OF THE
APPLIANCE BY A PERSON RESPONSIBLE
FOR THEIR SAFETY.
WARNING: THIS APPLIANCE AND
FLUE SYSTEM MUST BE INSTALLED IN
ACCORDANCE WITH AS/NZS 2918:2018
AND THE APPROPRIATE REQUIREMENTS
OF ANY RELEVANT LOCAL/NATIONAL
BUILDING CODES.
WARNING: APPLIANCES INSTALLED SHALL
COMPLY WITH THE REQUIREMENTS
OF AS/NZS 4013 WHERE REQUIRED BY
THE REGULATORY AUTHORITY I.E. THE
APPLIANCE SHALL BE IDENTIFIABLE BY A
COMPLIANCE PLATE WITH THE MARKING
‘TESTED TO AS/NZS 4013’
ANY MODIFICATION OF THE APPLIANCE
THAT HAS NOT BEEN APPROVED IN
WRITING BY THE TESTING AUTHORITY IS
CONSIDERED TO BE IN BREACH OF ANY
APPROVAL GRANTED FOR COMPLIANCE
WITH AS/NZS 4012:2014 & AS/NZS 4013:2014.
IF THE SUPPLY CORD IS DAMAGED,
IT MUST BE REPLACED BY THE
MANUFACTURER, ITS SERVICE AGENT
OR SIMILARLY QUALIFIED PERSONS IN
ORDER TO AVOID A HAZARD.
CAUTION: THIS APPLIANCE SHOULD BE
MAINTAINED AND OPERATED AT ALL
TIMES IN ACCORDANCE WITH THESE
INSTRUCTIONS:
ͳThe appliance should be allowed to cool before
servicing.
ͳDo not operate without fully assembling all
components.
ͳRisk of cuts and abrasions. Wear protective
gloves and safety glasses during installation.
Sheet metal edges may be sharp.
ͳDo not operate appliance before reading and
understanding operating instructions. Failure
to operate appliance according to operating
instructions could cause fire or injury.
55
A
CAUTION: MIXING OF APPLIANCE OR
FLUE SYSTEM COMPONENTS FROM
DIFFERENT SOURCES OR MODIFYING
THE DIMENSIONAL SPECIFICATION
OF COMPONENTS MAY RESULT IN
HAZARDOUS CONDITIONS. WHERE
SUCH ACTION IS CONSIDERED, THE
DISTRIBUTOR: ESCEA LTD SHOULD BE
CONSULTED AT THE FIRST INSTANCE.
CAUTION: CRACKED AND BROKEN
COMPONENTS. E.G. GLASS PANELS, MAY
RENDER THIS INSTALLATION UNSAFE.
CAUTION: THIS APPLIANCE SHOULD NOT
BE OPERATED WITH CRACKED GLASS.
ͳThis appliance can be very hot when burning.
ͳCombustible materials such as firewood, wet
clothing, etc. placed too close can catch fire
ͳYoung children and elderly people should be
carefully supervised when they are in the same
room as the appliance. Toddlers, young children
and others may be susceptible to accidental
contact burns. A physical barrier is recommended
if there are at risk individuals in the house. To
restrict access to an appliance or stove, install an
adjustable safety gate to keep toddlers, young
children and other at risk individuals out of the
room and away from hot surfaces. Children
and pets must be prevented from touching the
appliance when it is hot.
ͳClothing or other flammable material should not
be placed on or near the appliance.
ͳDue to high temperatures, the appliance should
be located out of trac and away from furniture
and draperies.
ͳEnsure you have incorporated adequate safety
measure to protect infants/toddlers from
touching hot surfaces.
ͳEven after the fire within the appliance is out,
the glass and/or screen will remain hot for an
extended period of time.
ͳKeep the packaging material out of reach of
children and dispose of the material in a safe
manner. As with all plastic bags, these are not
toys and should be kept away from children and
infants.
ͳOperate only with the door tightly closed unless
instructed otherwise.
ͳDo not strike or slam shut the appliance door. Do
not put excessive weight on the door.
ͳThis appliance is designed to burn natural
hardwood only for Australian models.
ͳDo not burn green or freshly cut wood.
CAUTION: THE USE OF SOME TYPES OF
PRESERVATIVETREATED WOOD AS FUEL
CAN BE HAZARDOUS.
ͳYour appliance requires periodic maintenance
and cleaning. Failure to maintain your appliance
may lead to smoke spillage into your home.
ͳDo not start a fire with chemicals or fluids such
as gasoline, engine oil, etc.
ͳDo not burn treated wood, coal, charcoal,
coloured paper, cardboard, solvents or garbage.
ͳDo not let the appliance become hot enough for
any part to glow red.
ͳDo not overload or over fire the appliance.
ͳAshes must be disposed in a metal container
with a tight lid and placed on a non-combustible
surface well away from the home or structure
until completely cool.
ͳEnsure clearances to combustibles are
maintained when building a mantel or shelves
above the appliance. Elevated temperatures
on the wall or in the air above the appliance
can cause melting, discolouration or damage
to decorations, a TV, or other electronic
components.
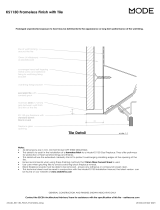
ͳThe appliance must be installed using only
the building materials as approved by the
manufacturer.
ͳEnsure that there is always a socket installed
within 1 metre of the product that is accessible
after installation.
WARNING
HOT GLASS WILL CAUSE BURNS. DO NOT
TOUCH GLASS UNTIL COOLED.
NEVER ALLOW CHILDREN TO TOUCH
GLASS.
6
B
630591_4 TC950 InsTallaTIon Manual
B PRODUCT DETAILS
B1 Product Description
The TC950 is an indoor in-built wood fire.
B2 Specifications Table
Fuel Type Hardwood
Average particulate emissions (g/kg) 1.00
Overall average eciency (%) 61.88
Maximum average heat output (kW) 8.77
B3 Product Dimensions
Fire Dimensions:
746
940 Door width
429
FRONT VIEW
1050
200
150
253
827
189
ISOMETRIC VIEW
TOP VIEW
SIDE VIEW
980 Opening width
Appliance base
423
77
A
7
B
TC950 Zero Clearance Kit Dimensions:
TC950 Linear Fascia Dimensions:
1069mm Width
611mm Height
45mm flange
all around
50mm
fascia depth
1056
748 530
1260
248
247
802
873
1143
ISOMETRIC VIEW
147
600
TOP VIEW
FRONT VIEW
SIDE VIEW
BACK VIEW
832
8630591_4 TC950 InsTallaTIon Manual
8
A
8
B
TC950 Frameless Trim Dimensions
983mm Width
524mm Height
65mm
trim depth
C
9
C INSTALLATION REQUIREMENTS
C1 Installation - General
WARNING
THE INSTALLATION OF THIS FIREPLACE,
CONSTRUCTION OF THE FIREPLACE
ENCLOSURE AND THE FINISHING AND
COMMISSIONING OF THE INSTALLATION
IS A HIGHLY SPECIALIST TASK. ONLY
AHHA APPROVED/ACCREDITED
TRADESMEN SHOULD BE USED
AHHA  AUSTRALIAN HOME HEATING
ASSOCIATION. FAILURE TO FOLLOW
THESE REQUIREMENTS WILL VOID ALL
WARRANTY TERMS.
THIS APPLIANCE AND ITS COMPONENTS
ARE DESIGNED TO BE INSTALLED AND
OPERATED AS A SYSTEM. ANY ALTERATION
TO OR SUBSTITUTION FOR ITEMS IN THIS
SYSTEM, UNLESS ALLOWED BY THESE
INSTALLATION INSTRUCTIONS, WILL
VOID THE LISTING AND MAY VOID THE
PRODUCT WARRANTY. IT MAY ALSO
CREATE A HAZARDOUS INSTALLATION.
READ THROUGH THESE INSTRUCTIONS
THOROUGHLY BEFORE STARTING
YOUR INSTALLATION AND FOLLOW
THEM CAREFULLY THROUGHOUT YOUR
PROJECT.
ͳBefore beginning your installation, consult with
your local building code agency or fire ocials and
insurance representative to ensure compliance.
ͳFor the first two weeks use generous amounts of
fuel and burn the appliance with the air control
fully open for an hour as the appliance goes
through a process of eliminating moisture in
the steel and vermiculite panels. The initial heat
output will be reduced while the moisture is being
drawn from the appliance and it will be necessary
to build several hot fires to remove this moisture.
WEAR GLOVES AND SAFETY GLASSES FOR
PROTECTION
CAREFULLY FOLLOW THE INSTRUCTIONS
FOR INSTALLATION AND USE. FAILURE TO
DO SO MAY RESULT IN A FIRE, ESPECIALLY
IF COMBUSTIBLES ARE TOO CLOSE TO
THE APPLIANCE OR FLUE SYSTEM AND AIR
SPACES ARE BLOCKED, PREVENTING THE
FREE MOVEMENT OF COOLING AIR.
ESCEA ACCEPTS NO LIABILITY
FOR IMPROPER INSTALLATION OR
CONSEQUENTIAL DAMAGES.
Note: The Appliance has been tested and complies
with AS/NZS2918:2018 Appendix B. The flue
system has been tested and complies with
AS/NZS2918:2018 Appendix F.
10 630591_4 TC950 InsTallaTIon Manual
10
A
10
B
10
C
C2 Cavity Construction Requirements
If installing into a cavity constructed from a combustible material, the TC950 fireplace
must be installed into the TC950 Zero Clearance Kit. For installation of the TC950 Zero
Clearance Kit, the minimum cavity opening dimensions are 1265mm W x 580mm D, with
an overall cavity height of 2400mm.
If installing into a non-combustible cavity, the TC950 Zero Clearance Kit is recommended
but not required. Where the TC950 Zero Clearance Kit is not used, it is the responsibility
of the Installer/Owner to ensure that the TC950 Fireplace is installed to AS/NZS
2918:2018.
C3 Floor Protector Requirements
If there is combustible flooring within 500mm of the appliance, a floor protector of a
suitable non-combustible and heat resistant material must be installed. The floor protector
must extend not less than 300mm from the front of the appliance and not less than
200mm from each side of the appliance.
If there is combustible flooring (or any other combustible material) within 500mm of the
appliance front, the base of the appliance must be raised by a minimum of 235mm from
the floor. The base upon which the appliance sits on may be constructed of a suitably stable
heat sensitive material (the base must not extend beyond the front of the appliance).
The floor to product height of 235mm can be reduced if the product is installed over an
insulating, heat resistant floor complying with requirements of AS/NZS 2918:2018 section
3.3.3.
300
1380
Appliance Opening
200 200
1111
A
11
B
11
C
C4 Mantel and Side Wall Clearances
For mantels constructed from a combustible material, the mantel must be installed at a
minimum of 500mm above the appliance opening, a minimum of 300mm either side
of the appliance opening, and can protrude a maximum of 100mm from the front of the
cavity.
Mantels constructed out of non-combustible material may be installed anywhere above the
opening of the appliance.
For more advice on mantel material choice, please contact Escea’s architectural advisory team.
Mantel legs or adjacent side walls, extending more than 100mm from the front of the
cavity, must be 500mm away horizontally from the fireplace opening.
Note: the appliance opening is defined as the inside face of the trim/fascia.
500mm minimum
from appliance opening
100mm maximum
Heat sensitive mantel material
300mm minimum
from appliance opening
300mm minimum
from appliance opening
12 630591_4 TC950 InsTallaTIon Manual
12
A
12
B
12
C
C5 Electrical Requirements
The TC950 appliance comes with a pre-installed fan. Please ensure there is a 10A
3-pin socket within the cavity before installation. This socket must be able to tolerate
temperatures greater than 75 °C and be installed no higher than 300mm from the base
of the fireplace. The electrical supply cable is rated to 105°C. An isolation switch or RCD
must be placed outside the cavity.
The power can be left on when the fire is not in use. The appliance has a built in thermal
switch which will turn the fan on when the fire is in use, and switch the fan o when the
appliance cools down.
C6 TV Installation Requirements
Any TV above the fireplace should be installed with a mantel between the TV and the
fireplace, which meets the following requirements.
The mantel should be made of non-combustible and heat-tolerant material.
The mantel should be at least 1220mm wide and protrude at least 300mm from the
wall.
The underside of the mantel should be at least 420mm above the top of the fireplace
trim.
The mantel should extend at least 100mm wider than both sides of the TV.
The TV should protrude no more than 80mm from the wall.
ALWAYS OPERATE THIS APPLIANCE WITH THE DOOR CLOSED AND LATCHED. A MANTEL
MAY NOT PROTECT A TV WHEN THE DOOR IS LEFT OPEN AND THE FIRE IS HOT.
THE FAN MUST ALWAYS BE POWERED WHEN THE FIREPLACE IS IN OPERATION.
THE TELEVISION CLEARANCE RECOMMENDATIONS ARE TO BE TREATED AS A
SUGGESTION OF A SUITABLE INSTALLATION ONLY. IT IS THE RESPONSIBILITY OF THE END
USER TO CHECK THE INSTALLATION INSTRUCTIONS OF THEIR ELECTRICAL APPLIANCES
TO ENSURE THAT THE LOCATION IN RELATION TO THE FIREPLACE IS SUITABLE. ESCEA
IN NO WAY GUARANTEES OR TAKES RESPONSIBILITY THAT THE RECOMMENDED
INSTALLATION SUGGESTION WILL BE SUITABLE FOR ALL ELECTRICAL OR HOME
ENTERTAINMENT APPLIANCES.
MOST TELEVISION BRANDS WILL NOT WARRANT A TV ABOVE ANY FIREPLACE.
Please contact an Escea Architectural Advisor for any queries regarding installing a TV
above your woodfire.
1313
A
13
B
13
C
C7 Painted Wall Finish Installation Requirements
This installation scenario is for installation into a timber/ combustible cavity, with a painted
wall finish.
The TC950 Zero Clearance Kit must be specified when the appliance is installed into a
combustible cavity. For this installation scenario, the appliance must be installed with the
TC950 Linear Fascia.
When constructing the base (for a combustible floor install), the base needs to be set back
40mm from the front of the cavity front, to accommodate the ‘Skamotec’ panels. The
front of the Skamotec should be flush with the adjacent timber side framing. The base can
be constructed entirely of combustible materials but the upper surface must be continuous
and support the weight of the appliance.
The TC950 Zero Clearance Kit comes supplied with 40mm thick ‘Skamotec’ insulative
panels. For this installation scenario, the top panel and side panels must be rebated to
the dimensions shown below. Use a handsaw to rebate the panels, ensuring the panels are
adequately supported while cutting.
Non-combustible 12mm fibre cement sheet shall be adhesive and mechanically fixed to
the Skamotec panels, the Zero clearance kit, and the adjacent timber framing to provide
a continuous substrate for plaster and paint. Use a high temperature RTV Sealant or
adhesive designed to withstand up to 300 °C. Use the supplied schematics for cutting
the fibre cement sheets. The front of the cavity must be covered with non-combustible
wallboard. The sides of the cavity may be covered with combustible wallboard.
Cavity opening width
1265mm minimum
Heat sensitive floor
to product base
235mm minimum
Cavuty height 2400mm minimum
Lintel stando
342mm minimum
14 630591_4 TC950 InsTallaTIon Manual
14
A
14
B
14
C
2400mm
1440mm*
1200mm 1200mm
B
B
DD
*FIBRE CEMENT
NON-COMBUSTIBLE
WALLBOARD
(HIGHLIGHTED IN LIGHT GRAY)
Bottom sheet cutting pattern
1200mm
1440mm*
Linear fascia
NOTE: STARRED* DIMENSIONS ARE FOR
90 x 45mm FRAMING, ADJUST ACCORDINGLY
IF USING THICKER FRAMING
1054mm 193mm*
193mm*
419mm 563mm
2400mm
393mm
1255mm
419mm 419mm
538mm
129mm
*DIMENSIONS FOR
SKAMOTEC PANELS
(HIGHLIGHTED IN GRAY)
(SUPPLIED WITH
ZERO CLEARANCE KIT)
129mm
1053mm
A
SKAMOTEC TO CHASSIS LIP
(TOP) MINIMUM 30mm
SKAMOTEC TO CHASSIS LIP
(SIDE) MINIMUM 33mm
28mm
45mm
DETAIL A
SCALE 1 : 2
If in
For a painted wall finish, the skamotec panels
must be rebated on the top panel, side panel
top LH corner and side panel top RH corner
(to the dimensions shown).
1515
A
15
B
15
C
250mm dia liner to
combustible material
78mm minimum
Appliance base to lintel:
1143mm minimum
Heat sensitive floor to
product base 235mm
minimum
Internal cavity depth
580mm minimum
C
SECTION B-B
30mm minimum
DETAIL C
LINEAR FASCIA
TOP STANDOFF
FIBRE-CEMENT
WALLBOARD
SKAMOTEC
BOARD
Base set back 40mm from
front of timber to accomodate
skamotec panels
E
SECTION D-D
Skamotec board 40mm thickness
Fascia width 45mm
Fibre cement sheet thickness
10mm recommended
Skamotec to chassis opening
5mm clearance
DETAIL E
SCALE 1 : 2
16 630591_4 TC950 InsTallaTIon Manual
16
A
16
B
16
C
C8 Other Wall Finish Installation Requirements
This installation scenario is for installation into a timber/ combustible cavity, with other
wall finishes such as tiles,brick, schist, stack stone, concrete etc. When installed with the
Frameless Trim, the wallboard can be placed close to the trim (with a small clearance),
giving a sleek, minimalist aesthetic. For more advice on wallboard choice, please contact
Escea’s Architectural Advisory team.
The TC950 Zero Clearance Kit must be specified when the appliance is installed into a
combustible cavity. For this installation scenario, the appliance must be installed with the
TC950 Frameless Trim.
When constructing the base (for a combustible floor install), the base needs to be set back
40mm from the front of the cavity front, to accommodate the ‘Skamotec’ panels. The
front of the Skamotec should be flush with the adjacent timber side framing.
The TC950 Zero Clearance Kit comes supplied with 40mm thick ‘Skamotec’ insulation
board panels. Note: the Skamotec panels do not need to be modified for this install
scenario. Non-combustible 12mm fibre cement sheet shall be adhesive and mechanically
fixed to the skamotec panels, the Zero Clearance Kit, and the adjacent timber framing to
provide a continuous substrate for fixing the selected non-combustible material or finish.
Use a high temperature RTV Sealant or adhesive designed to withstand up to 300°C Use
the supplied schematics for cutting the fibre cement sheets.
The front of the cavity must be covered with non-combustible wallboard. The sides of the
cavity may be covered with combustible wallboard.
Cavity opening width
1265mm minimum
Heat sensitive floor
to product base
235mm minimum
Cavuty height 2400mm minimum
Lintel stando
342mm minimum
1717
A
17
B
17
C
1255mm
419mm 538mm 419mm
129mm 129mm
G
G
F
F
*DIMENSIONS FOR
SKAMOTEC PANELS
(HIGHLIGHTED IN GRAY)
(SUPPLIED WITH
ZERO CLEARANCE KIT)
2400mm
1440mm*
1200mm 1200mm
B
B
DD
*FIBRE CEMENT
NON-COMBUSTIBLE
WALLBOARD
(HIGHLIGHTED IN LIGHT GRAY)
Bottom sheet cutting pattern
1200mm
1440mm*
Frameless Trim
NOTE: STARRED* DIMENSIONS ARE FOR
90 x 45mm FRAMING, ADJUST ACCORDINGLY
IF USING THICKER FRAMING
998mm 221mm*
221mm*
419mm 553mm
18 630591_4 TC950 InsTallaTIon Manual
18
A
18
B
18
C
H
SECTION F-F
DETAIL H
SKAMOTEC
BOARD
FRAMELESS TRIM
250mm dia liner to
combustible material
78mm minimum
Lintel clearance
342mm minimum
Heat sensitive floor to
product base
235mm minimum
Internal cavity depth
580mm minimum
Base set back 40mm from
front of timber to accomodate
skamotec panels
FIBRE CEMENT SHEET
WALLBOARD
SECURED IN
FRONT OF FIBRE
CEMENT SHEET
Skamotec to trim
6mm minimum
Fibre-cement
sheet to trim
10-20mm
recommended
Note: a minimum clearance of 6mm between the trim and the chosen wallboard is required
to account for thermal expansion of the trim.
SKAMOTEC BOARD THICKNESS
40mm
DETAIL I
FRAMELESS TRIM
FIBRE CEMENT SHEET
THICKNESS
10mm RECOMMENDED
FRAMELESS TRIM TO WALLBOARD
6mm MINIMUM
1919
A
19
B
19
C
C9 Zero Clearance Kit Venting Requirements
The TC950 Zero Clearance Kit must be vented. There are multiple options for venting the
kit depending on the install scenario. For all options, the hot air will exhaust through the
Ø250mm galvanised liner sections to outside (which are supplied with the Escea Inbuilt
Flue Kit).
Option 1 - Venting with Outside Air (Preferred)
Outside air can be drawn in by connecting a Ø150mm pipe from outside of the building
to the zero clearance kit. It is recommended to use Ø150mm aluminium ducting (not
supplied).
Venting air can be supplied from the back, or from either side of the zero clearance kit.
A Ø150mm spigot is supplied with the kit. To attach it, take out the blanking plate from
the desired panel and screw the spigot to the panel using the supplied 4x Tek screws (1/4”
driver size).
2
20 630591_4 TC950 InsTallaTIon Manual
20
A
20
B
20
C
Option 2- Venting with Roof Cavity Air
This option takes air from the roof space to vent the Zero Clearance Kit and is only suitable
for single story buildings with ceiling heights 2.7m or less.
Air from the roof space can be utilised to vent the zero clearance kit down through the
square holes located on the back panel and side panels.
Holes must be cut in the ceiling to allow roof space air into the enclosure. The minimum
opening size is 2x 250mm x 150mm (or an equivalent surface area). Alternatively, you can
have no ceiling inside the enclosure to allow as much air as possible into the zero clearance
kit.
MINIMUM CEILING
HOLE SIZE:
250mm x 150mm
CEILING
MINIMUM FLUE
TO CEILING GAP:
25mm
Option 3- Venting with Room Air
This option is not preferred - only consider this if both Options 1 and 2 cannot be applied.
This method will take away warm air from the room - this is undesirable.
Room air can be drawn into the cavity through vents on the side of the cavity. The
minimum venting area is 17,670mm2. Place the vents so that they are in line with the base
of the zero clearance kit. There must be nothing inside the cavity that obscures the path of
venting air to the zero clearance kit.
This will require make up air or a resupply of air into the room the fire is located. This may
be taken from outside by opening a window or door, or providing a vent from the room to
outside.
CEILING
NO CEILING INSIDE
ENCLOSURE
  • Page 1 1
  • Page 2 2
  • Page 3 3
  • Page 4 4
  • Page 5 5
  • Page 6 6
  • Page 7 7
  • Page 8 8
  • Page 9 9
  • Page 10 10
  • Page 11 11
  • Page 12 12
  • Page 13 13
  • Page 14 14
  • Page 15 15
  • Page 16 16
  • Page 17 17
  • Page 18 18
  • Page 19 19
  • Page 20 20
  • Page 21 21
  • Page 22 22
  • Page 23 23
  • Page 24 24
  • Page 25 25
  • Page 26 26
  • Page 27 27
  • Page 28 28
  • Page 29 29
  • Page 30 30
  • Page 31 31
  • Page 32 32
  • Page 33 33
  • Page 34 34
  • Page 35 35
  • Page 36 36
  • Page 37 37
  • Page 38 38
  • Page 39 39
  • Page 40 40
  • Page 41 41
  • Page 42 42
  • Page 43 43
  • Page 44 44
  • Page 45 45
  • Page 46 46
  • Page 47 47
  • Page 48 48
  • Page 49 49
  • Page 50 50
  • Page 51 51
  • Page 52 52
  • Page 53 53
  • Page 54 54
  • Page 55 55
  • Page 56 56
  • Page 57 57
  • Page 58 58
  • Page 59 59
  • Page 60 60
  • Page 61 61
  • Page 62 62
  • Page 63 63
  • Page 64 64
  • Page 65 65
  • Page 66 66
  • Page 67 67
  • Page 68 68
  • Page 69 69
  • Page 70 70
  • Page 71 71
  • Page 72 72
  • Page 73 73

Escea TC950 Installation guide

Category
Fireplaces
Type
Installation guide

Ask a question and I''ll find the answer in the document

Finding information in a document is now easier with AI