Page is loading ...

Robotiq EPick Vacuum Gripper
for TMRobots
Instruction Manual robotiq.com | leanrobotics.org
Original Notice
© 2021 Robotiq Inc.

Revisions 4
1. General Presentation 6
1.1. Gripper nomenclature 6
1.2. Object picking 8
1.3. Setup and control 8
2. Safety 10
2.1. Warning 11
2.2. Intended Use 12
3. Installation 14
3.1. Scope of Delivery 14
3.2. Required Tools and Equipment 17
3.3. Environmental and Operating Conditions 17
3.4. Mechanical Installation 18
3.5. Electrical Setup 24
3.6. Testing the Gripper with the Robotiq User Interface (RUI) 28
4. Software 32
4.1. Overview 32
4.2. Vacuum Gripper register mapping 34
4.3. Robot output registers & functionalities 34
4.4. Robot input registers & status 38
4.5. Vacuum Gripper behavior 41
4.6. Control logic 45
4.7. Modbus RTU communication 45
4.8. Control over TM 52
5. User Interface 70
6. Specifications 71
6.1. Technical dimensions 72
6.2. Mechanical specifications 79
6.3. Electrical specifications 88
7. Maintenance 89
7.1. Vacuum Gripper cleaning 90
7.2. Periodic inspection 91
EPick - Instruction Manual
2


EPick - Instruction Manual
Revisions
Robotiq may modify this product without notice, when necessary, due to product improvements, modifications or changes in
specifications. If such modification is made, the manual will also be revised, see revision information. See the latest version of this
manual online at support.robotiq.com.
2021/07/01
lUpdate of section 4.3 Robot Output Registers & Functionalities
lUpdate of section 3.1 Scope of Delivery
lUpdate of section 6.2 Mechanical Specifications
lUpdate of section 6.2.2 Center of Mass and Tool Center Point
lUpdate of section 8. Spare Parts, Kits and Accessories
2020/04/14
lUpdate of Specification and Warranty sections
2019/12/04
lUpdate of the Vacuum Gripper firmware
lUpdate of the Vacuum Gripper behavior and modes
2019/11/06
lAddition of the TM Wrist Connection Kit (I/O Coupling)
2019/08/13
lUpdate of the latest TMflow 1.72.3500
lUpdate of the version V_002 of the components
2019/07/02
Initial release
4

Copyright
© 2019-2021 Robotiq Inc. All rights reserved.
This manual and the product it describes are protected by the Copyright Act of Canada, by laws of other countries, and by
international treaties, and therefore may not be reproduced in whole or in part, whether for sale or not, without prior written
consent from Robotiq. Under copyright law, copying includes translation into another language or format.
Information provided by Robotiq in this document is believed to be accurate and reliable. However, no responsibility is assumed
by Robotiq for its use. There may be some differences between the manual and the product if the product has been modified after
the edition date.
The information contained in this document is subject to change without notice.
5

1. General Presentation
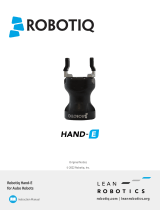
The terms “Gripper”, "EPick Gripper", "EPick Vacuum Gripper" and "EPick" used in the following manual all refer to the Robotiq
EPick Vacuum Gripper. The Robotiq EPick Vacuum Gripper is a robotic peripheral designed for industrial applications. The
vacuum is generated with an electric vacuum pump. Its design makes it a unique robotic end-of-arm tool to quickly pick, place and
handle a large range of parts of varying sizes and shapes.
Info
The following section presents the key features of the Gripper and must not be considered as appropriate to the
operation of the Gripper. Each feature is detailed in the appropriate section.
Info
The following manual uses the metric system. Unless specified, all dimensions are in millimeters.
1.1. Gripper nomenclature
1.1.1. EPick Gripper
The EPick Gripper is a vacuum Gripper that generates a vacuum with an electric vacuum pump.. It is equipped with one or multiple
suction cups. Each suction cup can be adapted to your application and grasping needs. The EPick Gripper is compatible with the
Robotiq standard coupling interface.
Fig. 1-1: Robotiq EPick Gripper
EPick - Instruction Manual
6

Info
Please refer to the Scope of Delivery section subsection and the Spare Parts, Kits and Accessories section for details on
standard and optional parts.
1.1.2. Suction Cup System
A Robotiq Suction Cup System can be installed directly under the Vacuum Gripper. Each Robotiq Suction Cup System includes a
bracket, a manifold, air nodes, port plugs, bumpers, tubing and additional suction cups.
Fig. 1-2: Suction cup system
Info
Please refer to the Installation section for more information on how to integrate the Suction Cup System to EPick.
Info
Please refer to the Scope of Delivery section subsection and the Spare Parts, Kits and Accessories section for details on
standard and optional parts.
Tip
The owner can use a custom bracket or a mounting plate. The bracket or mounting plate can be installed directly under
the manifold.
7

EPick - Instruction Manual
1.2. Object picking
The EPick Gripper allows:
1. Main unit suction cup
2. Auxiliary system with multiple suction cups
Warning
Object picking causes the compression of the suction cup(s) , which can result in pinching points between the gripper
and the load. Avoid presence of body parts in this zone during operation.
Warning
Before picking any new object or material in autonomous mode, always check that the resulting vacuum level is sufficient
to ensure safe gripping, in order to prevent dropping or ejection of the load.
1.2.1. Main unit suction cup
In order to use only one suction cup, the single cup can be mounted right in the port of the vacuum generator.
1.2.2. Auxiliary system with multiple suction cups
A standard Suction Cup System can be attached to the EPick Vacuum Gripper. The bracket normally holds two or four suction
cups (corresponding to the four ports of the manifold).
Any unused manifold port should be blocked with a mating plug to avoid air leakage.
Other custom mounting options can also be used to benefit from a multiple suction cups solution
Caution
Custom brackets and plates must meet the required technical specifications (refer to the Technical dimensions section
subsection).
1.3. Setup and control
The Vacuum Gripper is powered and controlled directly via a single device cable that carries 24 V DC power and Modbus RTU
communication over RS-485.
Info
Please refer to the Electrical Setup section subsection for wiring information, and to the Software section for the control
of the Vacuum Gripper.
In order to be used, the EPick Gripper has to be connected to a Gripper coupling which provides both the mechanical and
electrical connectivity to the Gripper.
8

Info
Please refer to the Mechanical Installation section for more information on mounting the Vacuum Gripper onto the
coupling. Refer to the Technical dimensions section for the technical drawing, and refer to the Spare Parts, Kits and
Accessories section for a list of the available couplings.
The EPick Gripper boasts an embedded object detection feature which uses indirect sensing measurements. The system thus
indicates if the workpiece has been dropped or if the Gripper failed to grasp the workpiece.
Info
For more information regarding the object detection feature, please refer to the Software section.
9

2. Safety
Warning
The operator must have read and understood all of the instructions in the following manual before operating the Robotiq
Vacuum Gripper.
Caution
The term “operator” refers to anyone responsible for any of the following operations on the Robotiq Vacuum Gripper:
lInstallation
lControl
lMaintenance
lInspection
lCalibration
lProgramming
lDecommissioning
This manual covers the various components of the Robotiq Vacuum Gripper and the general operations regarding the whole life-
cycle of the product, from installation to operation and decommissioning.
The drawings and photos in this manual are representative examples. However, discrepancies may be observed between the visual
supports and the actual product.
EPick - Instruction Manual
10

2.1. Warning
Caution
Any use of the Gripper in non-compliance with these warnings is deemed inappropriate and may cause injury or
damage.
Warning
lAlways use the suction cup system and its components (air nodes, port plug, etc.) with the Robotiq Vacuum Gripper
only.
lNever operate the Vacuum Gripper with leaking or worn parts.
lThe Vacuum Gripper needs to be properly secured before operating the robot.
lDo not install or operate a Gripper that is damaged or lacking parts.
lNever supply the Gripper with an alternating current source.
lMake sure all cord sets are always secured at both ends—Gripper and robot.
lAlways meet the recommended keying for electrical connections.
lMake sure no individuals or assets are in the vicinity of the robot and/or Gripper prior to initializing the robot.
lAlways meet the Gripper’s payload specifications.
lSet your vacuum level based on your application.
lKeep body parts and clothing away from the Gripper while the device is powered on.
lDo not use the Gripper on people or animals.
lNever stand under suspended loads held by the Vacuum Gripper.
2.1.1. Risk assessment and final application:
The Robotiq Vacuum Gripper is meant to be used on cobots and industrial robots.
The robot, the Gripper and any other equipment used in the final application must go through a comprehensive risk assessment
process before they can be used. Special care must be taken during this step if custom mounting options are used for the suction
cups.
Caution
It is the robot integrator’s responsibility to ensure that all local safety measures and regulations are met.
The following non-exhaustive list presents risks that must be assessed during the integration process:
lRisk of contact between body parts and suction cups during gripping;
lRisk of load ejection resulting from loss of vacuum;
lRisk of load dropping resulting from loss of vacuum;
11

EPick - Instruction Manual
lRisk of pinching between the Vacuum Gripper and the part(s) or the environment;
lRisk of damage or breaking if using a custom suction cup bracket that does not meet the technical requirements.
Depending on the application, there may be hazards that require additional protection and/or safety measures. For instance, the
workpiece handled by the Gripper could be inherently dangerous to the operator.
Warning
Depending on the supply sources, when an emergency stop (e-Stop) button is pressed, the following consequences may
occur. The robot owner has the responsibility to do a risk assessment and choose the appropriate option.
Supply sources e-Stop consequences
Robot tool supply
(tool connector)
Power failure to the Vacuum Gripper. The vacuum level will drop to ambient pressure and
the object will be lost.
Robot controller supply
(Any 24V pin)
Vacuum Gripper powered ON.
lIf an object is detected: the vacuum level will continue to be regulated and the object
will not be lost.
lIf no object is detected: the Vacuum Gripper will go into a standby state 2 seconds
after the e-Stop button is pressed.
Warning
Loss of vacuum can occur due to power failure.
2.2. Intended Use
The Gripper unit is designed for gripping and temporarily securing or holding objects.
Caution
The Gripper is NOT intended for applying force against objects or surfaces.
12

The product is intended for installation on a robot or other automated machinery and equipment.
Info
Always comply with local, state, province and/or federal laws, regulation and directives regarding automation safety and
general machine safety.
The unit should be used exclusively within the range of its technical data. Any other use of the product is deemed improper and
unintended. Robotiq will not be liable for any damages resulting from any improper or unintended use.
13

3. Installation
The following subsections will guide you through the installation and general setup of your Robotiq Vacuum Gripper.
Warning
Before installing:
lRead and understand the safety instructions related to the Vacuum Gripper.
lVerify your package according to the scope of delivery and your order.
lMake sure to have the required parts, equipment and tools listed in Scope of delivery.
Warning
When installing:
lMeet the recommended environmental conditions.
lDo not operate the Vacuum Gripper, or even turn on the power supply, before the device is firmly anchored and the
machine area is cleared. Make sure that the air supply is secured.
3.1. Scope of Delivery
3.1.1. Robotiq EPick Vacuum Gripper Kit
Standard upon delivery:
lSingle Suction Cup Kit
oOne (1) electrical vacuum generator
oTwo (2) standard suction cups (two different sizes : Ø 40 mm and Ø 55 mm [one of each] ; 1.5 bellows)
oOne (1) End-effector coupling kit
oOne (1) USB stick
oOne (1) USB to RS485 signal converter
oOne (1) RS485 to RS232 Converter
oOne (1) 10-meter communication cable
oRequired hardware
EPick - Instruction Manual
14

lDual Suction Cup Kit
oOne (1) vacuum generator (with one (1) suction cup : Ø 40 mm ; 1.5 bellows)
oOne (1) suction cup system for 2 suction cups (one (1) manifold, one (1) bracket, one (1) tubing, two (2) air nodes)
oFour (4) standard suction cups (two different sizes : Ø 40 mm and Ø 55 mm [two of each] ; 1.5 bellows)
oFour (4) port plugs (two already mounted on the suction cup system)
oOne (1) End-effector coupling kit
o10-meter communication cable
oOne (1) USB to RS485 signal converter
oOne (1) RS485 to RS232 Converter
oRequired hardware
lQuad Suction Cup Kit
oOne (1) vacuum generator (with one (1) suction cup : Ø 40 mm ; 1.5 bellows)
oOne (1) suction cup system for 4 suction cups (one (1) manifold, one (1) bracket, one (1) tubing, four (4) air nodes)
oEight (8) standard suction cups (two different sizes : Ø 40 mm and Ø 55 mm [four of each] ; 1.5 bellows)
oFour (4) port plugs
oOne (1) End-effector coupling kit
o10-meter communication cable
oOne (1) USB to RS485 signal converter
oOne (1) RS485 to RS232 Converter
oRequired hardware
3.1.2. Techman Robots Wrist Connection Kit
EPick Wrist Connect Kit for TM Robots / One (1) cup (VAC-TM-EPICK-KIT1-W)
Included:
l1 x Robotiq EPick Gripper
l1 X I/O Coupling Kit (IO-CPL-TM-KIT) including:
l1 x I/O Coupling
l1 x screw kit to install on the robot
l1 x Micro-USB to USB cable (CBL-MICRO-USB-6FT)
l1 x USB Stick (ACC-USB-16G)
l1 x Suction cup
15

EPick - Instruction Manual
EPick Wrist Connect Kit for TM Robots / Two (2) cups (VAC-TM-EPICK-KIT2-W)
Included:
l1 x Robotiq EPick Gripper
l1 X I/O Coupling Kit (IO-CPL-TM-KIT) including:
l1 x I/O Coupling
l1 x screw kit to install on the robot
l1 x Micro-USB to USB cable (CBL-MICRO-USB-6FT)
l1 x USB Stick (ACC-USB-16G)
l1 x Suction system for two (2) cups
EPick Wrist Connect Kit for TM Robots / Four (4) cups (VAC-TM-EPICK-KIT4-W)
Included:
l1 x Robotiq EPick Gripper
l1 X I/O Coupling Kit (IO-CPL-TM-KIT) including:
l1 x I/O Coupling
l1 x screw kit to install on the robot
l1 x Micro-USB to USB cable (CBL-MICRO-USB-6FT)
l1 x USB Stick (ACC-USB-16G)
l1 x Suction system for four (4) cups
Info
Please refer to the Spare Parts, Kits and Accessories section for a list of available couplings.
Caution
The following are not included in the standard delivery:
lOptions such as custom suction cup brackets/plates or couplings for mounting on various industrial robots.
lHardware required for accessories or fixtures, unless specified.
Info
When purchased as a kit, the EPick Vacuum Gripper will come in a package with the appropriate coupling, suction cups
and cabling. Please refer to the Spare Parts, Kits and Accessories section for additional components.
16

3.2. Required Tools and Equipment
3.2.1. EPick Gripper Add-On
The following tools are required to install the Vacuum Gripper:
lHex key to mount the coupling onto the robot, according to your coupling
l4 mm hex key to mount the Vacuum Gripper onto its coupling .
3.2.2. Suction cup system
The following tool is required to install the Suction cup system on the Vacuum Gripper:
l4 mm hex key to assemble together the suction cup system and the vacuum generator.
3.3. Environmental and Operating Conditions
CONDITION VALUE
Minimum storage/transit
temperature
-30°C [-22°F]
Maximum storage/transit
temperature
60°C [140°F]
Minimum operating temperature 5°C [41°F]
Maximum operating temperature 40°C [104°F]
Humidity (non-condensing) 20-80% RH
IP Rating IP 4X
Table 3-1: Environmental and operating conditions of the EPick Vacuum Gripper
Caution
Use of the Vacuum Gripper is not recommended in presence of chemicals in the environment.
Info
The input filter prevents any dust larger than 200 µm from getting inside the pump. Dry dust will prevent the
accumulation on filters or inside the pump. The use of suction cups with integrated filter can be used to reduce dust
accumulation.
17

EPick - Instruction Manual
The exhaust must not be blocked.
3.4. Mechanical Installation
3.4.1. Installing the Vacuum Gripper onto the robot
Single Gripper
Installation with the Standard Coupling Kit
For purposes of power and communication, a coupling must be used to attach the Vacuum Gripper to the robot.
Here are the steps to follow to mount the Gripper on the robot arm (exploded view in figure below). Please note that all screws
should be secured using medium strength threadlockers.
1. Mount the coupling on the robot wrist using the provided M6 screws and tooth lock washers. Align properly with the dowel
pin. The dowel pin is meant to have a tight fit on the robot side and a slip fit on the effector side of the assembly.
2. Fasten the Gripper to the coupling using the provided M5 screws and tooth lock washers.
3. Plug the device cable into the gripper's pigtail and attach the cable along the robot arm using a cable routing system.
18

Fig. 3-1: Installing the Vacuum Gripper onto the robot wrist
Installation with the Techman Robots Wrist Connection Kit
General presentation & Nomenclature of the I/O Coupling
The Robotiq I/O Coupling is a robotic peripheral designed to allow a direct connection of the Robotiq Grippers to the Techman
Robots tool flange. It removes the need of any cable management and avoids downtime caused by cable issues. Depending on
the robot tool I/Os, the I/O Coupling will send the selected presets to the Robotiq Vacuum Gripper to allow its full programming.
Fig. 3-2: Robotiq I/O Coupling
The status LED, integrated in the micro-USB port presented in the figure above, will be:
19

EPick - Instruction Manual
lSolid blue/red when booting
lSolid red when looking for product or waiting for communication
lSolid blue when powered with no errors (while communication is active)
lSolid green when communicating with USB
The I/O Coupling comes with four (4) factory presets, as shown in the table below. These four (4) presets can be reconfigured on a
computer before using them on a robot.
Preset 1 Preset 2 Preset 3 Preset 4
Grip in Auto mode Continuous grip Min: 10
Max: 20
Release in Auto mode
Table 3-2: Factory presets for Vacuum Grippers
Safety
Warning
When changing the Vacuum Gripper, it is important to follow the steps in order:
1. Unplug the I/O Coupling cable.
2. Remove the Gripper with the 4mm hex key.
3. Install the new Vacuum Gripper with the required tools.
4. Plug the I/O Coupling cable in the robot tool connector.
Mechanical Installation
Mounting the I/O Coupling
1. Insert the provided dowel pin into the tool flange. The dowel pin is meant to have a tight fit on the robot side and a slip fit
on the effector side of the assembly.
2. Mount the I/O Coupling on the robot tool flange. Align it properly with the dowel pin.
3. Use the provided M6 screws, the M6 toothlock washers and the 4mm hex key to secure the I/O Coupling installation.
Mounting the Vacuum Gripper onto the I/O Coupling
1. Fasten the Vacuum Gripper onto the I/O Coupling using the M5 screws and toothlock washers of the Gripper.
Caution
Be careful with the fragile pins while installing the Vacuum Gripper onto the I/O Coupling. Any abrupt movement can
damage the pins and lead to product malfunction.
2. Plug the I/O Coupling connector into the robot tool flange connector.
20
/