Page is loading ...

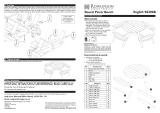
1. Sides
3. Liner
2021 © Rowlinson Garden Products Ltd
2. Floor panel
We constantly improve the quality of our products, occasionally
the components may differ from the components shown and are
only correct at time of printing. We reserve the right to change the
specification of our products without prior notice.
x 2 Drill
No. Components Qty.
1 Corner Posts 4
2 Side panels 4
3 Floor 1
4 Liner material 1
No. Fixings Qty.
4 80mm screw 16
5 50mm screw 6
Position the liner inside the planter and fill
with chosen planting media, trim away
any excess liner to suit.
Important Note: turn planter upside down to fit floor.
Before assembly
• We recommend that time is taken to read the instructions before
starting assembly, then follow the easy step by step guide.
The instruction sheet is only a guide to the assembly.
Certain items may not be shown to scale.
• Check all components prior to assembly
• Drill pilot holes for every screw.
• This product should be assembled by two people
• Never attempt to erect the assembly in high winds.
Recommended tools for assembly
• Power drill/screwdriver
• Drill with 3mm diameter drill bit
• Crosshead screwdriver bit
• Tape measure
English SS532
Assembly Instructions
Aston Planter
ROWLINSON GARDEN PRODUCTS LIMITED
Green Lane
Wardle, Nr. Nantwich
Cheshire, CW5 6BN
email: [email protected]
Help Line (Normal Office Hours) 01829 261 121
40mm
20mm
Chamfered
top
40mm
20mm
2
3
1
1
4
1
2
2
4
2
50mm
80mm
80mm
80mm
80mm
80mm
80mm
80mm 80mm
/