Page is loading ...

This kit contains the following items:
Quantity: Description: Size: Location:
12 Puck-Aluminum 2-1/4” x 1” 1/2” hole All
12 Bolt 12-1.75x130mm All
2 Lock Nut 12-1.75mm 1,2
2 Flat Washer 1/2” USS 1,2
2 OEM Body Mounts 1,2
MOUNTAIN OFF ROAD ENTERPRISES, LLC.
P.O. BOX 690, DELTA, COLORADO 81416
970-625-0500 970-625-3747 Fax
E-mail: [email protected]
www.mountainoffroad.com
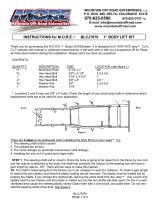
INSTRUCTIONS for M.O.R.E.™ BLJK4D 1” BODY LIFT KIT
This M.O.R.E.™ One Inch Body Lift Kit fits 2007 Jeep® JK®
Wrangler® vehicles with manual* or automatic transmissions and
with or without air conditioning. This kit has been designed to fit on
JK Wrangler’s that are stock (no suspension lift), or Wrangler’s that
have been lifted with aftermarket suspension lift kits up to 6”.
Please read all instructions and our Terms and Policies on page 3
before you begin installing this kit. Familiarize yourself with all
components in this kit and the parts of your Jeep that you will be
working on. Common hand tools are required and some mechani-
cal knowledge is recommended.
*May be necessary to trim inner shifter boot if you have contact in
2nd, 4th and reverse.
Page 1 of 3
©

1. Remove the grille facia by removing the plastic screw retainers and carefully pull forward on the bottom
to release the snap clips. Remove the turn signal electrical connectors and grille facia is able to be re-
moved (See figures 2, 3 & 4)
2. Follow the wires coming from the oxygen sensor on the drivers side exhaust manifold up to the
connector ( close to the Brake master cyl. ). Pull the connector out of it’s locating hole to allow slack once
the body is lifted up. ( see Figure 5 )
3. Loosen all 12 body mount bolts. Remove 5 bolts and 1 nut ( Position # 1 ) on the driver’s side. You will
need to remove the large washers from the stock bolts. This is easiest done by supporting the washer
over the jaws of a vise and hammering down on the bolt . ( See Figures 6 & 7 )
4. Place a stout piece of wood on a floor jack and place the jack between body mount 3 and 5 on the DS
channel portion of the body. Jack up the body just enough to install the 1 inch pucks on top of the factory
rubber insulators. On position 1 & 2 you will need to remove the factory body mount ( Figure 8 ), you will
then need to remove the washer from the factory body mounts ( See Figure 9 ). Now place the supplied
body mounts in to position 1 & 2, the supplied 1/2” uss flat washers will be placed under the body mount
outrigger. ( See Figure 10 for proper sequence of pucks and body mount in positions 1 & 2 ).Place the
M.O.R.E.™ pucks in locations 1,3,5,7,9,11. It is recommended that you use a dab of lock-tight on the
new longer bolts. Start the new longer bolts with the large washers in locations 1,3,5,7,9,11 ( See Figure
11 For proper sequence of pucks and hardware in all remaining locations ). Do not tighten at this time.
See Figure 1 for locations of body mounts.
5. Repeat steps 3 & 4 on the passenger side of the body.
6. Now, tighten the new longer body mount bolts. Use your judgment as to how tight to torque the bolts. Do
not "crush" the rubber insulators or leave the bolts too loose!
7. Go back and re-check all of your work. Make sure that all the bolts are tight and nothing has been left
"un-done". Re-check the body bolts after 4-Wheeling and every few months. If you have any questions or
comments, please call. Thank you for purchasing this product from M.O.R.E.™.
TERMS-POLICIES:
RETURNS: No returns will be accepted without prior permission from M.O.R.E.™ LLC. After you receive a Return Goods Authorization (RGA) number, merchan-
dise must be returned prepaid and insured. A claim must be made with in 30 days from receipt of merchandise. The original invoice or a copy with the RGA num-
ber written on must accompany all returns. A 20% restocking fee will be charged on all parts returned for credit or refund unless merchandise is proven to be
defective or was shipped wrong by M.O.R.E.™ LLC. No merchandise will be issued credit or refund if it has been installed, modified, used in any way or is in
unsalable condition.
WARRANTY: All merchandise is warranted to be free from defects in materials and workmanship prior to installation. Any alteration or improper use will void this
warranty. Because all parts we sell are intended for use in heavy-duty applications it is not possible to warrantee or guarantee the performance of any items.
M.O.R.E.™ LLC. products and the products manufactured by others, which we sell may be subject to an infinite variety of conditions due to the manner in which
they are used, serviced and/or installed. Purchasers and users of such products rely upon their own judgment as to the suitable use selection, service and instal-
lation of such products.
PRODUCT DISCLAIMER: Modification of your vehicle to enhance performance with parts sold by M.O.R.E.™ LLC. may create a dangerous condition which
could cause serious bodily injury, and the buyer hereby expressly assumes all risks associated with any such modifications. All parts sold by M.O.R.E.™ LLC.
are for racing or off road use only. Mountain Off Road Enterprises LLC. will not accept responsibility for personal injury or property damage arising from the failure
of any parts manufactured or sold by M.O.R.E.™ LLC.
Specifications are subject to change without notice.
Jeep® , JK® , Wrangler® , are registered trademarks of DaimlerChrysler .
M.0.R.E.™ is a trademark used by Mountain Off Road Enterprises, LLC. The M.O.R.E.™ logo and these instructions are copyright© , 2008.
Page 2 of 3

Page 3 of 3
Figure 2 Figure 3 Figure 4
Figure 5 Figure 6 Figure 7
Figure 8 Figure 9 Figure 10
Figure 11

This kit contains the following items:
Quantity: Description: Size: Location:
10 Puck-Aluminum 2-1/4” x 1” 1/2” hole 1-10
2 Puck-Aluminum 2-1/4” x 1” 9/16” hole 11-12
10 Bolt 12-1.75x130mm 1-10
2 Bolt 14-2.0x130mm 11-12
2 Lock Nut 12-1.75mm 1,2
2 Flat Washer 1/2” USS 1,2
2 OEM Body Mounts 1,2
MOUNTAIN OFF ROAD ENTERPRISES, LLC.
P.O. BOX 690, DELTA, COLORADO 81416
970-625-0500 970-625-3747 Fax
E-mail: [email protected]
www.mountainoffroad.com
INSTRUCTIONS for M.O.R.E.™ BLJK4D 1” BODY LIFT KIT
This M.O.R.E.™ One Inch Body Lift Kit fits 2008 Jeep® JK®
Wrangler® vehicles with manual* or automatic transmissions and
with or without air conditioning. This kit has been designed to fit on
JK Wrangler’s that are stock (no suspension lift), or Wrangler’s that
have been lifted with aftermarket suspension lift kits up to 6”.
Please read all instructions and our Terms and Policies on page 3
before you begin installing this kit. Familiarize yourself with all
components in this kit and the parts of your Jeep that you will be
working on. Common hand tools are required and some mechani-
cal knowledge is recommended.
*May be necessary to trim inner shifter boot if you have contact in
2nd, 4th and reverse.
Page 1 of 3
©

1. Remove the grille facia by removing the plastic screw retainers and carefully pull forward on the bottom
to release the snap clips. Remove the turn signal electrical connectors and grille facia is able to be re-
moved (See figures 2, 3 & 4)
2. Follow the wires coming from the oxygen sensor on the drivers side exhaust manifold up to the
connector ( close to the Brake master cyl. ). Pull the connector out of it’s locating hole to allow slack once
the body is lifted up. ( see Figure 5 )
3. Loosen all 12 body mount bolts. Remove 5 bolts and 1 nut ( Position # 1 ) on the driver’s side. You will
need to remove the large washers from the stock bolts. This is easiest done by supporting the washer
over the jaws of a vise and hammering down on the bolt . ( See Figures 6 & 7 )
4. Place a stout piece of wood on a floor jack and place the jack between body mount 3 and 5 on the DS
channel portion of the body. Jack up the body just enough to install the 1 inch pucks on top of the factory
rubber insulators. On position 1 & 2 you will need to remove the factory body mount ( Figure 8 ), you will
then need to remove the washer from the factory body mounts ( See Figure 9 ). Now place the supplied
body mounts in to position 1 & 2, the supplied 1/2” uss flat washers will be placed under the body mount
outrigger. ( See Figure 10 for proper sequence of pucks and body mount in positions 1 & 2 ).Place the
M.O.R.E.™ pucks in locations 1,3,5,7,9,11. It is recommended that you use a dab of lock-tight on the
new longer bolts. Start the new longer bolts with the large washers in locations 1,3,5,7,9,11 ( See Figure
11 For proper sequence of pucks and hardware in all remaining locations ). Do not tighten at this time.
See Figure 1 for locations of body mounts. On 2008 Jk’s you will need to install the 2 pucks with the
9/16” holes in locations 9-10 and install the larger 14mm bolts.
5. Repeat steps 3 & 4 on the passenger side of the body.
6. Now, tighten the new longer body mount bolts. Use your judgment as to how tight to torque the bolts. Do
not "crush" the rubber insulators or leave the bolts too loose!
7. Go back and re-check all of your work. Make sure that all the bolts are tight and nothing has been left
"un-done". Re-check the body bolts after 4-Wheeling and every few months. If you have any questions or
comments, please call. Thank you for purchasing this product from M.O.R.E.™.
TERMS-POLICIES:
RETURNS: No returns will be accepted without prior permission from M.O.R.E.™ LLC. After you receive a Return Goods Authorization (RGA) number, merchan-
dise must be returned prepaid and insured. A claim must be made with in 30 days from receipt of merchandise. The original invoice or a copy with the RGA num-
ber written on must accompany all returns. A 20% restocking fee will be charged on all parts returned for credit or refund unless merchandise is proven to be
defective or was shipped wrong by M.O.R.E.™ LLC. No merchandise will be issued credit or refund if it has been installed, modified, used in any way or is in
unsalable condition.
WARRANTY: All merchandise is warranted to be free from defects in materials and workmanship prior to installation. Any alteration or improper use will void this
warranty. Because all parts we sell are intended for use in heavy-duty applications it is not possible to warrantee or guarantee the performance of any items.
M.O.R.E.™ LLC. products and the products manufactured by others, which we sell may be subject to an infinite variety of conditions due to the manner in which
they are used, serviced and/or installed. Purchasers and users of such products rely upon their own judgment as to the suitable use selection, service and instal-
lation of such products.
PRODUCT DISCLAIMER: Modification of your vehicle to enhance performance with parts sold by M.O.R.E.™ LLC. may create a dangerous condition which
could cause serious bodily injury, and the buyer hereby expressly assumes all risks associated with any such modifications. All parts sold by M.O.R.E.™ LLC.
are for racing or off road use only. Mountain Off Road Enterprises LLC. will not accept responsibility for personal injury or property damage arising from the failure
of any parts manufactured or sold by M.O.R.E.™ LLC.
Specifications are subject to change without notice.
Jeep® , JK® , Wrangler® , are registered trademarks of DaimlerChrysler .
M.0.R.E.™ is a trademark used by Mountain Off Road Enterprises, LLC. The M.O.R.E.™ logo and these instructions are copyright© , 2008.
Page 2 of 3

Page 3 of 3
Figure 2 Figure 3 Figure 4
Figure 5 Figure 6 Figure 7
Figure 8 Figure 9 Figure 10
Figure 11
/