Page is loading ...

LoD Offroad
Jeep JK Signature Series Midwidth Front Bumper
Installation Instructions
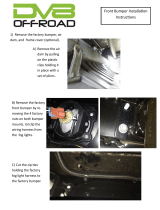
1. Begin the installation of your
new LoD Signature Series
Midwidth Front Bumper by
unscrewing the 4 plastic screws
securing the factory air dam to
the bottom of your front bumper.
A phillips screwdriver will be
needed for this job.
2. Once unscrewed, you should
be able to pull out both the
plastic screw and insert with
little effort but if you find that
your screws are just spinning (as
several of mine did), you will
need to wedge a flathead
screwdriver or small pry bar
between your JK’s plastic
bumper and air dam to help you
force it out as shown in this
photo.
3. Now, climb under the front of
your Jeep JK Wrangler and using
a phillips screwdriver, remove
the remaining 2 plastic screws
securing the air dam to the lower
cross member. As before, if these
screws just spin in place, use a
flathead screwdriver or small pry
bar to help you force them out.
1

4. If your Jeep JK Wrangler
came equipped with factory fog
lights, climb under the front of
your Jeep, look up behind the
front bumper, locate the wiring
harness plug, lift up the clip and
then pull it off as shown in this
photo.
5. Using a pair of needle nose
pliers, pry off all the fog light
wiring harness connectors on the
back of your Jeep JK Wrangler’s
front bumper.
6. Using an 18mm socket,
remove the 4 bumper mounting
nuts (2 on each side) located next
to the inside of your Jeep JK
Wrangler’s frame rails and fog
light holes.
2

7. Using an 18mm socket,
remove the 4 bumper mounting
nuts (2 on each side) located next
to the outside of your Jeep JK
Wrangler’s frame rails.
8. Remove the backing plates off
the bumper mounting studs as
shown in this photo.
9. Carefully pull off your Jeep
JK Wrangler’s front bumper off
the frame rails. If your JK came
equipped with factory tow hooks,
grab and use both of them to
carefully pull your front bumper
off the frame rails.
3

10. Using a phillips screwdriver,
remove the 2 plastic screws
securing the top plastic cover in
place.
11. Again, if you find these
screws to just spin in place, use a
flathead screwdriver or small pry
bar to help you lift up the cover
off the frame rail and force the
screw out.
12. Again, if your Jeep JK
Wrangler came equipped with
factory fog lights, use a phillips
screwdriver to remove the 4
screws securing them to the
bumper. Then, pull the fog lights
out and set them aside until you
are ready to install them in your
new LoD Signature Series JK
Front Winch Bumper.
Note: If installing on 2012 or
newer Wrangler Refer to end
of Instructions Step 1a for
Relocation of Vacuum Switch.
4

13. Place the LoD Signature
Series winch plate in between the
frame rails of your Jeep JK
Wrangler and loosely secure it in
place using the flagged nut and
bolt and washer provided as
shown in this pic.
14. Slide one of the steel spacers
in between the LoD Signature
Series winch plate and frame rail
bumper mount on your Jeep JK
Wrangler. Then, insert the long
bolts and washers provided with
the bumper through the
mounting holes and spacer as
shown in this pic.
15. Repeat step #14 until all the
steel spacers are installed in
between the LoD Signature
Series winch plate and frame rail
bumper mount and that all the
bolts are sticking through them
as shown in this pic.
5

16. With the help of a friend,
carefully place your new LoD
Signature Series JK Front Shorty
Winch Bumper on to the frame
rails of your Jeep JK Wrangler and
slide the mounting holes through
the bolts you just installed.
Reaching from the back, loosely
secure it in place using the nuts
provided.
17. Using a 3/4″ socket and
wrench, tighten up the (4)
mounting bolts and nuts on the
inside of your Jeep JK Wrangler’s
frame rails as shown in this pic.
18. Accessing the bolts and nuts
through the fog light holes on your
LoD Signature Series JK Front
Winch Bumper, tighten up the (4)
mounting bolts and nuts located on
the outside of your Jeep JK
Wrangler’s frame rails using a 3/4″
socket and wrench.
6

19. Using a 3/4″ socket, tighten up
the LoD Signature Series winch
plate frame rail mounts as shown in
this pic.
20. Drill out the 4 mounting holes
on each of your your Jeep JK
Wrangler’s fog lights using a 1/4″
drill bit.
21. Make sure that the adjustment
screw is pointing down and then
install your Jeep JK Wrangler
factory fog lights to the studs
attached to the back side of your
LoD Signature Series JK Front
Winch Bumper.
7

22. Secure your Jeep JK
Wrangler factory fog lights on
to your LoD Signature Series
JK Front Winch Bumper using
the nuts provided. You will
need a 3/8″ socket for this job.
23. Using a phillips
screwdriver, loosen the plastic
retaining screws securing the
top of your grille to your Jeep
JK Wrangler.
24. Once loose, the entire
plastic screw and expansion
sleeve should pull up and out
of their mounting holes.
8

25. Lean your Jeep JK
Wrangler’s grille forward a bit
to gain access to the indicator
lights. Then, take the wiring
harness plug and pull the red
locking tab back.
26. Squeeze the wiring harness
plug and pull it out of your
Jeep JK Wrangler’s indicator
light socket. You can now pull
the grille off and set it aside for
now.
27. At this point you will need
to extend your factory wiring
harness to the fog lights since
the fog lights are now relocated
to a wider position than before.
After lengthening the wiring
plug your Jeep JK Wrangler’s
factory wiring harness back
into the fog lights.
9

28. If you are installing a
winch, you will need to install
your fairlead now. Most
fairleads have a bolt and nut
that requires a 5/8″ socket and
wrench to install.
29. Carefully place your winch
on top of the LoD Signature
Series winch plate and then
reinstall your Jeep JK
Wrangler’s grille as shown in
this pic.
30. Using the bolts and
washers provided, secure your
winch to the bottom of the LoD
Signature Series winch plate.
You will need a 9/16″ socket
for this job.
10

31. Using a phillips
screwdriver, secure the top of
the grille to your Jeep JK
Wrangler by inserting and
screwing in the plastic
retaining screws.
32. Hold up the LoD Signature
Series skid plate to the bottom
of the bumper and secure it in
place using the bolts and
washers provided. You will
need a 9/16″ socket for this
job.
33. Secure the LoD Signature
Series skid plate to the lower
cross member of your Jeep JK
Wrangler using the bolts and
washers provided. You will
need a 9/16″ socket and
wrench for this job.
11

12
34. This completes the
Installation of the LoD
Signature Series Midwidth
Front Bumper.
Jeep JK 2012 Relocation Bracket
Installation Instructions
1a. The 2012 Jeep Wrangler has a
vacuum switch located within the
frame rails. This vacuum switch
will need to be relocated to allow
room for the LoD winch plate.
2a. Begin by removing the green clip
that secures the vacuum line to the
switch. Simply slide the clip down
and pull the line off the switch.

13
3a. Remove the two nuts that secure
the switch. You can leave the switch
wiring connected. Move the switch
away from the mounting tab with
studs.
4a. With the switch out of the way
cut the tab off that is closest to the
front of the Jeep as shown in the
photo.
5a. Place the LoD relocation
bracket up under the cross member
as shown in the pic. Bolt the
bracket on using the bolts provided
with the kit. The bracket will
mount directly up to existing holes
so there is no drilling required.

6a. With the bracket installed bolt
the vacuum switch to the bracket
as shown. The switch will be
repositioned on its side in the new
bracket.
7a. Bolt the switch into place on
the bracket.
8a. Connect the vacuum lines that
were removed earlier.
14

9a. When finished the vacuum
switch should look like the pic to
the right.
Note: Return to Step 13 of
Bumper Installation.
15
/