Page is loading ...

RABW4QUAD BLACK & WHITE CAMERA KIT WITH QUAD SPLITTER VIDEO SURVEILLANCE SYSTEM INSTALLATION AND SETUP GUIDE (8000-2752-03, REV. A)
1 OF 5
Black & White Camera
Kit with Quad Splitter
Video Surveillance
System
Installation and Setup Guide
P
o
w
e
r
T
o
n
e
S
e
q
M
o
d
e
L
i
v
e
D
i
s
p
l
a
y
S
e
t
1
2
3
4
A
L
L
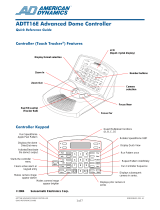
RABW4QUAD
Qty Description
4 1/3” B/W Indoor Fixed Camera
4 3.5-8mm Variable Focal Lens
1 12” B/W Video Monitor
1 24hr Time lapse VCR
3 25’ BNC-BNC Patch Cord
1 B/W Standard Quad Splitter
4 100’ Composite Video and Power Cables
4 Transformers
4 Wall Mounts
4 Fixed Camera Install Kit
Contents
About this Guide................................................ 1
Before You Begin............................................... 1
Installation Overview.......................................... 2
Preparing Cameras............................................ 3
Connecting Cables to the Quad Splitter............ 3
Adjusting the Lenses ......................................... 4
Troubleshooting................................................. 4
Video Does Not Appear on Monitor ............ 4
VCR Recording ........................................... 5
VCR Playback............................................. 5
If you need assistance... ............................. 5
Declarations....................................................... 5
Regulatory Compliance............................... 5
Other Declarations...................................... 5
© Sensormatic 2000
About this Guide
This installation and setup guide explains how to
connect the equipment included in your video
surveillance system. Each piece of equipment
includes its own operating instructions. These
instructions should be used for specific operating
information.
Before You Begin
1. Unpack and inspect each piece of
equipment.
If any equipment appears damaged, contact
your sales representative.
2. Locate the manuals for each piece of
equipment.
Manuals are included with each component.
Keep these manuals for future reference.
3. Read through the instructions before
installing any equipment.
Understanding the steps before starting helps
you identify any tools you might need.
4. Identify where each piece of equipment will
be installed.
Ensure that you have enough space for
installing the equipment.
5. Make that you have enough electrical
outlets to power the equipment.
To protect your equipment, you may want to
consider using a power strip with surge
protection.
6. Perform any pre-installation steps that are
needed.
Mark the locations for each component. Install
the lenses before mounting the cameras.
Route cables before installing other equipment.
7. Determine how the cables will be routed
between the cameras and the Quad Splitter.
Ensure that the cables do not cross sharp
objects or are subject to possible damage.
Consider using cable clamps or mounts to
keep the cables securely in place.
Cameras (4) Quad Splitter
Monitor VCR

RABW4QUAD BLACK & WHITE CAMERA KIT WITH QUAD SPLITTER VIDEO SURVEILLANCE SYSTEM INSTALLATION AND SETUP GUIDE (8000-2752-03, REV. A)
2 OF 5
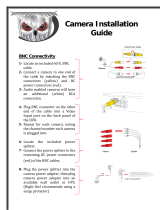
Installation Overview
The following illustrates the basic connections used with your video surveillance system.
Figure 1. Video Surveillance System connections.
Item From Connection To Connection
Camera Video (BNC) Quad Splitter Cam 1 In
Camera Video (BNC) Quad Splitter Cam 2 In
Camera Video (BNC) Quad Splitter Cam 3 In
Camera Video (BNC) Quad Splitter Cam 4 In
VCR Video Out Quad Splitter VCR In
VCR Video In Quad Splitter VCR Out
Monitor In - set to 75
Ω
(ohms)
Quad Splitter Monitor
Camera 24 Vac 24Vac Transformers
Monito
r
Time Lapse
VCR
Quad Splitte
r
(Rear View)
Cameras
Use 100' Plenum cable
Use 25' BNC-BNC
Patch Cord
Use 25' BNC-BNC
Patch Cords
Cameras use 24Vac power
transformers. See
Preparing Cameras.

RABW4QUAD BLACK & WHITE CAMERA KIT WITH QUAD SPLITTER VIDEO SURVEILLANCE SYSTEM INSTALLATION AND SETUP GUIDE (8000-2752-03, REV. A)
3 OF 5
Preparing Cameras
These steps are provided for information only.
For specific steps, use the instructions
included with the cameras.
1. Mark the locations where the cameras will be
mounted. Use the camera base to mark where
holes will be drilled.
2. Drill holes for the camera base. Install the
camera base.
3. Route the 100' video and power cables from
the camera locations to the location where the
multiplexer will be installed.
4. Remove the protective cover from the front of
each camera. Install the lens.
5. Decide if the camera base will be installed as a
wall mount or ceiling mount. Attach the base to
the camera. Refer to the instructions included
with the camera.
6. Connect the video cable to the Video port on
the camera.
IMPORTANT! Switches on the back of the
camera have been preset for proper
performance.
7. Connect the two-conductor power cable to the
connector labeled 24VAC on back of camera.
8. Connect other end of the power cable to the
power transformer terminals labeled AC. See
Figure 2.
Figure 2. Power Transformer.
9. Apply power to the cameras.
Continue with Connecting Cables to the Quad
Splitter.
Connecting Cables to the
Quad Splitter
These steps are provided for information only. For
specific steps, use the information included with
the Quad Splitter.
1. Orient the Quad Splitter so that its rear panel is
facing you.
2. Connect the video cables from the cameras to
the ports labeled Cam 1 - Cam 4 In.
3. Connect one end of the monitor cable to the
Quad Splitter port labeled Monitor. Connect
the other end of the cable to the monitor port
labeled Video In. Set the termination switch to
75Ω (ohms).
4. Connect the VCR cables.
• VCR In on the Quad Splitter connects to
Video Out on the VCR.
• VCR Out on the Quad Splitter connects to
Video In on the VCR.
5. Connect all power cables to electrical outlets.
Power on each piece of equipment. You
should see video from the cameras on the
monitor.
Refer to the information included with the
equipment for additional information concerning the
setup of the video surveillance system.
Continue with Adjusting the Lenses.

RABW4QUAD BLACK & WHITE CAMERA KIT WITH QUAD SPLITTER VIDEO SURVEILLANCE SYSTEM INSTALLATION AND SETUP GUIDE (8000-2752-03, REV. A)
4 OF 5
Adjusting the Lenses
Once all cables are connected to the video
surveillance system, you may need to adjust the
lenses on the cameras. Because the cameras are
installed away from the monitor, you will need a
second person to help with this job: one person to
watch the monitor, and one person to adjust the
lens.
The variable focus lens provides three types of
adjustments:
• Focus: Near (N) to Infinity (∞)
• Focal Length: Telephoto (T) to Wide Angle (W)
• Iris: Close to Open
The following illustration identifies the locations of
the adjustment rings on the lens.
Figure 3. Lens adjustment rings.
To adjust the lens settings:
1. Adjust the Focal Length.
• Turn the ring towards W (wide angle) to use a
longer focal length.
• Turn the ring towards T (telephoto) to use a
shorter focal length.
2. Adjust the Focus.
• Turn the ring towards N (near) to adjust the
focus to close objects.
• Turn the ring towards ∞ (infinity) to adjust the
focus to distant objects.
3. If the image seems too dark or too bright, adjust
the Iris.
• Turn the ring towards Close to make the
image appear dimmer (darker).
• Turn the ring towards Open to make the
image appear brighter (lighter).
Troubleshooting
Your video surveillance system includes a one-
year factory mail-in repair limited warranty. If
you experience problems with your equipment, use
these procedures to help identify the problem. If
these procedures do not work, contact customer
support at 1-800-241-6678.
Note: The instructions included with the equipment
may include additional troubleshooting steps. If you
do not find the answer to your problem here,
review the other instructions before contacting
customer support.
Video Does Not Appear on
Monitor
1. Make sure that the monitor is plugged in and
powered on. (The monitor light is on.)
2. Make sure that the monitor cable is connected
to the Monitor port on the Quad Splitter and
Video In port on the monitor.
3. Make sure that video cables from the cameras
are securely connected to the Camera In ports
on the Quad Splitter and Video ports on the
cameras. Refer to Figure 1 for wiring
information.
4. Make sure that power has been applied to the
cameras. The power light is located on the
back of the cameras.
5. If video appears from some cameras but not
others, try switching cable connections.
• Unplug a camera that is working and plug in
one that it is not working into the working
Camera In port. If the camera works, there
may be a problem with the original “Camera
In” port. Try connecting a working camera
into the suspected bad port. If this camera
does not work, contact customer support for
instructions.
• If the camera does not work, check the cable
for damage. If the cable appears
undamaged, verify that the power is
connected and applied to the camera. If
power is OK, you may have a bad camera.
Contact customer support for instructions.
If none of these procedures work, contact
customer support for instructions.
Iris
Focus
Focal
Length

RABW4QUAD BLACK & WHITE CAMERA KIT WITH QUAD SPLITTER VIDEO SURVEILLANCE SYSTEM INSTALLATION AND SETUP GUIDE (8000-2752-03, REV. A)
5 OF 5
VCR Recording
1. VCR is not recording.
• Make sure that the VCR is powered on,
and a tape is in the VCR. Use standard T-
160 VHS videotapes.
• Make sure recording tab is not missing on
back of video tape. If the tab is missing,
cover opening with a piece of tape, or
replace with a new video tape.
• Make sure that VCR cables are connected
to the correct ports. Refer to Figure 1 for
wiring information. Perform a test record to
verify that the VCR is working properly.
If none of these procedures work, contact customer
support for instructions.
VCR Playback
1. VCR does not playback tapes.
• Make sure that the VCR is powered on, and
a tape is in the VCR.
• Make sure recording tab is not missing on
back of video tape. If the tab is missing,
cover opening with a piece of tape, or
replace with a new video tape.
• Make sure VCR is in playback mode. If the
"VCR" light on the front of the Quad Splitter
is lit, the VCR is in playback mode. If the
light is not lit, press the VCR button to switch
the unit to playback mode.
If none of these procedures work, contact customer
support for instructions.
Note: The instructions included with the equipment
may include additional troubleshooting steps. If you
do not find the answer to your problem here,
review the other instructions before contacting
customer support.
If you need assistance...
Your video surveillance system includes a one-
year factory mail-in repair limited warranty. For
warranty assistance, contact Sensormatic
Customer Support at 1-800-241-6678.
Declarations
Regulatory Compliance
Specific Regulatory Compliance statements are
included with each component.
FCC COMPLIANCE: This equipment complies with Part 15
of the FCC rules for intentional radiators and Class A digital
devices when installed and used in accordance with the
instruction manual. Following these rules provides reasonable
protection against harmful interference from equipment
operated in a commercial area. This equipment should not be
installed in a residential area as it can radiate radio frequency
energy that could interfere with radio communications, a
situation the user would have to fix at their own expense.
CISPR 22 WARNING: This is a class A product. In a
domestic environment this product may cause radio
interference in which case the user may be required to take
adequate measures.
EQUIPMENT MODIFICATION CAUTION: Equipment
changes or modifications not expressly approved by
Sensormatic Electronics Corporation, the party responsible for
FCC compliance, could void the user's authority to operate the
equipment and could create a hazardous condition.
Other Declarations
WARRANTY DISCLAIMER: Sensormatic Electronics
Corporation makes no representation or warranty with respect
to the contents hereof and specifically disclaims any implied
warranties of merchantability or fitness for any particular
purpose. Further, Sensormatic Electronics Corporation
reserves the right to revise this publication and make changes
from time to time in the content hereof without obligation of
Sensormatic Electronics Corporation to notify any person of
such revision or changes.
LIMITED RIGHTS NOTICE: For units of the Department
of Defense, all documentation and manuals were developed at
private expense and no part of it was developed using
Government Funds. The restrictions governing the use and
disclosure of technical data marked with this legend are set
forth in the definition of “limited rights” in paragraph (a) (15)
of the clause of DFARS 252.227.7013. Unpublished - rights
reserved under the Copyright Laws of the United States.
TRADEMARK NOTICE: Sensormatic, and the Sensormatic
logo are registered trademarks of Sensormatic Electronics
Corporation. Other product names (if any) mentioned herein
may be trademarks or registered trademarks of other
companies.
No part of this guide may be reproduced in any form without
written permission from Sensormatic Electronics Corporation.
BSL 9/2000
/