Page is loading ...

Oilhead
Maintenance
Manual
R850, R1100, R1150, R1200
Internet BMW Riders and Oilhead Riders

2
Edited by Carl Kulow
Send comments/corrections to
ISBN R-850-1100-1150-1200
Third Edition
2-25-02
Copyright: IBMWR and Oilhead Riders
The authors have done their best to produce accurate information. However, they
assume no liability for any damage or injury caused by any errors or omissions in
this manual. Use at your own risk.

3
TABLE OF CONTENTS
Section I – by Carl Kulow
MAINTENANCE SCHEDULE.................................................................................................................................................6
PARTS AND TOOL LIST .......................................................................................................................................................7
Cold Engine and Drivetrain Procedures
ALTERNATOR BELT.............................................................................................................................................................8
VALVE ADJUSTMENT ..........................................................................................................................................................9
SPARK PLUGS ....................................................................................................................................................................12
AIR FILTER ..........................................................................................................................................................................13
LUBE SIDESTAND AND CENTERSTAND .........................................................................................................................14
CLUTCH CABLE..................................................................................................................................................................14
BRAKE AND CLUTCH FLUID.............................................................................................................................................15
BRAKE PADS ......................................................................................................................................................................16
BATTERY INSPECTION......................................................................................................................................................17
FUEL FILTER .......................................................................................................................................................................18
MISCELLANEOUS...............................................................................................................................................................19
SUMP GUARD REMOVAL ..................................................................................................................................................20
TEST RIDE ...........................................................................................................................................................................20
Hot Engine and Drivetrain Procedures
THROTTLE BODY SYNC ....................................................................................................................................................21
ENGINE OIL AND FILTER CHANGE ..................................................................................................................................23
TRANSMISSION GEAR OIL CHANGE ...............................................................................................................................24
REAR WHEEL DRIVE GEAR OIL CHANGE ......................................................................................................................25
SUMP GUARD INSTALLATION ..........................................................................................................................................25
Other procedures
BRAKE PAD REPLACEMENT ............................................................................................................................................26
TIRE CHANGE .....................................................................................................................................................................28

4
TABLE OF CONTENTS (CONTINUED)
Section II – by Various Authors
ROUTINE R1100 SERVICE - PAUL GLAVES.....................................................................................................................32
VALVE ADJUSTMENT - STEPHEN KARLAN ....................................................................................................................38
CLUTCH ADJUSTMENT - PAUL GLAVES.........................................................................................................................40
CLUTCH ADJUSTMENT - BOB GORMAN.........................................................................................................................41
BRAKE BLEEDING - STEPHEN KARLAN .........................................................................................................................42
CHANGING THE FUEL FILTER ON AN R1100RS - JON DIAZ.........................................................................................47
EXTRNAL FUEL FILTER MODIFICATION - ROB LENTINI ...............................................................................................49
SYNCHRONIZING R1100 THROTTLE BODIES - BOB GORMAN.....................................................................................53
THROTTLE BODY SYNC - JON DIAZ ................................................................................................................................54
THROTTLE BODY SYNCH - STEPHEN KARLAN ............................................................................................................56
THROTTLE POSITION SENSOR - BOB GORMAN............................................................................................................60
THROTTLE POSITION SENSOR - ROB LENTINI ..............................................................................................................61
THROTTLE SCREW AND TPS ADJUSTMENT - STEPHEN KARLAN ............................................................................62
THROTTLE CABLE AND CHOKE CABLE REPLECEMENT - BRYAN LALLY ................................................................69
MOTRONIC FAULT CODES -STEFAN HEGNAUER..........................................................................................................71
LED FAULT CODE READER - HENRY DE KUIJER ..........................................................................................................73
ANALOG FAULT CODE READER - ROB LENTINI............................................................................................................73
DRIVESHAFT AND CLUTCH SPLINE LUBE - KIT VERCELLA ........................................................................................74
Section III - Super Tuning! by Rob Lentini
ZERO = ZERO THROTTLE POSITION SENSOR TUNING ...............................................................................................79
ADVANCED IGNITION TIMING...........................................................................................................................................81
VALVE LASH INCREASE....................................................................................................................................................82
RESULTS OF INCREASED VALVE LASH AND ADVANCED TIMING .............................................................................82
NON-OEM PLUGS FOR THE R1100/850 OILHEADS ........................................................................................................83
THROTTLE BODY BUTTERFLY BUSHING/SEAL WEAR.................................................................................................85
GS INTAKE MANIFOLDS AND CAT CODE PLUG HOP UP AN R1100RS/RT...............................................................86

5
Introduction
There are three main sections to this manual as follows:
Section I – by Carl Kulow
This section consists of basic maintenance procedures that were done on an
R1150GS, 2001. Once you remove the various plastic covers from an R, RT or
RS, the procedures should essentially be identical to those given here.
Section II – by Various Authors
Generally, this section contains more detailed instructions than those found in
Section I, especially Stephen Karlan’s very detailed write-ups. This section also
contains procedures that are not part of the normal maintenance schedule.
Section III – by Rob Lentini
This section is the real masterpiece of this manual, containing Rob Lentini’s
“Zero = Zero” surging fix and other gems.
Note to RT and RS Riders: for many of the following procedures, you will need to
remove the side panels as described in your owners manual “Service and
Technical Booklet” except RT: instead of pulling the mirror off as the manual
says, hold the back of the mirror (front of bike) with one hand while you hit the
front outside corner of the mirror with the palm of your hand thus knocking the
mirror off.
Note: When performing maintenance on your bike, be sure that you consult
multiple sources of information such as your owner’s manual, www.ibmwr.org/,
and the various bike specific lists. Haynes, Clymer, and BMW have maintenance
manuals with pictures and instructions that are invaluable – get one of each for
your bike.

6
Service – Every 6K Miles
Engine oil and filter - change
Brake fluid – check
Brake pads – check
Clutch fluid – check
Sidestand – grease
Sidestand switch – check
Spark plugs – check
Valves – adjust
Throttle cables – check
Throttle Bodies - synchronize
Inspection – Every 12K Miles
Transmission gear oil – change
Rear drive gear oil – change (every 24K miles)
Fuel filter – change (every 24K miles)
Battery fluid level – check
Battery – electrolyte level, clean/grease terminals
Air filter – change
Alternator belt – change (every 36K miles, some R1100 at 24K miles)
Wheel bearing play – check
Swing arm bearing play – check
Spark plugs – change
Annual Service
Brake fluid – change
Clutch fluid – change (every 2 years)

7
TOOLS
socket set, metric
hex bit socket set (allen), metric (Sears)
ratchet
extensions
wrenches – open end/box, metric
hex wrenches (allen T-handle), metric
torque wrench
pliers
screwdrivers
feeler gauges
oil filter wrench
oil drain pan
motorcycle toolkit (BMW)
rubber gloves (dishwashing)
flashlight, minimag
measuring cylinder (photo store)
Twin Max or carb stix
Mityvac or “one man brake bleeder”
tire change tools (see tire change instructions)
PARTS
Parts Misc.
spark plugs compressed air
oil filter anti seize paste
air filter carb or brake cleaner
brake pads rags
oil - 4 qt. BMW #10 grease
gear oil - 1 1/4 qt. flexible tubing (tygon)
alternator belt grease
fuel filter, o-ring, clamps chain lube
crush washers for: brake fluid (DOT 4)
- oil drain plug distilled water
- transmission fill and drain plugs
- rear drive fill and drain plugs

8
Cold Engine and Drivetrain Procedures
Check Alternator Belt
Tools Parts
T-handle hex – 4mm none
Note: In most cases the alternator belt does not need to be checked any more.
Early models should have the pulley and belt upgrade that came out a few years
ago. Current recommendations are that the belt is installed and adjusted, then
not disturbed until 36K when replacement is specified.
1. Remove the four bolts holding the black plastic alternator belt cover at the front
of the engine, 4mm T-handle hex.
2. Remove the cover by sliding it straight down.
3. Check the belt for cracks or shredding.
4. Check the belt tension, quite tight, ~1/4” deflection when you press on the
center.
Note: Paul Glaves suggests that proper belt tension is when you can twist the
belt ~90 degrees, midway between the pulleys. If you can twist it more than 90
degrees, it is too loose. If you cannot twist it 90 degrees, then it is too tight.
5. Leave the cover off for the valve adjustment procedure on the next page.
Change Alternator Belt
Tools Parts
T-handle hex – 4mm alternator belt
socket – 13mm
ratchet
wrench – 13mm
torque wrench
1. Remove the four bolts holding the black plastic alternator belt cover at the front
of the engine, 4mm T-handle hex.
2. Remove the cover by sliding it straight down.
3. Loosen the 2 nuts and 1 bolt, 13mm, that hold the alternator – one is on top
and one is on each side, thus allowing the alternator to pivot down.
4. Remove the old belt. (Some bikes have a pipe that traps the belt – loosen it
enough to get the old belt out and the new belt in)
5. Install the new belt being sure it is properly seated.
6. BMW calls for a tensioning torque of 5.9 ft.lb. (8 Nm) on the adjuster bolt on
the left side of the bike. You have to get at this bolt from the alternator side and
you may have to lift the tank. Alternatively, you can pry the alternator up with a
large screwdriver to tension the belt.
7. Once the belt is under proper tension, tighten the 2 nuts and 1 bolt, 13mm, to
15 ft.lb. (20 Nm).
8. Check the belt for proper tension (see above) and proper seating alignment.

9
Valve Adjustment
Tools Parts
T-handle hex – 3mm, 5mm, 6mm none
plug wire cap puller
sparkplug socket
short extension
ratchet
rag
hex socket - 6mm
long thin screwdriver
box wrench – 10mm, 16mm (17 will work)
small flashlight
feeler gauges
sharp awl
1. Remember – engine cold!
2. Bike on centerstand.
3. Transmission in neutral.
4. Remove the black plastic valve cover protectors, if installed, using a 5mm T-
handle hex wrench.
5. Remove the black valve cover strip by pulling outward on the end where the
plug wire goes under it.
6. Pull the plug wire cap off the sparkplug using the special black plastic tool in
your BMW tool kit.
7. Before removing the sparkplug, blow compressed air around the plug well –
there is often dirt here that can fall into the cylinder when you remove the spark
plug!!!
Note: If you do not have an air compressor, you can get a compressed air tank at
any Xmart automotive department, or you can get a small can of compressed air
at any photo or computer supply store.
8. Repeat again after turning the spark plugs a couple of turns.
9. Remove the spark plugs using the tool kit spark plug socket or 5/8 in. deep
well very thin wall socket.
Warning!: It is very easy to get a spark plug socket stuck in the plug well. If your
socket does not slide onto the spark plug easily, do not use it!!! Use the spark
plug socket in the BMW tool kit instead. I welded a nut onto the end of my BMW
socket so I could use a torque wrench on it when installing the spark plugs.
10. Place an oil drain pan under the valve cover.
11. Remove both valve covers using a 6mm hex socket and ratchet.
Note: Loosen the valve cover bolts until you can pull them part way out. They
stay in the valve cover – do not try to pull them all the way out.

10
Note: The valve covers may stick slightly and you will need to tap them firmly
with the palm of your hand or a rubber mallet.
Note: Be careful not to dislodge the black rubber vibration damper block in the
bottom front of the valve adjustment area (not on some R1100).
12. Remove the black rubber timing hole plug, located above and behind the
right side throttle body, using a long thin screwdriver to pry it off.
13.Turn the lower alternator pulley clockwise with a 16mm box wrench.
14. Insert a long screwdriver into the right side spark plug hole while turning the
engine over.
15. When the screwdriver is almost pushed out the maximum, use a flashlight
and start looking for the timing marks S – OT in the small timing window where
you removed the rubber plug. (some R1100 = Z – S – OT)
16. Center the OT mark in the window.
Note: Also at OT, the arrow on the cam chain gear will be pointing straight out.
17. Wiggle the valve rockers in and out on both sides -
both the intake and
exhaust valve rockers for one side should wiggle slightly in and out, the rockers
on the other side should be tight.
18. You will be adjusting the valves on the side where they all wiggle slightly as
follows:
Valve Clearance
Intake = .006in. (.15mm)
Exhaust = .012in. (.30mm)
Valve Location
Intake Valves are to the rear (take air/gas in from the throttle body).
Exhaust Valves are to the front (exhaust to the exhaust pipes).
19. Adjust the proper valves, located as described above, using a 10mm box,
3mm hex T-handle, and feeler gauge(s) as given in the following steps.
Note: Each intake and exhaust has two valves each that are operated by a
forked rocker. Correct procedure calls for you to use two identical feeler gauges
simultaneously – one for gauging the valve you are adjusting, and the other as a
spacer on the other valve. This is to prevent the rocker from canting while you
are adjusting it. Many people get excellent results using only one feeler gauge
and skip the spacer feeler gauge.
20. Insert the correct feeler gauge between the valve stem and the adjuster
screw. There should be slightly firm drag on the feeler gauge – be sure that you
do not have the gauge canted or curved as you are measuring.

11
Note: One method is to insert the feeler gauge and tighten the adjuster until the
feeler gauge will not slide, then back off the adjuster a little until the feeler gauge
begins to slide.
Note: You can use the “go, no go” method – a .008in. gauge should not go into
the .006 intake; a .014 should not go into a .012 exhaust if adjusted properly. A
.007 gauge will go into the .006 intake and a .013 gauge will go into the .012
exhaust, but will give a too tight drag.
21. If any valve needs adjusting, loosen the adjuster lock nut with a 10mm box
wrench and turn the adjuster screw with a 3mm hex T-handle to get the correct
clearance – slightly firm drag on the feeler gauge.
22. Slide the box wrench over the shaft of the 3mm hex T-handle and hold the
adjuster screw with the 3mm hex T-handle while tightening the lock nut with the
10mm box wrench (6 ft.lb or 8 Nm)
Warning! It is very easy for beginning mechanics to strip low torque threads -
eg. 6 ft.lb. Use a short grip on 10mm and smaller wrenches. It is also very easy
to strip low torque threads with a torque wrench because many torque wrenches
are improperly calibrated. Also, with click type torque wrenches it is very easy to
not feel the click at low torque settings and then your torque wrench becomes a
large breaker bar and you end up stripping the threads.
23. After tightening, double-check the clearance.
24. Rotate the engine 360 degrees to the same OT mark by turning the lower
alternator pulley clockwise with a 17mm box wrench as in step 13.
25. Check the rockers on the other side for wiggle – they should all wiggle slightly
26. Now adjust the valves on this other side.
27. Clean the valve covers of any dirt or oil on its sealing edge.
28. Wipe the oil off the valve cover gasket to help ensure no oil leaks. Place it
onto the head so that the edge with 3 notches goes to the top. Be sure all the
notches are fit into the corresponding studs on the head.
29. Be certain the center donut gasket is in place on the valve cover!!!
30. Carefully replace the valve cover so as not to dislodge the center donut
gasket.
31. Evenly tighten the 6mm hex bolts until they bottom out - 6 ft.lb (8 Nm).
32. Replace the small black rubber timing hole plug.
Warning!: Be careful!!! It is fairly easy to push it all the way through. I use a sharp
awl and stab the plug in the center to hold it. I then place the plug so its right lip is
under the timing hole edge and then use a long thin screwdriver to push the left
lip into place.
33. Leave the black valve cover strips and the valve cover protectors off until you
are done with the spark plugs in the next procedure.

12
Spark Plugs
Tools Parts
T-handle hex –5mm, 6mm spark plugs
plug wire cap puller
sparkplug socket
short extension
ratchet
rag
hex socket - 6mm
small flashlight
spark plug gauge
torque wrench
anti-seize paste
1. The spark plugs were removed in steps 1 – 9 of the preceding valve
adjustment procedure. Be sure to read the Warning! following step 9 of the valve
adjustment procedure.
2. Replace plugs every 12K miles.
3. Visually inspect the spark plugs and check each for abnormalities – carbon or
oil deposits, burned or cracked electrodes, etc.
4. If installing new plugs (every 12K miles), check that they are still set at the
factory set gap of .031 in (0.8mm).
5. Very lightly coat the plug threads with anti-seize.
6. Install the plugs by hand using only the spark plug socket to avoid any
possibility of cross-threading them.
7. Torque the plugs to 15 ft.lb.(20 Nm).
8. Push the spark plug wire caps firmly onto the spark plugs.
9. Replace the black valve cover strips by putting the two rear tits into place at
the spark plug wire and then pushing the front in until it snaps into place.
10. Replace the valve cover protectors using the 5mm hex T-handle – start the
bottom center bolt first - short screw goes to the front.
11. Replace the alternator cover – try to get the oil line brackets lined up first and
start the top right bolt first since you may need to push the oil line bracket to get
the bolt started – same with the bottom right bolt.

13
Air Filter
Tools Parts
phillips screwdriver air filter
rag
compressed air
1. Remove the rear and then the front seats.
2. Unscrew the two phillips screws holding the air filter cover down (some bikes
have clips).
3. Pivot the cover up.
4. Remove the old filter and inspect it for damage or replace it with a new one.
5. Place a rag tightly over the air intake where the air filter sat and blow all the
dirt and dead bugs out of the filter housing and air horn.
6. Insert the air filter being careful to seat it properly.
7. If the cover hinges came unhooked from their holes, pivot the cover up as high
as it will go and hook the hinge tabs into their holes by pivoting the cover down.
8. Fasten the cover by tightening the two phillips screws (or clips).
Warning!: The air filter housing is a prime candidate for a mouse nest and the air
filter for use as nesting material. Especially after winter storage be sure to check
your air filter. Or screen off the air horn opening during storage so mice can’t get
in there in the first place.

14
Lube Side Stand and Center Stand
Tools Parts
wire none
grease gun
chain lube
1. Remove the debris from the small grease hole (not found on some R1100) at
the rear of the pivot point on the side stand using a small wire or carb or brake
cleaner if necessary.
2. Use a cone tip adapter on your grease gun to grease the side stand or use
chain lube.
Note: Some bikes may have zerk fittings.
3. Spray the center stand pivot bushings with chain lube.
Lube and Adjust Clutch Cable (some R1100)
Tools Parts
phillips screwdriver #10 grease
1. Adjust maximum slack at the clutch lever
2. At the rear of the transmission pry the clutch release arm to release the clutch
cable there
3. Lube both ends of the clutch cable with BMW #10 grease
4. Reattach the cable at the transmission
5. Using the knurled adjuster at the hand lever adjust to 12mm between it and
the knurled locknut
6. At the clutch release arm loosen the 13mm locknut using a 13mm deepwell
socket and swivel
7. Adjust the 10mm bolt to give 7mm freeplay at the hand clutch lever
8. Pull in the hand clutch lever while tightening the locknut at the rear clutch arm

15
Brake and Clutch Fluid
Tools Parts
phillips screwdriver brake fluid
towel
Note: Some R1100’s do not have a hydraulic clutch. See previous procedure.
Note: Brake fluid can ruin the bike’s paint, so cover the tank and any painted or
plastic parts with a towel if you are adding or changing fluid!!!
Front Brake Fluid Reservoir
1. Put the bike on the centerstand.
2. Turn the handlebar straight ahead so the reservoir on the right handlebar is
level.
3. Check the fluid level in the sight glass of the reservoir.
4. Add only DOT 4 brake fluid if the level is at or below the LOWER level mark.
Rear Brake Fluid Reservoir
1. Put the bike on the centerstand.
2. Check the fluid level in the rear reservoir that is located on the right side just
below the seat.
3. Add only DOT 4 brake fluid if the level is at or below the LOWER level mark.
Note: If either the front or rear is low on fluid, be sure to check the brake pads for
wear! As the pads wear, more fluid is taken into the system.
Clutch Fluid Reservoir
1. Same as Front Brake Fluid Reservoir above, but on the left handlebar.
Brake and Clutch Fluid Replacement – Bleeding the Brakes
Note: BMW calls for a fluid change annually. Good brakes are too important to
skip this relatively straightforward procedure.
Note: There are some devices that aid in bleeding the brakes as you replace the
fluid:
1. Mityvac is a small hand held vacuum pump that sucks the brake fluid
down and out through the bleeder nipple at each brake caliper. It is
available at most auto parts stores.
2. Speed Bleeder is a one way valve bleeder nipple that replaces your stock
bleeder nipples. It is available at www.speedbleeder.com

16
3. One Man Brake Bleeder is a one way valve that attaches to your stock
bleeder nipple via a hose. It is available at some auto parts stores.
4. A turkey baster is handy for removing the old fluid from the reservoir
before you add the fresh fluid. Once you use it for brake fluid, do not
return it to the kitchen.
Note: If bleeding by the standard method of pumping the lever, do not pull the
lever all the way to the handlebar or you will force the caliper piston too far out
and possibly ruin the seal. This applies to the clutch and rear brake as well.
Note: On the 1150 GS, BMW has a plug or grub screw instead of a bleeder
nipple on the right front brake caliper and on the clutch slave cylinder. BMW
wants you to replace these with a bleeder nipple to bleed the system and to then
reinstall the grub screw when you are finished.
Note: For brake bleeding procedures see page 42.
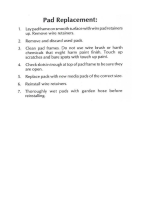
Brake Pads
Tools Parts
phillips screwdriver brake fluid
Note: Check front and rear pads for wear and replace them if they have less than
1 mm of pad left. Remove the right saddle bag so you can do a good inspection
of the rear pads. See the section on brake pad replacement.
Warning: Due to a sticky rear brake retaining pin, the rear pads can wear out in
only a few thousand miles. Clean the pin with fine emery paper and lube it with
anti-seize. See the section on brake pad replacement.
Note: If either the front or rear brake fluid reservoir is low on fluid, be sure to
check the brake pads for wear! As the pads wear, more fluid is taken into the
system.
Note: Be sure to check the brake fluid reservoir after replacing the pads as fluid
is forced back into the reservoir by the new thicker pads – the reservoir may be
too full.

17
Battery Inspection
Tools Parts
flashlight, minimag distilled H
2
O
phillips screwdriver
hex socket – 6mm
ratchet
Quick Check Method
1. Place the bike on the centerstand.
2. Remove the front seat.
3. Hold a minimag flashlight right up against the battery, at the expected
electrolyte level, and next to the cell you are checking.
Note: I have a 4 cell minimag type flashlight that is brighter and works somewhat
better than a minimag.
4. Gently rock the bike so that the battery electrolyte sloshes back and forth. It is
this movement of the electrolyte that you are able to see.
5. Repeat for the other cells.
6. If the electrolyte level is low, follow the Standard Method below.
7. Reinstall the front seat.
Standard Method
1. Remove the seats.
2. Remove the right side black plastic panel below the fuel tank.
3. Remove the fuel tank bolt, 6mm hex socket, right side of fuel tank – be careful
not to lose the nut on the inside and the bushing in between.
4. Slide the tank straight back as far as it will go.
5. Check the battery electrolyte level from in front of the tank.
6. Fill to the max level with distilled water only – use a squirt bottle with a small
hose attached.
7. Clean and grease the battery terminals.
8. Reinstall the fuel tank being sure the black rubber connectors at the front of
the tank are in place.
9. Buy a sealed maintenance free battery and skip steps 1 – 8.
10. Leave the tank off if you are doing a fuel filter change.
Warning: On bikes with Motronic 2.4 (1150), when you disconnect the battery or
the battery dies, settings that are stored in the Motronic 2.4 memory are lost.
After disconnecting the battery or removing the Motronic fuse (#5), switch on the
ignition and then fully twist the throttle all the way open once or twice. This will
restore the throttle valve settings to the Motronic memory. This does not apply to
Motronic 2.2.

18
Fuel Filter
Tools Parts
siphon fuel filter
empty gas can large tank o-ring
rubber gloves 2 small hose clamps
pencil 2 tiny hose clamps
hex bit socket – 6mm
socket – 8mm
ratchet
Note: The following is based on the procedure for my R1100R which should be
similar to other oilheads.
1. Ride the bike until you are almost out of gas or siphon the gas from the tank.
2. Remove the seats.
3. Remove the right side black plastic panel below fuel tank.
4. Remove the fuel tank bolt, 6mm hex bit socket, right side of fuel tank.
5. Set the tank to the side of the bike – lawn chair with an old blanket to prevent
scratching the tank.
6. With the tank on its side, remove the fuel pump plate, 8mm socket.
7. Disconnect the fuel overflow and vent hoses – the 2 small hoses inside the
tank, noting which hose goes where.
Warning! Do not get any of the hoses mixed up! Label them.
8. Remove the pump unit from the tank.
9. Replace the fuel filter noting the direction of flow.
10. Reconnect the new fuel filter using the 2 small hose clamps.
11. Insert a new o-ring into the tank groove.
Note: The original o-ring swells and will not fit unless you let it “dry” for a few
days.
12. Insert the pump unit into the tank.
13. Reconnect the 2 small hoses being sure to connect the striped hose to the
striped hose using the 2 tiny hose clamps.
14. Evenly tighten the fuel pump plate, 8mm socket.
15. Install the fuel tank.
16. Check for any leaks

19
Miscellaneous
Tools Parts
tire gauge none
sockets
hex bit sockets
ratchet
torque wrench
powdered graphite
T-40 Torx bit socket
1. Check tires for nails, tread wear, damage, etc.
2. Check tire pressure.
3. Check rear wheel lug bolts, 17mm socket, torque to 105 Nm.
4. Check the front wheel – axle bolt, 30 Nm, - axle clamp bolts, 22 Nm.
5. Check all nuts and bolts.
6. Check all lights.
7. Check horn.
8. Check all air and oil hose clamps.
9. Check the throttle cables.
10. Check for debris in the throttle cable pulleys.
11. Check rotor rivets.
12. Lube locks with powdered graphite.
13. Check the front wheel bearing.
14. Check the rear wheel bearing.
15. Check the swing arm bearings.
16. Check the spokes front and rear – tap them with a box wrench, if they are
properly tensioned they will “ping” at various pitches when tapped. If too loose,
you will hear more of a thud sound – tighten the spoke until it pings, T-40 Torx. It
is generally recommended that you do NOT try to true these wheels yourself,
only tighten the occasional loose spoke.
17. Splines – it is generally considered that the splines do not require lube
maintenance. If you find it necessary to do a spline lube see page 74 for a
detailed procedure.

20
Sump Guard Removal (GS only)
Tools Parts
socket – 10mm loctite(?)
ratchet
channel lock pliers
Note: Before you do the test ride, remove the sump guard (skid/bash plate) from
the bottom of the engine in preparation for the oil and filter change after your test
ride. It is much more pleasant to do before the engine is hot.
1. Remove the four nuts holding the sump guard on, using a 10mm socket and
ratchet
Note: If the rear (or front) studs come out with the nuts, loctite the studs into the
engine block after you remove the nuts. Once off, the nuts can be removed by
holding the rubber spacer with channel lock pliers. The rear nuts are self-locking
and will remove more easily after a few removals. (R1100GS may have the self-
locking nylock nuts front and rear).
2. Clean the stones, dirt, and dried mud from the sump guard plates.
Note: If you do not ride your GS offroad, you can consider leaving the sump
guard plates off permanently for easier oil changes.
Test Ride Bike
1. Take the bike out for a test ride, ~15 min., to get the bike to operating
temperature for the throttle body sync and fluid changes in the next several
procedures.
2. After the ride, check for oil leaks around the valve covers.
/