Page is loading ...

Congratulations! This Marmitek Observation System you have bought is a quality product, manufactured with high precision. Marmitek Observation
Systems are easy to install, and give you added security for many years. All items you need to hook up your Observation Systems are included in the
box. If you want to expand your system, an extensive range of camera’s and accessories is available. For more information visit www.marmitek.com.
Before you start, please read the installation and operating instructions in this manual, and keep it for future reference.
FEATURES
• Highly reliable stable circuit to assure best quality picture.
• Connect up to 4 cameras.
• Easy to install and operate.
• Compact, lightweight and versatile.
• High resolution monitor.
• Low, minimum lighting requirement.
• Manual or auto selector switch.
• 3 to 60 second auto switching speed adjustable.
• 2 way audio monitoring
• VCR outputs for VCR or time lapse recorder
• Camera cable extendable up to 100m
READ THE FOLLOWING PRECAUTIONS BEFORE INSTALLING OR USING THE SYSTEM
1. Choose an ideal location for the camera so that the lens won't be exposed to any direct light source. The camera unit must also be protected
against moisture and vibration.
2. The monitor should only be operated with the correct power source indicated on the specification.
3. Check the system for operation prior to installing the unit.
4. Be careful not to scratch the camera lens.
THE MARMITEK OBSERVER 25 KIT CONTAINS:
1. 25 cm black and white monitor with 4 channel auto camera switcher
2. 1/3" CCD Auto iris camera
3. 20m DIN cable for plug&play connection
2 MARMITEK
4. Camera bracket
5. Owner’s manual

DESCRIPTION OF CONTROLS & OPERATION
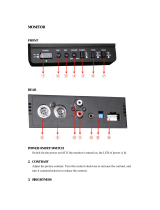
FRONT VIEW MONITOR UNIT
1. TIME CONTROL KNOB
To vary the display switching speed from 3 to 60 seconds. When
the system is in the auto mode with more than one camera, this
knob enables you to vary the time each camera picture will be dis-
played on the monitor. In order to increase the switching time, turn
this knob in clockwise direction. Turning this knob all the way in
counter clockwise direction will quickly step through the camera
images.
2. VOLUME CONTROL KNOB
Adjust the volume control knob to reach the desired volume level.
3. CONTRAST CONTROL KNOB
To adjust the CONTRAST of the screen.
4. BRIGHTNESS CONTROL KNOB
To adjust the BRIGHTNESS of the screen.
5. VERTICAL HOLD CONTROL KNOB
To adjust the VERTICAL synchronization.
6. VCR ON/OFF SELECTOR
Press it to review the video signal from the VCR.
Press it again to switch back to the camera signal.
VCR Recording Reviewing Method
1) Connect the monitor to the VCR and press the RECORD button
on the VCR to start recording the pictures. The VCR will record the
3OBSERVER25
1
2 3
6
5
4
PUSH
TALK
1
234
AUTO
POWER
7 11 8 9 10
12

actual picture as displayed on the monitor.
2) To review the recorded pictures, press the VCR button on the monitor and then the PLAY button on the VCR.
7. TALK BUTTON
Press and hold this button to talk through the loud speaker built into the camera and release it to receive audio from the camera’s microphone.
8. CAMERA-1,2,3,4 BUTTONS
Press the corresponding button on the monitor for the desired camera channel.
9. PROGRAMMABLE AUTO SEQUENCE
Turns on/off the Auto Sequence Mode. In auto mode the system will switch between preset camera channels at a time sequence set by the
dwell time adjuster. The sequencer is also programmable. Press and hold the auto button for 3 seconds, this will enable sequence memory
mode and cause the auto LED to flash. With the auto led flashing press the channel of each camera required to be included in the display
sequence (in the order that you wish them to be displayed).
When your selections are finished press the auto button in order to lock the memory.
IMPORTANT-This operation must be carried out when using less than 4 cameras in order to avoid switching to a blank screen.
NB: The memory will be lost if the power to the monitor is lost.
10. POWER CONTROL BUTTON
Press to turn on the power.
The screen will display the areas being monitored.
Press again to turn power OFF.
11. MICROPHONE
Pick up your voice and sounds near the monitor. As soon as the TALK button is activated, your voice will be heard through the loudspeaker of
the active camera (intercom function).
12. LED INDICATORS
LED POWER, AUTO, TALK, CAMERA 1
~
4 function indicators.
4 MARMITEK

REAR VIEW MONITOR UNIT
13. CAMERA PLUG&PLAY INPUT CONNECTORS
Connect up to 4 cameras by these easy plug and play connectors.
14. VIDEO INPUT
Receives video signal from VCR / time lapse recorder for playback
15. AUDIO INPUT
Receives audio signal from VCR / time lapse recorder for playback
16. AUDIO OUTPUT
Transmits audio signal to VCR / time lapse recorder for recording.
17. VIDEO OUTPUT
Transmits video signal to VCR / time lapse recorder for recording.
Also used to send the camera signals to a second monitor (second
monitor will act as "slave" and will display a copy of the information
as displayed on the main monitor. Switching between camera
images is done on main monitor, slave monitor will follow).
18. AC POWER CORD
5OBSERVER25
13 17 16 15 14 18
C1 C2 C3 C4
D
E
F
A
B
C
A) B+
B) Audio in
C) Audio B+
D) Video in
E) Audio out
F) N.C

CAMERA UNIT
1. CCD CAMERA LENS
Fixed lens with built-in IR illumination
for night vision.
2. MICROPHONE
Pick up sound around the camera.
3. CAMERA OUTPUT JACK
For connection of the cable which
runs to the monitor.
4. ALARM TERMINAL
No function for this model.
5. SPEAKER
Deliver the sound from the monitor.
6. BRACKET
6 MARMITEK
Front View Rear View
3
5
4
1
2
6

INSTALLATION
INSTALLATION OF THE CAMERA
Permanent installation using camera bracket:
1. Attach the camera bracket using 4 screws.
2. Attach the camera onto the pedestal and tighten the thumb screw.
CAUTION : Keep camera installed away from direct sunlight. Also avoid places where humidity is high or where the camera is not protected from
rain. The mounting bracket must be attached to a structural object such as a wall stud or ceiling rafter using suitable fastener. Do not touch the
glass of the lens. This could damage the delicate coating on its surface. If the lens has to be cleaned, use a special lens cleaning tissue available at
any good camera store.
7OBSERVER25

INSTALLATION OF THE MONITOR
1-4 Camera connections
Using the provided plug&play cable, connect the camera to the monitor as
shown in the diagram on the next page.
Plug the AC cord into an 230V outlet
Power the monitor by pressing the green power button
1. Camera 1 Terminal
Connect camera 1 cable to this terminal
2. Camera 2 Terminal
Connect camera 2 cable to this terminal.
3. Camera 3 Terminal
Connect camera 3 cable to this terminal.
4. Camera 4 Terminal
Connect camera 4 cable to this terminal.
AUDIO/VIDEO JACK CONNECTIONS.
Refer to the following connection method, for connecting a VCR or time lapse recorder
Monitor VCR Terminal
Video OUT Video IN
Audio OUT Audio IN
Video IN Video OUT
Audio IN Audio OUT
NOTE : The cable for this connection is not supplied with the unit.
An "RCA" type cable is required.
8 MARMITEK
1
2
3
4
C1 C2 C3 C4
AC power cord

WIRING CONNECTIONS
Connect the Plug&Play Din Jack cable with the arrow mark upwards at the monitor side and with the arrow mark downwards at the camera side
NOTE: Do not use RCA jack to connect any camera.
9OBSERVER25
C1 C2 C3 C4
AC POWER CORD
CAMERA1
CAMERA2 CAMERA3
CAMERA4
CABLE
CABLE CABLE
CABLE

TROUBLE SHOOTING
PROBLEM CHECK POINT:
No picture, no sound Check if monitor is in VCR mode. Press VCR on/off selector to switch over to normal operation.
Multiple image in picture Readjust the VERTICAL Hold control knob.
Picture rolls up or down Readjust the VERTICAL Hold control knob.
Too dark or bright picture. Readjust the CONTRAST or BRIGHTNESS controls.
No Power Check for AC connection.
Poor picture quality Clean the camera lens. Readjust the CONTRAST or BRIGHTNESS controls.
Picture, but no sound Adjust the VOLUME control knob.
Sound, but no picture Readjust the CONTRAST or BRIGHTNESS controls.
Shrinking picture Check the condition of the POWER source.
Please visit our website www.marmitek.com if you need further assistance.
10 MARMITEK
Monitor

TECHNICAL DATA
MONITOR
Picture tube 25cm CRT black & white
Video input level 1.0V p-p
Video input impedance 75 ohm
Video output level 1.0V p-p
Horizontal Scanning rate 15.625 / 15.734 KHz
Vertical scanning rate 50 / 60 Hz
Video frequency response 6MHz (+ 1dB,-3dB)
Horizontal resolution 800 lines or better
Signal to noise ratio 50 dB or Better
Video amplifier circuit More Than 30dB
Operating temperature -10˚C
~
+50˚C
Power consumption less than 40W
Dimensions 250x250x255mm (wxdxh)
Weight 4,64 kg
CAMERA
Image sensor 1/3" CCD black & white
Min. light illumination 0,1 Lux
Night vision ± 1m by IR leds
Resolution more than 380 TV lines
Effective picture elements (V)492 x H(512) / 251.000 pixels
Video system CCIR
Power 12V (supplied by monitor)
Video output 1Vpp
Built in microphone electret
Loud speaker 0,5W
Connector 6P Mini DIN (plug&play)
Lens 4,3mm fixed lens, 73˚
Iris control 1/100.000 sec.
S/N ratio more than 45 dB
Operating temperature -10˚C
~
+50˚C
Power consumption 2W
Dimensions 50x70x50mm (wxdxh)
Weight 230g
Cabinet ABS plastic, white
Accessories included 20m HQ plug&play cable,
camera bracket
11OBSERVER25

OPTIONAL ACCESSORIES:
Part. No. Description
09324 CA159 B/W Camera with fixed lens (camera as provided in set)
09325 CA159M B/W Camera C/CS without lens (lens 4,6,12,16mm)
09328 CAD611 B/W dome camera, shock proof
09345 CA162WP B/W outdoor camera
09331 CA168 B/W camera in smoke detector housing
09333 CH112 outdoor housing for CA159/CA159M
09332 TLV9600 time lapse recorder
09164 20m HQ plug&play cable 6P Mini DIN
09165 40m HQ plug&play cable 6P Mini DIN
09166 100m HQ plug&play cable 6P Mini DIN
09167 6P/6P Mini DIN extension connector
CARE, MAINTENANCE AND SAFEGUARDS
• Keep your monitor and camera dry. When the units become wet, dry them immediately.
• Keep the unit away from excessive dirt and dust. These can cause premature wear of parts.
• Ventilation slots and openings in the cabinet and the back or bottom are provided for ventilation and to ensure reliable operation of the
equipment and to protect it from overheating. These openings must not be blocked or covered. The equipment should never be placed near or
over a radiator. The monitor should never be placed in a built-in installation such as bookcase, unless proper ventilation is provided.
• Do not attempt to service this equipment yourself as opening or removing covers may expose you to dangerous voltage or other hazards. Refer
all dervicing to qualified service personnel.
• Use and store your unit in normal temperature environment. Extreme temperatures can shorten the life of electronic devices.
• Handle the monitor carefully. Dropping it can cause serious damage to the unit.
• Clean the unit with a damp cloth to keep it looking new. Do not use harsh chemicals, cleaning solvents, or strong detergents to clean the unit.
This equipment is CE approved.
NOTE: All specifications are subect to change without notice.
12 MARMITEK

01082002 • OBSERVER25
CE Declaration of Conformity
We, Marmitek BV, PO BOX 4257, 5604 EG, EINDHOVEN, herewith declares that the following designated product:
Marmitek OBSERVER 25
Complies with the principal protection requirements of the Low Voltage Directive (Directive 73/23/EEC relating to electrical equipment
designed for use within certain voltage limits) based on a voluntary test.
Test standard: EN60065: 1993
Test report No.: 63.130.7.003.01
Date: 15.07.02
Evert Schaeffer
Product manager
MARMITEK BV – PO BOX 4257 – 5604 EG – EINDHOVEN – NETHERLANDS - T: 040 2122831 – F: 040 2128232 - @: [email protected] - www.marmitek.com
/