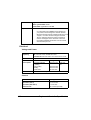
MINOLTA-QMS 2300 DL User manual
- Category
- Laser/LED printers
- Type
- User manual
This manual is also suitable for

magicolor 2300 DL
User’s Guide
®
1800687-001B

Thank You
Thank you for purchasing a MINOLTA-QMS printer.
Trademarks
The following are registered trademarks of MINOLTA-QMS, Inc.: QMS, the
MINOLTA-QMS logo, and magicolor.
Minolta is a trademark of Minolta Co., Ltd. Other product names mentioned in this
guide may also be trademarks or registered trademarks of their respective owners.
This product uses Software Developer Kit of Peerless Systems Corporation.
Copyright © 2001 Peerless Systems Corporation. All rights reserved.
This product uses NEST Office SDK of Novell, Inc. Copyright © 1999 Novell, Inc.
NEST is a trademark of Novell, Inc. in the United States and other countries.
Proprietary Statement
The digitally encoded software included with your printer is Copyrighted
© 2002 by MINOLTA-QMS, Inc. All Rights Reserved. This software may not be
reproduced, modified, displayed, transferred, or copied in any form or in any manner
or on any media, in whole or in part, without the express written permission of
MINOLTA-QMS, Inc.
Copyright Notice
This guide is Copyrighted © 2002 by MINOLTA-QMS, Inc., One Magnum Pass,
Mobile, AL 36618. All Rights Reserved. This document may not be copied, in whole or
part, nor transferred to any other media or language, without written permission of
MINOLTA-QMS, Inc.
Notice
MINOLTA-QMS, Inc. reserves the right to make changes to this guide and to the
equipment described herein without notice. Considerable effort has been made to
ensure that this guide is free of inaccuracies and omissions. However,
MINOLTA-QMS, Inc. makes no warranty of any kind including, but not limited to, any
implied warranties of merchantability and fitness for a particular purpose with regard
to this guide. MINOLTA-QMS, Inc. assumes no responsibility for, or liability for, errors
contained in this guide or for incidental, special, or consequential damages arising
out of the furnishing of this guide, or the use of this guide in operating the equipment,
or in connection with the performance of the equipment when so operated.
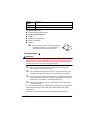
Registering the Printer
Mail
—Fill out and send in the registration card enclosed in your shipment or
downloaded from www.onlineregister.com/minolta-qms/
Internet
—Follow the instructions on www.onlineregister.com/minolta-qms/
or
Software Utilities
CD-ROM
—Follow the instructions on the CD-ROM.

Contents
1 Software Installation ............................................................................ 1
Utilities and Documentation CD-ROM 2
Drivers and Utilities 2
Installing the Printer Drivers and Software 3
System Requirements 3
Windows 4
Selecting Driver Options/Defaults 5
Uninstalling the Printer Driver 7
2 Using Media .......................................................................................... 9
Introduction 10
Media Specifications 11
Media Types 12
Plain Paper 12
Thick Stock 13
Envelopes 14
Labels 15
Letterhead and Memo Media 16
Postcards 16
Transparencies 17

Contentsii
What Is the Guaranteed Imageable (Printable) Area? 18
Page Margins 19
Loading Media 20
Tray 1 (Multipurpose Tray) 20
Tray 2 (Optional Lower Feeder Unit Media Tray) 23
Duplexing 24
Output Tray 26
Media Storage 26
Additional Assistance 27
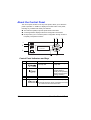
3 Working with the Printer .................................................................... 29
About the Control Panel 30
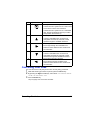
Control Panel Indicators and Keys 30
Cancelling Print Jobs 31
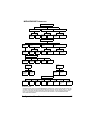
Configuration Menu Overview 32
MENU/ENGINE Submenus 33
Selecting a Message Window Language 34
Special Pages Menu 34
Engine Menu 34
Service Menu 35
Network Menu 36
Consumables Menu 36
4 Working with the Printer Driver ......................................................... 37
Displaying Printer Driver Settings 38
Displaying Settings in Windows 2000/XP 38
Displaying Settings in Windows NT 4.0 38
Displaying Settings in Windows Me/98/95 38
Common Settings for All Tabs 39
Common Buttons 40
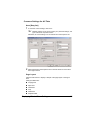
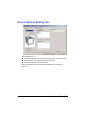
Setup Tab 41
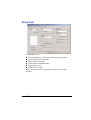
Paper Tab 42
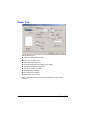
Quality Tab 43
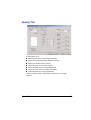
Device Options Setting Tab 44
5 Working with the Status Display ....................................................... 45
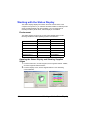
Working with the Status Display 46
Environment 46
Opening the Status Display and Showing Supplies Status 46
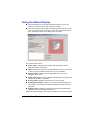
Using the Status Display 47
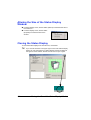
Altering the Size of the Status Display Window 48
Closing the Status Display 48
6 Replacing Consumables .................................................................... 49
Consumable Life Expectancies 50

Contents
iii
Plain Paper 50
Special Media 51
Auto-Image Density Control (AIDC) 51
Toner Cartridge Life 52
Replacing Consumables 52
Refilled Toner Cartridges 53
Replacing a Toner Cartridge 53
Replacing the Waste Toner Bottle 58
Replacing the OPC Drum Cartridge 59
Ordering Consumables 62
7 Maintaining the Printer ....................................................................... 63
Maintaining the Printer 64
Cleaning the Printer 66
Exterior 66
Interior 67
Media Rollers 67
Printer Interior and Laser Lens Cover 72
8 Troubleshooting ................................................................................. 75
Introduction 76
Printing a Configuration Page 76
Preventing Media Jams 77
Understanding the Media Path 78
Tray 1 (Multipurpose Tray) 78
Tray 2 (Optional Lower Feeder Unit with 500-sheet Media Tray) 78
Duplex Option 78
Clearing Media Jams 79
Handling Media Jams by Location 79
Tray 1 (Multipurpose Tray) 79
Tray 2 (Optional Lower Feeder Unit Media Tray) 80
Inside the Printer 82
Duplex Option 84
Output Tray 85
Solving Problems with Media Jams 86
Solving Other Problems 89
Solving Problems with Printing Quality 94
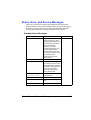
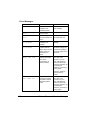
Status, Error, and Service Messages 101
Standard Status Messages 101
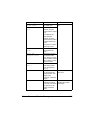
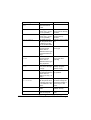
Error Messages 102
Service Messages 106
Additional Assistance 107
9 Installing Accessories ...................................................................... 109
Introduction 110
Antistatic Protection 111

Contentsiv
Dual In-Line Memory Module (DIMM) 111
Improved Performance or High Coverage 112
Duplex Option 115
Optional Lower Feeder Unit and Tray 2 119
10 Repacking the Printer ....................................................................... 123
Storing the Printer 124
Relocating Your Printer 124
Repacking the Printer 125
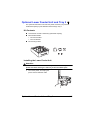
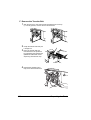
A. Turn off the Printer, Unplug the Power Cord, and Remove the Interface Ca-
bles 126
B. Remove the Media and the Tray 1 Media Support 127
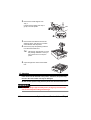
C. Remove the Options (if Attached) 127
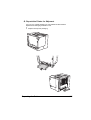
D. Remove the Waste Toner Bottle, Plug the Openings, and Dispose of It Ac-
cording to Your Local Regulations 130
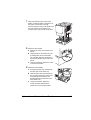
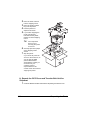
E. Remove the OPC Drum Cartridge 130
F. Remove the Transfer Belt 132
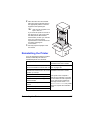
G. Repack the Printer for Shipment 133
H. Repack the OPC Drum and Transfer Belt Unit for Shipment 134
Reinstalling the Printer 135
Reinstalling a Transfer Belt Unit 136
A Technical Specifications ..............................................................................137
Requirements 138
Space Requirements 138
Location Requirements 140
Interface Panel 141
Power Requirements 142
ENERGY STAR Compliance 143
Engine and Controller Specifications 144
Engine 144
Print Speed—Simplex 144
Print Speed—Autoduplex 144
General 145
Controller 145
Electrical 146
Hazardous Chemical Substance Reporting 148
Physical 148
Consumable Life Expectancies 149
Plain Paper 149
Special Media 149
Regulatory Compliance 151
Safety Information 152
For Norway Users 154
For Finland, Sweden Users 155
Warning and Precaution Symbols 156


Contentsvi

1
Software
Installation

Utilities and Documentation CD-ROM2
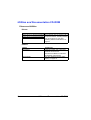
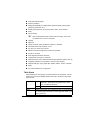
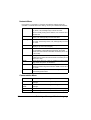
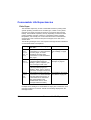
Utilities and Documentation CD-ROM
Drivers and Utilities
Drivers
Utilities
Drivers/Location Use/Benefit
Printer Driver for Windows Me/98/95 These drivers give you access to all of
the printer features, including finishing
and advanced layout. See also
“Working with the Printer Driver” on
page 37.
Printer Driver for Windows XP/2000
Printer Driver for Windows NT 4.0
Utilities Use/Benefit
Print Monitor magicolor TCP/IP port in Windows
Me/98/95 environments
Microsoft Print Monitor in Windows
XP/2000/NT environments
Status Display See also “Working with the Status
Display” on page 45.

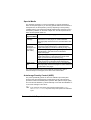
Installing the Printer Drivers and Software
3
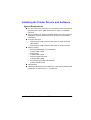
Installing the Printer Drivers and Software
System Requirements
!
PC with a clock speed of 200 MHz or more (300 MHz recommended) Intel
Pentium/Celeron series, AMD K6/Athron/Duron family, or compatible
processor
!
Microsoft Windows 95, Windows 98/98SE, Windows Me, Windows NT 4.0
Workstation, Windows 2000 Professional, Windows XP Home Edition/
Professional
!
Free hard disk space
–
Approximately 20 MB of free hard disk space for printer driver and
status display
–
Approximately 16 MB of free hard disk space for image processing
!
Memory capacity
–
Windows 95/98/98SE/NT 4.0 Workstation:
At least 32 MB of RAM
–
Windows Me:
At least 32 MB of RAM
–
Windows 2000 Professional:
At least 64 MB of RAM
–
Windows XP Home Edition/Professional:
At least 128 MB of RAM
!
CD-ROM drive
!
10BaseT/100BaseTX Ethernet interface port, IEEE 1284 compliant type B
parallel port, or USB Revision 1.1 compliant port

Windows4
Windows
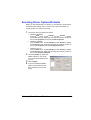
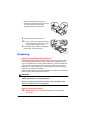
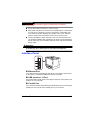
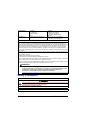
1
Insert the magicolor 2300 DL
Utilities and Documentation
CD-ROM in
your PC’s CD-ROM drive. The CD-ROM installer program starts
automatically (if not, browse with the Windows Explorer to the CD-ROM
location and double-click on setup.exe).
2
Choose Printer Setup.
3
Follow the instructions on the
screen to install printer
drivers, printer manage-
ment utilities, and latest
printer system software.
"#
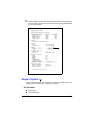
Note
: If your printer’s system software is newer than the version
on the CD-ROM, an error page will print. The installation program
will not install an older version of system software over a newer
version.
4
When you have finished installing drivers and software, choose Main
Menu.
5
If you want to register your printer, review the driver or utility
documentation, or purchase supplies online, do that now.
6
Choose Exit.
7
Remove the
Utilities and Documentation
CD-ROM from your PC’s
CD-ROM drive and store it in a safe place.

Selecting Driver Options/Defaults
5
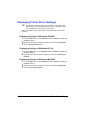
Selecting Driver Options/Defaults
Before you start working with your printer, you are advised to verify/change
the default driver settings. Also, in case you have options installed, you
should “declare” the options in the driver.
1
Choose the driver’s properties as follows:
–
(Windows Me/98/95)
From the
Start
menu, choose
Settings
and then
Printers
to display
the
Printers
directory. Right-click the magicolor 2300 DL printer icon
and choose
Properties
. Choose the
Printer Properties
.
–
(Windows 2000/XP)
From the
Start
menu, choose
Settings
and then
Printers
to display
the
Printers
directory. Right-click the magicolor 2300 DL printer icon
and choose
Properties
. Choose
Printing Preferences
.
–
(Windows NT 4.0)
From the
Start
menu, choose
Settings
and then
Printers
to display
the
Printers
directory. Right-click the magicolor 2300 DL printer icon
and choose
Document Defaults
.
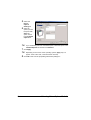
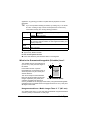
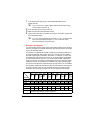
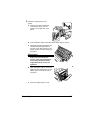
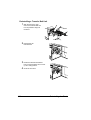
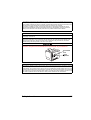
2
Choose the
Paper
tab. Select the
default settings for your printer,
such as the default media format
you use.
3
Click on
Apply
.
4
If you have installed available
options, proceed with the next
step. Otherwise, proceed with
step 8.

Selecting Driver Options/Defaults6
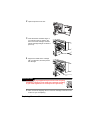
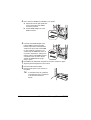
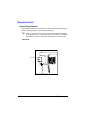
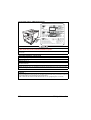
5
Select the
Device
Options
Setting
tab.
6
Select an
option (one at a
time) and click
Add
. The
option moves
to the
Installed
Options
list.
"#
If you accidentally select an uninstalled option, select the option in the
Installed Options
list and then click
Remove
.
7
Click
Apply
.
"#
Depending on the version of the operating system,
Apply
may not
appear. If this is the case, continue with the next step.
8
Click
OK
to exit from the properties (preferences) dialog box.

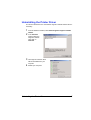
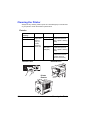
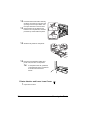
Uninstalling the Printer Driver
7
Uninstalling the Printer Driver
This section describes how to uninstall the magicolor 2300 DL Printer Driver if
necessary.
1
From the Window’s taskbar, select
Start
/
Programs
/
magicolor 2300DL
Utilities
.
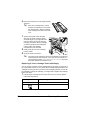
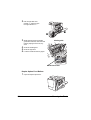
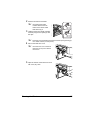
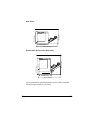
2
In the
Uninstall
window, select the
magicolor 2300 DL.
Then click on
Uninstall
.
3
The magicolor 2300 DL driver
will be uninstalled from your
computer.
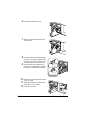
4
Restart your computer.


2
Using Media

Introduction10
Introduction
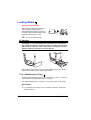
This chapter provides information on handling, selecting, loading, and storing
media.
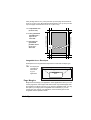
!
All media is fed short edge first, face up.
!
There is a 0.157" (4 mm) non-print border for all edges on all media
types. Refer to page 18 for paper longer than 11.7" (297 mm).
!
See your application documentation for specific information on formatting
data and printing.
!
Try printing your data on a plain sheet of paper first to check placement.
!
Only plain paper, 16–24 lb (60–90 g/m
2
) can be autoduplexed. See
“Media Specifications” for supported sizes.
Attention
Use only MINOLTA-QMS-approved media. Using unsupported media
such as inkjet paper will result in damaging the printer and in voiding
your warranty.
Getting Started
What
types
and
sizes
of media can I load? page 11
What Is the
guaranteed
imageable (printable) area? page 18
Other Information
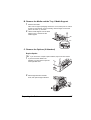
How do I
load
media? page 20
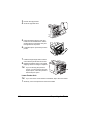
How do I
duplex
? page 24
How do I
store
media? page 26
Where can I
order
MINOLTA-QMS-approved media or get more
information
?
page 27

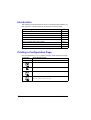
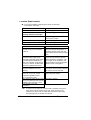
Media Specifications
11
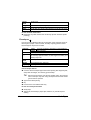
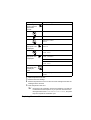
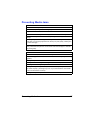
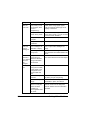
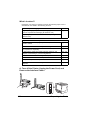
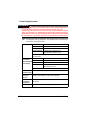
Media Specifications
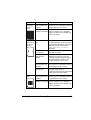
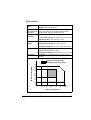
What types and sizes of media can I load?
Media Media Size Tray* Duplex Mode Weight
Inches Millimeters
A4 8.2 x 11.7 210.0 x 297.0 1 & 2 Yes
Plain
Paper
16–24 lb
bond
(60–90
g/m²)
A5 5.9 x 8.3 148.0 x 210.0 1 No
B5 (JIS) 7.2 x 10.1 182.0 x 257.0 1 No
Custom, Minimum 3.6 x 8.3 92.0 x 210.0 1 No
Custom, Maximum 8.5 x 14.0 216.0 x 356.0 1 No
Executive 7.25 x 10.5 184.0 x 267.0 1 No
Folio 8.3 x 13.0 210.0 x 330.0 1 Yes
Foolscap 8.0 x 13.0 203.2 x 330.2 1 Yes
Government Legal 8.5 x 13.0 216.0 x 330.0 1 Yes
Kai 16 7.3 x 10.2 185.0 x 260.0 1 No
Kai 32 5.1 x 7.3 130.0 x 185.0 1 No
Legal 8.5 x 14.0 215.9 x 355.6 1 Yes
Letter 8.5 x 11.0 215.9 x 279.4 1 & 2 Yes
Letter Plus 8.5 x 12.7 215.9 x 322.3 1 Yes
Statement 5.5 x 8.5 140.0 x 216.0 1 No
UK Quarto 8.0 x 10.0 203.2 x 254.0 1 No
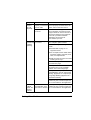
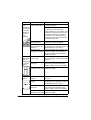
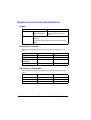
A4 Transparency 8.2 x 11.7 210.0 x 297.0 1 No
Trans-
parency
Use only
approved
media
Letter Transparency 8.5 x 11.0 215.9 x 279.4 1 No
Japanese Postcard 3.9 x 5.8 100.0 x 148.0 1 No
Postcard
Use only
approved
media
Envelope B5 (ISO) 6.9 x 9.8 176.0 x 250.0 1 No
Envelope
Envelope C5 6.4 x 9.0 162.0 x 229.0 1 No
Envelope C6 4.5 x 6.4 114.0 x 162.0 1 No
Envelope Commercial
#10
4.1 x 9.5 104.1 x 241.3 1 No
Envelope
International DL
4.3 x 8.7 110.0 x 220.0 1 No
Envelope Monarch 3.9 x 7.5 99.0 x 190.5 1 No
Envelope Chou #3 4.7 x 9.2 120.0 x 235.0 1 No
Envelope Chou #4 3.5 x 8.1 90.0 x 205.0 1 No
Thick Stock—Only supported for letter, A4, or smaller media.
Custom, Minimum 3.6 x 5.8 92.0 x 148.0 1 No
Thick
Stock
25–90 lbs
(91–163
g/m²)
Custom, Maximum 8.5 x 11.7 216.0.0 x
297.0
Notes:
*Tray 1 = Multipurpose Tray (MPT),
Tray 2 = Optional Lower Feeder Unit Media Tray (letter or A4 media only)

Media Types12
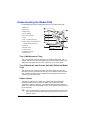
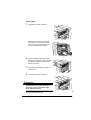
Media Types
Before purchasing a large quantity of special media, do a trial printing
with the same media and check print quality. Check our web site
www.minolta-qms.com for a list of currently approved media.
Keep media on a flat, level surface in its original wrapper until it is time to
load it.
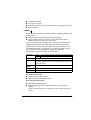
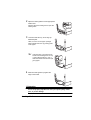
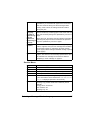
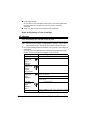
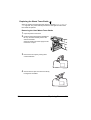
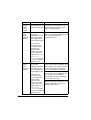
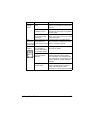
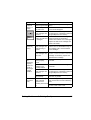
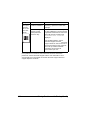
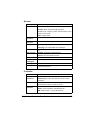
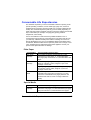
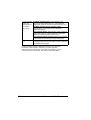
Plain Paper
Use media that is
Suitable for plain-paper laser printers, such as standard or recycled office
paper.
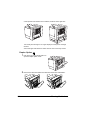
Attention
Do not use the media types listed below. These could cause poor print
quality, media jams, or damage to the printer.
Do not use media that is
!
Coated with a processed surface (such as carbon paper, digitally gloss-
coated media, colored paper that has been treated)
!
Carbon backed
!
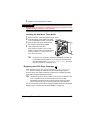
Unapproved iron-on transfer media (heat-sensitive paper, heat-pressure
paper, heat-press transfer paper)
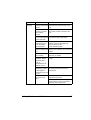
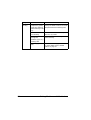
Capacity Tray 1
(multipurpose
tray)
200 sheets of 22 lb bond (80 g/m
2
) paper;
capacity for other weights varies accordingly.
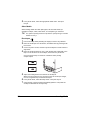
Tray 2
(optional lower
feeder unit
media tray)
500 sheets of 22 lb bond (80 g/m
2
) paper
(letter/A4 only); capacity for other weights
varies accordingly.
Orientation
Face up
Type
Check www.minolta-qms.com/support (click on Answer Base)
for currently approved media. To order approved media, go to
www.q-shop.com.
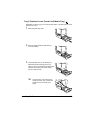
Driver
Mode
Plain paper
Weight
16–24 lb bond (60–90 g/m²)
Duplexing
See page 11 for supported sizes.
Page is loading ...
Page is loading ...
Page is loading ...
Page is loading ...
Page is loading ...
Page is loading ...
Page is loading ...
Page is loading ...
Page is loading ...
Page is loading ...
Page is loading ...
Page is loading ...
Page is loading ...
Page is loading ...
Page is loading ...
Page is loading ...
Page is loading ...
Page is loading ...
Page is loading ...
Page is loading ...
Page is loading ...
Page is loading ...
Page is loading ...
Page is loading ...
Page is loading ...
Page is loading ...
Page is loading ...
Page is loading ...
Page is loading ...
Page is loading ...
Page is loading ...
Page is loading ...
Page is loading ...
Page is loading ...
Page is loading ...
Page is loading ...
Page is loading ...
Page is loading ...
Page is loading ...
Page is loading ...
Page is loading ...
Page is loading ...
Page is loading ...
Page is loading ...
Page is loading ...
Page is loading ...
Page is loading ...
Page is loading ...
Page is loading ...
Page is loading ...
Page is loading ...
Page is loading ...
Page is loading ...
Page is loading ...
Page is loading ...
Page is loading ...
Page is loading ...
Page is loading ...
Page is loading ...
Page is loading ...
Page is loading ...
Page is loading ...
Page is loading ...
Page is loading ...
Page is loading ...
Page is loading ...
Page is loading ...
Page is loading ...
Page is loading ...
Page is loading ...
Page is loading ...
Page is loading ...
Page is loading ...
Page is loading ...
Page is loading ...
Page is loading ...
Page is loading ...
Page is loading ...
Page is loading ...
Page is loading ...
Page is loading ...
Page is loading ...
Page is loading ...
Page is loading ...
Page is loading ...
Page is loading ...
Page is loading ...
Page is loading ...
Page is loading ...
Page is loading ...
Page is loading ...
Page is loading ...
Page is loading ...
Page is loading ...
Page is loading ...
Page is loading ...
Page is loading ...
Page is loading ...
Page is loading ...
Page is loading ...
Page is loading ...
Page is loading ...
Page is loading ...
Page is loading ...
Page is loading ...
Page is loading ...
Page is loading ...
Page is loading ...
Page is loading ...
Page is loading ...
Page is loading ...
Page is loading ...
Page is loading ...
Page is loading ...
Page is loading ...
Page is loading ...
Page is loading ...
Page is loading ...
Page is loading ...
Page is loading ...
Page is loading ...
Page is loading ...
Page is loading ...
Page is loading ...
Page is loading ...
Page is loading ...
Page is loading ...
Page is loading ...
Page is loading ...
Page is loading ...
Page is loading ...
Page is loading ...
Page is loading ...
Page is loading ...
Page is loading ...
Page is loading ...
Page is loading ...
Page is loading ...
Page is loading ...
Page is loading ...
Page is loading ...
Page is loading ...
Page is loading ...
Page is loading ...
Page is loading ...
Page is loading ...
Page is loading ...
Page is loading ...
Page is loading ...
Page is loading ...
Page is loading ...
Page is loading ...
-
 1
1
-
 2
2
-
 3
3
-
 4
4
-
 5
5
-
 6
6
-
 7
7
-
 8
8
-
 9
9
-
 10
10
-
 11
11
-
 12
12
-
 13
13
-
 14
14
-
 15
15
-
 16
16
-
 17
17
-
 18
18
-
 19
19
-
 20
20
-
 21
21
-
 22
22
-
 23
23
-
 24
24
-
 25
25
-
 26
26
-
 27
27
-
 28
28
-
 29
29
-
 30
30
-
 31
31
-
 32
32
-
 33
33
-
 34
34
-
 35
35
-
 36
36
-
 37
37
-
 38
38
-
 39
39
-
 40
40
-
 41
41
-
 42
42
-
 43
43
-
 44
44
-
 45
45
-
 46
46
-
 47
47
-
 48
48
-
 49
49
-
 50
50
-
 51
51
-
 52
52
-
 53
53
-
 54
54
-
 55
55
-
 56
56
-
 57
57
-
 58
58
-
 59
59
-
 60
60
-
 61
61
-
 62
62
-
 63
63
-
 64
64
-
 65
65
-
 66
66
-
 67
67
-
 68
68
-
 69
69
-
 70
70
-
 71
71
-
 72
72
-
 73
73
-
 74
74
-
 75
75
-
 76
76
-
 77
77
-
 78
78
-
 79
79
-
 80
80
-
 81
81
-
 82
82
-
 83
83
-
 84
84
-
 85
85
-
 86
86
-
 87
87
-
 88
88
-
 89
89
-
 90
90
-
 91
91
-
 92
92
-
 93
93
-
 94
94
-
 95
95
-
 96
96
-
 97
97
-
 98
98
-
 99
99
-
 100
100
-
 101
101
-
 102
102
-
 103
103
-
 104
104
-
 105
105
-
 106
106
-
 107
107
-
 108
108
-
 109
109
-
 110
110
-
 111
111
-
 112
112
-
 113
113
-
 114
114
-
 115
115
-
 116
116
-
 117
117
-
 118
118
-
 119
119
-
 120
120
-
 121
121
-
 122
122
-
 123
123
-
 124
124
-
 125
125
-
 126
126
-
 127
127
-
 128
128
-
 129
129
-
 130
130
-
 131
131
-
 132
132
-
 133
133
-
 134
134
-
 135
135
-
 136
136
-
 137
137
-
 138
138
-
 139
139
-
 140
140
-
 141
141
-
 142
142
-
 143
143
-
 144
144
-
 145
145
-
 146
146
-
 147
147
-
 148
148
-
 149
149
-
 150
150
-
 151
151
-
 152
152
-
 153
153
-
 154
154
-
 155
155
-
 156
156
-
 157
157
-
 158
158
-
 159
159
-
 160
160
-
 161
161
-
 162
162
-
 163
163
-
 164
164
-
 165
165
-
 166
166
-
 167
167
-
 168
168
-
 169
169
-
 170
170
-
 171
171
-
 172
172


MINOLTA-QMS 2300 DL User manual
- Category
- Laser/LED printers
- Type
- User manual
- This manual is also suitable for
Ask a question and I''ll find the answer in the document
Finding information in a document is now easier with AI
Related papers
-
 MINOLTA-QMS Magicolor 6110 GN User manual
-
 MINOLTA-QMS PagePro 4110W User manual
-
 MINOLTA-QMS 2060 Specification
-
MINOLTA-QMS Magicolor 2 Desklaser User manual
-
-
-
 MINOLTA-QMS Magicolor 6110 GN User manual


Other documents
-
Star Micronics SLIP SP298 SERIES User manual
-
Lexmark MX711de User manual
-
HP CF411X User guide
-
QMS Magicolor WX User manual
-
-
Minolta Magicolor 2200 DeskLaser User manual
-
Panasonic XX-XXXX User manual
-
-
Xerox AltaLink B8045 Maintenance
-