Page is loading ...

ASUS Tablet

2
E10469
July 2015
First Edition
COPYRIGHT INFORMATION
No part of this manual, including the products and software described in it, may be reproduced, transmitted, transcribed,
stored in a retrieval system, or translated into any language in any form or by any means, except documentation kept by
the purchaser for backup purposes, without the express written permission of ASUSTeK COMPUTER INC. (“ASUS”).
ASUS PROVIDES THIS MANUAL “AS IS” WITHOUT WARRANTY OF ANY KIND, EITHER EXPRESS OR IMPLIED, INCLUDING
BUT NOT LIMITED TO THE IMPLIED WARRANTIES OR CONDITIONS OF MERCHANTABILITY OR FITNESS FOR A PARTICULAR
PURPOSE. IN NO EVENT SHALL ASUS, ITS DIRECTORS, OFFICERS, EMPLOYEES OR AGENTS BE LIABLE FOR ANY INDIRECT,
SPECIAL, INCIDENTAL, OR CONSEQUENTIAL DAMAGES (INCLUDING DAMAGES FOR LOSS OF PROFITS, LOSS OF
BUSINESS, LOSS OF USE OR DATA, INTERRUPTION OF BUSINESS AND THE LIKE), EVEN IF ASUS HAS BEEN ADVISED OF THE
POSSIBILITY OF SUCH DAMAGES ARISING FROM ANY DEFECT OR ERROR IN THIS MANUAL OR PRODUCT.
Products and corporate names appearing in this manual may or may not be registered trademarks or copyrights of their
respective companies, and are used only for identication or explanation and to the owners’ benet, without intent to
infringe.
SPECIFICATIONS AND INFORMATION CONTAINED IN THIS MANUAL ARE FURNISHED FOR INFORMATIONAL USE ONLY, AND
ARE SUBJECT TO CHANGE AT ANY TIME WITHOUT NOTICE, AND SHOULD NOT BE CONSTRUED AS A COMMITMENT BY
ASUS. ASUS ASSUMES NO RESPONSIBILITY OR LIABILITY FOR ANY ERRORS OR INACCURACIES THAT MAY APPEAR IN THIS
MANUAL, INCLUDING THE PRODUCTS AND SOFTWARE DESCRIBED IN IT.
Copyright © 2015 ASUSTeK COMPUTER INC. All Rights Reserved.
LIMITATION OF LIABILITY
Circumstances may arise where because of a default on ASUS’ part or other liability, you are entitled to recover damages
from ASUS. In each such instance, regardless of the basis on which you are entitled to claim damages from ASUS, ASUS is
liable for no more than damages for bodily injury (including death) and damage to real property and tangible personal
property; or any other actual and direct damages resulted from omission or failure of performing legal duties under this
Warranty Statement, up to the listed contract price of each product.
ASUS will only be responsible for or indemnify you for loss, damages or claims based in contract, tort or infringement
under this Warranty Statement.
This limit also applies to ASUS’ suppliers and its reseller. It is the maximum for which ASUS, its suppliers, and your reseller
are collectively responsible.
UNDER NO CIRCUMSTANCES IS ASUS LIABLE FOR ANY OF THE FOLLOWING: (1) THIRD-PARTY CLAIMS AGAINST YOU FOR
DAMAGES; (2) LOSS OF, OR DAMAGE TO, YOUR RECORDS OR DATA; OR (3) SPECIAL, INCIDENTAL, OR INDIRECT DAMAGES
OR FOR ANY ECONOMIC CONSEQUENTIAL DAMAGES (INCLUDING LOST PROFITS OR SAVINGS), EVEN IF ASUS, ITS
SUPPLIERS OR YOUR RESELLER IS INFORMED OF THEIR POSSIBILITY.
SERVICE AND SUPPORT
Visit our multi-language web site at: http://support.asus.com

3
Contents
Conventions used ................................................................................................................................. 7
Care and safety ....................................................................................................................................... 7
1 Get your Zen ready!
Parts and features ......................................................................................................... 9
Installing a memory card ..................................................................................................................10
Removing a memory card ................................................................................................................ 12
Installing a micro SIM card (on selected models) ....................................................................14
Removing a micro SIM card (on selected models) ..................................................................16
Charging your ASUS Tablet .............................................................................................................. 17
Turning your ASUS Tablet on or o ...............................................................................................19
Basics ........................................................................................................................................................20
Starting for the rst time ..................................................................................................................21
Using your ASUS Mobile Dock ...................................................................................23
Package contents ................................................................................................................................23
Parts and features ................................................................................................................................ 23
Charging your ASUS Mobile Dock ................................................................................................. 25
Pairing your ASUS Tablet with ASUS Mobile Dock ..................................................................26
Pairing your Bluetooth devices with ASUS Mobile Dock ......................................................27
Docking your ASUS Tablet ................................................................................................................28
Using the special keys ........................................................................................................................ 28
Undocking your ASUS Tablet ..........................................................................................................30
Using the touchscreen.......................................................................................................................31
ZenMotion .............................................................................................................................................33
2 There’s no place like Home
Zen Home features .....................................................................................................35
Home screen .........................................................................................................................................35
Personalizing your Home screen ............................................................................... 37
App shortcuts .......................................................................................................................................37
Widgets ...................................................................................................................................................38
Wallpapers .............................................................................................................................................39
Extended Home screen .....................................................................................................................40
Setting up the date and time ..........................................................................................................41
Setting up your ringtone and alert sounds................................................................................41
Quick settings .......................................................................................................................................42
System notications ...........................................................................................................................43
Lock Screen .................................................................................................................44
Customizing your lock screen ......................................................................................................... 44
Customizing the quick access buttons ........................................................................................45

4
3 Keeping in touch
Managing contacts .....................................................................................................49
Launching the Contacts app ...........................................................................................................49
Contacts Settings ................................................................................................................................49
Setting up your prole ......................................................................................................................49
Adding contacts ................................................................................................................................... 50
Setting up your VIPs ...........................................................................................................................51
Marking your favorite contacts ......................................................................................................54
Importing contacts .............................................................................................................................55
Exporting contacts .............................................................................................................................. 55
Social networking with your contacts .........................................................................................56
Send messages and more ..........................................................................................57
Messaging (on selected models) ...................................................................................................57
Linking your contacts’ info ...............................................................................................................59
Omlet Chat ............................................................................................................................................. 59
4 Your precious moments
Capture moments .......................................................................................................69
Launching the Camera app .............................................................................................................69
Using Camera for the rst time.......................................................................................................70
Advanced camera features ..............................................................................................................74
Using the Gallery ........................................................................................................79
Viewing les from your social network or cloud storage ...................................................... 79
Viewing the photo location .............................................................................................................80
Sharing les from the Gallery ..........................................................................................................81
Deleting les from the Gallery ........................................................................................................ 81
Editing images ...................................................................................................................................... 81
Using MiniMovie .................................................................................................................................. 82
Using PlayTo ..........................................................................................................................................83
5 Work hard, play harder
Browser ........................................................................................................................85
Launching the Browser app .............................................................................................................85
Sharing pages .......................................................................................................................................86
Reading the pages later ....................................................................................................................86
Adding a new tab ................................................................................................................................86
Bookmarking pages ...........................................................................................................................86
Clearing the browser cache .............................................................................................................87
Email ............................................................................................................................87
Setting up email accounts................................................................................................................87
Adding email accounts ......................................................................................................................88
Setting up a Gmail account .............................................................................................................88
Calendar ......................................................................................................................89
Creating events ....................................................................................................................................89
Adding accounts to Calendar .........................................................................................................89
Creating an event from your account ..........................................................................................90
Enabling alert reminders for events .............................................................................................90

5
What’s Next .................................................................................................................91
Getting event reminders...................................................................................................................91
Accepting or declining invites to events ....................................................................................92
Getting event-related alerts ............................................................................................................93
Getting the weather updates .......................................................................................................... 94
Do It Later .................................................................................................................... 95
Adding to-do tasks .............................................................................................................................95
Prioritizing to-do tasks ......................................................................................................................95
Catching up on my online reading now .....................................................................................96
Replying now (on selected models) .............................................................................................96
Deleting to-do tasks ...........................................................................................................................96
SuperNote ...................................................................................................................97
Understanding icons .......................................................................................................................... 97
Creating a notebook ..........................................................................................................................98
Sharing a notebook on the Cloud .................................................................................................98
Sharing a note to the Cloud ............................................................................................................98
File Manager................................................................................................................99
Accessing the internal storage .......................................................................................................99
Accessing the external storage device ........................................................................................99
Accessing Cloud Storage ..................................................................................................................99
The Cloud...................................................................................................................100
ASUS WebStorage ............................................................................................................................ 100
Data Transfer .............................................................................................................101
ASUS Support............................................................................................................102
6 Fun and entertainment
Using a headset ......................................................................................................... 103
Connecting the audio jack ............................................................................................................ 103
Music .......................................................................................................................... 104
Launching Music ............................................................................................................................... 104
Playing songs ..................................................................................................................................... 104
Streaming Cloud music .................................................................................................................. 105
Creating a playlist ............................................................................................................................. 106
PlayTo other devices ........................................................................................................................ 107
7 Staying connected
Wi-Fi ...........................................................................................................................109
Enabling Wi-Fi .................................................................................................................................... 109
Connecting to a Wi-Fi network .................................................................................................... 109
Disabling Wi-Fi ................................................................................................................................... 110
Bluetooth® ................................................................................................................. 110
Enabling Bluetooth® ........................................................................................................................ 110
Pairing your ASUS Tablet to a Bluetooth® device .................................................................. 111
Unpairing your ASUS Tablet from the Bluetooth® device .................................................. 111
Tethering ...................................................................................................................112
Wi-Fi Hotspot ..................................................................................................................................... 112
Bluetooth Tethering ......................................................................................................................... 113

6
PlayTo .........................................................................................................................114
Launching PlayTo.............................................................................................................................. 114
8 Travel and Maps
Weather .....................................................................................................................115
Launching the Weather app ......................................................................................................... 115
Weather home screen ..................................................................................................................... 116
Clock ..........................................................................................................................117
World Clock ......................................................................................................................................... 117
Alarm clock ......................................................................................................................................... 118
Stopwatch ........................................................................................................................................... 118
Timer ..................................................................................................................................................... 119
9 ZenLink
Knowing ZenLink ......................................................................................................121
Share Link ............................................................................................................................................ 122
PC Link .................................................................................................................................................. 123
Remote Link ........................................................................................................................................ 125
10 Zen Everywhere
Special Zen Tools .......................................................................................................129
Calculator ............................................................................................................................................ 129
Quick Memo ....................................................................................................................................... 131
Sound Recorder ................................................................................................................................ 132
Audio Wizard ...................................................................................................................................... 134
Splendid ............................................................................................................................................... 135
Power Saver ........................................................................................................................................ 138
11 Maintain your Zen
Keeping your device up-to-date .............................................................................. 141
Updating your system .................................................................................................................... 141
Storage ................................................................................................................................................. 141
Backup and reset .............................................................................................................................. 141
Securing your ASUS Tablet ............................................................................................................ 142
Appendix
Notices .......................................................................................................................147

7
Conventions used
To highlight key information in this manual, some text are presented as follows:
IMPORTANT! This message contains vital information that must be followed to complete a task.
NOTE: This message contains additional information and tips that can help complete tasks.
CAUTION! This message contains important information that must be followed to keep you safe while
performing tasks and prevent damage to your ASUS Tablet data and components.
Care and safety
Guidelines
Road safety comes rst. We strongly recommend not to use your device when
driving or operating any type of vehicle.
This device should only be used in environments with ambient temperatures
between 0°C (32°F) and 35°C (95°F).
Turn o your device in restricted areas where the use of mobile devices is prohibited.
Always obey rules and regulations when in restricted areas, such as, in aircraft, movie
theater, in hospitals or near medical equipment, near gas or fuel, construction sites,
blasting sites and other areas.
Use only AC adapters and cables approved by ASUS for use with this device. Refer to
the rating label on the bottom of your device and ensure that your power adapter
complies with this rating.
Do not use damaged power cables, accessories, and other peripherals with your
device.
Keep your device dry. Do not use or expose your device near liquids, rain, or
moisture.
You can put your device through x-ray machines (such as those used in conveyor
belts for airport security), but do not expose the device to magnetic detectors and
wands.
The device screen is made of glass. If the glass gets broken, stop using the device
and do not touch the broken glass parts. Immediately send device for repair to
ASUS-qualied service personnel.
Do not listen at high volume levels for long periods to prevent possible hearing
damage.
Disconnect the AC power before cleaning your device. Use only a clean cellulose
sponge or chamois cloth when cleaning your device screen.
Send device for repair to ASUS-qualied service personnel only.

8
Proper disposal
Risk of explosion if battery is replaced by an incorrect type. Dispose of used batteries
according to the instructions.
Do not throw your device in municipal waste. This product has been designed to
enable proper reuse of parts and recycling. The symbol of the crossed out wheeled
bin indicates that the product (electrical, electronic equipment and mercury-
containing button cell battery) should not be placed in municipal waste. Check local
regulations for disposal of electronic products.
Do not throw the battery in municipal waste. The symbol of the crossed out wheeled
bin indicates that the battery should not be placed in municipal waste.
DO NOT throw the device in re. DO NOT short circuit the contacts. DO NOT
disassemble the device.
WARNING: This product may contain chemicals known to the State of California to cause cancer, birth
defects or other reproductive harm. Wash hands after handling.

Chapter 1: Get your Zen ready!
9
1
Get your Zen ready!
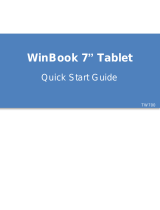
Parts and features
Take a hold of your device and have it up and running in a jiy.
IMPORTANT! Keep the device, particularly the touch screen, dry all the time. Water or other liquids can
cause the touch screen to malfunction.
1 Get your Zen ready!
Power button
Ambient light sensor
Volume button
Microphone
Speaker/Headset port
Micro USB 2.0 port
Accessory
connector
Micro SIM/microSD
card compartment
Rear camera
Audio speakers
Front camera
Touch screen panel
NOTES:
• Thecardcompartment'slayoutmayvarypermodel.
• ThemicroSIMcardslotisavailableonselectedmodels.

Chapter 1: Get your Zen ready!
10
Installing a memory card
Your ASUS Tablet supports a microSD™, microSDHC™, and microSDXC™ memory card with up to
128 GB of capacity.
NOTE: Some memory cards may not be compatible with your ASUS Tablet. Ensure that you use only
compatible memory cards to prevent loss of data, damage to your device, or memory card, or both.
CAUTION! Be extra careful when handling a memory card. ASUS is not responsible for any data loss or
damage incurred to your memory card.
To install a memory card:
1. Orient your device as shown, and open the micro SIM/microSD card compartment.
CAUTION!
• Becarefulnottodamagetheslotcoverorinjureyourngernailswhenyouremovethecover.
• Donotforciblyremove,shear,ordistortthememorycardslotcover.
NOTE:Thecardcompartment'slayoutmayvarypermodel.

Chapter 1: Get your Zen ready!
11
NOTE: After installing a formatted memory card, you can access its contents from ASUS > File Manager
> Internal storage > sdcard.
2. Align and insert a memory card into the memory card slot.
3. Push the memory card all the way into the slot until it is seated rmly in place.
4. Put back the memory card slot cover.

Chapter 1: Get your Zen ready!
12
Removing a memory card
CAUTION!
• Beextracarefulwhenhandlingamemorycard.ASUSisnotresponsibleforanydatalossordamage
incurred to your memory card.
• Ejectthememorycardproperlytosafelyremoveitfromdevice.Toejectthememorycard,goto
Settings > Storage > Unmount external storage.
To remove a memory card:
1. Orient your device as shown, and open the micro SIM/microSD card compartment.
CAUTION!
• Becarefulnottodamagetheslotcoverorinjureyourngernailswhenyouremovethecover.
• Donotforciblyremove,shear,ordistortthememorycardslotcover.
NOTE:Thecardcompartment'slayoutmayvarypermodel.

Chapter 1: Get your Zen ready!
13
2. Press the memory card to eject, then pull it out.
3. Put back the memory card slot cover.

Chapter 1: Get your Zen ready!
14
Installing a micro SIM card (on selected models)
Your micro SIM card slot supports WCDMA and EDGE/GSM bands. Certain model supports WCDMA,
LTE, and GSM network bands.
NOTE: To prevent connector damage, ensure to use a standard micro SIM card without a SIM adapter or
the use of a cutter.
CAUTION! Be extra careful when handling a micro SIM card. ASUS is not responsible for any data loss or
damage incurred to your micro SIM card.
To install a micro SIM card:
1. Orient your device as shown, and open the micro SIM/microSD card compartment.
CAUTION!
• Becarefulnottodamagetheslotcoverorinjureyourngernailswhenyouremovethecover.
• Donotforciblyremove,shear,ordistortthememorycardslotcover.

Chapter 1: Get your Zen ready!
15
2. Align and insert a micro SIM card into the micro SIM card slot.
3. Push the micro SIM card all the way into the slot until it is seated rmly in place.
4. Put back the memory card slot cover.

Chapter 1: Get your Zen ready!
16
Removing a micro SIM card (on selected models)
CAUTION! Be extra careful when handling a micro SIM card. ASUS is not responsible for any data loss or
damage incurred to your
micro SIM
card.
2. Press the micro SIM card to eject, then pull it out.
To remove a micro SIM card:
1. Orient your device as shown, and open the micro SIM/microSD card compartment.
CAUTION!
• Becarefulnottodamagetheslotcoverorinjureyourngernailswhenyouremovethecover.
• Donotforciblyremove,shear,ordistortthememorycardslotcover.

Chapter 1: Get your Zen ready!
17
Charging your ASUS Tablet
Your ASUS Tablet comes partially charged but you must charge it fully before using it for the rst
time. Read the following important notices and cautions before charging your device.
IMPORTANT!
• UseonlythebundledACpoweradapterandmicro-USBcabletochargeyourASUSTablet.Usinga
dierent AC power adapter and cable may damage your device.
• PeelotheprotectivelmontheACpoweradapterandmicro-USBcablebeforeusingitwithyour
device.
• EnsuretoplugtheACpoweradaptertoacompatiblepoweroutlet.YoucanplugtheACpower
adapter to any compatible 100~240V outlet.
• TheoutputvoltageoftheACpoweradapterforthisdeviceisDC5.2V,1.35A.
• WhenusingyourASUSTabletwhileplugged-intoapoweroutlet,thepoweroutletmustbenear
your device and easily accessible.
• DonotuseorexposeyourASUSTabletnearliquids,rain,ormoisture.
• DonotuseyourASUSTabletnearheatingequipmentorinplaceswherethereislikelihoodofhigh
temperature.
• KeepyourASUSTabletawayfromsharpobjects.
• DonotplaceobjectsontopofyourASUSTablet.
CAUTION!
• Whilecharging,yourASUSTabletcanbecomewarm.Thisisnormal,however,ifyourdevicebecomes
unusually hot, disconnect the micro-USB cable from your device and send the device, including the
AC power adapter and cable to an ASUS-qualied service personnel.
• TopreventanydamagetoyourASUSTablet,ACadapter,ormicro-USBcable.Ensurethatthemicro-
USB cable, AC adapter, and your device are connected properly before charging.
3. Put back the memory card slot cover.

Chapter 1: Get your Zen ready!
18
To charge your ASUS Tablet:
1. Connect the micro USB cable to the AC power adapter.
2. Plug the AC power adapter to a grounded power outlet.
3. Connect the micro USB cable to your ASUS Tablet.
IMPORTANT!
• ChargeyourASUSTabletforeight(8)hoursbeforeusingitinbatterymodeforthersttime.
• Thestatusofbatterychargeisindicatedbythefollowingicons:
Low Not Charging Charging Full
4. When fully-charged, disconnect the USB cable from your ASUS Tablet rst before unplugging
the AC power adapter from the power outlet.
NOTES:
• Youcanuseyourdevicewhilechargingbutitmaytakelongertofullychargethedevice.
• ChargingyourdeviceviaUSBportofacomputermaytakelongertofullychargethedevice.
• IfyourcomputerdoesnotprovideenoughpowerforchargingviaUSBport,chargeyourASUSTablet
using the AC power adapter plugged to a power outlet instead.

Chapter 1: Get your Zen ready!
19
Turning your ASUS Tablet on or o
Turning your device on
To turn your device on, press and hold the power button until your device vibrates and starts up.
Turning your device o
To turn your device o:
1. If your screen is turned o, press the power button to turn it on. If your screen is locked, unlock
the device screen.
2. Press and hold the power button, then when prompted, tap Power o then tap OK.
Sleep mode
To put your device in sleep mode, press the power button once until the screen turns o.

Chapter 1: Get your Zen ready!
20
Basics
Explore the intuitive simplicity of ASUS Zen UI 2.0!
ASUS Zen UI 2.0 is a charming and intuitive interface exclusively for ASUS Tablets. It provides you
with special apps, which are integrated in or with other apps, to t your unique individual needs
and make your life easier while letting you have fun with your ASUS Tablet.
ASUS Support
Find answers from FAQs (Frequently Asked Questions) or provide your feedbacks in the
user forum.
Camera
With PixelMaster technology, capture those precious moments in vivid and high-quality
photos and videos.
Do It Later
Get hold and act on your important emails, SMS messages, interesting websites, or other
important tasks when it is more convenient for you to do so.
What’s Next
View meeting details, emails, and other event alerts or notications at a glance right
from your Home screen, Lock Screen, or What’s Next app.
ZenLink
Get maximum productivity from ZenLink, which comprises of Remote Link, Share Link
and PC Link apps. Use any of these apps to connect with other devices for sharing and
receiving les.
NOTE: Availability of the ZenLink apps vary with ASUS Tablet models.
NOTE: Availability of ASUS Zen UI 2.0 apps vary per region and ASUS Tablet model. Tap from your
Home screen to check the apps available on your ASUS Tablet.
/