
1
Tablet PC
Model: MoticamBTW8

2
Contents
1 Safety Precautions ................................ 3
3 Charging .................................................. 9
5 Power on / Power off .......................... 10
6 Android Home Screen Guides .......... 11
7 Changing Language & Time ............. 12
8 Connecting to Wi-Fi ............................ 13
9 Transferring Contents from PC ....... 13
10 Troubleshooting ................................ 14
11 Technical Specifications ................. 15
Notice
The device’ pictures, as well as data on the device’
appearance, color and design features found in the
manual are for reference only. We reserve the right to
change the appearance and technical parameters of
the product without prior notice.
Hereby,NANJING WANLIDA TECHNOLOGY CO.LTD.,

3
declares that this Tablet (SMB-D8012) is in compliance
with the essential requirements and other relevant
provisions of Directive 1999/5/EC.
1 Safety Precautions
Keep the device away from extreme heat, cold,
moisture and dust.
Do not spill any liquids on the device as it may
damage the device or cause a fire.
Do not use liquids and chemical cleaners for
cleaning the device.
Do not insert any objects into the device, or it may
result in short circuit or it might damage the circuit.
Do not keep the device near magnetic sources,
heaters, microwave ovens, heating up kitchen
appliances, or in high pressure containers, as it may
cause the battery leaking, the device overheating
and inflammation.
Power off the device if you want to install or remove
some external devices which do not support hot-plug.
Do not disassemble the device. Only a certified
service technician should perform repairs on your
device.
Use only the AC adapters, power cords and batteries
that are approved for use with this device. Use of
another type of battery or AC adapter may cause fire
or explosion.

4
To prevent possible hearing damage, do
not listen at high volume levels for long
periods. Another type of battery or AC
adapter may cause fire or explosion.
The adapter shall be installed near the equipment
and shall be easily accessible.
If an equipment is provided with a replaceable
battery, and if replacement by an incorrect type could
result in an explosion (for example, with some lithium
batteries).
FCC RF Exposure Information and
Statement
The SAR limit of USA (FCC) is 1.6 W/kg averaged over
one gram of tissue. Device types Tablet PC (FCC ID:
PVEMOTICAMBTW8) has also been tested against
this SAR limit. The highest reported SAR value for body
condition is 0.338 W/kg respectively. Compliance with
FCC RF exposure requirements, use accessories that
maintain a 0mm separation distance between the

5
user's body. The use of case and similar accessories
should not contain metallic components in its assembly.
The use of accessories that do not satisfy these
requirements may not comply with FCC RF exposure
requirements, and should be avoided.
FCC Warning
This device complies with Part 15 of the FCC Rules.
Operation is subject to the following two conditions:
(1) This device may not cause harmful interference,
and (2) this device must accept any interference
received, including interference that may cause
undesired operation.
NOTE 1: This equipment has been tested and found to
comply with the limits for a Class B digital device,
pursuant to part 15 of the FCC Rules. These limits are
designed to provide reasonable protection against
harmful interference in a residential installation. This

6
equipment generates, uses and can radiate radio
frequency energy and, if not installed and used in
accordance with the instructions, may cause harmful
interference to radio communications. However, there
is no guarantee that interference will not occur in a
particular installation. If this equipment does cause
harmful interference to radio or television reception,
which can be determined by turning the equipment off
and on, the user is encouraged to try to correct the
interference by one or more of the following measures:
- Reorient or relocate the receiving antenna.
- Increase the separation between the equipment and
receiver.
-Connect the equipment into an outlet on a circuit
different from that to which the receiver is connected.
-Consult the dealer or an experienced radio/TV
technician for help.
NOTE 2: Any changes or modifications to this unit not
expressly approved by the party responsible for

7
compliance could void the user's authority to operate
the equipment.

8
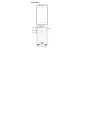
2 Overview

9
3 Charging
Plug the DC end of adapter to the USB port of the
device and plug the AC end to the wall socket for
charging.
Normally it takes approximately 5 hours to fully
charge the device. Operating the device during
charging with the AC adapter may extend the time of
full charging.
The connection to USB interfaces has to be limited to
USB 2.0 version or higher. The connection to so
called power USB is prohibited.
Use only the AC adapters, power cords and batteries
that are approved for use with this device. Use of
another type of battery or AC adapter may cause fire
or explosion.
4 Inserting a Memory Card
The device supports micro SD/SDHC cards.
To insert a micro SD card, place the card connector
towards the front side of the device and the printing
side of the card towards the rear side of the device.

10
To remove the micro SD card, gently press the edge
of the card to release the safety lock and pull the
card out of the slot.
Notice
Don’t remove the micro SD card while viewing the file in
it, or the device could fail to operate correctly.
5 Power on / Power off
1) To turn on the device, press and hold the Power
button until you see the start-up screen then release,
it will automatically enter the Home screen. If it is the
first time to use it, it will enter set-up guide menu.
Please follow the on-screen instructions.
2) Press the Power button once to enter sleep mode
and press it again to open the device.
3) Press and hold the Power button. Tap Power off and
OK to power off the device.
Notice
If the system halts, press and hold the Power button
until it is turned off completely.

11
6 Android Home Screen Guides
: tap to enter Home screen.
: tap to return to the previous page.
: tap to open recent APPs list menu.
: tap to enter APPs Menu.
Web Information
search
Status Ba
r
: Slide
down to see more.
Status Bar: Slide down to
open quick settings menu.
Shortcuts:
touch to open;
touch & hold
to move.

12
Home Screen
Your Home screen is the starting point to access all of
the tablet's features. The Home screen can have
multiple panels. To view other panels, slide left or right.
Add an app icon to home screen
On the Home screen, tap
to open APPs list menu,
tap and hold an application icon, and then drag it into a
panel preview.
Set wallpaper
Tap and hold the blank area on the Home screen. Tap
WALLPAPERS and select one of the following: Black
Hole, Bubbles, Holo Spiral, Magic Smoke, Nexus,
Phase Beam, Spectrum, Water, Vedio Wallpaper.
Select an image and tap Set wallpapers.
7 Changing Language & Time
On the home screen tap and select Settings icon
to access the list of options.
Select Settings---Language & input---Language to
change OSD language.

13
Select Settings---Date & time to change system
time.
8 Connecting to Wi-Fi
On the home screen tap and select Settings
icon to access the list of options. Select Wi-Fi.
If the Wi-Fi is off, tap on the Wi-Fi line to turn it on.
The device will scan for available Wi-Fi networks and
display them on the screen.
Tap on the network you want to connect to. Then tap
on the wireless password field to enter the required
network information and tap on Done---Connect.
Your device will now attempt to establish a
connection to the Wi-Fi access point with the network
parameters you entered.
9 Transferring Contents from PC
Connect the device to your PC/Notebook via USB
cable.
Select the contents you want to transfer from your
PC/Notebook.
Drag the contents from the PC/Notebook to the
device.
Please do not disconnect the USB cable during
loading. It may cause malfunction of the device and

14
files. Left click on to disconnect the device from
PC/Notebook safely.
10 Troubleshooting
Q1: What if water enters the device?
A:
1) DO NOT turn on the device.
2) Disconnect the outlet cable in order to turn it off
instead of pressing the power button. Disconnect
all external devices and then send to the service
center for advice.
Q2: How to check the device if it won’t turn on?
A:
If the power is low, connect the adapter to
charge.
Remove the micro-SD card and any other
external device.
Q3: How to restore the factory default settings?
A:Go to Settings---Backup & reset---Factory data
reset to recover the system to the default status.
Q4: How to prolong the usage time of the battery?
A:
Adjust the brightness of the touch screen to
proper level on Settings---Display---Brightness
menu.
Turn down the volume.

15
Set the sleep time to proper level on Settings---
Display---Sleep menu.
Q5: What to do if the SD card can’t be read?
A: Please turn off the device and re-insert the card.
Q6: Why are the Bluetooth and 3G function disabled?
(Applicable only for model with Bluetooth and 3G
function)
A:Check if the “Airplane mode” is enabled, if it is then
the Bluetooth and 3G function can’t be activated.
11 Technical Specifications
Processor
INTEL Z3735F
RAM (#) 1GB DDR3L
Storage capacity(#) 16GB eMMC
Display
8'' IPS,
Capacitive Multi-touch panel
Resolution 800X1280 pixels
Interfaces
Micro USB, Micro SD (micro
SDHC compatible), Micro HDMI
Descriptions
Front: 2M pixel;
Back: 5M pixel
Communications
Wi-Fi (802.11 b/g/n),
Bluetooth(V4.0(HS))
Operating 5-35℃

16
Temperature
Operating Humidity 35%-85%
Storage
Temperature
-20-55℃
Storage Humidity 20%-93%
Adapter AC 100~240V; DC 5V/2A
Output Power
(maximum)
≤10W
Battery 4500mAh Li-Poly battery
Weight About 380g
Dimension 215mm x125mm x8.7mm
-
 1
1
-
 2
2
-
 3
3
-
 4
4
-
 5
5
-
 6
6
-
 7
7
-
 8
8
-
 9
9
-
 10
10
-
 11
11
-
 12
12
-
 13
13
-
 14
14
-
 15
15
-
 16
16


Motic China Group Edison 3 mini User manual
- Type
- User manual
- This manual is also suitable for
Ask a question and I''ll find the answer in the document
Finding information in a document is now easier with AI
Other documents
-
NordicTrack NTMC17 User manual
-
evoo EV-C-116-7 User guide
-
 LincPlus P1 Laptop User manual
-
Asus ZenPad 10.0 Z301ML User manual
-
evoo 11.6 Inch Ultra Thin Laptop User guide
-
Asus ME302 Kl User manual
-
-
Asus Fonepad 7 User manual
-
-
Asus ME7010 C User manual
