Page is loading ...

U andCareof
!!$pacernake~
JVM58
FeaturesofYouroven p5
Howtousethe
A~ORONfeature
p8
bytime
jplo
—.
Howtousethe
COOKCOIN?’feature
pll
by
p12
Savetimeandmoney,
Beforeyourequestservice,
usetheProblemSolver
pl’7
—.—%
YourDirectLineto Eltkkic
TheGEAnswerc~~~~p8~o,626,20~~

Read thisbookcarefully.
It is intended to help you operate
and maintain your new Microwave
Oven properly.
Keep it handy for answersto your
questions.
If you don’t understand something
or need more help. . .
Call, toll free:
TheCXAnswerCenter’”
800.626.2000
consumer information service
or write: (include your phone
number);
Consumer Affairs
General Electric Company
Appliance Park
Louisville, KY 40225
Writedownthe mode!and
serialnumbers.
You’llfind them on a label inside
the oven cmthe upper left side.
These numbers are also cmthe
Consumer Product Ownership
Registration Card that came with
your Microwave Oven. Before
sending in this card,
pleasewrite
these numbers here:
-.—...—————
-A --
SzjrwlNo.
Use these numbers in any
cmvwspondenceor service calls
concerning your Microwave Oven,
Be sureyour Microwave
oven isregistered.
Itis important that we, the manu-
facturer, know the location of your
Microwave Oven should a need
occur for adjustments.
Your supplier is responsible for
registering you as the owner.
Pleasecheck with
yoursupplierto
besure
he hasdone so; also send
in
yourConsumerProductOwner-
ship Registration Card. If you move,
or if you are not the original pur-
chaser pleasewrite to us, stating
model and serial numbers. This
appliancemustberegistered.
PleasebecertainthatNis.
Writeto:
General Electric Company
RangeProductService
AppliancePark
Louisville,KY40225
Myou receiveda
oven.@6
immediately contact the dealer (or
builder) that sold you the
Micro-
waveoven.
Savetimeand money.
Befareyourequestservice,check
thePmbkmSolveronpageIi’,
It listsminorcausesofoperating
problomsthatyoucancxxrect
ycwrself.
The eleetric output of this
microwave oven is 600 Watts.
——
(a)DoNotAttempttooperatethis”
ovenwith thedooropensinceopen
dooroperationcanresultin harmful
expoqureto microwaveenergy.It’is
importantnotto defeator tamper
withthew3@yinterlocks.
(b) De NkMPlaceanyobject
betweentheovenfront faceandthe
dooror d[ow soilor cldanerresidue
toaccumulateonsealingsurfaces.
[e)_l%?Not
Operatetheovenif it is
damaged.Itisparticularlyimportant
thattheovendoorclosepfdperly
andthattherek no damageto the:
(d)TheOven!iMmddNotbe
adjustedor repairedby anyons
exceptpraperlyqualifiedservice
p$r’&xlm3L -
7,>
.
2

Before Microwaving . . . . . . .. . .. . 2
Safety Instructions .
Introduction to Oven
Touch Control Panel
Set the Clock . . .. . .
. . . . . .. .. 3,4
. . . . . . .. . . . 5
. .. . . .. . . . .
6
. .. . . .. .. .. 6
Auto Roast & Chart . . . . . . . . .. 8,9
Time Cook . . . . .. . . . . .. . . . . . . . 10
Cook Code’” control . . . . . . . . . . . 11
Defrost . . . .. . . . . .. . . . . . . .. . . . II
Temp Cook..... . .. . . . . .. .. . . . 12
Hold/Timer. . . . . . . . .. . . .. .. . . . 13
Careof YourOven
... ?..0.. 14?15
The Exhaust Feature . . . . . . . . . . 16
The Problem Solver . . . . . . . . . . . 17
Grounding instructions . .. .. . . . 18
ConsumerServiceso . . . . . . .. .. . ~9
Warranty . . .. .. . . .
... . BackCover
@Make sure all utensils used in
your microwave oven are labeled
“suitableforrnicrowaving”. Check
your Cookbook forspec~i~ test
to determine ’’microwave-safe”
utensils.
@Papertowels, waxpa~erl and
plastic wrap canbe used tocovef
dishes in orderto retain moisture
and prevent spattering.
@Some.microwaved foocfsrequire
stirring, rotating, orr@arrangin9.
Check ycmrCookbook forspedfic
itistrwtionsj
e Somofoods such asunshdled
eggs andhotdogsmust tm pierced
to allow steam toescape during
cooking.
.-
-..
G....—
When usingelectricalappliances
basicsa’fetyprecautionsshould
befollowed,includingthe
following:
tW4RNlNG—TOreducethe risk
of burns,electricshock,fire,
injury to personsor exposureto
excessivemicrowaveenergy:
eI Usethis applianceonlyfor its
intendeduseasdescribedinthis
manual.
e Readandfollow theqxwif~c
“PRECAUTIONSTOAVOID
POSSIBLEEXPOSURETO
EXCESSIVEMICROWAVE
ENERGY”found on page2.
e Thi$appliancemustbe
grounded.Connectonlyto
properlygroundedoutlet.See
“GFKXINDINGINSTRUCTIONS”
foundon page18.
e Forbestqx?raticm,plugthis
applianceinto it own electrical
outlet,to preventflickeringof
lights,blowingof fuseor trip-
pingof circuit breaker.
49instaHor locatethisappliance
only in accordancewiththe pro-
videdinstallationinstructions.
@Do not coveror blockany
openingson theappliance.
49Do not useoutdoors.
a Da not immersepowercord
or plug in water,
@Keeppoww’cord awayfrom
heatedSLwfwxm.
4sDo not letpow~rcord hang
overedgecdtableor counter.
* Do notoperatethis appliance
if it hasa damagedpowercord
or plug,if it isriotworkingprop-
erly,or if it hasbeendamaged
or dropped.
s Thisapplianceshouldbeser-
vicedonly by qualifiedservice
persormel.Contactnearest
authorizedservicefacility for
e~aminati~n,repairor
adjustment.
@Aswith anyappliance,close
supervisionis necessarywhen
usedby children.
3
a Seedoor cleaninginstrw
tionson page14.
ISTo
reduce the risk of fire in
theovencavity:
—-Donot overcookfood. Care-
f6Jllyattendappiianceif paper,
plastic,or othercombustible
materialsareplacedinsidethe
ovento facilitatecooking.
—-Removewiretwist-tieSfrom
paperor plasticbagsbefore
placingbagin oven.
—Donot useyour microwave
ovento dry newspapers.
—-Paper!Owel$?$mdnapkins,
waxpaper.Recycledpaperpro-
ductscancontainmetalflecks
which maycausearcingor
ignite.Paperproductscon-
taining nylonor nylonfilaments
shouldbeavoided,asthey may
alsoignite.
-Do
notpoppopcorninyour
microwaveovenunlessin aspe-
cialmicrowavepopcornacces-
soryor unlessyouuse’popcorn
Iatxdedfor usein microwave
ovens.
—“00notoperate’theCwenwhile
emptytoavoiddamagetothe
ovenandthedangeroffire.If by
accidentthe ovenshouldrun
emptya minuteortwo, noharm
isdone+However,try to avoid
theovenemptyat ail
tinwx+=itsavesenergyandpro-
longslifeof the oven.
-If materialsinsidethe oven
shouldignite,keepovendoor
closed,turn ovenoff, anddis-
connectthe powercxxd,or shut
off poweratthefuseor circuit
breakerpanel.
@Someproductssuchas
wholeeggsandsealedccm-
tainers—forexample,closed
glassjars–may explodeand
should not beheatedin this
oven.
49Avoid
heatingbaby Wx$ in
glassjars,evenwithout their
lids;especiallymeatandegg
mixtures.
(conthimlnext page)

49Don’t defrostfrozenbever-
agesin narrowneckedbottles;
especiallycarbonatedones.
Evenifthe containerisopened,
pressurecanbuild up.Thiscan
causethecontainerto burst,
resultingin injury.
o Usemetalonlyasdirectedin
Cookbook.Metalstripsasused
on meatroastsarehelpfulwhen
usedasshownin Cookbook.
TVdinnersmaybecookedin
metaltrays.However,when
usingmetalin microwaveoven,
keepmetalatleastl-inchaway
fromsidesofoven.
e Cookingutensiismay
becomehotbecauseof heat
transferredfromthe heated
food. This isespeciallytrueif
plasticwrap hasbeencovering
thetop andhandlesof the
utensil.Potholdersmaybe
neededto handletheutensil.
@Sornetlmes,theovenfloor
canbecometoohottotouch.
Becarefultouching thefloor
during andaftercooking.
e i30
notme anythermometer
in food youaremicrowaving
unlessthatthermometeris
designedor recommendedfor
useinthe microwaveoven.
e Removethetemperature
probefromtheovenwhennot
usingit
tocook wHh*Ifyoub3Ve
theprobeinsidetheovenwithout
insertingit in food or Ilquid,and
turn on microwaveenergy,it can
createelectricalarcingin the
oven,and damageovenwalls.
* PlasticLJtensils--Plastic
utensilsdesignedfor microwave
cookingareveryuseful,but
shouldbeusedcarefully.Even
microwaveplasticmaynot beas
tolerantof overcookingcondi-
tionsasareglassor ceramic
materialsand maysoftenor
charifsubjectedto shortperiods
of overcooking.Inlongerexpo-
suresto overcooking,thefood
andutensilscouldignite.For
thesereasons:1)Usemicro-
waveplasticsonly “anduse
them” instrictcompliancewith
theutensilmanufacturer’s
recommendations.2)Do not
subjectemptyuterwiisto micro-
waving,3)Donotpermitchildren
to useplasticutensilswithout
completesupervision.
e Whencookingporkfollow
our directionsexactlyand
alwayscookthe meatto at least
170°.Thisassuresthat,in the
remotepossibilitythattrichina
maybepresentin themeat,it
will bekilledandmeatwill be
safeto eat.
69Eh3illngeggs(inandoutof
shell)isnotrecctmrnwxfedfor
microwavecooking.Pressure
canbuild up insideeggyolkand
maycauseit to burst,resulting
in.injury,
e f%od$withunbrokenouter
“akin”suchaspotatoes,hot
dogsor sausages,tomatoes,
apples,chickenliversandother
giblets,andeggs(seeabove)
shouldbepiercedto allow
steamto escapeduringcooking.
# cookingpotwhes
and clWMMfplasticbags
shouldbeslit,piercedor vented
asdirectedinCookbook.Ifthey
arenot,plasticcould burstdur-
ingor irnwiediatelyaftercooking,
possiblyresultingin injury.Also,
plasticstoragecontainersshould
beat leastpartiallyuncovered
be(IaLH3theyforma tight seal.
Whencookingwith containers
tightly coveredwith plasticwrap,
removecoveringcarefullyand
directsteamawayfrom hands
andface.
THE IHOOD:
e Haveitinstailedandproperiy
groundedbya qualifiedinstaller.
Seethespecialinstallationbook-
letpackedwiththe microwave
oven.
s ‘T’heventfaninyourSpace-
maker@ovenwilioperate
automaticallyundercertain
conditions[seeAutomaticFan
Feature,page7).Whilethefanis
operatingcautionisrequiredto
preventthestartingandspreaef-
ingofaccidentalcookingfires
whiietheventfanisinuse.For
thisreason:
-Never leaveswfaceunits
unattendedathighheatsettings.
Boilovercausessmokingand
greasyspilloversthatmayignite
andspreadif ventfan isoper-
ating.Tominimizeautomaticfan
operation,useadequatesized
utensilsandusehigh heatset-
tingsonly whennecessary.
—Intheeventofa greasefire,
smotherflamingpanon surface
unit by coveringpancompletely
with well-fitting lid,cookiesheet
or flattray.
-Never framefoodsunderthe
ovenwiththeventfanoperating
becauseit mayspreadthe
flames.
-Keep hoodandgreasefilters
ckxm$accordingto instructions
on pages15and16,to maintain
goodventingandavoidgrease
fires,
4
.—.

m
@
Id I 41M9 A!
v
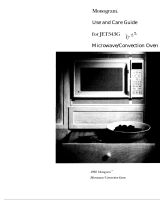
- 1. ChxJrHandle.Ovendoesn’t operateunlessdoor 14.Number Pads.Touchtheseto enter Time or
2.
3.
4.
50
&
7.
8.
9.
10.
11.
12.
~
“-”
13.
issecurely Mched.
Door
Latch.Pushin to open door,
W!ndowwithMetalShield.Screenallows cook-
ing to be
viewed while keepingmicrowavescon-
fined
in oven.
PlasticMode StirrerCover.Protects the mode
stirrer which distributes microwaveenergy into
Meoven+
oven
vent’
Oven Light. Goeson when door is opened or
when ovenis operating in any function,
OvenShelf.
MicroThermometerTM
%xnperatureProbe.Use
with Temperature Cook and Auto Roast func-
tion only.
Receptaclefor‘lkmperatureProbe.
ReadoutDisplay. During microwaving, shows
cooking times in minutesand seconds,tempera-
ture in degrees,and power levelor code.When
mmnis not in use,display shows tiraeof day.
Cmkkq $!lIgnalL@ht8,Light to show which
kindof cooking you’re setting or using,
Clock,Ovenwill work ‘withoutsetting theclock,
out wili not display time of day, (To set the
Clockseethe following page.)
%mthm Pads. We these to se~ect
a micr’o-
#aving
method—-eithercooking or l-lolct/Timor,
:See foilowing page for brief explanation of
~a~h,)
Temperature,and PowerLevelor AuiGCode.
15.Power Level. To set or change Power Level,
touch this pad first, then number.
16.Wart.Always touch Start last after setting all
other controls.
17.t21ear/Oft.Stopstheovenanderasesall settings
excepttime of day,
Ill,Cook Code’UPad. Use to set time and power
level quickly, Chart helps you select appro-
priate Code for popular foods, Eliminates
looking in Cookbook for cooking times and
power level,
19.Auto Roast Pad. Use this automatic cooking
controlfor temperaturecooking of meats.Tem-
perature Probemustbeusedduring Auto Roast
function.
20.Greasefilters.
21.CooktopLight.
22. HoodControls:
Fan Switch.Pressonce for high and twice for
low speed.f%ns againfor off.
LampSwitch.Pushand releasefor light,
23.Mode! and Serial Numbers. Located #Mar
inside oven at top left side or cmbottom lower
left corner of case,
——.—...—-......

TheTouch Control Panelallows youto set’the oven
controls electronically with the touch of a finger.
It’s designed to be easy to use and understand.
With your microwave oven,you havethe option of
using the Cook Code’” or Auto Roast pads for quick
and easy convenience
cooking. Or you may make
your own programs to suit
your individualized
cooking style.
ReadoutDk@ay. Displaystime of day,time or tan=
perature during
cooking functions, power level
being usedand cooking mode.
TempCook.Use
thetemperatureprobeto cookby
using a preset temperature. Oven shows tempera-
ture until preset temperature is reached and then
turns off. (Seepage 12.)
TimeCook.Microwave
for a preset amount of time
using automatic Power Level 10 or change power
level-aftersetting
Cook Code!”Use
entering cooking
11.)
time. (Seepage10.)
this padasashort-cut methodfor
time, and
power level. (See page
Number Pads, Touch these pads to enter Time,
Temperature,
Power Level, Cook Code digits, or
Auto RoastCode n~lmbe~.
Start. Must touch this pad for oven to begin any
functions.
Power Lwel. Touch this pad before entering
another power level number if you want to change
from automatic PowerLevel10(HIGH) for cooking
or Power Level 3 (LOW) for defrosting, (During
cooking, touch this pad to see Power Level being
used.)
—.
\
.—
—
——
—-—..
=-v-T- .- ——.—
-.,., .—
—-T-:-. .—
,––==::===== — —
—.
—- . . . .
—.—
I
=—.
—
-—=—..-.—-——
2
——— .
i -——
~—
- ———— —
E .—
— . . . . . ———--——
-.
——
-—iii=-~-=’’”’’-’’= -”’ ‘---
——---—.-—.——
—-----
——--.—. -
—
❑
❇ ✍✍
✍✎
✚
m-—–-
q=
_.---- —---.-.--—-.—-------
---
. ——---—
—
=
- ———— —————
■
Fa ====-
—
—
—
—
—
...
—
—.——-.———___ ----------- —--
-.
———-——- —
—--————------ -- .-
—-———_-
--——.—.———.
...-——.-.—-—- -- .-
—~ —...—.
.— —....——-..----
_—
~ ==———-–---—–--—
—-.——— —.—
.-
1
—
.
—
~ “-:-“.:.......
.—.
f?)

v ‘—
—.—— ——————.——.—. ....——.—.——..—-—
—
—
–K..— -—- — .
—
—
——a
—
——
.—
---—- —----
—
. . —.—
-
—— —
... .—.——
—-..-..-..———
— ———
.—
——
.-—
—
—-
—
—.
——
—-—
-.-x.
.———— -
.—
— -———-
—
.=.—
-
———
..= — —~
_--.——
.-
“’=~~
-——
——
....——
-..—
— .-
—
—-———
———
—
—
—------- -...—
-—
——.-
—
.——.----——————
--.—-
..
—
-..—
_...—
—
—-
—-———
— —.———
— –,: . ..—.
—.-.——
->
— ———.-.——.—
–
–-=4
-.—
.—
-1
FAN
\
>.—.——
5
. .——
-.. -—. -- —. —.— -..
/
Defrost.Gentle,more uniform thawingwith little or
no attention at autdmatic
Power Level 3, or change
power level
afterentering time. (See page 11.)
Hold/Thner. This feature uses no microwave
energywhile it functions as both akitchentimer or
as a holding period between defrost and time or
temperaturecooking. (Seepage13.)
Clock.Touch this padto enter time of dayor ~heck
time of day while microwaving. To set clock, first
touch CLOCK pad and then enter time of
d~jt.For
example, if time is 1:30,touch number pads 1, 3,
andOand 1:30wIIIappearInreadoutd!splay,Touch
STARTthussettingthe clock, Ifyouwishto rtxietor
changetime, simply repeataboveprocess.
Auto Roast, Insert probe, touch this pad, and
desired number pad for Code to temperaturecook
meatwith automatic presetprogram.
Clear/OfL
Whentouched,it stops the oven and
erasesall settings excepttime of day.
ALJT’ONMWICFANFEATURE
Cooking appliancesinstalled undertheovenmight,
under some heavy usage conditions, causetemp-
eratures high enough to overheat some internal
partsof the microwaveoven.
To prevent overheating from taking place,the vent
fan is designed to automatically turn on at low
speedif excessivetemperatures occur. Should this
happen,the fan cannot be manually turned Gtf,
but
It
will automatically turn off when the internal parts
have cooled.
The fan may stay on up to approxb
mately 30 minutes after the range and microwave
ovencontrols havebeenturned off.

AutoRoastusesthe temperatureprobe to cook to
Just as in conventionalroasting,cmlytender roasts
thedesiredservingtemperature.UnlikeTempCook,
shouldbeAuto !?oasteduntilspecifiedinternaltem-
which uses a single power level, Auto Roast uses
peratures are reached. Less tender roasts should
up to 3 power settings which automaticallyswitch
be microwavedbytime, according to the Cookbook
during roasting,thus providingeven.tendercooking
which comeswith your oven.Completeinformation
resultswithout overcooking.
on preparing roasts for microwaving is in your
—
Cookbook. -
Roastsfor
—
Placetender beef roastson trivet
in microwave safe dish. Insert
probe from front horizontally into
center meaty area not touching
boneor fat.Coverwithwaxpaper.
Poultry, pork or ham roasts need
notrivet,Add %cup water to roast
dish, cover with plastic wrap. (For
cooking bag method, see cook=
book.) Insert probe into center
meatyarea.
HowtoAuto I13eefto
Placemeatwith probe in oven. in-
sert cable end of probe firmly into
receptacleon ovenwall.
Touch AUTO RC?ASTPad. Cooking signal light
over Code flashes, Touch number pad 3, Touch
START.
Light over Code shows on display. Readout dis-
plays internal food temperature.
Oven rnonitora Iflterrml
temperatum,automatically
switchingto
lower power as meat’s Mmperaturo
rises,”This prevents toughening or overcooking.
Aftertemperatureisreix$mxl, ovensignals andthen
shuts off,
8
.—
...——-

AutoRoastChart
@Usecontainersandcoveringsasdirectedatleft.Placeprobecorrectlyin roastbeforecooking.
6+Turnoverwhen80° (exceptpork)hasbeenreached,
Beef
TenderRoast
Rare
2
80”
125°
12-14
5-10
Medium 3
80°
140° 14-16
10-15
Well
4
80°
170° 17”18
30
Meatloaf
4
No Turn 170”
30”40
5-1o
(loaf or round) CNer
Pork
Loin Roast
4
1
20°
170°
18-20
20
Precooked i-lam
1
80° 115° 17-19
5-1o
Poultry
WholeChicken
5
80°
1
90” 13-15
20
(31b,)
WholeTurkey
5
80°
190°
13”15
20
(up to 12fbs.)
(Insertprobe into meatiestareaof inner thigh from below endand parallelto leg.)
Turkey Breast
4
80” 1
70”
13”15
20
(Insertptwbehorizontally into meatiestarea.)
--.=.-..=.....,-.--.--—
*Recommendedstandingtime beforeservi;g.
and
0. A~ethere any particulartrivets
that work better than others?
A. Yes, flat glass trivets such as
lids or dish covers give mom even
cooking resultsthan plastictrivets.
Also,ceramicridge-bottomedroast-
ing disheswork well. Plastictrivets
require meat to be turned over
more frequently because the grid
design and legs allow the bottom
of the meat to stay cooler as it
cooks,than glasstrivets do.
CLIs it necessaryto always cover
foods during Auto Roast?
A. No, but a loose covering helps
preventspattering and hold mois-
ture in food,
CL Why was my roast not fully
cooked eventhough the tempera-
ture cm the readout was correct
and Auto Roastcompleted?
A. Whencooking with Auto Roast,
the temperature probe must be
insertedproperly asfully described
intheCookbook,Afterturning meat
over or rotating, the probe should
be chocked to make sure it hasn’t
slipped or changed pmition.
Q. last
time I used Auto Roast
1
removedthe roastfrom the oven
to turn it over. When I replaced
roast in ovenand reconnectedthe
meat probe, a lower temperature
appeared.Why?
A, The oven and roast may have
cooled to below the temperature
when you r~moved it, or probe
mayhavebeen repositioned. Con-
tinue roasting and numbers will
sooncount upward again.
9
—...—.
——
..
-----

—
Time Cooking, or cooking your food according to a pre-
.
determinedamount of time, is probably familiarto you from
conventional cooking. With your microwaveoven, however.
youpresetthetime andthe 6venturns off automatically.
LJsirtg Your Oven to ?’irne Cook
Followthe cooking steps below to
help you learn to Time Cook
properly.
Step1: Fill a cup 2/3 full of water
and 1 teaspoon of freeze dried
coffee.Useacup thathasno metal
decoration. Placecup in ovenand
closedoor.
Step 2: Touch TIME COOK. The
display shows :0. Signal light
aboveTIME COC)Kflashes.Power
Level 10 is automatically set in
oven, but does not appear in
display.
Step 3: Select your time. Touch
1,2 and Ofor a minuteand 20sec-
onds. 1:20and signal light above
TIME COOK appear on display. If
another Power Level is desired
touch POWfER LEVEL and the
number, although Power Level 10
(HIGH) is preferred for this cup of
coffee,
Step 4: Touch START. Time
counting down showson display.
Step 5:
sounds
When time is up, oven
and
oven, light, and fan
shut off.
and
Q. Isetmyoven for thetimecalled
for in the recipe but at the end of
the time allowed, my dish wasn’t
done.Whathappened?
A. Since house powor varies due
to time or location, many
Time
Cook
recipesgive you atime range
to
prevent overcooking,Set the
oven
for min~mumtime, test the
food for doneness, and cook your
disha littlelonger, if necessary,
Q. I want to cook my dish on a
PowerLevelotherthanHK3H,what
do 1needto do?
A. To change the Power Level,
touch thePOWERLEVELpadafter
entering desired cooking time,
Enterthedesired numberandthen
tc)uchSTART.
Q. Can I interrupt my Time Cook
function to check
tt’wfood?
A. Yes,To resumecooking, simply
close the door and touch START,
NOTE: Microwave power will not
come on until you are ready. You
must touch
STARTfor cooking to
begin.
CL Itouched the numberpadsand
selected my power leveL When I
touched START,however,myoven
didn’t comeoh.Whynot?
A. The TIME COOK pad must be
touched before settingthe number
pads or elseyour ovenwill not be-
gin cooking.
Q. I tried to change Power Level
but the display changed back to
cooking time.Why’?
A, After touching PowerLevelpad
you only have4 seconds to enter
the number. Try setting controls
again.
10
--------———-——-

HOWtoUse
COOkCOde~~Control
CookCodeTMis a short-cutcontrol for enteringtime
and the Power Level on your microwaveoven. Be
sureto check your Cookbookfor specific codesfor
specific recipes.
To understand the Cook Code control, it is impor-
tant tOknow what the numbersmeanand whatthe
sequenceis. The first and second numbers,if set-
ting a 3 digit Cook Code, indicate the amgunt of
time you desire:the last control entry numberis al-
wavs the Power Level. For examde, 125means12
minutes at Power Level 5. NOTE:Your oven can
only be programmedto 99 minuteswhen usingthe
Cook Code control and the highest PowerLevelis
10which is represented by “0”. When setting a 2
digit Cook Code control entry, the first is time, the
secondis powerlevel.
Step 1: Touch COOK CC)13E.Signal light above
Codeflashes.
Step2: Enterthe proper code into Cook Codecon-
trol. For example, a recipe calling for 12 minutes
cooking time at Power Level10would be 120.120
appearson the display
Step3:TouchSTART.SignallightaboveTIMECOOK
showsaswell astime counting down on display.
I’iowwto Defrost
The Defrostsetting is designedfor
even thawing necessaryfor large
amountsof food and is one of the
most important advantages of a
microwave oven, making cfefrost-
ing quick and easywith little atten-
tion. PowerLevel3 isautomatically
set for defrosting, but you may
changethisfor moreflexibility.See
your Cookbook for the complete
defrostingchart.
To become better acquainted with
your Defrost function, defrost fro-
zen pork chops by following the
stepsbelow,
Step 1: Place package of frozen
chops in the oven and closedoor.
Step2: Touch DEFROST.Display
reads:0,PowerLevel3isautomat-
ically set in oven but does not
appear on readout. Signal light
aboveDEF.flashes.
SW@3:Touch8,0, andOfor 8 rnin-
utest 8:00 and signal light above
DEF.are displayed. if you wish to
change Power Level,touch Power
Levelpad and then new number.
Step4:TouchSTART.Timecounts
down on display. When cycle Is
completed, the ovefi signals and
automatically shutsoff.
Step !Y TurrI package over, close
door and repeatSteps2,3 and 4.
Step 6: When oven signals and
shutsoff,removepackageandsep-
aratechops to finish defrosting.
DefrostingTips
@Foodsfrozen in paper or plastic
can be defrosted in the package.
@Forevendefrosting,manyfoods
needto beturned ever, rota~ed,or
broken up part d the way through
thedefrostingtime.
● Pre-packaged frozen dinners
can be defrosted and microwave
cooked.
● Check your Cookbook for other
defrostingtips.
and
(2.
When I press START,! hear a
dull thumping noise.Whatisit’?
A. Thissound is normal.Itis letting
you know the oven is using a
PowerLevellowerthan HIGH.
(2,Can I Defrost small items in a
hurry?
A, Yes,but they wIIIneedmore fre-
quent attention than usual. Raise
the Power Levelafter entering the
time by touching POWER LEVEL
and 7or 10,PowerLevel cuts the
time in %;PowerLevel 10cuts the
time to M. During either, rotate or
stirfood frequently.
(3,Can I open the door during l)E-
FROSTto check on the progress
ofmyfood?
A. Yes.You may open the door at
any time during microwaving, To
resumedefrosting, close the door
andpressSTART
Ct.Why don’t the defrosting times
in the Cookbookseemright for my
food?
A. Cookbook times are average.
Defrostingtirm canvaryacctwdlng
to the temperatureifi your freezer.
Set your oven for the time in-
dicated in your Cookbook, If your
food is still not completelythawed
at the end of that time, re-setyour
oven and adjust the time ac-
cordingly.
Q. When I enter a fourth digit
using Cook Codecontrol, nothing
happens.Whatwent wrong?
A. The oven will take only 2 or 3
numbers, If more are pressed,
oven does not respond. Touch
Clear/Off and begin again.
Q.CanI selectaPowerLevelother
than automatic power Level 3 for
defrosting?
A. Yes,Somesmallerfoods maybe
defrosted quicker on higher Power
Levels but for even,‘carefree de-
frosting, Power Level 3 is sug-
gested. Check the chart in the
Cookbook for specific times and
PowerLevels. “

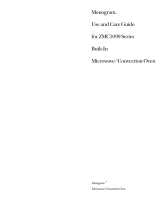
For many foods, internal temperature is the best
gauges the internal temperature of your food; it
testof doneness.
musf be used when using TEMP COOK or AUTO
Roasts or poultry are cooked to perfecticmwhen
ROAST.Toutilizeyourtemperatureprobeproperly,
temperature cooking. Heating or reheating foods
follow the directions for use and insertion in this
accurately to a serving temperature you desire is
book in the section entitled “Automatic Roasting”.
simpleandeasy.
TEMP COOKtakes the guesswork out of cooking
HANDLE
becausethe oven shuts off automatically whenthe
/
cp13~E
food is done.
-
/
The Temperature Probe
SENSOR
m
The temperature probe is a food thermometerthat
CLIP
FlowtoTempCooka BeefRibRoasttoMedium
Step 1: Insert temperature probe
as directed in Cookbook and at-
tach probe securely in oven wall.
Closethe door.
Step2: Touch TEMP COOK. The
readoutdisplayshowsOandsignal
light aboveTHv?PCX30Kflashes.
Step3:Touch 1,3, 0 or 130°, 130
shows on display. Power Level 10
is automatically set in oven but
doesnot appearon display,
Step4:Touch POWERLEVELpads
Touch 5 for MEDIUM power. P-5
showson display andthendisplay
reverts back to set finished
temperature.
Mep 5: Touch START+ Display
showstemperature of food count-
ing up,
Step& When 130° is reached,the
oven sounds and automatically
shuts off. Removeprobeand food
from the oven.
CookingTips
@Where you have a choice of
PowerLevels,use a lower setting;
it will heat more evenly even
thoughrequiring moretime,
@Be sure frozen food has been
completely defrosted before in-
serting probe.Probemaybreakoff
ifusedinfrozenfoods.
0 Always insert pr@e into !he
center of meaty areas; take care
notto touchthe fator ths borw,
a Insert probe as horizontally as
possible into foods as directed in
the recipes. Makesure the handle
doesnottouchthefood,Theprobe
is easiest to use when inserted
from the front.
@Usethe clipto keepthe probein
placewhile heating.
@Cover foods as directed in
Cookbookfor moisturecontrol and
quick,evenheating.
tmcl
Q. Are thww any foods I can’t
TEMPCXXIK?
A, Ye$,Delicate butter icing~, ice
wwam, frozen whipped toppings,
etc., soft~n rapidly @warm ternp-
emturec. Batters and doughs as
weli as frozen foods are aiso diffi-
cult to cook precisely with the
probe. It is best to TiME COOK
thesefoods.
CLAfter I followed the steps and
touched START,a signal sounded
and oven did not start. What is
wrong?
A. Ifyou setthe temperatureeither
below 80° or greater than 199°the
oven wiii not start. To re-enter,
touch CLEAR/OFF pad and begin
stepsagain.
Q. Oven sounded and would not
start although I enteredthe temp-
erature cxwrectiy,Whatis wrong’?
A. If you havenot smwr$ly seated
tho end of the probe into the
receptacle in the ovenwail, if you
touch TEfvlPCXX3Kand havefor-
gotten to use the probe or if the
actual food temperature is higher
than set temperature, oven will
sound and not start.
Q. Can I leave my probe in the
over!if it’s notinsertedin thefood?
A. No. Ifthe probe is left insidethe
oven, touching the oven wail, and
not insertedin food,you maydam-
agetheoven,
Q. Flow do I know what temperat-
ure toset?
A. Your cookbook contains sec-
tion$ on ali typesof foods showing
the temperatures needed to cook
the foods to different degrees of
doneness. For reheating, refer to
Reheating Charts in the front
of the Cookbook for specific
temperatures.
12

Your HOLt)/TlhEFl, which oper-
ates without microwave energy,
hasthreetimingfunctions.
It operates as a Minute Timer, it
canbe setto delaycooking or may
be usedas a hold setting after de-
frosting. Hold/Timer can be set up
to99 minutes.
Step 1:Touch HOLD/TIMER pad.
The display shows :0.Signal light
aboveHOLD/TIMERflashes.
Step2: Select the amount of time
you desire, Touch the appropriate
number pads. If, for example,you
are timing a three minute phone
call, touch 3,0, andO.Thedisplay
shows3:00.
Step3:Touch START.The readout
display showsthetime asit counts
down.
Step4:When time is up, a signal
soundsand the timer turns off,
TtM tlOLD/TIMER can also be
used to program “standing time”
betweenmicrowavecooking func-
tions,Thetimecan rangefrom one
secondto 99 minutesand 99 sec-
onds.A HOLD,or “standing” time
maybefound in someof
your own
recipes or Cookbook.
To set the oven to delay cooking
up to 99 minutes follow Steps 1
and 2 to enter hold time, then set
Time Cook and time, or T’emp
Cook and temperature desired
before pressing START, When
holding before temperature
cooking, be sure probe is in food
beforepressingSTART.
HowtoDefrost~Hold/Time~TimeCook
To help you becomeacquainted with the H0Lf2/TIMER feature as usedwith Time Cook or Temp Cook follow
Stepsbelowto defrostafrozencasserolefor 15minutes,thenhold 10minutesandthencook 25minutes.If using
TempCookafter Hold/Timer, besureto insert probe correctly asshown inTempCook sectionof this book,after
HOLD time.
Step1:Removecasserolefrom the
freezer and place in oven. Touch
the DEFROST pad. The display
shows :0 and ~ignal light a~ov~
DEF,flashes.
Step 3: Set standing or hold time
by touching HCNJV17MER.:0 ap-
pearson display,Signallight above
HOLD/TIMER flashes,
Step 2: Touch 1, 5, 0 and O for
defrosting time, 1!5:00appears on
readout display. (Defrosting is
automatically seton PowerLevel3
but can be changed by touching
POWERLEVEL pad and the new
PowerLevel,)
Step4:Touch 1,0,0 and Oto hold
for ten minutes, 10:00appears on
display.
Step 5: Touch the TIME CC)C)K
pad. The display shows :0 and
signal light above TIME COOK
flashes,
Step6: Touch 2, 5, 0 and O for
twenty-five minutes of cooking
time, 25:00appearson display,
Step7:TouchSTART,15:00count-
ing down shows on display. As
eachfunction isautomatically per-
formedovendisplayshowsentered
information and light above that
function comeson. Whilecooking,
you may touch appropriate pad to
recall times you set,
and
Q. What will happen if I acciden-
tallyreversethe instructions?
A,
if you accidentally reverse the
sequenceof programming instruc-
tions, your oven automatically
rearrangesyour program, Defrost-
ing always comes first, then hold,
andthen thecooking function,
Q. I programmed my oven for a
specific defrosting time but it de-
frosted longer than necessary.
Whathappened?
A. When instructions conflict, the
oven carries out the last instruc-
tion. You mayhavesetthe ovento
Defrost far 4 minutes, f-iold/Tirne
for 2 minutes,and then Defrostfor
6 minutm, In this ease, the oven
would Defrost for 6 minutes and
Hold/Time for 2minutes.
Q, Can i C)efrost-Holdonly on my
oven?
A. Yes, for foods you don’t want
to cook, like frozen fruit, frozen
whipped topping, etc.—-refer to
Cookbook.
NOTE: Allow foods to remain at
room temperature only as long as
safe.Timeswi!lvary,
13

for
YourNewMicrowaveovenisa
ValuableAppliance,ProtectItFrom
MisuseByFollowingTheseRules:
@ Keepyourovencleanand
sweet-smelling.Openingtheoven
doorafewminutesafter
cooking
helps“air-out”the interior.An
occasionalthoroughwipingwith a
solutionof bakingsodaandwater
keepsthe interiorfresh.
@ Don’tusesharp-edgedutensils
withyouroven.Theinteriorandex-
teriorovenwallscanbescratched.
Thecontrolpanelam bedamaged.
@ Don’tremovetheantennacover
atthetop of theoven(microwave
feature4on page5)0Youwill
damagetheoven.
EwcxwtEmJPOWERIs OFF
EWOFIECLEANINGANY
PARTOFTHISOVEN.
How
toCtealthefn$kk?
Wails~floorandphw!iccover.E3e=
causethereis little heatexceptin
the food, or sometimes in the uteri=
sits,spills
andspattersareeasyto
remove,Somespatterscanbe
removedwith apapertowel,others
mayrequirea dampcloth.Remove
grea$yspatterswith asudsycloth,
thenrinseanddry.Do notuse
abrasivecleanerson ovenwalls.
NEVERUSEA CX2MMEFK21AL
OVEhlCLEANER0t4 ANYPART
OFYOURMKXK3WAVEOVEN.
Door-inside.Glass:Wipeupspatters
daily,washwhensoiled,with a min-
imumof sudsywarmwater.
Rinse
thoroughly and dry.
SpecialnotewhenusingBrown‘N
SearDish:Highheatgeneratedon
boflomof Brown‘NSearDishcan
causescorchedappearingstainsto
bakeontotheovenfloor ifgreaseis
present.Thesemayberemoved
with BarKeepersFriend@Cleanser
bySerVaasLaboratories,Inc.
AfterusingBarKeepersFriend@
Cleanser,rinseanddrythoroughly,
followinginstructionsoncan.Do
notuseBarKeepersFriend@
Cleanseronthepaintedsurfaces
suchasthewalls.It mayscratch
thepaint.
BarKeepwsFriend@Cleanseris
soldin many
grocery,hardware,
anddepartmentstores.
AutomaticTemperatureProbe.
Probeissturdy,butcareshouldbe
takenin handling.Do nottwistor
bend;avoiddroppingtemperature
probe.
Cleanassoonafterusingaspos-
sible.Toclean,wipewithsudsy
cloth,thenrublightlywithplastic
scouringballif necessary.Rinse
anddry. (Orwashindishwasher.)
Howto(Hem the Outside
Case.Cleantheoutsideof your
ovenwithsoapanddampcloth,
thenrinseanddry.Theouterpane
ofthewindowisglass.Justwipe
cleanwith adampcloth.Chrome
trim is bestwipedwith adampcloth
andthenwithadrytowel.
ControlPanel.Wipewith adamp
cloth.Drythoroughly.Donot use
abrasivesor sharpobjectson the
panel.Theycandamageit.
DoorSurface.Whencleaningsur-
facesof door andoventhatcome
togetheronclosingthedoor,use
only mild,non-abrasivesoapsor
detergentsappliedwith asponge
or softcloth.
PowerCord.if thecordbecomes
soiled,unplugandwashwith damp
cloth.Forstubbornspots,sudsy
watermaybeused,but becertain
to rinseanddry thoroughlybefore
pluggingcord intooutlet.
Met81andpla$tiepartson door:
Wipofrequeritlywith adampcloth
to removeal!soil.DONCWUSE
ABRASIVES,SUCHASCLEANING
POWIXMW(3RSTEELAND PLAS-
TIC PADS.THEYMAYMARTHE
SURFACE.
14

I
I
i
------ .-..— —.
1
TO replace hood lamp, first dlscmmct powerag
mainfuseor clrcultWaker pfml or pull plug.
Remove2 screwsfrom eachside of lower paneland
3 screws from front edge. Lower panel until it rests
on range below. Besure bulb to be replaced is cool
.
Toreplaceyour oven lamp,first Wmmnwt powerat
mainfuseorcircuitbreakerorpullplug.Removethe
top grill by taking off 2 screwswhich hold it In place,
Next, remove the single screw on top left that
secures lamp housing, (CM models so equipped,)
Openovendoor for
easier removalof the lamphous-
ing assembly.Then grasptab and pu!!out and up to
clear door hinge and front tip of oven. To remove
bulb, push it inward gently and turn to left, then pull
outward from socket, Replace with GE Lamp
a ~~~~~~,
30notattempttooperat~theovenunlessth~grhim
nplace.
before removing, Removebulb or bulbs and replace
with 40 watt appliance bulbs. Raiselower oanel and
replace screwk;
waveoven.
Connect electrical power-to micro-
\\.
I
Clean off the grease and dust on hood surfaces
often. Usea warm detergent solution. About 1 table-
spoon of ammoniamaybe added to the water. Take
care not to touch the filters and enameledsurfaces
withthis. Ammoniawill tendto darkenmetal,
15

—.—.—..——_—_—
.—
The ExhaustFeature
IL
IL
E
The exhaust hood feature on your GE microwave
oven is equipped with a metal filter which collects
grease. When the fan is operated, air is drawn up
through the filter and is then discharged through
providedventingto theoutside.The ho6d also hasa
lightfor illuminatingthe countersurface.
To remove grease filter, grasp the “finger hold” on
thefilter andpush to therear.The filterwill drop CM
TOrepimx?grease fitter,insert the filter in the top
frame slot cmthe back of the opening, Push to the
rearand upwardto snapinto place.
Soak, then agitat$ fiiter In hot detergent
s~iuhnt
Don’t use ammonia or other alkaii because H wiii
darken rnetai.Light brushing can be usedto remove
embedded dirt. Rinse, shake and remove moisture
before repiacing. FWtersshouldbe cleanedat least
a
once a month.Neveroperateyourhoodwithoutthe
filter M plarx+.in situations where framing might
occur on surfacesbelow hood,fiiter wiii retardentry
of flamesinto the unit.
16

B
s
E
a
Savetimeandmoney
. . before you call for service,check the kdllowwing:
plJ
*
9
oven Will Not Come On:
FoodsMe EitherOvercooked or
~
0)
Main circuit breaker IS tripped
LJndercooked:
-9
e One of house fuses has blown.
e
@ 3-prong plug isn’t fully inserted into wall recep-
tacle.
Control Panel Lighted,YetOvenWill
@
NotStart:
@
Make sure you touched START button,
Door is not securely closed.
You have already entered another program and
@
not touched CLEAR1OFF to cancel it.
@
Temperature Probe not inserted properly or not
e
being used during Auto Roast or Temp Cook.
You have not entered numbers after Time Cook.
e
You have not entered desired finished temper-
e
ature after Temp Cook.
/
CLEAR/OFF was touched accidentally.
After touching Cook Code’” or Auto Roast pads,
Not enough time set when using Time Cook func-
tion because of variance of starting food temp- e
eratureso
E
The density and amount of foods will vary and -+
thus may need more time for completion.
Probe not inserted properly into meat or dish.
Check Cookbook and Auto Roast section in this
book for specific probe placement.
Incorrect Cook Code numbers entered.
Incorrect Power Level entered.
Dish was not rotated, turned or stirred if these
instructions were given in recipe.
Too many dishes in oven at same time.
You did not enter a different Power Level as sug-
gested in recipe.
no code number was entered,
“IV?
Appears(h
~ When bvin is first plugged in.
@ When power to oven has been interrupted, and
then is resumed. Touching CLEAR/OFF erases
“PF” and clock must be reset.
AllThese on ..
17

Thisappliancemustbegrounded.
Intheeventofanelectricalshort
circuit,groundingreducestherisk
ofelectricshockby providingan
escapewireforthe electriccurrent.
Thisapplianceisequippedwith a
powercord havingagroundingwire
withagroundingplug.Theplug
mustbepluggedintoanoutletthat
isproperlyinstalledandgrounded.
(Fig.!)
WARNING–lrnpropet’useofthe
groundingplugcanresultin arisk
ofelectricshock.
I
Q
‘t
,
@
\
Fig.1
INSURE PROPERGROUNO
EXISTS BEFOREUSE -
Whereastandardtwo-prongwall
receptacleisencountered,it isyour
personalresponsibilityandobliga-
tion to haveit replacedwith a prop-
erly groundedthree-prongwall
receptacle.
EM3
NotUnderAnyCimm-
stames (M orRemovethe
Third(Ground)ProngFrom
ThePower
Cord.
DoNotUseanAdapterPlug
WithThisAppliance.
IX3NotUseanE!xtenshm
CordWithThisAppliance.
Consultaqualifiedelectricianor
servicetechnicianif thegrounding
instructionsarenotcompletely
understood,or ifdoubt existsasto
whethertheapplianceis properly
grounded.

.-
——..———..-———.——..——.—..
—
-—.....
mainlandstates,Hawaiiand
Washington,D.C.InAlaskathe
warrantyis thesameexceptthat it
is LIMITEDbecauseyoumustpay
to shiptheproducltotheservice
shoporforthe servicetechnician’s
travelcoststo yourhome.
t
?
1 IS
——.
FULLC)NE=YEARWARF?ANN
This
warrantyisextendedtothe ~
!
Foroneyearfromdateoforiginal
originalpurchaserand
anysucceed=
purchase,wewiHprovide,freeof
ingownerfor productspurchased
charge,partsandservicelaborin
for ordinaryhomeusein the48
,
yourhometo repairorreplaceany
par2of themicrowaveovenlrange
thatfails becauseof a manufac-
turingdefect.
MINTEDADDITIONAL
FOIJFFYEAFIWARRANTY
Forthesecondthroughfifth year
/
fromdateof originalpurchase,
wewill provide,freeofcharge,a
replacementmagnetrontube if the
magnetrontubefails becauseof a
i
manufacturingdefect.Youpayfor
ths servicetrip to yourhomeand
Lookin theWhiteorYellowPages “
of yourtelephonedirectoryfor
servicelaborcharges.
GENERALELECTRICCOMPAPiY,
GENERALELECTRICFACTORY
SERV!CE,GENERALELECTRIC-
HOTPOINTFACTORYSERVICEor
GENERALELECTRICCUSTOMER
CARE@SERVICE.
I
-—
IS NOT ~Servicetrips toyour hometo
@iRep@emsmtof housefuses
teachyouhowto usetheproduct.
or resettingof circuitbreakers.
Road
yourUseand(We material.
Ifyouthenhaveanyquestions
● Failureof theproductif it is
aboutoperatingthe product,
usedforotherthanits intended
pleasecontactyourdealerorour
purposeor usedcommercially.
ConsumerAffairsofficeat the
addressbelow,or call,toll free:
● Damageto productcaused
TheGEAnswerCenter~
by
accktent,fire,!Ioodsor acts
3
x-,,
v
800.626,2000
ofGod.
consumerinfOrm$tlOn
service
—.
.—
WARRANTORISNOTRESPON=
~Improperinstallation.
SI13LEFOFiCONSEQUENTIAL
—.
al
DAMAGES,
/
I
Ifyouhavean installationproblem,
contactyourdealeror installer.
fig!
Youareresponsibleforproviding
.—-
=—-~II
-..
~[
adequateelectrical,exhausting
..—.—-
—.-
—-..
==,=.[j
—..
~~~
Somestatesdo not allowtheexclusionor Iimhationof incidentalor consequentialdamages,GOthe abovelimitation or exclusion
19E+@li
maynot applytoyou.Thiswarrantygivesyouspecificle~alr!~hts,andyoumayalsohaveotherrightswhich varyfrom state to state.
..-—*U
-:9Kr;
nKz~!!
To knowwhat
yourlegalrightsareinyourstate,consultyour100alor staie consumeraffak$ office or yourstate’s AttorneyGeneral.
~!
*II
Warrantor:GeneralElectricCompany
SK=:1!
-G.s!!
---–=:!:
IffurtherhelpIsnesdedconcerningW? warranty,contact:
-ii
=~.1)
Nlamiger-CcmsutmerAffairs,GeneralElectricCompany,AppliancePark,Lcn+MiNle,W
40226
=fqll
-=–-S1.-—
..~rl
uR....——-........
.-...—. w-—-
=rn-..~f&~~+@?fi
-mrw.
-~.=m
.-–-—3=—-—*—-%&7m-.’=
All warrantyservicewill beprovided
byour FactoryServiceCentersor
byourauthorizedCustomerCare@ .
servicersduringnormalworking
hours,
4
Part. No. f362A725P49 Rev. 1
Pub. NO.49-4506+%
12/84
A

11
/
r-
.—
AIGeneralElectricwe’recommittedto providingyou
thatyouwantyourappliancesto giveyoumanyyears
———
withthebestappliancesweknowhowto buildandweknow
ofdependableservice.
OurConsumerServicesaredesignedwithyourneedsandwantsinmind.
WarrantyProtection
Beforeyournewapplianceleftthefactory,itwent
Andyouhaveawrittenwarrantytoprotectyou.Seethe
throughrigorousteststodetectmanufacturingdefects.
warrantyonthebackpageofthisbookfordetails.
41B
2
ConvenientEkwvice
Whetheryourapplianceisinoroutofwarranty,you’re
FIRST,contactthepeoplewhoservicedyourappliance.
justa
phonecallawayfromournationwidenetworkof
Explainwhyyouarenotpleased,Inmostcases,thiswill
FactoryTrainedServiceprofessionals,
solvetheproblem,
SimplycallourGEserviceorganization.Lookinthe
NEXT’,ifyouamstillnotpleasedwriteallthe
WhiteorYeliowPagesofyourtelephonedireetoryfor
details—includingyourphonenumberto:
GENERALELECTRICCOMPANY,GENERAL
Manager,ConsumerRelations
ELECTRICFACTORYSERVICE,GENERAL
GeneralElectric
ELJXTRKXIOTP(XNTFACTORYSERVKX
or
GENERAL
ELECTRICCUSTOMERCARE!@
AppliancePark
SERVICE!.
Louisville,Kentucky40225
Servicecannormallybescheduledal yourconvenience
FINALLY,ifyourproblemisstillnotresolved,write:
andthetechniciandrivesa fully-stockedpartsservice
MajorApplianceConsumerActionPanel
trucksothat,inmostcases,therepaircanbecompleted
20NorthWackerDrive
inonevisit.
Chicago,Illinois60606
We’reproudofourserviceandwantyoutobepleased,
butifforsomereasonyouareno?happywiththeservice
youreceive,herearedweestepstofollowforfurtherhelp.
%xviceContracts
For trouble-freeservicebeyond
thewrittenwarrantyperiod.
If’youprefertobudgetyourrepairexpenditures
insteadofbeingsurprisedbythem,(X offers
servicecontractsforvaryinglengthsoftimecm
allGEmajorappliances.Whhacontract,we’ll
keepyourapplianceingoodoperatingcondhiort
dwin~theummx periodatnoadditional
charge.
u
3
Servicecontractsletyoupaytoday%pricesfor
$
~- ,.~--=-,.-~ ;
.
serviceamonth,ayear,orseveralyearsfrom
-,
a
now,And, you’llreceiveservicefromGE
trainedservicete&mMmsusingonlygenuine
;$:g%%:-..~
GEparts,Hyouhaveanyquestionsabout
ServieeContracts,call
TOLL-FMM’
8(X),626,2224.(h
~tXltUC@, cdi 800s292.2057.)
~heQuick~b@~yStf3Kll
Aprogramfordo-it-yourselfappliancerepair,
YOMam
savemoneyml time
E%
thesystemincludesstep-by-sk~repairmmua/s
by
doingit yourself’.
for refrigerators,mostnon-microwaveelectric
@
ranges,dishwashers,andstandardandlarge
Fordo-it-yourselferswhowouklpreferto fix
1
capacitywashersanddryers,plusspecially
C%major
appliancesthemselves.., CWoffers
packagedreplacentintparts,andtechnicalhelp
anindustryfirst,theQuickFixsSystem.
HelpForMuBy mm
r
‘with a-to!!free800mthbe~
.
-
Shouldyou needtwlp in [hewlwtion and
The GE!
AnswerCenter4r~lconsumer
purchuxof ncwapplitmccs,orhavequcsticm
informationserviceisopen24hoursaday,
abouttiwopcrationoftheGEtipplianccsyou
sevendaysaweek,
nowown--—or
haw any otherquestionsabout
Ourstaffofexperts
standsrewiy to assistyou
C%consumerproducts
orservices,youare
onlya TOLLF’REEcidlnway.
anytime,
*–
f& -‘.+
YourDirectLineto
GeneralElectric
&y-.“
::;; .;+
T:%3$s‘fheGEAnswerCentef800,626,2000
19
/